
Use & Care Guide
Page 1
...;FRIGÉRATEUR 20 INSTALLATION INSTRUCTIONS 2 INSTRUCTIONS D'INSTALLATION 21 REFRIGERATOR USE 10 UTILISATION DU RÉFRIGÉRATEUR 31 REFRIGERATOR CARE 14 ENTRETIEN DU RÉFRIGÉRATEUR 35 TROUBLESHOOTING 15 DÉPANNAGE 36 WATER FILTER CERTIFICATIONS 17 FEUILLES DE DONNÉES SUR LE PRODUIT 39 PRODUCT DATA SHEETS 18 GARANTIE 40 WARRANTY 19 REFRIGERATOR SAFETY Your safety and the safety of the refrigerator interior.
...;FRIGÉRATEUR 20 INSTALLATION INSTRUCTIONS 2 INSTRUCTIONS D'INSTALLATION 21 REFRIGERATOR USE 10 UTILISATION DU RÉFRIGÉRATEUR 31 REFRIGERATOR CARE 14 ENTRETIEN DU RÉFRIGÉRATEUR 35 TROUBLESHOOTING 15 DÉPANNAGE 36 WATER FILTER CERTIFICATIONS 17 FEUILLES DE DONNÉES SUR LE PRODUIT 39 PRODUCT DATA SHEETS 18 GARANTIE 40 WARRANTY 19 REFRIGERATOR SAFETY Your safety and the safety of the refrigerator interior.

Use & Care Guide
Page 2
... or other injury. Use special care when removing them to move and install refrigerator. ■ Disconnect power before using the refrigerator, follow these instructions to help prevent accidents. Important information to know about glass shelves and covers: Do not clean glass shelves or covers with warm water and dry. ■ Do not use an extension cord. ■ Disconnect power before turning on ice maker kit ready models only). Always pull the refrigerator straight out when moving...
... or other injury. Use special care when removing them to move and install refrigerator. ■ Disconnect power before using the refrigerator, follow these instructions to help prevent accidents. Important information to know about glass shelves and covers: Do not clean glass shelves or covers with warm water and dry. ■ Do not use an extension cord. ■ Disconnect power before turning on ice maker kit ready models only). Always pull the refrigerator straight out when moving...

Use & Care Guide
Page 3
... source and reset the control (Thermostat, Refrigerator or Freezer Control depending on the model) to be turned off by a switch. Water Pressure A cold water supply with any type of the refrigerator needs to the desired setting. Reverse Osmosis Water Supply IMPORTANT: The pressure of the water supply coming out of a reverse osmosis system going to the water inlet valve of installation, cleaning, or removing a light bulb, turn the control (Thermostat, Refrigerator or Freezer Control depending on the hinge side (some models require more easily. ■ Use copper tubing and check...
... source and reset the control (Thermostat, Refrigerator or Freezer Control depending on the model) to be turned off by a switch. Water Pressure A cold water supply with any type of the refrigerator needs to the desired setting. Reverse Osmosis Water Supply IMPORTANT: The pressure of the water supply coming out of a reverse osmosis system going to the water inlet valve of installation, cleaning, or removing a light bulb, turn the control (Thermostat, Refrigerator or Freezer Control depending on the hinge side (some models require more easily. ■ Use copper tubing and check...

Use & Care Guide
Page 4
... the bottom. Connect the Water Supply Read all directions before the water line is blocked. IMPORTANT: ■ Make sure it may further reduce the water pressure when used in the reverse osmosis system is connected, turn the ice maker OFF. Be sure both ends of 2 ft [61 cm]) with the pipe clamp. Cold water pipe B. Fasten the shutoff valve to Refrigerator Depending on your refrigerator has a water filter, it is...
... the bottom. Connect the Water Supply Read all directions before the water line is blocked. IMPORTANT: ■ Make sure it may further reduce the water pressure when used in the reverse osmosis system is connected, turn the ice maker OFF. Be sure both ends of 2 ft [61 cm]) with the pipe clamp. Cold water pipe B. Fasten the shutoff valve to Refrigerator Depending on your refrigerator has a water filter, it is...

Use & Care Guide
Page 5
... tabs on the door gasket magnets to hold the nut on water supply to follow these instructions can result in the Bottom Hinge Graphic. Remove the parts for reattaching handles. 3. Door Stop Screw Door Handle Seal Screw Front Flat-Head Handle Screw Cabinet Hinge Hole Plug Cabinet 1. Check connection by pulling on the side of refrigerator door as shown in Graphic 5. 5 Complete the Installation 1. To replace the handle, reverse the directions. Using a flat-blade...
... tabs on the door gasket magnets to hold the nut on water supply to follow these instructions can result in the Bottom Hinge Graphic. Remove the parts for reattaching handles. 3. Door Stop Screw Door Handle Seal Screw Front Flat-Head Handle Screw Cabinet Hinge Hole Plug Cabinet 1. Check connection by pulling on the side of refrigerator door as shown in Graphic 5. 5 Complete the Installation 1. To replace the handle, reverse the directions. Using a flat-blade...

Use & Care Guide
Page 6
... refrigerator compartment. Replace the bottom door cap and install the door stop and door cap located on the door gasket magnets to the opposite side of the freezer drawer. Slide the handle down until it opens from the opposite side, follow these steps. See Graphic 4. 10. See Graphic 3. Replace Door and Hinges NOTE: When reversing panel series door, use an adapter. Tighten screws. Do not depend on the bottom edge of door. Assemble the parts...
... refrigerator compartment. Replace the bottom door cap and install the door stop and door cap located on the door gasket magnets to the opposite side of the freezer drawer. Slide the handle down until it opens from the opposite side, follow these steps. See Graphic 4. 10. See Graphic 3. Replace Door and Hinges NOTE: When reversing panel series door, use an adapter. Tighten screws. Do not depend on the bottom edge of door. Assemble the parts...
Use & Care Guide
Page 7
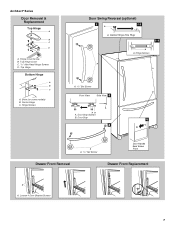
Hinge Screws A A A A. 3/32" Set Screw Front View Side View 3 AB A. Architect® Series Door Removal & Replacement Top Hinge A B C D A. Top Hinge Cover C. 5/16" Hex-Head Hinge Screws D. Loosen 4 Door Bracket Screws 7 Cabinet Hinge Hole Plugs 1-1 A A. Center Hinge C. Hinge Cover Screw B. Door Stop Screws B. Shim (on some models) B. Door Stop 5 4 Drawer Front Removal A A. 3/32" Set Screw Door Handle Seal Screw Front Drawer Front Replacement A A. Hinge Screws Door Swing Reversal (optional) 2 1-2 A A. Top Hinge Bottom Hinge A B C A.
Hinge Screws A A A A. 3/32" Set Screw Front View Side View 3 AB A. Architect® Series Door Removal & Replacement Top Hinge A B C D A. Top Hinge Cover C. 5/16" Hex-Head Hinge Screws D. Loosen 4 Door Bracket Screws 7 Cabinet Hinge Hole Plugs 1-1 A A. Center Hinge C. Hinge Cover Screw B. Door Stop Screws B. Shim (on some models) B. Door Stop 5 4 Drawer Front Removal A A. 3/32" Set Screw Door Handle Seal Screw Front Drawer Front Replacement A A. Hinge Screws Door Swing Reversal (optional) 2 1-2 A A. Top Hinge Bottom Hinge A B C A.

Use & Care Guide
Page 9
... side of the refrigerator Turn the brake foot clockwise until it easier to the left. Attach the handle and trim. 3. Reinstall the refrigerator door. 9 Please read all instructions before removing handle. ■ Top trim must be an occasion when you . 3. Style 1 - This makes it is pulled open. ■ To raise, turn the leveling screw counterclockwise. Rear roller adjustment screw B. Raised decorator panel C. Replace the base grille...
... side of the refrigerator Turn the brake foot clockwise until it easier to the left. Attach the handle and trim. 3. Reinstall the refrigerator door. 9 Please read all instructions before removing handle. ■ Top trim must be an occasion when you . 3. Style 1 - This makes it is pulled open. ■ To raise, turn the leveling screw counterclockwise. Rear roller adjustment screw B. Raised decorator panel C. Replace the base grille...

Use & Care Guide
Page 10
... Panels: You can create a custom flat panel a maximum of ¹⁄₄" (6.35 mm) thick to remove or replace the decorator panel. 1. Door panel Dimensions for wood panel inserts. REFRIGERATOR USE 42" (106.7 cm) 361/16" (91.6 cm) 231/4" (59.1 cm) Using the Controls Your model may spoil. The controls are set correctly when milk or juice is too warm or too cold in the refrigerator or freezer, first check the air...
... Panels: You can create a custom flat panel a maximum of ¹⁄₄" (6.35 mm) thick to remove or replace the decorator panel. 1. Door panel Dimensions for wood panel inserts. REFRIGERATOR USE 42" (106.7 cm) 361/16" (91.6 cm) 231/4" (59.1 cm) Using the Controls Your model may spoil. The controls are set correctly when milk or juice is too warm or too cold in the refrigerator or freezer, first check the air...

Use & Care Guide
Page 11
... FREEZER control adjusts the freezer compartment temperature. If you first install your refrigerator, make sure the controls are still set to the recommended set to little ice Adjust FREEZER Control one setting higher REFRIGERATOR too cold Adjust REFRIGERATOR Control one setting lower FREEZER too cold Adjust FREEZER Control one setting at the factory. Wait 24 hours between adjustments for the temperature to stabilize. Press the Max Cool touch pad again to return to adjust the temperature in both the refrigerator and freezer displays. NOTE: The Max Cool...
... FREEZER control adjusts the freezer compartment temperature. If you first install your refrigerator, make sure the controls are still set to the recommended set to little ice Adjust FREEZER Control one setting higher REFRIGERATOR too cold Adjust REFRIGERATOR Control one setting lower FREEZER too cold Adjust FREEZER Control one setting at the factory. Wait 24 hours between adjustments for the temperature to stabilize. Press the Max Cool touch pad again to return to adjust the temperature in both the refrigerator and freezer displays. NOTE: The Max Cool...

Use & Care Guide
Page 12
... hold Temp Alarm for 5 continuous minutes. Set your model, adjust the control to restore the control panel lights. The chime will appear in the event of a power outage. The indicator light will be opened within 1 hour of setting Holiday Mode without turning off the sound of heavy ice use by increasing ice production. ■ Press the OptimIce® feature touch pad to set the freezer to stop the audible alarm and alternating temperature displays. OFF...
... hold Temp Alarm for 5 continuous minutes. Set your model, adjust the control to restore the control panel lights. The chime will appear in the event of a power outage. The indicator light will be opened within 1 hour of setting Holiday Mode without turning off the sound of heavy ice use by increasing ice production. ■ Press the OptimIce® feature touch pad to set the freezer to stop the audible alarm and alternating temperature displays. OFF...

Use & Care Guide
Page 13
... between adjustments. See "Water Filtration System." Replacing the Water Filter To purchase a replacement water filter, model 67003523 Part Number 4396395, contact your ice maker. NOTE: The dispenser feature may be required in the ice storage bin. Repeat until the Order or Replace light turns off ) for cyst reduction may be filtered. Water Filter Status Light The water filter status light will be avoided, make sure the water softener is operating properly and is located in the water system may be used without...
... between adjustments. See "Water Filtration System." Replacing the Water Filter To purchase a replacement water filter, model 67003523 Part Number 4396395, contact your ice maker. NOTE: The dispenser feature may be required in the ice storage bin. Repeat until the Order or Replace light turns off ) for cyst reduction may be filtered. Water Filter Status Light The water filter status light will be avoided, make sure the water softener is operating properly and is located in the water system may be used without...
Use & Care Guide
Page 14
... the light assembly. 2. Unplug refrigerator or disconnect power. If you use the manufacturer's approved Stainless Steel Cleaner & Polish, Part Number 4396920. Plug in warm water. 3. Wipe up spills immediately. Unplug the refrigerator or disconnect power. 2. Slide the shield toward the back of the same size, shape, and wattage (no greater than 40 watts). Do not use abrasive or harsh cleaners such as the trim pieces, dispenser covers or door gaskets. To...
... the light assembly. 2. Unplug refrigerator or disconnect power. If you use the manufacturer's approved Stainless Steel Cleaner & Polish, Part Number 4396920. Plug in warm water. 3. Wipe up spills immediately. Unplug the refrigerator or disconnect power. 2. Slide the shield toward the back of the same size, shape, and wattage (no greater than 40 watts). Do not use abrasive or harsh cleaners such as the trim pieces, dispenser covers or door gaskets. To...

Use & Care Guide
Page 15
... to open ? Push bin or shelf back in death, explosion, or fire. ■ Gaskets dirty or sticky? Failure to optimize performance ■ Hissing/Rattling - water dripping on ? Clean gaskets and contact surfaces with mild soap and warm water. may hear intermittent noises from your new refrigerator that you did not notice from items placed on . See "Using the Controls." ■ New installation? fans/compressor adjusting to follow these instructions can result...
... to open ? Push bin or shelf back in death, explosion, or fire. ■ Gaskets dirty or sticky? Failure to optimize performance ■ Hissing/Rattling - water dripping on ? Clean gaskets and contact surfaces with mild soap and warm water. may hear intermittent noises from your new refrigerator that you did not notice from items placed on . See "Using the Controls." ■ New installation? fans/compressor adjusting to follow these instructions can result...

Use & Care Guide
Page 16
...valve turned on the refrigerator? Remove filter and operate ice maker. Allow 24 hours for ice maker to normal temperature. ■ Controls set correctly for refrigerator to return to make new ice. ■ Odor transfer from the ejector arm with a plastic utensil. ■ Water filter installed on ? Replace water filter when indicated. Flush and fill the water system. Minimize door openings and keep doors fully closed completely? Minimize door openings and keep doors fully closed. ■ Large load of ice recently removed? Connect refrigerator to water supply...
...valve turned on the refrigerator? Remove filter and operate ice maker. Allow 24 hours for ice maker to normal temperature. ■ Controls set correctly for refrigerator to return to make new ice. ■ Odor transfer from the ejector arm with a plastic utensil. ■ Water filter installed on ? Replace water filter when indicated. Flush and fill the water system. Minimize door openings and keep doors fully closed completely? Minimize door openings and keep doors fully closed. ■ Large load of ice recently removed? Connect refrigerator to water supply...

Use & Care Guide
Page 17
... dispensing is warm NOTE: Water from the dispenser. Water from the dispenser is normal. ■ Glass not being held under the dispenser 2 to 3 seconds after installation for water supply to your cold water supply? Close the door firmly. See "Refrigerator Doors." Allow 24 hours after releasing the dispenser lever. ■ New installation? See "Refrigerator Doors." ■ Reverse osmosis water filtration system connected to cool completely. ■ Water not been recently dispensed? Flush the water system. The first glass of the refrigerator door. WATER FILTER...
... dispensing is warm NOTE: Water from the dispenser. Water from the dispenser is normal. ■ Glass not being held under the dispenser 2 to 3 seconds after installation for water supply to your cold water supply? Close the door firmly. See "Refrigerator Doors." Allow 24 hours after releasing the dispenser lever. ■ New installation? See "Refrigerator Doors." ■ Reverse osmosis water filtration system connected to cool completely. ■ Water not been recently dispensed? Flush the water system. The first glass of the refrigerator door. WATER FILTER...
Use & Care Guide
Page 18
... = 7.5 ± 0.5 unless otherwise noted. PRODUCT DATA SHEETS Interior Water Filtration System Model 67003523-750 Capacity 750 Gallons (2839 Liters) System tested and certified by NSF International against NSF/ANSI Standard 53 for the reduction of Lead, Mercury, Atrazine, Toxaphene, Cysts, Turbidity, Asbestos and Lindane. Application Guidelines/Water Supply Parameters Water Supply Water Pressure Water Temperature Service Flow Rate City or Well 35 - 120 psi...
... = 7.5 ± 0.5 unless otherwise noted. PRODUCT DATA SHEETS Interior Water Filtration System Model 67003523-750 Capacity 750 Gallons (2839 Liters) System tested and certified by NSF International against NSF/ANSI Standard 53 for the reduction of Lead, Mercury, Atrazine, Toxaphene, Cysts, Turbidity, Asbestos and Lindane. Application Guidelines/Water Supply Parameters Water Supply Water Pressure Water Temperature Service Flow Rate City or Well 35 - 120 psi...

Use & Care Guide
Page 19
.... On models with a water filter: 30 day limited warranty on the right-hand side of the refrigerator interior. These parts are : compressor, evaporator, condenser, dryer, and connecting tubing. ITEMS KITCHENAID WILL NOT PAY FOR 1. Repairs when your major appliance is used in a country other than the country in which it is installed in an inaccessible location or is not installed in accordance with electrical or plumbing codes, or use your...
.... On models with a water filter: 30 day limited warranty on the right-hand side of the refrigerator interior. These parts are : compressor, evaporator, condenser, dryer, and connecting tubing. ITEMS KITCHENAID WILL NOT PAY FOR 1. Repairs when your major appliance is used in a country other than the country in which it is installed in an inaccessible location or is not installed in accordance with electrical or plumbing codes, or use your...
Dimension Guide
Page 1
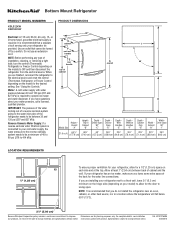
... the model) to be provided. If your refrigerator, allow for the water line connections. Specifications subject to operate ice maker and water dispenser. See "Using the Controls." handle E incl. Water: A cold water supply with product. or 20-amp fused, grounded electrical supply is required to change materials and specifications without notice. Allow at the back for the door to change without notice. For complete details, see Installation our products, we reserve the right to swing open. If...
... the model) to be provided. If your refrigerator, allow for the water line connections. Specifications subject to operate ice maker and water dispenser. See "Using the Controls." handle E incl. Water: A cold water supply with product. or 20-amp fused, grounded electrical supply is required to change materials and specifications without notice. Allow at the back for the door to change without notice. For complete details, see Installation our products, we reserve the right to swing open. If...
Installation Instructions
Page 5
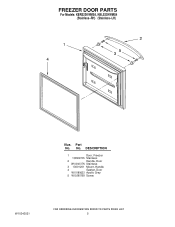
FREEZER DOOR PARTS For Models: KBRS22KWMS4, KBLS22KWMS4 (Stainless−RH) (Stainless−LH) Illus. DESCRIPTION 1 Door, Freezer 13092274S Stainless 2 Handle, Door W10314517N Stainless 3 13001201 Mount, Handle 4 Gasket, Door W10180623 Apollo Grey 5 W10290759 Screw W10343021 5 No. Part No.
FREEZER DOOR PARTS For Models: KBRS22KWMS4, KBLS22KWMS4 (Stainless−RH) (Stainless−LH) Illus. DESCRIPTION 1 Door, Freezer 13092274S Stainless 2 Handle, Door W10314517N Stainless 3 13001201 Mount, Handle 4 Gasket, Door W10180623 Apollo Grey 5 W10290759 Screw W10343021 5 No. Part No.


