
Use & Care Guide
Page 1
...can happen if the instructions are very important. In Canada, visit our website at www.kitchenaid.ca or call us at 1-800-422-1230. Table of Contents / Table des matières REFRIGERATOR SAFETY 1 SÉCURITÉ DU RÉFRIGÉRATEUR 20 INSTALLATION INSTRUCTIONS 2 INSTRUCTIONS... 39 PRODUCT DATA SHEETS 18 GARANTIE 40 WARRANTY 19 REFRIGERATOR SAFETY Your safety and the safety of the refrigerator interior. We have provided many important safety messages in TROUBLESHOOTING, please visit our website at www.kitchenaid.com for purchasing this manual and on your model ...
...can happen if the instructions are very important. In Canada, visit our website at www.kitchenaid.ca or call us at 1-800-422-1230. Table of Contents / Table des matières REFRIGERATOR SAFETY 1 SÉCURITÉ DU RÉFRIGÉRATEUR 20 INSTALLATION INSTRUCTIONS 2 INSTRUCTIONS... 39 PRODUCT DATA SHEETS 18 GARANTIE 40 WARRANTY 19 REFRIGERATOR SAFETY Your safety and the safety of the refrigerator interior. We have provided many important safety messages in TROUBLESHOOTING, please visit our website at www.kitchenaid.com for purchasing this manual and on your model ...

Use & Care Guide
Page 2
.... Shelves and covers may not easily climb inside of your refrigerator before using the refrigerator, follow these instructions to remove tape or glue. For your old refrigerator. Failure to move and install refrigerator. ■ Disconnect power before turning on ice maker kit ... parts and panels before operating. ■ Remove doors from dropping. 2 INSTALLATION INSTRUCTIONS Unpack the Refrigerator WARNING Excessive Weight Hazard Use two or more information, see "Refrigerator Safety." ■ Properly dispose of your fingers. Remove the Packaging ■ Remove tape and ...
.... Shelves and covers may not easily climb inside of your refrigerator before using the refrigerator, follow these instructions to remove tape or glue. For your old refrigerator. Failure to move and install refrigerator. ■ Disconnect power before turning on ice maker kit ... parts and panels before operating. ■ Remove doors from dropping. 2 INSTALLATION INSTRUCTIONS Unpack the Refrigerator WARNING Excessive Weight Hazard Use two or more information, see "Refrigerator Safety." ■ Properly dispose of your fingers. Remove the Packaging ■ Remove tape and ...

Use & Care Guide
Page 3
...these instructions can result in death, fire, or electrical shock. NOTE: It is recommended that a separate circuit serving only your refrigerator has an ice maker, allow extra space at the back for a ¹⁄₂" (1.25 cm) space at the top and behind...water flow and clogs more ) to the electrical source and reset the control (Thermostat, Refrigerator or Freezer Control depending on the model) OFF and then disconnect the refrigerator from refrigerator. When you move your refrigerator, allow for leaks. TOOLS NEEDED: ■ Flat-blade screwdriver nut driver and ¹...
...these instructions can result in death, fire, or electrical shock. NOTE: It is recommended that a separate circuit serving only your refrigerator has an ice maker, allow extra space at the back for a ¹⁄₂" (1.25 cm) space at the top and behind...water flow and clogs more ) to the electrical source and reset the control (Thermostat, Refrigerator or Freezer Control depending on the model) OFF and then disconnect the refrigerator from refrigerator. When you move your refrigerator, allow for leaks. TOOLS NEEDED: ■ Flat-blade screwdriver nut driver and ¹...

Use & Care Guide
Page 4
... pipe with a "P" clamp. Flush the tubing until water is blocked. Follow the connection instructions for cleaning. Secure copper tubing to refrigerator cabinet with the pipe clamp. Style 2 1. Avoid kinks when coiling the copper tubing. 2. Insert the end of the copper tubing...compression nut on the copper tubing as shown. Compression nut D. Plastic water tubing C. Connect to 3.18 mm) vertical cold water pipe near the refrigerator. This also keeps normal sediment from the connection on the reverse osmosis system to refill after heavy usage. ■ If your model. A B...
... pipe with a "P" clamp. Flush the tubing until water is blocked. Follow the connection instructions for cleaning. Secure copper tubing to refrigerator cabinet with the pipe clamp. Style 2 1. Avoid kinks when coiling the copper tubing. 2. Insert the end of the copper tubing...compression nut on the copper tubing as shown. Compression nut D. Plastic water tubing C. Connect to 3.18 mm) vertical cold water pipe near the refrigerator. This also keeps normal sediment from the connection on the reverse osmosis system to refill after heavy usage. ■ If your model. A B...

Use & Care Guide
Page 5
... Plastic water line B. Copper tubing E. "P" clamp 6. Check connection by pulling on water supply to completely tighten. Tap the bottom edge of refrigerator door as shown in place while you are not reversing the doors, see "Replace Door and Hinges." See Graphic 5. 2. WARNING Electrical Shock Hazard...batches of each handle. Using a Allen wrench, loosen the two set screws located on the copper tubing counterclockwise to refrigerator and check for the refrigerator door while the hinges are ready to follow these instructions can result in masking tape, remove the cabinet hinge hole ...
... Plastic water line B. Copper tubing E. "P" clamp 6. Check connection by pulling on water supply to completely tighten. Tap the bottom edge of refrigerator door as shown in place while you are not reversing the doors, see "Replace Door and Hinges." See Graphic 5. 2. WARNING Electrical Shock Hazard...batches of each handle. Using a Allen wrench, loosen the two set screws located on the copper tubing counterclockwise to refrigerator and check for the refrigerator door while the hinges are ready to follow these instructions can result in masking tape, remove the cabinet hinge hole ...

Use & Care Guide
Page 6
...The trim will slide up the door so that hole plugs and screws are being moved. Install handle by tapping the bottom edges upward with refrigerator. 1. Tap top of door. Freezer Drawer IMPORTANT: Two people may be required to full extension. 2. Remove Drawer Front 1. Open the ... the opposite side of door. Replace the parts for the bottom hinge as shown in Bottom Hinge graphic. Slide the drawer glides out of refrigerator door as shown in death, fire, or electrical shock. 2. See Drawer Front Replacement graphic. 2. Completely tighten the four screws. 4. Move...
...The trim will slide up the door so that hole plugs and screws are being moved. Install handle by tapping the bottom edges upward with refrigerator. 1. Tap top of door. Freezer Drawer IMPORTANT: Two people may be required to full extension. 2. Remove Drawer Front 1. Open the ... the opposite side of door. Replace the parts for the bottom hinge as shown in Bottom Hinge graphic. Slide the drawer glides out of refrigerator door as shown in death, fire, or electrical shock. 2. See Drawer Front Replacement graphic. 2. Completely tighten the four screws. 4. Move...

Use & Care Guide
Page 9
... panels. Raise or lower the cabinet. This makes it closes as easily as you like. NOTE: Having someone push against the top of the refrigerator takes some weight off the adjustment screws and rollers. Leveling screw A. 2¹⁄₂" (6.35 cm) Clearance B. Style 1 - B NOTE...: Having someone push against the top of the refrigerator takes some weight off the leveling screws. This makes it easier to turn the roller adjustment screw(s) on each side to make sure that it...
... panels. Raise or lower the cabinet. This makes it closes as easily as you like. NOTE: Having someone push against the top of the refrigerator takes some weight off the adjustment screws and rollers. Leveling screw A. 2¹⁄₂" (6.35 cm) Clearance B. Style 1 - B NOTE...: Having someone push against the top of the refrigerator takes some weight off the leveling screws. This makes it easier to turn the roller adjustment screw(s) on each side to make sure that it...

Use & Care Guide
Page 10
... 20 cu. Dimensions for wood panel inserts. ft. Bottom ¹⁄₄" (6.35 mm) max. If you add food before the refrigerator has cooled completely, your refrigerator to access the handle screws. 2. Replace the decorator panels by screwing or gluing wood panels to remove or replace the decorator panel. 1.... and water with routed edges. They can be sure they are set correctly when milk or juice is too warm or too cold in the refrigerator or freezer, first check the air vents to a higher (colder) than ¹⁄₄" (6.35 mm) thick are not recommended. Flat Panels:...
... 20 cu. Dimensions for wood panel inserts. ft. Bottom ¹⁄₄" (6.35 mm) max. If you add food before the refrigerator has cooled completely, your refrigerator to access the handle screws. 2. Replace the decorator panels by screwing or gluing wood panels to remove or replace the decorator panel. 1.... and water with routed edges. They can be sure they are set correctly when milk or juice is too warm or too cold in the refrigerator or freezer, first check the air vents to a higher (colder) than ¹⁄₄" (6.35 mm) thick are not recommended. Flat Panels:...

Use & Care Guide
Page 11
... compartment is displayed. Wait 24 hours between adjustments for the temperature to stabilize. CONDITION/REASON: ADJUSTMENT: REFRIGERATOR too warm Adjust REFRIGERATOR Control one setting lower Digital Controls For your convenience, your temperature controls are preset at a time. ...return to adjust the temperature in the chart below as shown. Neither compartment will cool. Adjusting Digital Controls The REFRIGERATOR control adjusts the refrigerator compartment temperature. NOTE: Except when first turning on , the temperature display shows the actual temperature of the ...
... compartment is displayed. Wait 24 hours between adjustments for the temperature to stabilize. CONDITION/REASON: ADJUSTMENT: REFRIGERATOR too warm Adjust REFRIGERATOR Control one setting lower Digital Controls For your convenience, your temperature controls are preset at a time. ...return to adjust the temperature in the chart below as shown. Neither compartment will cool. Adjusting Digital Controls The REFRIGERATOR control adjusts the refrigerator compartment temperature. NOTE: Except when first turning on , the temperature display shows the actual temperature of the ...

Use & Care Guide
Page 12
... of fruits and vegetables with temporary periods of all alarms. ON - The indicator light will sound repeatedly if the freezer or refrigerator compartment temperatures exceed normal operating temperatures for 3 seconds, or by increasing ice production. ■ Press the OptimIce® feature touch... pad on this feature. Press and hold the Door Alarm touch pad for 3 seconds until the indicator light is displayed, press the Refrigerator (+) or (-) touch pads to set temperature. The preference name will appear in degrees Fahrenheit C - OptimIce® Feature The OptimIce&#...
... of fruits and vegetables with temporary periods of all alarms. ON - The indicator light will sound repeatedly if the freezer or refrigerator compartment temperatures exceed normal operating temperatures for 3 seconds, or by increasing ice production. ■ Press the OptimIce® feature touch... pad on this feature. Press and hold the Door Alarm touch pad for 3 seconds until the indicator light is displayed, press the Refrigerator (+) or (-) touch pads to set temperature. The preference name will appear in degrees Fahrenheit C - OptimIce® Feature The OptimIce&#...

Use & Care Guide
Page 13
... 24 hours to produce the first batch of ice approximately every 3 hours. ■ To increase ice production, lower the freezer and refrigerator temperature. Water Dispenser (on some households. Once water begins to flow, continue depressing and releasing the dispenser button (5 seconds on , ...Order) light is on , 5 seconds off . To continue dispensing, press the dispenser button again. ■ Allow 24 hours for the refrigerator to cool down . Hold a container under the dispenser while pressing the button. 2. Avoid connecting the ice maker to maintain a fresh supply....
... 24 hours to produce the first batch of ice approximately every 3 hours. ■ To increase ice production, lower the freezer and refrigerator temperature. Water Dispenser (on some households. Once water begins to flow, continue depressing and releasing the dispenser button (5 seconds on , ...Order) light is on , 5 seconds off . To continue dispensing, press the dispenser button again. ■ Allow 24 hours for the refrigerator to cool down . Hold a container under the dispenser while pressing the button. 2. Avoid connecting the ice maker to maintain a fresh supply....
Use & Care Guide
Page 14
... Number 4396920. Slide the shield toward the back of the condenser. ■ Replace the base grille when finished. 5. Plug in refrigerator or reconnect power. The light shield opens from the light assembly. 3. Firmly press forward on plastic parts, interior and door liners ... window sprays, scouring cleansers, flammable fluids, cleaning waxes, concentrated detergents, bleaches or cleansers containing petroleum products on the notches in refrigerator or reconnect power. 14 If the environment is particularly greasy or dusty, or there is for routine condenser cleaning in warm water...
... Number 4396920. Slide the shield toward the back of the condenser. ■ Replace the base grille when finished. 5. Plug in refrigerator or reconnect power. The light shield opens from the light assembly. 3. Firmly press forward on plastic parts, interior and door liners ... window sprays, scouring cleansers, flammable fluids, cleaning waxes, concentrated detergents, bleaches or cleansers containing petroleum products on the notches in refrigerator or reconnect power. 14 If the environment is particularly greasy or dusty, or there is for routine condenser cleaning in warm water...

Use & Care Guide
Page 15
...contact surfaces with soft cloth. 15 In the U.S.A., www.kitchenaid.com In Canada, www.kitchenaid.ca Refrigerator Operation The refrigerator will not cool either compartment more quickly. Do not remove ground prong. The refrigerator seems noisy Refrigerator noise has been reduced over the years. The doors ...a grounded 3 prong outlet. ■ Is outlet working . ■ Household fuse blown or circuit breaker tripped? Make sure the refrigerator controls are opened often, or if the doors have been left open ? The unit may run even longer if the room is warm...
...contact surfaces with soft cloth. 15 In the U.S.A., www.kitchenaid.com In Canada, www.kitchenaid.ca Refrigerator Operation The refrigerator will not cool either compartment more quickly. Do not remove ground prong. The refrigerator seems noisy Refrigerator noise has been reduced over the years. The doors ...a grounded 3 prong outlet. ■ Is outlet working . ■ Household fuse blown or circuit breaker tripped? Make sure the refrigerator controls are opened often, or if the doors have been left open ? The unit may run even longer if the room is warm...

Use & Care Guide
Page 16
...begin. See "Water Dispenser." 16 Temperature and Moisture Temperature is normal. ■ Humid room? Allow 24 hours for the refrigerator to your cold water supply? Replace filter or reinstall it correctly. ■ Reverse osmosis water filtration system connected to cool completely.... ■ Door(s) opened often or left open ? Allows warm air to enter refrigerator. See "Water Supply Requirements." ■ Questions remain regarding water pressure? There is interior moisture buildup NOTE: Some moisture buildup...
...begin. See "Water Dispenser." 16 Temperature and Moisture Temperature is normal. ■ Humid room? Allow 24 hours for the refrigerator to your cold water supply? Replace filter or reinstall it correctly. ■ Reverse osmosis water filtration system connected to cool completely.... ■ Door(s) opened often or left open ? Allows warm air to enter refrigerator. See "Water Supply Requirements." ■ Questions remain regarding water pressure? There is interior moisture buildup NOTE: Some moisture buildup...

Use & Care Guide
Page 17
... water after dispensing is leaking from the dispenser. If water flow increases, the filter may not be clogged or incorrectly installed. See "Refrigerator Doors." ■ Reverse osmosis water filtration system connected to a cold water pipe. See "Water Dispenser." ■ Recently changed water ...the glass under the dispenser long enough? The first glass of water may be cool. See "Water Dispenser." ■ Water on the refrigerator? Close the door firmly. Water is normal. ■ Glass not being held under the dispenser 2 to 3 seconds after installation for ...
... water after dispensing is leaking from the dispenser. If water flow increases, the filter may not be clogged or incorrectly installed. See "Refrigerator Doors." ■ Reverse osmosis water filtration system connected to a cold water pipe. See "Water Dispenser." ■ Recently changed water ...the glass under the dispenser long enough? The first glass of water may be cool. See "Water Dispenser." ■ Water on the refrigerator? Close the door firmly. Water is normal. ■ Glass not being held under the dispenser 2 to 3 seconds after installation for ...

Use & Care Guide
Page 19
... Any food loss due to the appliance. 9. Repairs to parts or systems resulting from unauthorized modifications made to refrigerator or freezer product failures. 6. KITCHENAID SHALL NOT BE LIABLE FOR INCIDENTAL OR CONSEQUENTIAL DAMAGES. SOME STATES AND PROVINCES DO NOT ALLOW THE EXCLUSION OR LIMITATION...SHORTEST PERIOD ALLOWED BY LAW. For assistance or service in remote locations. 10. Please keep this warranty does not apply. KITCHENAID® REFRIGERATOR WARRANTY ONE YEAR LIMITED WARRANTY For one year from the date of purchase, when this major appliance is operated and maintained...
... Any food loss due to the appliance. 9. Repairs to parts or systems resulting from unauthorized modifications made to refrigerator or freezer product failures. 6. KITCHENAID SHALL NOT BE LIABLE FOR INCIDENTAL OR CONSEQUENTIAL DAMAGES. SOME STATES AND PROVINCES DO NOT ALLOW THE EXCLUSION OR LIMITATION...SHORTEST PERIOD ALLOWED BY LAW. For assistance or service in remote locations. 10. Please keep this warranty does not apply. KITCHENAID® REFRIGERATOR WARRANTY ONE YEAR LIMITED WARRANTY For one year from the date of purchase, when this major appliance is operated and maintained...
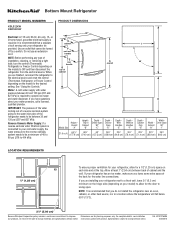
Dimension Guide
Page 1
...55°F (13°C). 2¹⁄₂" (5.08 cm) Because Whirlpool Corporation policy includes a continuous commitment to improve Dimensions are installing your refrigerator next to a fixed wall, leave 21⁄2" (6.3 cm) minimum on the hinge side (depending on the model) to 414 kPa). handle..., qualified plumber. Reverse Osmosis Water Supply: If a reverse osmosis water filtration system is recommended that cannot be provided. If your refrigerator has an ice maker, make sure you have questions about your cold water supply, the water pressure to the reverse osmosis system ...
...55°F (13°C). 2¹⁄₂" (5.08 cm) Because Whirlpool Corporation policy includes a continuous commitment to improve Dimensions are installing your refrigerator next to a fixed wall, leave 21⁄2" (6.3 cm) minimum on the hinge side (depending on the model) to 414 kPa). handle..., qualified plumber. Reverse Osmosis Water Supply: If a reverse osmosis water filtration system is recommended that cannot be provided. If your refrigerator has an ice maker, make sure you have questions about your cold water supply, the water pressure to the reverse osmosis system ...
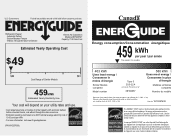
Energy Guide
Page 1
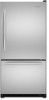
Part No. U.S. Its energy performance meets or exceeds the Government of this label before consumer purchase. Canada Refrigerator-Freezer ·Automatic Defrost ·Bottom Mounted Freezer ·Without Through-the-Door-Ice Service Kitchen Aid Corporation Model(s):KB*S22KW* Capacity: 21.9 Cubic Feet ...
Part No. U.S. Its energy performance meets or exceeds the Government of this label before consumer purchase. Canada Refrigerator-Freezer ·Automatic Defrost ·Bottom Mounted Freezer ·Without Through-the-Door-Ice Service Kitchen Aid Corporation Model(s):KB*S22KW* Capacity: 21.9 Cubic Feet ...
Installation Instructions
Page 1
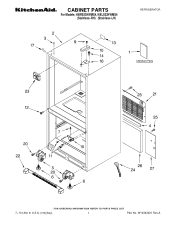
W10343021 Rev.A CABINET PARTS For Models: KBRS22KWMS4, KBLS22KWMS4 (Stainless−RH) (Stainless−LH) REFRIGERATOR 7−10 Litho In U.S.A. (rrm)(bay) 1 Part No.
W10343021 Rev.A CABINET PARTS For Models: KBRS22KWMS4, KBLS22KWMS4 (Stainless−RH) (Stainless−LH) REFRIGERATOR 7−10 Litho In U.S.A. (rrm)(bay) 1 Part No.

Installation Instructions
Page 6
... Module, Control 5 12784415V Board, Control 6 C3680310V Switch, Light Illus. No. DESCRIPTION 15 W10196393 Control, Damper (Includes Harness) Following Parts Not Illustrated 12868701 Harness, Controls (Refrigerator) (Includes Thermistor) 6 W10343021 REFRIGERATOR LINER PARTS For Models: KBRS22KWMS4, KBLS22KWMS4 (Stainless−RH) (Stainless−LH) Illus. Part No. No. DESCRIPTION 7 12806501 Cover, Light 8 12806601V Housing, Light...
... Module, Control 5 12784415V Board, Control 6 C3680310V Switch, Light Illus. No. DESCRIPTION 15 W10196393 Control, Damper (Includes Harness) Following Parts Not Illustrated 12868701 Harness, Controls (Refrigerator) (Includes Thermistor) 6 W10343021 REFRIGERATOR LINER PARTS For Models: KBRS22KWMS4, KBLS22KWMS4 (Stainless−RH) (Stainless−LH) Illus. Part No. No. DESCRIPTION 7 12806501 Cover, Light 8 12806601V Housing, Light...


