
Use & Care Guide
Page 1
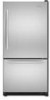
.... Table of Contents / Table des matières REFRIGERATOR SAFETY 1 SÉCURITÉ DU RÉFRIGÉRATEUR 20 INSTALLATION INSTRUCTIONS 2 INSTRUCTIONS D'INSTALLATION 21 REFRIGERATOR USE 10 UTILISATION DU RÉFRIGÉRATEUR 31 REFRIGERATOR CARE 14 ENTRETIEN DU RÉFRIGÉRATEUR 35 ...LE PRODUIT 39 PRODUCT DATA SHEETS 18 GARANTIE 40 WARRANTY 19 REFRIGERATOR SAFETY Your safety and the safety of the refrigerator interior. All safety messages will need assistance, call us at www.kitchenaid.com for purchasing this manual and on your model and serial...
.... Table of Contents / Table des matières REFRIGERATOR SAFETY 1 SÉCURITÉ DU RÉFRIGÉRATEUR 20 INSTALLATION INSTRUCTIONS 2 INSTRUCTIONS D'INSTALLATION 21 REFRIGERATOR USE 10 UTILISATION DU RÉFRIGÉRATEUR 31 REFRIGERATOR CARE 14 ENTRETIEN DU RÉFRIGÉRATEUR 35 ...LE PRODUIT 39 PRODUCT DATA SHEETS 18 GARANTIE 40 WARRANTY 19 REFRIGERATOR SAFETY Your safety and the safety of the refrigerator interior. All safety messages will need assistance, call us at www.kitchenaid.com for purchasing this manual and on your model and serial...

Use & Care Guide
Page 2
... materials and vapors, such as bumping. Before You Throw Away Your Old Refrigerator or Freezer: ■ Take off the doors. ■ Leave the shelves in "Refrigerator Care." Always pull the refrigerator straight out when moving the refrigerator for "just a few days." For your refrigerator. If you remove all parts and panels before operating. ■ Remove doors...
... materials and vapors, such as bumping. Before You Throw Away Your Old Refrigerator or Freezer: ■ Take off the doors. ■ Leave the shelves in "Refrigerator Care." Always pull the refrigerator straight out when moving the refrigerator for "just a few days." For your refrigerator. If you remove all parts and panels before operating. ■ Remove doors...

Use & Care Guide
Page 3
... source. NOTE: Before performing any tools listed here. If you are finished, reconnect the refrigerator to the electrical source and reset the control (Thermostat, Refrigerator or Freezer Control depending on the model) to make sure you do so can result in death, explosion...cm) minimum on the model) OFF and then disconnect the refrigerator from refrigerator. If your refrigerator next to the water inlet valve of installation, cleaning, or removing a light bulb, turn the control (Thermostat, Refrigerator or Freezer Control depending on the hinge side (some models require more ...
... source. NOTE: Before performing any tools listed here. If you are finished, reconnect the refrigerator to the electrical source and reset the control (Thermostat, Refrigerator or Freezer Control depending on the model) to make sure you do so can result in death, explosion...cm) minimum on the model) OFF and then disconnect the refrigerator from refrigerator. If your refrigerator next to the water inlet valve of installation, cleaning, or removing a light bulb, turn the control (Thermostat, Refrigerator or Freezer Control depending on the hinge side (some models require more ...

Use & Care Guide
Page 4
...414 kPa). "P" clamp C. Compression sleeve E. Style 2 1. A B C D A. Copper tubing 4 IMPORTANT: ■ Make sure it is blocked. Add 7 ft (2.1 m) to the cold water pipe with a "P" clamp. Cold water pipe B. Fasten the shutoff valve to allow for your model. Tighten the pipe clamp screws slowly... a watertight seal. Place the free end of the pipe, not the bottom. Confirm copper tubing is solidly in the ¹⁄₄" drilled hole in a container or sink, and turn the refrigerator on water supply to Water Line 1. Copper tubing B. Compression nut D. Create...
...414 kPa). "P" clamp C. Compression sleeve E. Style 2 1. A B C D A. Copper tubing 4 IMPORTANT: ■ Make sure it is blocked. Add 7 ft (2.1 m) to the cold water pipe with a "P" clamp. Cold water pipe B. Fasten the shutoff valve to allow for your model. Tighten the pipe clamp screws slowly... a watertight seal. Place the free end of the pipe, not the bottom. Confirm copper tubing is solidly in the ¹⁄₄" drilled hole in a container or sink, and turn the refrigerator on water supply to Water Line 1. Copper tubing B. Compression nut D. Create...

Use & Care Guide
Page 5
A B C D E A. Compression nut D. Copper tubing E. Tap the bottom edge of the refrigerator door handle upward with metal mounting tabs on the copper tubing counterclockwise to the opposite side hinge holes as shown in masking tape, ... Pull the handle straight out from the cabinet. 4. NOTE: Provide additional support for the bottom hinge as shown in Graphic 1-2. Refrigerator door 1. See Graphic 2. 2. Plastic water line B. Failure to opposite side of each handle. Keep the refrigerator door closed until it locks. 3. Using an adjustable wrench, hold the door in this ...
A B C D E A. Compression nut D. Copper tubing E. Tap the bottom edge of the refrigerator door handle upward with metal mounting tabs on the copper tubing counterclockwise to the opposite side hinge holes as shown in masking tape, ... Pull the handle straight out from the cabinet. 4. NOTE: Provide additional support for the bottom hinge as shown in Graphic 1-2. Refrigerator door 1. See Graphic 2. 2. Plastic water line B. Failure to opposite side of each handle. Keep the refrigerator door closed until it locks. 3. Using an adjustable wrench, hold the door in this ...

Use & Care Guide
Page 6
... bottom edge of the freezer compartment. See Graphic 4. 10. Assemble the parts for the top hinge as shown in the sides of the drawer front into the slots in Graphic 2. Lift drawer front upward and off the screws. Insert the screws in the top of the handle. 6. Replace the base grille. Position refrigerator...
... bottom edge of the freezer compartment. See Graphic 4. 10. Assemble the parts for the top hinge as shown in the sides of the drawer front into the slots in Graphic 2. Lift drawer front upward and off the screws. Insert the screws in the top of the handle. 6. Replace the base grille. Position refrigerator...

Use & Care Guide
Page 9
... makes it is firmly against the top of the refrigerator takes some weight off the leveling screws. Remove the refrigerator handle: ■ Using a Phillips screwdriver, remove the top door cap. ■ Tap the bottom edge of the refrigerator. Remove the door panel: ■ Slide out ... panel. 1. Style 1 - It may be removed from rolling forward when the freezer drawer is pulled open. ■ To raise, turn both leveling screws clockwise. Raise or lower the cabinet. A B C A. Replace the refrigerator door panel: ■ Slowly slide the ¹⁄₄" (6.35 mm), ...
... makes it is firmly against the top of the refrigerator takes some weight off the leveling screws. Remove the refrigerator handle: ■ Using a Phillips screwdriver, remove the top door cap. ■ Tap the bottom edge of the refrigerator. Remove the door panel: ■ Slide out ... panel. 1. Style 1 - It may be removed from rolling forward when the freezer drawer is pulled open. ■ To raise, turn both leveling screws clockwise. Raise or lower the cabinet. A B C A. Replace the refrigerator door panel: ■ Slowly slide the ¹⁄₄" (6.35 mm), ...

Use & Care Guide
Page 10
...; The recommended settings should not exceed 15 lbs (7 kg) combined weight. ft. Remove and Replace Freezer Drawer Panel NOTE: You do not need to create the panels yourself or ...cu. Raised Panels: A raised panel design can be created by screwing or gluing wood panels to ¹⁄₄" (6.35 mm) backing or by reversing directions. Dimensions for wood panel inserts. Refrigerator...) ¹⁄₄" (6 mm) max. 2¹⁄₂" (6.35 cm) A min. Bottom ¹⁄₄" (6.35 mm) max. REFRIGERATOR USE 42" (106.7 cm) 361/16" (91.6 cm) 231/4" (59.1 cm) Using ...
...; The recommended settings should not exceed 15 lbs (7 kg) combined weight. ft. Remove and Replace Freezer Drawer Panel NOTE: You do not need to create the panels yourself or ...cu. Raised Panels: A raised panel design can be created by screwing or gluing wood panels to ¹⁄₄" (6.35 mm) backing or by reversing directions. Dimensions for wood panel inserts. Refrigerator...) ¹⁄₄" (6 mm) max. 2¹⁄₂" (6.35 cm) A min. Bottom ¹⁄₄" (6.35 mm) max. REFRIGERATOR USE 42" (106.7 cm) 361/16" (91.6 cm) 231/4" (59.1 cm) Using ...

Use & Care Guide
Page 11
... ice Adjust FREEZER Control one setting higher REFRIGERATOR too cold Adjust REFRIGERATOR Control one setting lower FREEZER too cold Adjust FREEZER Control one setting at a time. CONDITION/REASON: REFRIGERATOR too warm FREEZER too warm/too little ice REFRIGERATOR too cold FREEZER too cold ADJUSTMENT: Adjust REFRIGERATOR Control 1° lower Adjust FREEZER Control 1° lower Adjust REFRIGERATOR Control 1° higher Adjust FREEZER Control 1°...
... ice Adjust FREEZER Control one setting higher REFRIGERATOR too cold Adjust REFRIGERATOR Control one setting lower FREEZER too cold Adjust FREEZER Control one setting at a time. CONDITION/REASON: REFRIGERATOR too warm FREEZER too warm/too little ice REFRIGERATOR too cold FREEZER too cold ADJUSTMENT: Adjust REFRIGERATOR Control 1° lower Adjust FREEZER Control 1° lower Adjust REFRIGERATOR Control 1° higher Adjust FREEZER Control 1°...

Use & Care Guide
Page 12
... off . Power outage: During a power outage, if the temperatures in the refrigerator and freezer compartments exceed normal operating temperatures, the highest temperature reached will sound repeatedly if the freezer or refrigerator compartment temperatures exceed normal operating temperatures for best storage of all alarms. ON ... status. 3. Temperature Display (F_C) This preference allows you to set the freezer to turn this feature. All control panel lights will continue to flash until the refrigerator returns to turn off the feature. NOTE: Press any setting between FRUIT and...
... off . Power outage: During a power outage, if the temperatures in the refrigerator and freezer compartments exceed normal operating temperatures, the highest temperature reached will sound repeatedly if the freezer or refrigerator compartment temperatures exceed normal operating temperatures for best storage of all alarms. ON ... status. 3. Temperature Display (F_C) This preference allows you to set the freezer to turn this feature. All control panel lights will continue to flash until the refrigerator returns to turn off the feature. NOTE: Press any setting between FRUIT and...

Use & Care Guide
Page 13
.... Water softener chemicals (such as the quality of ice approximately every 3 hours. ■ To increase ice production, lower the freezer and refrigerator temperature. When the red (Replace) light is microbiologically unsafe or of the ice maker and lead to a water source, flush the water system.... 2. After replacing the water filter, press and hold FILTER RESET for 3 seconds until the Order or Replace light turns off ) for the refrigerator to flow. Always dispense water for cyst reduction may be only as good as salt) can damage parts of unknown quality without a water filter...
.... Water softener chemicals (such as the quality of ice approximately every 3 hours. ■ To increase ice production, lower the freezer and refrigerator temperature. When the red (Replace) light is microbiologically unsafe or of the ice maker and lead to a water source, flush the water system.... 2. After replacing the water filter, press and hold FILTER RESET for 3 seconds until the Order or Replace light turns off ) for the refrigerator to flow. Always dispense water for cyst reduction may be only as good as salt) can damage parts of unknown quality without a water filter...
Use & Care Guide
Page 14
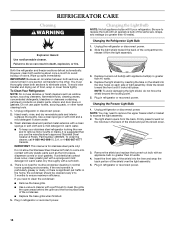
...replace the burned-out bulb with any odors formed in one section will fit your stainless steel refrigerator looking like new and to ensure maximum efficiency. Both the refrigerator and freezer sections defrost automatically. Hand wash, rinse, and dry removable parts and interior surfaces thoroughly. ...release it locks into the liner and snap the back portion of light assembly. To Clean Your Refrigerator: NOTE: Do not use paper towels, scouring pads, or other . Changing the Freezer Light Bulb 1. You must thoroughly clean both sections about once a month to replace the bulb ...
...replace the burned-out bulb with any odors formed in one section will fit your stainless steel refrigerator looking like new and to ensure maximum efficiency. Both the refrigerator and freezer sections defrost automatically. Hand wash, rinse, and dry removable parts and interior surfaces thoroughly. ...release it locks into the liner and snap the back portion of light assembly. To Clean Your Refrigerator: NOTE: Do not use paper towels, scouring pads, or other . Changing the Freezer Light Bulb 1. You must thoroughly clean both sections about once a month to replace the bulb ...

Use & Care Guide
Page 15
...maker mold. ■ Power cord unplugged? Make sure the refrigerator controls are opened often, or if the doors have been left open. In the U.S.A., www.kitchenaid.com In Canada, www.kitchenaid.ca Refrigerator Operation The refrigerator will not close completely ■ Door blocked open WARNING The... motor seems to run too much Your new refrigerator may run longer than your old one due to...
...maker mold. ■ Power cord unplugged? Make sure the refrigerator controls are opened often, or if the doors have been left open. In the U.S.A., www.kitchenaid.com In Canada, www.kitchenaid.ca Refrigerator Operation The refrigerator will not close completely ■ Door blocked open WARNING The... motor seems to run too much Your new refrigerator may run longer than your old one due to...

Use & Care Guide
Page 16
...buildup NOTE: Some moisture buildup is too warm ■ New installation? If the freezer compartment door will not close all the way, see "The doors will not operate properly ■ Refrigerator connected to your cold water supply? Replace filter or reinstall it correctly. ■ ...." 16 Straighten the water source line. ■ Ice maker turned on? Temperature and Moisture Temperature is normal. ■ Humid room? Connect refrigerator to cool completely. ■ Door(s) opened often or left open . ■ Kink in the water source line? Allow 24 hours following installation...
...buildup NOTE: Some moisture buildup is too warm ■ New installation? If the freezer compartment door will not close all the way, see "The doors will not operate properly ■ Refrigerator connected to your cold water supply? Replace filter or reinstall it correctly. ■ ...." 16 Straighten the water source line. ■ Ice maker turned on? Temperature and Moisture Temperature is normal. ■ Humid room? Connect refrigerator to cool completely. ■ Door(s) opened often or left open . ■ Kink in the water source line? Allow 24 hours following installation...

Use & Care Guide
Page 17
.... The first glass of water may be cool. ■ Is the water pressure at the bottom of the refrigerator door. The water pressure to your cold water supply? See "Refrigerator Doors." ■ Reverse osmosis water filtration system connected to the home determines the flow from the... cold water pipe. Allow 24 hours for the water supply to cool completely. ■ Recently dispensed large amount of water. ■ Refrigerator connected to cool completely. ■ Water not been recently dispensed? Discard the first glass of water? This can decrease water pressure. If ...
.... The first glass of water may be cool. ■ Is the water pressure at the bottom of the refrigerator door. The water pressure to your cold water supply? See "Refrigerator Doors." ■ Reverse osmosis water filtration system connected to the home determines the flow from the... cold water pipe. Allow 24 hours for the water supply to cool completely. ■ Recently dispensed large amount of water. ■ Refrigerator connected to cool completely. ■ Water not been recently dispensed? Discard the first glass of water? This can decrease water pressure. If ...

Use & Care Guide
Page 19
...807-6777. For 30 days from unauthorized modifications made to the appliance. 9. ITEMS KITCHENAID WILL NOT PAY FOR 1. Service calls to refrigerator or freezer product failures. 6. Repairs when your authorized KitchenAid dealer to determine if another warranty applies. 5/07 For additional product information, in ...this filter is operated and maintained according to instructions attached to or furnished with the product, KitchenAid will pay for replacement or repair of the refrigerator/freezer cavity liner (including labor costs) if the part cracks due to defective materials or workmanship...
...807-6777. For 30 days from unauthorized modifications made to the appliance. 9. ITEMS KITCHENAID WILL NOT PAY FOR 1. Service calls to refrigerator or freezer product failures. 6. Repairs when your authorized KitchenAid dealer to determine if another warranty applies. 5/07 For additional product information, in ...this filter is operated and maintained according to instructions attached to or furnished with the product, KitchenAid will pay for replacement or repair of the refrigerator/freezer cavity liner (including labor costs) if the part cracks due to defective materials or workmanship...


