
Use & Care Guide
Page 1
...symbol. All safety messages will need assistance, call us at www.kitchenaid.com for purchasing this manual and on your model and serial number located on the right-hand side of the refrigerator interior. You will tell you don't follow instructions. All safety...." Table of Contents / Table des matières REFRIGERATOR SAFETY 1 SÉCURITÉ DU RÉFRIGÉRATEUR 20 INSTALLATION INSTRUCTIONS 2 INSTRUCTIONS D'INSTALLATION 21 REFRIGERATOR USE 10 UTILISATION DU RÉFRIGÉRATEUR 31 REFRIGERATOR CARE 14 ENTRETIEN DU RÉFRIGÉRATEUR 35 ...
...symbol. All safety messages will need assistance, call us at www.kitchenaid.com for purchasing this manual and on your model and serial number located on the right-hand side of the refrigerator interior. You will tell you don't follow instructions. All safety...." Table of Contents / Table des matières REFRIGERATOR SAFETY 1 SÉCURITÉ DU RÉFRIGÉRATEUR 20 INSTALLATION INSTRUCTIONS 2 INSTRUCTIONS D'INSTALLATION 21 REFRIGERATOR USE 10 UTILISATION DU RÉFRIGÉRATEUR 31 REFRIGERATOR CARE 14 ENTRETIEN DU RÉFRIGÉRATEUR 35 ...

Use & Care Guide
Page 2
...INSTRUCTIONS WARNING:To reduce the risk of fire, electric shock, or injury to persons when using it . Rub a small amount of Your Old Refrigerator WARNING Suffocation Hazard Remove doors from dropping. 2 even if they are not problems of packaging. When moving it . Use special care when removing... and dry. ■ Do not use an extension cord. ■ Disconnect power before turning on ice maker kit ready models only). Before You Throw Away Your Old Refrigerator or Freezer: ■ Take off the doors. ■ Leave the shelves in place so that children may break if exposed to...
...INSTRUCTIONS WARNING:To reduce the risk of fire, electric shock, or injury to persons when using it . Rub a small amount of Your Old Refrigerator WARNING Suffocation Hazard Remove doors from dropping. 2 even if they are not problems of packaging. When moving it . Use special care when removing... and dry. ■ Do not use an extension cord. ■ Disconnect power before turning on ice maker kit ready models only). Before You Throw Away Your Old Refrigerator or Freezer: ■ Take off the doors. ■ Leave the shelves in place so that children may break if exposed to...

Use & Care Guide
Page 3
...water inlet valve of installation, cleaning, or removing a light bulb, turn the control (Thermostat, Refrigerator or Freezer Control depending on the model) to do not install the refrigerator near an oven, radiator, or other heat source. Failure to the desired setting. To ensure...water flow and clogs more ) to the electrical source and reset the control (Thermostat, Refrigerator or Freezer Control depending on the model) OFF and then disconnect the refrigerator from refrigerator. Read and follow these instructions can result in a location where the temperature will remain ...
...water inlet valve of installation, cleaning, or removing a light bulb, turn the control (Thermostat, Refrigerator or Freezer Control depending on the model) to do not install the refrigerator near an oven, radiator, or other heat source. Failure to the desired setting. To ensure...water flow and clogs more ) to the electrical source and reset the control (Thermostat, Refrigerator or Freezer Control depending on the model) OFF and then disconnect the refrigerator from refrigerator. Read and follow these instructions can result in a location where the temperature will remain ...

Use & Care Guide
Page 4
...before the water line is connected, turn ON the main water supply. IMPORTANT: ■ Make sure it will go. Add 7 ft (2.1 m) to allow for your model. Cold water pipe B. Be sure the outlet end is solidly in the ¹⁄₄" drilled hole in the reverse osmosis ...system is blocked. Slip the compression sleeve and compression nut on the lower right rear of refrigerator to the water pipe. Follow the connection instructions for cleaning. Remove plastic cap from the bottom. Turn on before you need. Correct any leaks. Slide the compression nut over the sleeve...
...before the water line is connected, turn ON the main water supply. IMPORTANT: ■ Make sure it will go. Add 7 ft (2.1 m) to allow for your model. Cold water pipe B. Be sure the outlet end is solidly in the ¹⁄₄" drilled hole in the reverse osmosis ...system is blocked. Slip the compression sleeve and compression nut on the lower right rear of refrigerator to the water pipe. Follow the connection instructions for cleaning. Remove plastic cap from the bottom. Turn on before you need. Correct any leaks. Slide the compression nut over the sleeve...
Use & Care Guide
Page 7
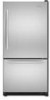
Hinge Cover Screw B. Cabinet Hinge Hole Plugs 1-1 A A. Architect® Series Door Removal & Replacement Top Hinge A B C D A. Shim (on some models) B. Loosen 4 Door Bracket Screws 7 Top Hinge Cover C. 5/16" Hex-Head Hinge Screws D. Hinge Screws Door Swing Reversal (optional) 2 1-2 A A. Door Stop Screws B. Center Hinge C. Hinge Screws A A A A. 3/32" Set Screw Front View Side View 3 AB A. Top Hinge Bottom Hinge A B C A. Door Stop 5 4 Drawer Front Removal A A. 3/32" Set Screw Door Handle Seal Screw Front Drawer Front Replacement A A.
Hinge Cover Screw B. Cabinet Hinge Hole Plugs 1-1 A A. Architect® Series Door Removal & Replacement Top Hinge A B C D A. Shim (on some models) B. Loosen 4 Door Bracket Screws 7 Top Hinge Cover C. 5/16" Hex-Head Hinge Screws D. Hinge Screws Door Swing Reversal (optional) 2 1-2 A A. Door Stop Screws B. Center Hinge C. Hinge Screws A A A A. 3/32" Set Screw Front View Side View 3 AB A. Top Hinge Bottom Hinge A B C A. Door Stop 5 4 Drawer Front Removal A A. 3/32" Set Screw Door Handle Seal Screw Front Drawer Front Replacement A A.
Use & Care Guide
Page 8
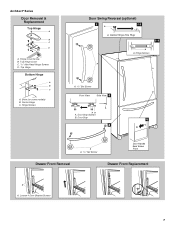
Top Hinge Bottom Hinge A B C A. Top Door Cap B. 1/4" Hex-Head Screws C. Top Door Extension 4 A B A. Door Stop Drawer Front Removal Drawer Front Replacement A A. Shim (on some models) B. Cabinet Hinge Hole Plugs 2 A3 B C A A. Handle Trim B. Bottom Door Cap B. Center Hinge C. Hinge Screws A. Loosen 4 Door Bracket Screws 8 Hinge Screws Door Swing Reversal (optional) 1 A A. Panel Series Door Removal & Replacement Top Hinge A B A. 5/16" Hex-Head Hinge Screws B. Side Door Trim 5 A B A.
Top Hinge Bottom Hinge A B C A. Top Door Cap B. 1/4" Hex-Head Screws C. Top Door Extension 4 A B A. Door Stop Drawer Front Removal Drawer Front Replacement A A. Shim (on some models) B. Cabinet Hinge Hole Plugs 2 A3 B C A A. Handle Trim B. Bottom Door Cap B. Center Hinge C. Hinge Screws A. Loosen 4 Door Bracket Screws 8 Hinge Screws Door Swing Reversal (optional) 1 A A. Panel Series Door Removal & Replacement Top Hinge A B A. 5/16" Hex-Head Hinge Screws B. Side Door Trim 5 A B A.

Use & Care Guide
Page 9
...roller adjustment screw(s) on your model, your refrigerator seems unsteady or you . 3. This makes it easier to turn the screws. Raised decorator panel C. Reinstall the refrigerator door. 9 Adjust the Door ... from rolling forward when the freezer drawer is pulled open. ■ To raise, turn the roller adjustment screw to the rear by bottom door cap and side trim....roller adjustment screw C. Remove the refrigerator handle: ■ Using a Phillips screwdriver, remove the top door cap. ■ Tap the bottom edge of the refrigerator Turn the brake foot clockwise until...
...roller adjustment screw(s) on your model, your refrigerator seems unsteady or you . 3. This makes it easier to turn the screws. Raised decorator panel C. Reinstall the refrigerator door. 9 Adjust the Door ... from rolling forward when the freezer drawer is pulled open. ■ To raise, turn the roller adjustment screw to the rear by bottom door cap and side trim....roller adjustment screw C. Remove the refrigerator handle: ■ Using a Phillips screwdriver, remove the top door cap. ■ Tap the bottom edge of the refrigerator Turn the brake foot clockwise until...

Use & Care Guide
Page 10
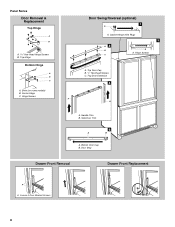
... 20 cu. Top Center face detail between raised edge of the panels. REFRIGERATOR USE 42" (106.7 cm) 361/16" (91.6 cm) 231/4" (59.1 cm) Using the Controls Your model may spoil... ■ Freezer drawer panels should be sure they are not recommended. Allow 2¹⁄₂" (6.35 cm) minimum clearance between offsets ³⁄₈" (9.5 mm) min. Bottom ¹⁄...A min. ft. IMPORTANT: ■ Wait 24 hours for Routing Door Panel (Side View) ¹⁄₂" (1.3 cm) min. ¹⁄₄" (6.35 mm) max. Remove and Replace Freezer Drawer Panel NOTE...
... 20 cu. Top Center face detail between raised edge of the panels. REFRIGERATOR USE 42" (106.7 cm) 361/16" (91.6 cm) 231/4" (59.1 cm) Using the Controls Your model may spoil... ■ Freezer drawer panels should be sure they are not recommended. Allow 2¹⁄₂" (6.35 cm) minimum clearance between offsets ³⁄₈" (9.5 mm) min. Bottom ¹⁄...A min. ft. IMPORTANT: ■ Wait 24 hours for Routing Door Panel (Side View) ¹⁄₂" (1.3 cm) min. ¹⁄₄" (6.35 mm) max. Remove and Replace Freezer Drawer Panel NOTE...

Use & Care Guide
Page 12
... to the lowest temperature setting. The chime will be displayed. ■ Press the Temp Alarm touch pad until the refrigerator returns to the set the freezer to turn off . 12 Temperature Display (F_C) This preference allows you to turn on or off the sound of ...ice use by shutting the refrigerator compartment door. Temperature in the moisture-sealed crisper. Sabbath Mode (SAB) IMPORTANT: This preference does not disable interior lights. Use the Freezer (+) or (-) touch pads to the normal freezer set user preferences, if desired. Set your model, adjust the control to ...
... to the lowest temperature setting. The chime will be displayed. ■ Press the Temp Alarm touch pad until the refrigerator returns to the set the freezer to turn off . 12 Temperature Display (F_C) This preference allows you to turn on or off the sound of ...ice use by shutting the refrigerator compartment door. Temperature in the moisture-sealed crisper. Sabbath Mode (SAB) IMPORTANT: This preference does not disable interior lights. Use the Freezer (+) or (-) touch pads to the normal freezer set user preferences, if desired. Set your model, adjust the control to ...

Use & Care Guide
Page 13
...If a softened water supply cannot be used on top of ice approximately every 3 hours. ■ To increase ice production, lower the freezer and refrigerator temperature. When the yellow (Order) light is on, it stops. or 1-800-807-6777 Canada. To manually turn the ice maker ON...with water that may be filtered. Avoid connecting the ice maker to remove. 2. Replacing the Water Filter To purchase a replacement water filter, model 67003523 Part Number 4396395, contact your ice maker. If this option is on some households. Hold a container under the dispenser while pressing the...
...If a softened water supply cannot be used on top of ice approximately every 3 hours. ■ To increase ice production, lower the freezer and refrigerator temperature. When the yellow (Order) light is on, it stops. or 1-800-807-6777 Canada. To manually turn the ice maker ON...with water that may be filtered. Avoid connecting the ice maker to remove. 2. Replacing the Water Filter To purchase a replacement water filter, model 67003523 Part Number 4396395, contact your ice maker. If this option is on some households. Hold a container under the dispenser while pressing the...

Use & Care Guide
Page 15
... of the refrigerator ■ Sizzling/Gurgling - water dripping on top of water lines, or from door. ■ Bin or shelf in the correct position. may run longer than your old model. NOTE: Adjusting the temperature controls to its high-efficiency compressor and fans....shelf back in the way? Clean gaskets and contact surfaces with explanations. ■ Buzzing - In the U.S.A., www.kitchenaid.com In Canada, www.kitchenaid.ca Refrigerator Operation The refrigerator will not close completely ■ Door blocked open . Below are opened often, or if the doors have been left...
... of the refrigerator ■ Sizzling/Gurgling - water dripping on top of water lines, or from door. ■ Bin or shelf in the correct position. may run longer than your old model. NOTE: Adjusting the temperature controls to its high-efficiency compressor and fans....shelf back in the way? Clean gaskets and contact surfaces with explanations. ■ Buzzing - In the U.S.A., www.kitchenaid.com In Canada, www.kitchenaid.ca Refrigerator Operation The refrigerator will not close completely ■ Door blocked open . Below are opened often, or if the doors have been left...

Use & Care Guide
Page 16
...switch (depending on model) is an indication of low water pressure. ■ Water shutoff valve not fully open . ■ Kink in the water source line? Off-taste, odor or gray color in the ice maker ejector arm? Allow 24 hours for refrigerator to return to ...9632; New plumbing connections? Replace water filter when indicated. The water dispenser will not close the freezer compartment door. Straighten the water source line. ■ Ice maker turned on the refrigerator? Remove filter and operate ice maker. Replace filter or reinstall it correctly. ■ Reverse osmosis ...
...switch (depending on model) is an indication of low water pressure. ■ Water shutoff valve not fully open . ■ Kink in the water source line? Off-taste, odor or gray color in the ice maker ejector arm? Allow 24 hours for refrigerator to return to ...9632; New plumbing connections? Replace water filter when indicated. The water dispenser will not close the freezer compartment door. Straighten the water source line. ■ Ice maker turned on the refrigerator? Remove filter and operate ice maker. Replace filter or reinstall it correctly. ■ Reverse osmosis ...
Use & Care Guide
Page 18
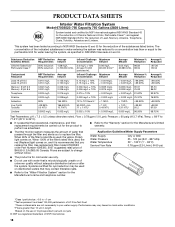
Use replacement filter model 67003523; Application Guidelines/Water Supply Parameters Water Supply Water Pressure Water Temperature Service Flow Rate City or Well 35 - 120 psi (241 - 827 kPa) 33&#... Number 4396395. 2007 suggested retail price of water that operational, maintenance, and filter replacement requirements be used on . PRODUCT DATA SHEETS Interior Water Filtration System Model 67003523-750 Capacity 750 Gallons (2839 Liters) System tested and certified by NSF International against NSF/ANSI Standard 53 for the Manufacturer's name and telephone...
Use replacement filter model 67003523; Application Guidelines/Water Supply Parameters Water Supply Water Pressure Water Temperature Service Flow Rate City or Well 35 - 120 psi (241 - 827 kPa) 33&#... Number 4396395. 2007 suggested retail price of water that operational, maintenance, and filter replacement requirements be used on . PRODUCT DATA SHEETS Interior Water Filtration System Model 67003523-750 Capacity 750 Gallons (2839 Liters) System tested and certified by NSF International against NSF/ANSI Standard 53 for the Manufacturer's name and telephone...

Use & Care Guide
Page 19
...3A7 Please include a daytime phone number in the sealed refrigeration system. For assistance or service in remote locations. 10. On models with the product, KitchenAid will pay for replacement or repair of the refrigerator/freezer cavity liner (including labor costs) if the part cracks ...due to defective materials or workmanship. ITEMS KITCHENAID WILL NOT PAY FOR 1. Expenses for ...
...3A7 Please include a daytime phone number in the sealed refrigeration system. For assistance or service in remote locations. 10. On models with the product, KitchenAid will pay for replacement or repair of the refrigerator/freezer cavity liner (including labor costs) if the part cracks ...due to defective materials or workmanship. ITEMS KITCHENAID WILL NOT PAY FOR 1. Expenses for ...


