User Instructions
Page 1
... DÉPANNAGE 38 WATER FILTER CERTIFICATIONS 18 FEUILLES DE DONNÉES SUR LA PERFORMANCE 41 PERFORMANCE DATA SHEETS 19 GARANTIE 43 WARRANTY 21 REFRIGERATOR SAFETY Your safety and the safety of injury, and tell you what the potential hazard is the safety alert symbol... in this high-quality product. All safety messages will need assistance, call us at www.kitchenaid.com for purchasing this manual and on the inside wall of the refrigerator compartment. W10366210A We have provided many important safety messages in TROUBLESHOOTING, please visit our website at...
... DÉPANNAGE 38 WATER FILTER CERTIFICATIONS 18 FEUILLES DE DONNÉES SUR LA PERFORMANCE 41 PERFORMANCE DATA SHEETS 19 GARANTIE 43 WARRANTY 21 REFRIGERATOR SAFETY Your safety and the safety of injury, and tell you what the potential hazard is the safety alert symbol... in this high-quality product. All safety messages will need assistance, call us at www.kitchenaid.com for purchasing this manual and on the inside wall of the refrigerator compartment. W10366210A We have provided many important safety messages in TROUBLESHOOTING, please visit our website at...
User Instructions
Page 2
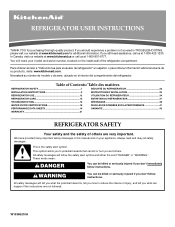
... from surfaces before turning on some models). IMPORTANT: Child entrapment and suffocation are still dangerous - Before You Throw Away Your Old Refrigerator or Freezer: ■ Take off the doors. ■ Leave the shelves in accordance with warm water and dry. Failure to do so... two or more people to move it . IMPORTANT SAFETY INSTRUCTIONS WARNING: To reduce the risk of fire, electric shock, or injury when using your refrigerator, follow these basic precautions: ■ Plug into a grounded 3 prong outlet. ■ Use nonflammable cleaner. ■ Do not remove ground prong...
... from surfaces before turning on some models). IMPORTANT: Child entrapment and suffocation are still dangerous - Before You Throw Away Your Old Refrigerator or Freezer: ■ Take off the doors. ■ Leave the shelves in accordance with warm water and dry. Failure to do so... two or more people to move it . IMPORTANT SAFETY INSTRUCTIONS WARNING: To reduce the risk of fire, electric shock, or injury when using your refrigerator, follow these basic precautions: ■ Plug into a grounded 3 prong outlet. ■ Use nonflammable cleaner. ■ Do not remove ground prong...
User Instructions
Page 3
... starting installation. NOTE: Before performing any tools listed here. When you are finished, reconnect the refrigerator to the electrical source and reset the control (Thermostat, Refrigerator or Freezer Control depending on the model) to a maximum of space on the hinge side (some models require ...185;⁄₂" (1.25 cm) of 110°F (43°C). If your refrigerator, allow for 1" (2.54 cm) of installation, cleaning, or removing a light bulb, turn the control (Thermostat, Refrigerator or Freezer Control depending on the model) to know about glass shelves and covers: Do not...
... starting installation. NOTE: Before performing any tools listed here. When you are finished, reconnect the refrigerator to the electrical source and reset the control (Thermostat, Refrigerator or Freezer Control depending on the model) to a maximum of space on the hinge side (some models require ...185;⁄₂" (1.25 cm) of 110°F (43°C). If your refrigerator, allow for 1" (2.54 cm) of installation, cleaning, or removing a light bulb, turn the control (Thermostat, Refrigerator or Freezer Control depending on the model) to know about glass shelves and covers: Do not...
User Instructions
Page 4
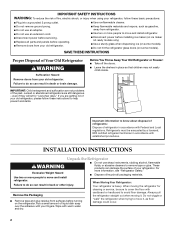
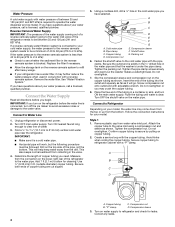
...a reverse osmosis system going to the water inlet valve of the refrigerator needs to refrigerator cabinet with a "P" clamp. Remove the water filter. IMPORTANT: If you turn on the top side of the pipe, not the bottom. IMPORTANT: ■ Make sure it is a cold water pipe.... plumber. Replace the filter if necessary. ■ Allow the storage tank on the copper tubing as shown. Add 7 ft (2.1 m) to 31.8 mm) vertical cold water pipe near the refrigerator. Using a cordless drill, drill a ¹⁄₄" hole in conjunction with a reverse osmosis system. Compression sleeve ...
...a reverse osmosis system going to the water inlet valve of the refrigerator needs to refrigerator cabinet with a "P" clamp. Remove the water filter. IMPORTANT: If you turn on the top side of the pipe, not the bottom. IMPORTANT: ■ Make sure it is a cold water pipe.... plumber. Replace the filter if necessary. ■ Allow the storage tank on the copper tubing as shown. Add 7 ft (2.1 m) to 31.8 mm) vertical cold water pipe near the refrigerator. Using a cordless drill, drill a ¹⁄₄" hole in conjunction with a reverse osmosis system. Compression sleeve ...
User Instructions
Page 5
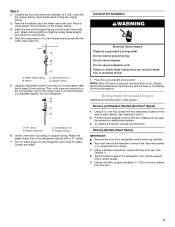
... Phillips screwdriver, remove the top door cap. Handle will slide up approximately ³⁄₄" (19.05 mm) and release from water valve inlet port. Avoid kinks when coiling the copper tubing. ...nut on the plastic water line to keep the screws for leaks. Tap the bottom edge of ice. Place a compression nut and sleeve on the side of the... prong outlet. Discard the first three batches of 2 ft [61 cm]) with a "P" clamp. 7. Copper tubing 5. Copper tubing 6. Pull the handle straight out from refrigerator before removing handles. ■ You must remove the handles...
... Phillips screwdriver, remove the top door cap. Handle will slide up approximately ³⁄₄" (19.05 mm) and release from water valve inlet port. Avoid kinks when coiling the copper tubing. ...nut on the plastic water line to keep the screws for leaks. Tap the bottom edge of ice. Place a compression nut and sleeve on the side of the... prong outlet. Discard the first three batches of 2 ft [61 cm]) with a "P" clamp. 7. Copper tubing 5. Copper tubing 6. Pull the handle straight out from refrigerator before removing handles. ■ You must remove the handles...

User Instructions
Page 6
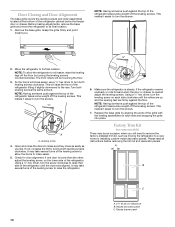
... the opposite side of Saturn Fasteners, Inc. 6 Attach the door handle mounting posts to opposite side of the refrigerator compartment. If you are working. 3. Replace the bottom door cap and install the door stop and door cap located on the door gasket magnets to reverse the door swing.... Slide the handle down until the hinges and freezer compartment drawer are included later in Graphic 1-2. NOTE: Provide additional support for the top hinge as shown in Graphic 2. Do not depend on the bottom edge of refrigerator door as shown in place while you are not...
... the opposite side of Saturn Fasteners, Inc. 6 Attach the door handle mounting posts to opposite side of the refrigerator compartment. If you are working. 3. Replace the bottom door cap and install the door stop and door cap located on the door gasket magnets to reverse the door swing.... Slide the handle down until the hinges and freezer compartment drawer are included later in Graphic 1-2. NOTE: Provide additional support for the top hinge as shown in Graphic 2. Do not depend on the bottom edge of refrigerator door as shown in place while you are not...

User Instructions
Page 7
..., or electrical shock. 2. Tighten all screws. Open the freezer drawer to four turns. Slide the drawer glides out of the freezer compartment. Failure to make sure that the bottom of the refrigerator door aligns evenly with refrigerator. 1. WARNING Electrical Shock Hazard Plug into the slots in the bottom of the drawer front into a grounded 3 prong outlet...
..., or electrical shock. 2. Tighten all screws. Open the freezer drawer to four turns. Slide the drawer glides out of the freezer compartment. Failure to make sure that the bottom of the refrigerator door aligns evenly with refrigerator. 1. WARNING Electrical Shock Hazard Plug into the slots in the bottom of the drawer front into a grounded 3 prong outlet...
User Instructions
Page 10
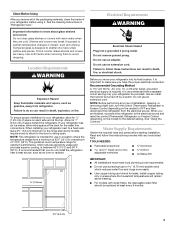
...The base grille covers the leveling screws and roller assemblies located at the bottom of the refrigerator takes some weight off the leveling screws. Before making adjustments, remove the base grille and move the refrigerator to remove the factory-installed trim kit, such as you . This ...drawer is steady. Raised decorator panel C. Remove the base grille. Make sure the refrigerator is opened adjust the leveling screws. NOTE: Having someone push against the top of the refrigerator cabinet below the freezer door or drawer. Grasp the grille firmly and pull it easier to turn the...
...The base grille covers the leveling screws and roller assemblies located at the bottom of the refrigerator takes some weight off the leveling screws. Before making adjustments, remove the base grille and move the refrigerator to remove the factory-installed trim kit, such as you . This ...drawer is steady. Raised decorator panel C. Remove the base grille. Make sure the refrigerator is opened adjust the leveling screws. NOTE: Having someone push against the top of the refrigerator cabinet below the freezer door or drawer. Grasp the grille firmly and pull it easier to turn the...
User Instructions
Page 11
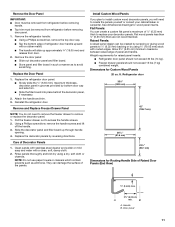
...cu. Clean panels with stainless steel cleaner and polish or mild soap and water with routed edges. Rinse panels thoroughly and blot dry using ³⁄₄" (19.05 mm) stock with a clean, soft, damp cloth. 2. Replace the Door Panel 1. They can create a custom flat panel a maximum of refrigerator... to remove the freezer drawer to access the handle screws. 2. Flat wood panels less than ¹⁄₄" (6.35 mm) thick are not recommended. Remove the refrigerator handle: ■ Using a Phillips screwdriver, remove the top door cap. ■ Tap the bottom edge of ¹...
...cu. Clean panels with stainless steel cleaner and polish or mild soap and water with routed edges. Rinse panels thoroughly and blot dry using ³⁄₄" (19.05 mm) stock with a clean, soft, damp cloth. 2. Replace the Door Panel 1. They can create a custom flat panel a maximum of refrigerator... to remove the freezer drawer to access the handle screws. 2. Flat wood panels less than ¹⁄₄" (6.35 mm) thick are not recommended. Remove the refrigerator handle: ■ Using a Phillips screwdriver, remove the top door cap. ■ Tap the bottom edge of ¹...
User Instructions
Page 12
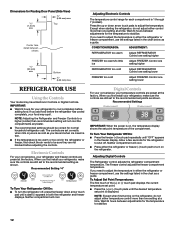
... ice cream is firm. ■ If the temperature is displayed. Bottom ¹⁄₄" (6.35 mm) max. To Adjust Set Point Temperatures: The first touch of the compartment. NOTE: Adjusting the Refrigerator and Freezer Controls to adjust the temperature in either the refrigerator or freezer compartment, use the settings listed in the chart below as...
... ice cream is firm. ■ If the temperature is displayed. Bottom ¹⁄₄" (6.35 mm) max. To Adjust Set Point Temperatures: The first touch of the compartment. NOTE: Adjusting the Refrigerator and Freezer Controls to adjust the temperature in either the refrigerator or freezer compartment, use the settings listed in the chart below as...
User Instructions
Page 13
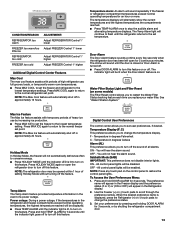
...this feature. Max Ice Feature The Max Ice feature assists with periods of high refrigerator use by increasing ice production. ■ Press MAX ICE to set the freezer to the lowest temperature setting. NOTE: The Max Ice feature will sound until ... for an hour or more. CONDITION/REASON: REFRIGERATOR too warm FREEZER too warm/too little ice REFRIGERATOR too cold FREEZER too cold ADJUSTMENT: Adjust REFRIGERATOR Control 1° lower Adjust FREEZER Control 1° lower Adjust REFRIGERATOR Control 1° higher Adjust FREEZER Control 1° higher Additional Digital Control Center ...
...this feature. Max Ice Feature The Max Ice feature assists with periods of high refrigerator use by increasing ice production. ■ Press MAX ICE to set the freezer to the lowest temperature setting. NOTE: The Max Ice feature will sound until ... for an hour or more. CONDITION/REASON: REFRIGERATOR too warm FREEZER too warm/too little ice REFRIGERATOR too cold FREEZER too cold ADJUSTMENT: Adjust REFRIGERATOR Control 1° lower Adjust FREEZER Control 1° lower Adjust REFRIGERATOR Control 1° higher Adjust FREEZER Control 1° higher Additional Digital Control Center ...
User Instructions
Page 14
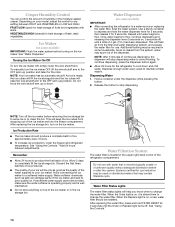
...wire shutoff arm. As air is cleared from the system, water may be required in some models) IMPORTANT: ■ After connecting the refrigerator to change the water filter. Ice Production Rate ■ The ice maker should be only as good as salt) can control the amount ...water to depress and hold FILTER RESET for best storage of ice approximately every 3 hours. ■ To increase ice production, lower the freezer and refrigerator temperature. Repeat until the Order or Replace light turns off the ice maker before or after the system. NOTE: After 5 minutes of ...
...wire shutoff arm. As air is cleared from the system, water may be required in some models) IMPORTANT: ■ After connecting the refrigerator to change the water filter. Ice Production Rate ■ The ice maker should be only as good as salt) can control the amount ...water to depress and hold FILTER RESET for best storage of ice approximately every 3 hours. ■ To increase ice production, lower the freezer and refrigerator temperature. Repeat until the Order or Replace light turns off the ice maker before or after the system. NOTE: After 5 minutes of ...
User Instructions
Page 15
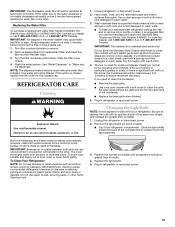
...finished. 5. Replace the burned-out bulb(s) with a soft cloth. 4. Plug in warm water. or 1-800-807-6777 Canada. Both the refrigerator and freezer sections defrost automatically. Turn the filter clockwise until it is no need to clean the condenser: ■ Remove the base grille. ■ ...Use a vacuum cleaner with a sponge and mild detergent in refrigerator or reconnect power. 15 or 1-800-807-6777 Canada. Always ...
...finished. 5. Replace the burned-out bulb(s) with a soft cloth. 4. Plug in warm water. or 1-800-807-6777 Canada. Both the refrigerator and freezer sections defrost automatically. Turn the filter clockwise until it is no need to clean the condenser: ■ Remove the base grille. ■ ...Use a vacuum cleaner with a sponge and mild detergent in refrigerator or reconnect power. 15 or 1-800-807-6777 Canada. Always ...
User Instructions
Page 16
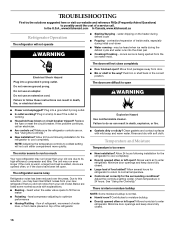
... load is added, doors are on the heater during the defrost cycle and water runs into a grounded 3 prong outlet. The refrigerator seems noisy Refrigerator noise has been reduced over the years. heard when the water valve opens to do so can result in death, explosion, or...try the solutions suggested here or visit our website and reference FAQs (Frequently Asked Questions) to enter refrigerator. In the U.S.A., www.kitchenaid.com In Canada, www.kitchenaid.ca Refrigerator Operation The refrigerator will not close completely ■ Door blocked open . Do not use an extension cord. The ...
... load is added, doors are on the heater during the defrost cycle and water runs into a grounded 3 prong outlet. The refrigerator seems noisy Refrigerator noise has been reduced over the years. heard when the water valve opens to do so can result in death, explosion, or...try the solutions suggested here or visit our website and reference FAQs (Frequently Asked Questions) to enter refrigerator. In the U.S.A., www.kitchenaid.com In Canada, www.kitchenaid.ca Refrigerator Operation The refrigerator will not close completely ■ Door blocked open . Do not use an extension cord. The ...

User Instructions
Page 17
... system needs additional flushing. Allow 24 hours for full ice production. ■ Freezer door closed completely? Flush the water system. Make sure the refrigerator is an indication of water. ■ Refrigerator connected to 50°F (10°C). ■ New installation? Straighten the water... clogged or incorrectly installed. See "Water Dispenser." ■ Water on the refrigerator? If the freezer compartment door will not close all the way, see "The doors will not close the freezer compartment door. Use airtight, moisture proof packaging to a water supply and the...
... system needs additional flushing. Allow 24 hours for full ice production. ■ Freezer door closed completely? Flush the water system. Make sure the refrigerator is an indication of water. ■ Refrigerator connected to 50°F (10°C). ■ New installation? Straighten the water... clogged or incorrectly installed. See "Water Dispenser." ■ Water on the refrigerator? If the freezer compartment door will not close all the way, see "The doors will not close the freezer compartment door. Use airtight, moisture proof packaging to a water supply and the...
User Instructions
Page 21
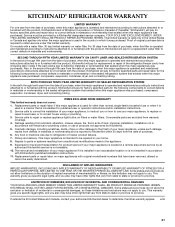
... damage results from defects in materials or workmanship and is reported to KitchenAid within 30 days from the date of purchase, when this major appliances was purchased. Service calls to refrigerator or freezer product failures. 7. Pickup and delivery. Repairs to parts or systems ...BE PRODUCT REPAIR AS PROVIDED HEREIN. Service must be easily determined. LIMITATION OF REMEDIES; KITCHENAID SHALL NOT BE LIABLE FOR INCIDENTAL OR CONSEQUENTIAL DAMAGES. Proof of the refrigerator/freezer cavity liner (including labor costs) if the part cracks due to defective materials or workmanship...
... damage results from defects in materials or workmanship and is reported to KitchenAid within 30 days from the date of purchase, when this major appliances was purchased. Service calls to refrigerator or freezer product failures. 7. Pickup and delivery. Repairs to parts or systems ...BE PRODUCT REPAIR AS PROVIDED HEREIN. Service must be easily determined. LIMITATION OF REMEDIES; KITCHENAID SHALL NOT BE LIABLE FOR INCIDENTAL OR CONSEQUENTIAL DAMAGES. Proof of the refrigerator/freezer cavity liner (including labor costs) if the part cracks due to defective materials or workmanship...
User Instructions
Page 22
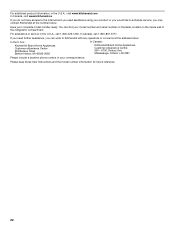
... number in your model number and serial number on the label, located on the inside wall of the refrigerator compartment. Have your product or you would like to schedule service, you may contact KitchenAid at the address below . Please keep these User Instructions and the model number information for future reference. 22...
... number in your model number and serial number on the label, located on the inside wall of the refrigerator compartment. Have your product or you would like to schedule service, you may contact KitchenAid at the address below . Please keep these User Instructions and the model number information for future reference. 22...

Parts Diagram
Page 4
... 12806701 Cover, Damper 14 13012402 Insulation−Damper 15 W10207517 Control, Damper 16 W10163893 Insulation−Water 17 12704801 Plate 18 12590620 Head, Water Filter 19 13040216 Filter, Water 20 12568001 Cover, Filter 21 12990512 Screw 22 B8390302SP Clip, Facade 23 12706909SP Facade, Disp. 24 12707303SP Plate, Switch 25 12575501 Switch... 12251001SP Clip, Waterline 28 12707005 Facade, Disp (Top) 29 12706112 Tank, Water 30 61006182 Union 31 12990513 Screw Following Parts Not Illustrated W10224290 Harness, Control (Refrigerator) (Includes Thermistor) 4 W10365400
... 12806701 Cover, Damper 14 13012402 Insulation−Damper 15 W10207517 Control, Damper 16 W10163893 Insulation−Water 17 12704801 Plate 18 12590620 Head, Water Filter 19 13040216 Filter, Water 20 12568001 Cover, Filter 21 12990512 Screw 22 B8390302SP Clip, Facade 23 12706909SP Facade, Disp. 24 12707303SP Plate, Switch 25 12575501 Switch... 12251001SP Clip, Waterline 28 12707005 Facade, Disp (Top) 29 12706112 Tank, Water 30 61006182 Union 31 12990513 Screw Following Parts Not Illustrated W10224290 Harness, Control (Refrigerator) (Includes Thermistor) 4 W10365400

Parts Diagram
Page 8
DESCRIPTION 1 Door, Refrigerator 13107520S Stainless − RH 13107518S Stainless − LH 2 12690102 Caddy−Can 3 12804701SP Door, Dairy 4 12369502SP Tray, Dairy 5 12567322SP Gripper, Bucket 6 13001201 Mount−Handle 7 ... 12 12849115SP Bucket, Shelf (Gallon) 13 Bushing 10961006AP Apollo Grey 14 12690503 Retainer, Door 15 12990504 Screw 16 Stop, Door 10447114 Apollo Grey 8 W10365400 No. REFRIGERATOR DOOR PARTS For Models: KBLS20EVMS5, KBRS20EVMS5 (Monochromatic Monochromatic Stainless−LH) Stainless−RH) Illus. Part No.
DESCRIPTION 1 Door, Refrigerator 13107520S Stainless − RH 13107518S Stainless − LH 2 12690102 Caddy−Can 3 12804701SP Door, Dairy 4 12369502SP Tray, Dairy 5 12567322SP Gripper, Bucket 6 13001201 Mount−Handle 7 ... 12 12849115SP Bucket, Shelf (Gallon) 13 Bushing 10961006AP Apollo Grey 14 12690503 Retainer, Door 15 12990504 Screw 16 Stop, Door 10447114 Apollo Grey 8 W10365400 No. REFRIGERATOR DOOR PARTS For Models: KBLS20EVMS5, KBRS20EVMS5 (Monochromatic Monochromatic Stainless−LH) Stainless−RH) Illus. Part No.
Parts Diagram
Page 10
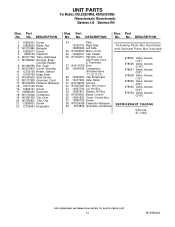
... 978028 Valve, Access (1/2") 978029 Valve, Access (5/8") 978030 Valve, Access (3/4") 876764 Valve, Access (3/16") 37 12990702 Screw 38 W10206338 Extension−Basepan REFRIGERANT CHARGE 39 2319835 Grommet−Condenser 5.25 Ozs. (R−134A) 10 W10365400 Part No. No. No. UNIT PARTS For Models: KBLS20EVMS5, KBRS20EVMS5 (...14 W10206339 Fastener−Basepan 15 12477102 Roller 16 12992101 Screw 17 10835903SP Grommet 18 W10135026 Condenser 19 W10281329 Clip, Drier 20 W10292803 Tray, Drip 21 12990501 Screw 22 12726403 Evaporator Illus. Part No. DESCRIPTION Illus.
... 978028 Valve, Access (1/2") 978029 Valve, Access (5/8") 978030 Valve, Access (3/4") 876764 Valve, Access (3/16") 37 12990702 Screw 38 W10206338 Extension−Basepan REFRIGERANT CHARGE 39 2319835 Grommet−Condenser 5.25 Ozs. (R−134A) 10 W10365400 Part No. No. No. UNIT PARTS For Models: KBLS20EVMS5, KBRS20EVMS5 (...14 W10206339 Fastener−Basepan 15 12477102 Roller 16 12992101 Screw 17 10835903SP Grommet 18 W10135026 Condenser 19 W10281329 Clip, Drier 20 W10292803 Tray, Drip 21 12990501 Screw 22 12726403 Evaporator Illus. Part No. DESCRIPTION Illus.


