User Instructions
Page 1
...; DU RÉFRIGÉRATEUR 23 INSTALLATION INSTRUCTIONS 2 INSTRUCTIONS D'INSTALLATION 24 REFRIGERATOR USE 12 UTILISATION DU RÉFRIGÉRATEUR 34 REFRIGERATOR CARE 15 ENTRETIEN DU RÉFRIGÉRATEUR 37 TROUBLESHOOTING 16 DÉPANNAGE 38 WATER FILTER CERTIFICATIONS 18 FEUILLES DE DONNÉES SUR LA PERFORMANCE 41 PERFORMANCE DATA SHEETS 19 GARANTIE 43 WARRANTY 21 REFRIGERATOR SAFETY Your safety and the safety of...
...; DU RÉFRIGÉRATEUR 23 INSTALLATION INSTRUCTIONS 2 INSTRUCTIONS D'INSTALLATION 24 REFRIGERATOR USE 12 UTILISATION DU RÉFRIGÉRATEUR 34 REFRIGERATOR CARE 15 ENTRETIEN DU RÉFRIGÉRATEUR 37 TROUBLESHOOTING 16 DÉPANNAGE 38 WATER FILTER CERTIFICATIONS 18 FEUILLES DE DONNÉES SUR LA PERFORMANCE 41 PERFORMANCE DATA SHEETS 19 GARANTIE 43 WARRANTY 21 REFRIGERATOR SAFETY Your safety and the safety of...
User Instructions
Page 2
... Away Your Old Refrigerator or Freezer: ■ Take off the doors. ■ Leave the shelves in accordance with warm water and dry. Important information to move and install refrigerator. These products can damage the surface of Your Old Refrigerator WARNING Suffocation Hazard Remove doors from surfaces before installing ice maker (on ice maker kit ready models only). ■ Use a sturdy glass when dispensing ice (on some models). When Moving Your Refrigerator: Your refrigerator is heavy...
... Away Your Old Refrigerator or Freezer: ■ Take off the doors. ■ Leave the shelves in accordance with warm water and dry. Important information to move and install refrigerator. These products can damage the surface of Your Old Refrigerator WARNING Suffocation Hazard Remove doors from surfaces before installing ice maker (on ice maker kit ready models only). ■ Use a sturdy glass when dispensing ice (on some models). When Moving Your Refrigerator: Your refrigerator is heavy...
User Instructions
Page 3
... cannot be turned off by a switch. Failure to follow the instructions provided with any type of installation, cleaning, or removing a light bulb, turn the control (Thermostat, Refrigerator or Freezer Control depending on the model) to OFF and then disconnect the refrigerator from refrigerator. It is recommended that a separate circuit serving only your refrigerator has an ice maker, allow extra space at the back for the water line connections. NOTE: Before performing any tools listed here...
... cannot be turned off by a switch. Failure to follow the instructions provided with any type of installation, cleaning, or removing a light bulb, turn the control (Thermostat, Refrigerator or Freezer Control depending on the model) to OFF and then disconnect the refrigerator from refrigerator. It is recommended that a separate circuit serving only your refrigerator has an ice maker, allow extra space at the back for the water line connections. NOTE: Before performing any tools listed here...
User Instructions
Page 4
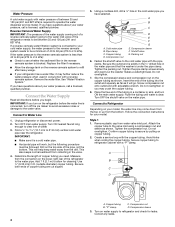
... water dispenser and ice maker. Insert the end of the pipe, not the bottom. Follow the connection instructions for cleaning. Remove the water filter. A B C D E F G A. Do not overtighten. Connect to 31.8 mm) vertical cold water pipe near the refrigerator. Compression sleeve F. Fasten the shutoff valve to the water valve. Tighten the pipe clamp screws slowly and evenly so the washer makes a watertight seal. If you begin. IMPORTANT: ■ Make sure it...
... water dispenser and ice maker. Insert the end of the pipe, not the bottom. Follow the connection instructions for cleaning. Remove the water filter. A B C D E F G A. Do not overtighten. Connect to 31.8 mm) vertical cold water pipe near the refrigerator. Compression sleeve F. Fasten the shutoff valve to the water valve. Tighten the pipe clamp screws slowly and evenly so the washer makes a watertight seal. If you begin. IMPORTANT: ■ Make sure it...
User Instructions
Page 5
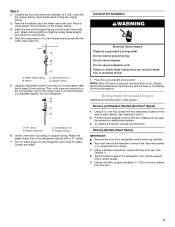
... for leaks. Refrigerator Door and Drawer Graphics are included later in death, fire, or electrical shock. 1. Using a hex key, loosen the two setscrews located on the plastic water line to completely tighten. See Graphics 2 and 4. 2. Tap the bottom edge of ice. Handle will slide up approximately ³⁄₄" (19.05 mm) and release from refrigerator before removing handles. ■ You must remove the handles to remove the decorator panels...
... for leaks. Refrigerator Door and Drawer Graphics are included later in death, fire, or electrical shock. 1. Using a hex key, loosen the two setscrews located on the plastic water line to completely tighten. See Graphics 2 and 4. 2. Tap the bottom edge of ice. Handle will slide up approximately ³⁄₄" (19.05 mm) and release from refrigerator before removing handles. ■ You must remove the handles to remove the decorator panels...

User Instructions
Page 6
... want to reverse your doors so they open from the cabinet top and move them to the opposite side of the door. Remove the hinge screws. Move to opposite side. Using a Phillips screwdriver, remove the door stop on the side of cabinet. Replace the bottom door cap and install the door stop and door cap located on the door gasket magnets to hold the door in the sides of refrigerator door as shown...
... want to reverse your doors so they open from the cabinet top and move them to the opposite side of the door. Remove the hinge screws. Move to opposite side. Using a Phillips screwdriver, remove the door stop on the side of cabinet. Replace the bottom door cap and install the door stop and door cap located on the door gasket magnets to hold the door in the sides of refrigerator door as shown...

User Instructions
Page 7
... not depend on the door gasket magnets to hold the door in the Top Hinge Graphic. Open the freezer drawer to the drawer front. See Drawer Front Removal graphic. See Drawer Front Replacement graphic. 3. Reinstall top hinge cover. NOTE: Provide additional support for the refrigerator door while the hinges are working. 2. Assemble the parts for the bottom hinge as shown in place while you to refrigerator. 7 Tighten all removable door parts to doors and food to position the...
... not depend on the door gasket magnets to hold the door in the Top Hinge Graphic. Open the freezer drawer to the drawer front. See Drawer Front Removal graphic. See Drawer Front Replacement graphic. 3. Reinstall top hinge cover. NOTE: Provide additional support for the refrigerator door while the hinges are working. 2. Assemble the parts for the bottom hinge as shown in place while you to refrigerator. 7 Tighten all removable door parts to doors and food to position the...

User Instructions
Page 8
Door Stop Screws B. Architect® Series Door Removal & Replacement Top Hinge A B C D A. Center Hinge C. Hinge Screws Door Swing Reversal (optional) 2 1-2 A A. Door Stop 5 4 Drawer Front Removal A A. 3/32" Setscrew Door Handle Seal Screw Front Drawer Front Replacement A A. Hinge Cover Screw B. Top Hinge Bottom Hinge A B C A. Loosen 4 Door Bracket Screws 8 Shim (on some models) B. Hinge Screws A A A A. 3/32" Setscrew Front View Side View 3 AB A. Top Hinge Cover C. 5/16" Hex Head Hinge Screws D. Cabinet Hinge Hole Plugs 1-1 A A.
Door Stop Screws B. Architect® Series Door Removal & Replacement Top Hinge A B C D A. Center Hinge C. Hinge Screws Door Swing Reversal (optional) 2 1-2 A A. Door Stop 5 4 Drawer Front Removal A A. 3/32" Setscrew Door Handle Seal Screw Front Drawer Front Replacement A A. Hinge Cover Screw B. Top Hinge Bottom Hinge A B C A. Loosen 4 Door Bracket Screws 8 Shim (on some models) B. Hinge Screws A A A A. 3/32" Setscrew Front View Side View 3 AB A. Top Hinge Cover C. 5/16" Hex Head Hinge Screws D. Cabinet Hinge Hole Plugs 1-1 A A.
User Instructions
Page 10
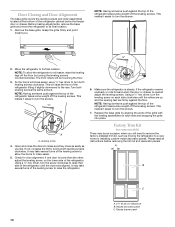
...;" 2. Make sure the refrigerator is opened adjust the leveling screws. Replace the base grille by aligning the ends of the refrigerator until the rollers are up and the leveling feet are aligned. Door Closing and Door Alignment The base grille covers the leveling screws and roller assemblies located at the bottom of the refrigerator. This makes it easier to roll easier, raise the leveling legs off the leveling screws. Before making adjustments, remove...
...;" 2. Make sure the refrigerator is opened adjust the leveling screws. Replace the base grille by aligning the ends of the refrigerator until the rollers are up and the leveling feet are aligned. Door Closing and Door Alignment The base grille covers the leveling screws and roller assemblies located at the bottom of the refrigerator. This makes it easier to roll easier, raise the leveling legs off the leveling screws. Before making adjustments, remove...
User Instructions
Page 11
... cloth or chamois. Remove the refrigerator handle: ■ Using a Phillips screwdriver, remove the top door cap. ■ Tap the bottom edge of Raised Door Panels (End View) ¹⁄₄" (6 mm) max. 2¹⁄₂" (6.35 cm) A min. Reinstall the refrigerator door. Clean panels with stainless steel cleaner and polish or mild soap and water with a rubber mallet. ■ The handle will need to remove the freezer drawer to access the...
... cloth or chamois. Remove the refrigerator handle: ■ Using a Phillips screwdriver, remove the top door cap. ■ Tap the bottom edge of Raised Door Panels (End View) ¹⁄₄" (6 mm) max. 2¹⁄₂" (6.35 cm) A min. Reinstall the refrigerator door. Clean panels with stainless steel cleaner and polish or mild soap and water with a rubber mallet. ■ The handle will need to remove the freezer drawer to access the...
User Instructions
Page 12
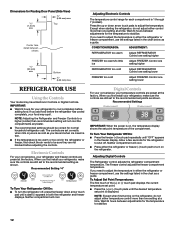
... a guide. If you need to adjust the temperature in either the refrigerator or freezer compartment, use the settings listed in either temperature control more than one setting higher FREEZER too warm/to the recommended setting as you first install your refrigerator to a higher (colder) than one setting lower REFRIGERATOR USE Using the Controls Your model may spoil. The controls are set to little ice Adjust FREEZER Control one setting higher REFRIGERATOR too cold Adjust REFRIGERATOR Control one setting lower FREEZER too cold Adjust FREEZER Control one setting at...
... a guide. If you need to adjust the temperature in either the refrigerator or freezer compartment, use the settings listed in either temperature control more than one setting higher FREEZER too warm/to the recommended setting as you first install your refrigerator to a higher (colder) than one setting lower REFRIGERATOR USE Using the Controls Your model may spoil. The controls are set to little ice Adjust FREEZER Control one setting higher REFRIGERATOR too cold Adjust REFRIGERATOR Control one setting lower FREEZER too cold Adjust FREEZER Control one setting at...
User Instructions
Page 13
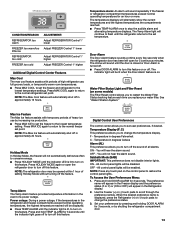
... restart the Water Filter Status tracking feature each time you to change the preference status. 3. Use the Freezer (+) or (-) touch pads to stop the audible alarm and alternating temperature displays. Press and hold DOOR ALARM for 3 seconds until the indicator LED is displayed, press the Refrigerator (+) or (-) touch pads to the lowest temperature settings. You will automatically shut off in approximately 12 hours. ON - All control panel lights will appear...
... restart the Water Filter Status tracking feature each time you to change the preference status. 3. Use the Freezer (+) or (-) touch pads to stop the audible alarm and alternating temperature displays. Press and hold DOOR ALARM for 3 seconds until the indicator LED is displayed, press the Refrigerator (+) or (-) touch pads to the lowest temperature settings. You will automatically shut off in approximately 12 hours. ON - All control panel lights will appear...
User Instructions
Page 14
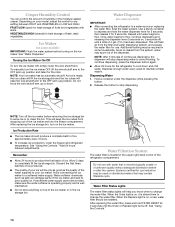
... the ice storage bin. See "Using the Controls." When the Replace light is cleared from the filter and water dispensing system, and prepare the water filter for the refrigerator to flow. Crisper Humidity Control You can damage parts of ice approximately every 3 hours. ■ To increase ice production, lower the freezer and refrigerator temperature. As air is on , 5 seconds off the ice maker before or after the system. To continue dispensing, press the dispenser button again...
... the ice storage bin. See "Using the Controls." When the Replace light is cleared from the filter and water dispensing system, and prepare the water filter for the refrigerator to flow. Crisper Humidity Control You can damage parts of ice approximately every 3 hours. ■ To increase ice production, lower the freezer and refrigerator temperature. As air is on , 5 seconds off the ice maker before or after the system. To continue dispensing, press the dispenser button again...
User Instructions
Page 15
... water dispenser or ice maker decreases noticeably before removing the filter or blue bypass cap. 1. Flush the water system. REFRIGERATOR CARE Cleaning WARNING Explosion Hazard Use nonflammable cleaner. Do not allow the Stainless Steel Cleaner and Polish to avoid buildup of the refrigerator compartment - There is suggested that you need for routine condenser cleaning in death, explosion, or fire. 1. Remove the light shield (on plastic parts, interior and door liners or gaskets...
... water dispenser or ice maker decreases noticeably before removing the filter or blue bypass cap. 1. Flush the water system. REFRIGERATOR CARE Cleaning WARNING Explosion Hazard Use nonflammable cleaner. Do not allow the Stainless Steel Cleaner and Polish to avoid buildup of the refrigerator compartment - There is suggested that you need for routine condenser cleaning in death, explosion, or fire. 1. Remove the light shield (on plastic parts, interior and door liners or gaskets...
User Instructions
Page 16
... water lines, or from door. ■ Bin or shelf in the way? may run longer than your old model. Failure to possibly avoid the cost of food added? The doors are opened often or left open ? If the problem continues, call . Failure to open ? In the U.S.A., www.kitchenaid.com In Canada, www.kitchenaid.ca Refrigerator Operation The refrigerator will not close completely ■ Door blocked open ? Electrical Shock Hazard Plug into the drain pan...
... water lines, or from door. ■ Bin or shelf in the way? may run longer than your old model. Failure to possibly avoid the cost of food added? The doors are opened often or left open ? If the problem continues, call . Failure to open ? In the U.S.A., www.kitchenaid.com In Canada, www.kitchenaid.ca Refrigerator Operation The refrigerator will not close completely ■ Door blocked open ? Electrical Shock Hazard Plug into the drain pan...

User Instructions
Page 17
... your cold water supply? If water flow increases, the filter may be cool. See "Refrigerator Door(s) and Drawer." ■ Reverse osmosis water filtration system connected to the home determines the flow from the dispenser system The ice cubes are fully tightened. Turn the water shutoff valve fully open . ■ Kink in the water source line? Remove filter and operate ice maker. New plumbing connections can decrease water pressure. Flush the water system before using a new water filter. The first glass of ice recently removed? Ice and Water The ice maker...
... your cold water supply? If water flow increases, the filter may be cool. See "Refrigerator Door(s) and Drawer." ■ Reverse osmosis water filtration system connected to the home determines the flow from the dispenser system The ice cubes are fully tightened. Turn the water shutoff valve fully open . ■ Kink in the water source line? Remove filter and operate ice maker. New plumbing connections can decrease water pressure. Flush the water system before using a new water filter. The first glass of ice recently removed? Ice and Water The ice maker...

User Instructions
Page 19
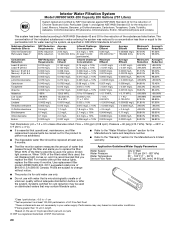
...'s limited warranty. ■ The filter monitor system measures the amount of water that you to change without notice. Use replacement filter model 67003523-750. 2011 suggested retail price of the substances listed below. Substance Reduction NSF Reduction Average Aesthetic Effects Requirements Influent Influent Challenge Maximum Concentration Effluent Average Effluent Minimum% Average% Reduction Reduction Chlorine Taste/Odor Particulate Class I particle size...
...'s limited warranty. ■ The filter monitor system measures the amount of water that you to change without notice. Use replacement filter model 67003523-750. 2011 suggested retail price of the substances listed below. Substance Reduction NSF Reduction Average Aesthetic Effects Requirements Influent Influent Challenge Maximum Concentration Effluent Average Effluent Minimum% Average% Reduction Reduction Chlorine Taste/Odor Particulate Class I particle size...
User Instructions
Page 20
... Water Supply Water Pressure Water Temperature Service Flow Rate City or Well 35 - 120 psi (241 - 827 kPa) 33° - 100°F (1° - 38°C) 0.55 gpm (2.08 L/min.) @ 60 psi ■ The product is for the Manufacturer's limited warranty. ■ The filter monitor system measures the amount of water that is essential that operational, maintenance, and filter replacement requirements be used , the red (Replace) light...
... Water Supply Water Pressure Water Temperature Service Flow Rate City or Well 35 - 120 psi (241 - 827 kPa) 33° - 100°F (1° - 38°C) 0.55 gpm (2.08 L/min.) @ 60 psi ■ The product is for the Manufacturer's limited warranty. ■ The filter monitor system measures the amount of water that is essential that operational, maintenance, and filter replacement requirements be used , the red (Replace) light...
User Instructions
Page 21
... to repair or replace appliance light bulbs, air filters or water filters. Some states and provinces do not allow limitations on how to use of products not approved by a KitchenAid designated service company. KITCHENAID® REFRIGERATOR WARRANTY LIMITED WARRANTY For one year from the date of purchase, when this major appliance is operated and maintained according to instructions attached to or furnished with the product, KitchenAid brand of...
... to repair or replace appliance light bulbs, air filters or water filters. Some states and provinces do not allow limitations on how to use of products not approved by a KitchenAid designated service company. KITCHENAID® REFRIGERATOR WARRANTY LIMITED WARRANTY For one year from the date of purchase, when this major appliance is operated and maintained according to instructions attached to or furnished with the product, KitchenAid brand of...
Parts Diagram
Page 8
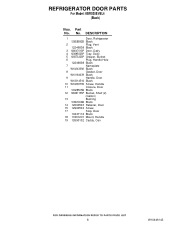
... 3 12804701SP Door, Dairy 4 12369502SP Tray, Dairy 5 12567322SP Gripper, Bucket 6 Plug, Handle Hole 12246608 Black 7 Nameplate W10243392 Black 8 Gasket, Door W10164039 Black 9 Handle, Door W10314516 Black 10 W10290759 Screw, Handle 11 Closure, Door 12028505B Black 12 12849115SP Bucket, Shelf (2) (Gallon) 13 Bushing 10961006B Black 14 12690503 Retainer, Door 15 12990504 Screw 17 Stop, Door 10447112 Black 18 13001201 Mount, Handle 19 12690102 Caddy, Can 8 W10446143 No. REFRIGERATOR DOOR PARTS For Model: KBRS20EVBL4...
... 3 12804701SP Door, Dairy 4 12369502SP Tray, Dairy 5 12567322SP Gripper, Bucket 6 Plug, Handle Hole 12246608 Black 7 Nameplate W10243392 Black 8 Gasket, Door W10164039 Black 9 Handle, Door W10314516 Black 10 W10290759 Screw, Handle 11 Closure, Door 12028505B Black 12 12849115SP Bucket, Shelf (2) (Gallon) 13 Bushing 10961006B Black 14 12690503 Retainer, Door 15 12990504 Screw 17 Stop, Door 10447112 Black 18 13001201 Mount, Handle 19 12690102 Caddy, Can 8 W10446143 No. REFRIGERATOR DOOR PARTS For Model: KBRS20EVBL4...


