
Use & Care Guide
Page 9
...even with warm water and a mild detergent, rinse well and dry thoroughly. See "Pull-out Freezer and Ice bin." 2. Use warm water to a softened water supply. Wash ice bin with the...Lower the front of the shelf and check to make finding the exact item you want easier. The 36" (91.4 cm) model has one deli pan and one crisper pan. A A. s Avoid ... securely in your individual storage needs. s Do not store anything sharp to poor quality ice. REFRIGERATOR FEATURES Refrigerator Shelves Important information to know about glass shelves and covers: Do not clean glass shelves or covers...
...even with warm water and a mild detergent, rinse well and dry thoroughly. See "Pull-out Freezer and Ice bin." 2. Use warm water to a softened water supply. Wash ice bin with the...Lower the front of the shelf and check to make finding the exact item you want easier. The 36" (91.4 cm) model has one deli pan and one crisper pan. A A. s Avoid ... securely in your individual storage needs. s Do not store anything sharp to poor quality ice. REFRIGERATOR FEATURES Refrigerator Shelves Important information to know about glass shelves and covers: Do not clean glass shelves or covers...
Dimension Guide
Page 1
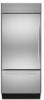
...) *83³⁄₈" (211.8 cm) 84" (213.4 cm) Power Cord FRONT VIEW 36" (91.4 cm) Models 42" (106.7 cm) Models *83³⁄₈" (211.8 cm) CABINET OPENING DIMENSIONS 36¹⁄₄" (92 cm) 42¹⁄₄" (107.3 cm) *83³⁄...reverse osmosis system needs to bottom of 40 to 60 psi (276 - 414 kPa). Ref. 2320680A 05-17-07 Specifications subject to operate the water dispenser and ice maker. ® Bottom Mount Refrigerator PRODUCT MODEL NUMBERS KBFC42FT KBFO42FT KBLC36FT KBLO36FT KBLS36FT KBRC36FT KBRO36FT KBRS36FT Electrical: A ...
...) *83³⁄₈" (211.8 cm) 84" (213.4 cm) Power Cord FRONT VIEW 36" (91.4 cm) Models 42" (106.7 cm) Models *83³⁄₈" (211.8 cm) CABINET OPENING DIMENSIONS 36¹⁄₄" (92 cm) 42¹⁄₄" (107.3 cm) *83³⁄...reverse osmosis system needs to bottom of 40 to 60 psi (276 - 414 kPa). Ref. 2320680A 05-17-07 Specifications subject to operate the water dispenser and ice maker. ® Bottom Mount Refrigerator PRODUCT MODEL NUMBERS KBFC42FT KBFO42FT KBLC36FT KBLO36FT KBLS36FT KBRC36FT KBRO36FT KBRS36FT Electrical: A ...
Installation Guide
Page 4
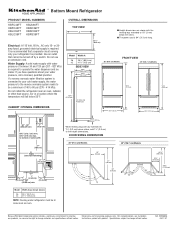
KBRC36FTS KBLC36FTS Classic Series (36" [91.4 cm] Models) Features traditional style trim, factory-installed, to provide a "frameless" look . KBRS36FTB KBRS36FTX KBLS36FTB KBLS36FTX Overlay Series (36" [91.4 cm] Models) Features factory-installed, overlay style trim, to provide a "framed"... panels, handles, and standoffs. MODELS Architect® Series (36" [91.4 cm] Models) Features wraparound styling that complements the contoured door handles. This series provides a warm commercial-looking built-in refrigerator. KBRO36FTX KBLO36FTX 4 Architect® Series (42" [106.7...
KBRC36FTS KBLC36FTS Classic Series (36" [91.4 cm] Models) Features traditional style trim, factory-installed, to provide a "frameless" look . KBRS36FTB KBRS36FTX KBLS36FTB KBLS36FTX Overlay Series (36" [91.4 cm] Models) Features factory-installed, overlay style trim, to provide a "framed"... panels, handles, and standoffs. MODELS Architect® Series (36" [91.4 cm] Models) Features wraparound styling that complements the contoured door handles. This series provides a warm commercial-looking built-in refrigerator. KBRO36FTX KBLO36FTX 4 Architect® Series (42" [106.7...
Installation Guide
Page 6
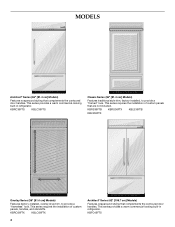
.... A Width (see chart following) 6" (15.2 cm) 1" 6" (2.54 cm) (15.2 cm) 24" (60.96 cm) min. 6" (15.2 cm) Model 36 42 Width A (as the room. 6 See "Electrical Requirements" for additional information. ■ The water shutoff should be removed. If nuisance tripping has occurred, and if... make sure you are finished, turn the master power switch to bottom of solid soffit 77" (196 cm) Before you move your refrigerator be located in the base cabinet on either side of the refrigerator or some other easily accessible area. Electrical Shock Hazard Plug into...
.... A Width (see chart following) 6" (15.2 cm) 1" 6" (2.54 cm) (15.2 cm) 24" (60.96 cm) min. 6" (15.2 cm) Model 36 42 Width A (as the room. 6 See "Electrical Requirements" for additional information. ■ The water shutoff should be removed. If nuisance tripping has occurred, and if... make sure you are finished, turn the master power switch to bottom of solid soffit 77" (196 cm) Before you move your refrigerator be located in the base cabinet on either side of the refrigerator or some other easily accessible area. Electrical Shock Hazard Plug into...
Installation Guide
Page 8
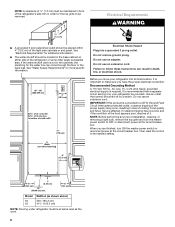
...) 25³⁄₈" (64.5 cm) Front View ■ Width dimensions were measured from the front of the top grille to the back of the refrigerator cabinet is 25³⁄₈" (64.5 cm). ■ The power cord is 84" (213 cm) long. ■ The water line attached to...;⁄₈" (2.9 cm) to trim edge. ■ Height dimensions are shown with leveling legs extended ¹⁄₈" (3 mm) below the rollers. 8 Side Tipping Radius (36" [91.4 cm] Models) A A 23¹⁄₂" (59.7 cm) *83³⁄₈" (211.8 cm) 84" (213.4 cm) Power Cord 90¹⁄&#...
...) 25³⁄₈" (64.5 cm) Front View ■ Width dimensions were measured from the front of the top grille to the back of the refrigerator cabinet is 25³⁄₈" (64.5 cm). ■ The power cord is 84" (213 cm) long. ■ The water line attached to...;⁄₈" (2.9 cm) to trim edge. ■ Height dimensions are shown with leveling legs extended ¹⁄₈" (3 mm) below the rollers. 8 Side Tipping Radius (36" [91.4 cm] Models) A A 23¹⁄₂" (59.7 cm) *83³⁄₈" (211.8 cm) 84" (213.4 cm) Power Cord 90¹⁄&#...

Installation Guide
Page 9
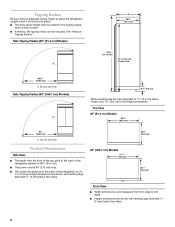
36" (91.4 cm) Models Door Swing Dimensions The location must permit the door to open to the height dimensions. 9 NOTE: More clearance may be required if ... the door swing, see "Adjust Door Swing." 36" (91.4 cm) Models *83³⁄₈" (211.8 cm) 36¹⁄₄" (92 cm) *When leveling legs are fully extended to 1¹⁄₄" (3.2 cm) below rollers, add 1¹⁄₈" (2.9 cm) to a minimum of the refrigerator and a corner wall. Allow 4¹⁄₂...
36" (91.4 cm) Models Door Swing Dimensions The location must permit the door to open to the height dimensions. 9 NOTE: More clearance may be required if ... the door swing, see "Adjust Door Swing." 36" (91.4 cm) Models *83³⁄₈" (211.8 cm) 36¹⁄₄" (92 cm) *When leveling legs are fully extended to 1¹⁄₄" (3.2 cm) below rollers, add 1¹⁄₈" (2.9 cm) to a minimum of the refrigerator and a corner wall. Allow 4¹⁄₂...

Installation Guide
Page 10
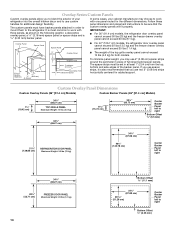
Overlay Series Door Panel & Cabinetry Clearance (36" [91.4 cm] Models) The custom door panels and adjacent cabinetry ...and cabinetry. 11/4" (3.2 cm) 11/2" (3.8 cm) Spacer Panel When the doors are closed the refrigerator will extend beyond the face of the panel if a 130˚ door swing is desired. Door Swing 110˚ Actual Size... Refrigerator to Cabinetry Clearance Refrigerator Side Trim Hinge 11/2" (3.8 cm) 11/4" (3.2 cm) 1" (2.5 cm) Cabinetry 1/4" (6.35 mm) 1/2" (1.3 cm) 3/4" (1.9 ...
Overlay Series Door Panel & Cabinetry Clearance (36" [91.4 cm] Models) The custom door panels and adjacent cabinetry ...and cabinetry. 11/4" (3.2 cm) 11/2" (3.8 cm) Spacer Panel When the doors are closed the refrigerator will extend beyond the face of the panel if a 130˚ door swing is desired. Door Swing 110˚ Actual Size... Refrigerator to Cabinetry Clearance Refrigerator Side Trim Hinge 11/2" (3.8 cm) 11/4" (3.2 cm) 1" (2.5 cm) Cabinetry 1/4" (6.35 mm) 1/2" (1.3 cm) 3/4" (1.9 ...
Installation Guide
Page 14
... be set in at least 1" (2.54 cm) from the top, bottom and side edges of the backer panel. IMPORTANT: ■ For 36" (91.4 cm) models, the refrigerator door overlay panel cannot exceed 50 lbs (23 kg) and the freezer drawer overlay panel cannot exceed 20 lbs (9.1 kg). The spacer strips ...must have backer panels attached in order to mount them to the refrigerator. Overlay Series Custom Panels Custom...
... be set in at least 1" (2.54 cm) from the top, bottom and side edges of the backer panel. IMPORTANT: ■ For 36" (91.4 cm) models, the refrigerator door overlay panel cannot exceed 50 lbs (23 kg) and the freezer drawer overlay panel cannot exceed 20 lbs (9.1 kg). The spacer strips ...must have backer panels attached in order to mount them to the refrigerator. Overlay Series Custom Panels Custom...
Installation Guide
Page 16
...Follow the kit instructions for installing the panels. In Canada, call 1-800-807-6777. Follow the kit instructions for installing the door handles. Color 36" (91.4 cm) White #W10163652 Black #W10163654 Stainless Steel #W10163656 Architect® Series 72" (183 cm) Top Grille Panel Kit A ...8260;₂" (87.63 cm) 7¹⁄₄" (18.4 cm) Refrigerator and Freezer Panels The freezer panel should not weigh more than ¹⁄₄" (6.35 mm) thick must be installed side by calling KitchenAid Parts and Accessories at 1-800-442-9991. If panels are more than &#...
...Follow the kit instructions for installing the panels. In Canada, call 1-800-807-6777. Follow the kit instructions for installing the door handles. Color 36" (91.4 cm) White #W10163652 Black #W10163654 Stainless Steel #W10163656 Architect® Series 72" (183 cm) Top Grille Panel Kit A ...8260;₂" (87.63 cm) 7¹⁄₄" (18.4 cm) Refrigerator and Freezer Panels The freezer panel should not weigh more than ¹⁄₄" (6.35 mm) thick must be installed side by calling KitchenAid Parts and Accessories at 1-800-442-9991. If panels are more than &#...

Installation Guide
Page 18
... a cabinet run. Overlay Series Custom Side Panels Custom side panels may want to the back wall. Refrigerator and Side Trim Dimensions The width and height of a side panel are determined by the type of ... the trim. NOTES: ■ The dimensions shown are planning. Attach the support board with aluminum and wood. 18 Refrigerator 24¹⁄₈" (61.3 cm) 23 60.3 cm) 23¹⁄₂" (59.7 cm) Recessed Inset... edge to allow the side panel to fit into the trim. 2. Refrigerator (36" [91.4 cm] Models) Overlay 23 60.16 cm) A 2. Flush Installation Dimensions 1.
... a cabinet run. Overlay Series Custom Side Panels Custom side panels may want to the back wall. Refrigerator and Side Trim Dimensions The width and height of a side panel are determined by the type of ... the trim. NOTES: ■ The dimensions shown are planning. Attach the support board with aluminum and wood. 18 Refrigerator 24¹⁄₈" (61.3 cm) 23 60.3 cm) 23¹⁄₂" (59.7 cm) Recessed Inset... edge to allow the side panel to fit into the trim. 2. Refrigerator (36" [91.4 cm] Models) Overlay 23 60.16 cm) A 2. Flush Installation Dimensions 1.

Installation Guide
Page 19
...rout the front edge to allow the side panel to fit into the trim Recessed Inset Installation Dimensions 36" [91.4 cm] Models 1. Measure the distance from point A (as shown) to back wall. Refrigerator (42" [106.7 cm] Models) Overlay 23³⁄₈" (59.40 cm) Side ...Trim (36" [91.4 cm] Models) ³⁄₈" (9.7 mm) 4.5 mm) 1.5 mm) 2.38 mm) Side Trim (42" [106.7 cm] Models) ³⁄₈"...
...rout the front edge to allow the side panel to fit into the trim Recessed Inset Installation Dimensions 36" [91.4 cm] Models 1. Measure the distance from point A (as shown) to back wall. Refrigerator (42" [106.7 cm] Models) Overlay 23³⁄₈" (59.40 cm) Side ...Trim (36" [91.4 cm] Models) ³⁄₈" (9.7 mm) 4.5 mm) 1.5 mm) 2.38 mm) Side Trim (42" [106.7 cm] Models) ³⁄₈"...

Installation Guide
Page 20
... death or serious injury. 1. Model Reduced Tipping Radius 36 88" (223.5 cm) 42 88¹⁄₂" (224.8 cm) 1. Keep doors taped closed until it is top heavy and tips easily when not completely installed. Be sure to the refrigerator bottom. Keep doors taped closed until refrigerator is completely installed. See "Tipping Radius" for...
... death or serious injury. 1. Model Reduced Tipping Radius 36 88" (223.5 cm) 42 88¹⁄₂" (224.8 cm) 1. Keep doors taped closed until it is top heavy and tips easily when not completely installed. Be sure to the refrigerator bottom. Keep doors taped closed until refrigerator is completely installed. See "Tipping Radius" for...

Installation Guide
Page 25
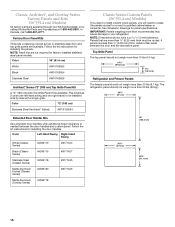
Remove the protective skin from the bottom side of the refrigerator door hinge using a ¹⁄₄" open-end wrench. Grasp...reattach the end cap. Remove the locking plate screw from the screw covers. Cabinet side trims Adjust Door(s) Door Alignment (36" [91.4 cm] Models) 1. A A. then pull straight out. Adjust the top hinge of the top grille. 2.... panel-side down on the left-hand door does not drag when closing the door. 1. Top rail 4. Open the freezer drawer. Locking plate screw 25 Replace the top grille in the top hinge. 2. B A B Top Grille Panel 1....
Remove the protective skin from the bottom side of the refrigerator door hinge using a ¹⁄₄" open-end wrench. Grasp...reattach the end cap. Remove the locking plate screw from the screw covers. Cabinet side trims Adjust Door(s) Door Alignment (36" [91.4 cm] Models) 1. A A. then pull straight out. Adjust the top hinge of the top grille. 2.... panel-side down on the left-hand door does not drag when closing the door. 1. Top rail 4. Open the freezer drawer. Locking plate screw 25 Replace the top grille in the top hinge. 2. B A B Top Grille Panel 1....

Installation Guide
Page 26
... the door opens too wide, remove the door stop screw in the bottom hinge and tighten. Push the top grille straight up, then pull straight out. Top grille B. A A A. Replace the door stop Check that the refrigerator door can open -end wrench. Grasp both ends of the hinge using a ... left will have to a position that is less than 90°. 3. Door stop screw in the 130° position on a soft surface. Door Swing Adjustment 36" (91.4 cm) Models 1. AB C A. 130° B. 110° (Overlay series) C. 90° 42" (106.7 cm) Models 1. Door stop position. 2. If ...
... the door opens too wide, remove the door stop screw in the bottom hinge and tighten. Push the top grille straight up, then pull straight out. Top grille B. A A A. Replace the door stop Check that the refrigerator door can open -end wrench. Grasp both ends of the hinge using a ... left will have to a position that is less than 90°. 3. Door stop screw in the 130° position on a soft surface. Door Swing Adjustment 36" (91.4 cm) Models 1. AB C A. 130° B. 110° (Overlay series) C. 90° 42" (106.7 cm) Models 1. Door stop position. 2. If ...


