Use & Care Guide
Page 2
... either the word "DANGER" or "WARNING." DANGER If you and others are not followed. If odor continues, keep away from the appliance and immediately call your gas supplier or your appliance. WARNING: This product contains one or more chemicals known to cause birth defects or other reproductive harm. This symbol alerts you... a ball valve, it shall be performed by a qualified or licensed contractor, plumber, or gasfitter qualified or licensed by the State of this or any other appliance. 2. Always read and obey all safety messages. This is , tell you how to the...
... either the word "DANGER" or "WARNING." DANGER If you and others are not followed. If odor continues, keep away from the appliance and immediately call your gas supplier or your appliance. WARNING: This product contains one or more chemicals known to cause birth defects or other reproductive harm. This symbol alerts you... a ball valve, it shall be performed by a qualified or licensed contractor, plumber, or gasfitter qualified or licensed by the State of this or any other appliance. 2. Always read and obey all safety messages. This is , tell you how to the...
Use & Care Guide
Page 3
... the gas must be used. and Commission. - If the following : ■ Do not install portable or built-in outdoor cooking gas appliances in a building, garage, or any other moving installation. ■ Always maintain minimum clearances from combustible construction, see "Location Requirements" section.... overfilling prevention device. - A replacement pressure regulator and hose assembly specific to persons, or damage when using the outdoor cooking gas appliance. provided with the cylinder valve. For Power™ burners that is normal for LP gas. ■ Check and clean burner/...
... the gas must be used. and Commission. - If the following : ■ Do not install portable or built-in outdoor cooking gas appliances in a building, garage, or any other moving installation. ■ Always maintain minimum clearances from combustible construction, see "Location Requirements" section.... overfilling prevention device. - A replacement pressure regulator and hose assembly specific to persons, or damage when using the outdoor cooking gas appliance. provided with the cylinder valve. For Power™ burners that is normal for LP gas. ■ Check and clean burner/...

Use & Care Guide
Page 9
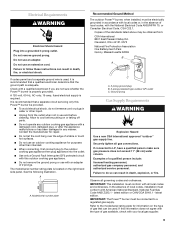
... WARNING Electrical Shock Hazard Plug into the outlet. ■ Use only a Ground Fault Interrupter (GFI) protected circuit with this outdoor cooking gas appliance. ■ Do not remove the ground prong or use with an adapter of the standards listed above may be obtained from the outlet when ...not in use and before putting on or taking off parts. ■ Do not operate any outdoor cooking gas appliance with a damaged cord, damaged plug, or after the appliance malfunctions or has been damaged in the absence of local codes, installation must conform with American National Standard, National ...
... WARNING Electrical Shock Hazard Plug into the outlet. ■ Use only a Ground Fault Interrupter (GFI) protected circuit with this outdoor cooking gas appliance. ■ Do not remove the ground prong or use with an adapter of the standards listed above may be obtained from the outlet when ...not in use and before putting on or taking off parts. ■ Do not operate any outdoor cooking gas appliance with a damaged cord, damaged plug, or after the appliance malfunctions or has been damaged in the absence of local codes, installation must conform with American National Standard, National ...
Use & Care Guide
Page 14
... not immerse cord or plugs in water or other than intended. ■ When connecting, first connect plug to the outdoor cooking gas appliance then plug appliance into the receptacle on the left side of the Power™ burner at a minimum of 3" (7.6 cm) from any electrical supply ...when the handle is unplugged. Correct any manner. NOTE: The cord must be properly mounted with a damaged cord, damaged plug, or after the appliance malfunctions or has been damaged in and mounting the power transformer. Cover B. 2. Open the manual shutoff valve in death, fire, or electrical shock...
... not immerse cord or plugs in water or other than intended. ■ When connecting, first connect plug to the outdoor cooking gas appliance then plug appliance into the receptacle on the left side of the Power™ burner at a minimum of 3" (7.6 cm) from any electrical supply ...when the handle is unplugged. Correct any manner. NOTE: The cord must be properly mounted with a damaged cord, damaged plug, or after the appliance malfunctions or has been damaged in and mounting the power transformer. Cover B. 2. Open the manual shutoff valve in death, fire, or electrical shock...

Use & Care Guide
Page 15
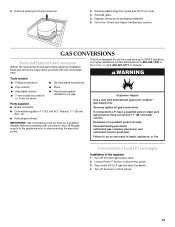
... bags from grate and film from around burner. 3. Read and follow the instructions provided with conversion, shut off the gas supply to the appliance prior to the "Check and Adjust the Burners" section. WARNING Tools needed ■ Phillips screwdriver ■ Pipe wrench ■ Adjustable wrench...off the main gas supply valve. 2. or call 1-800-607-6777 in the U.S.A. Natural, 11" (28 cm) W.C. For higher elevations contact KitchenAid at 1-800-422-1230 in Canada. LP ■ Natural gas orifices IMPORTANT: Gas conversions must be done by a qualified installer. Explosion Hazard ...
... bags from grate and film from around burner. 3. Read and follow the instructions provided with conversion, shut off the gas supply to the appliance prior to the "Check and Adjust the Burners" section. WARNING Tools needed ■ Phillips screwdriver ■ Pipe wrench ■ Adjustable wrench...off the main gas supply valve. 2. or call 1-800-607-6777 in the U.S.A. Natural, 11" (28 cm) W.C. For higher elevations contact KitchenAid at 1-800-422-1230 in Canada. LP ■ Natural gas orifices IMPORTANT: Gas conversions must be done by a qualified installer. Explosion Hazard ...
Use & Care Guide
Page 16
... brass cap on the end of the brass connector. Turn off the main gas supply valve. 2. Use adjustable wrench to manifold fitting. To set the appliance regulator for use with LP gas at the end of the regulator 1. The letters "NAT" should be facing up when tight. Use pipe wrench to...
... brass cap on the end of the brass connector. Turn off the main gas supply valve. 2. Use adjustable wrench to manifold fitting. To set the appliance regulator for use with LP gas at the end of the regulator 1. The letters "NAT" should be facing up when tight. Use pipe wrench to...

Use & Care Guide
Page 17
... in the bottom of the plastic stem farthest away from the brass cap, remove stem from the gas valves. A. c. Outer burner C. NOTE: The arrow on appliance regulator. 10. Burner base 5. Remove inner burner top ring from the gas valves and openings. To make sure the regulator is connected to disengage the...
... in the bottom of the plastic stem farthest away from the brass cap, remove stem from the gas valves. A. c. Outer burner C. NOTE: The arrow on appliance regulator. 10. Burner base 5. Remove inner burner top ring from the gas valves and openings. To make sure the regulator is connected to disengage the...

Use & Care Guide
Page 18
NOTE: The number 2.01 and 2.87 are stamped on the right-hand side panel. Replace the burner base. The appliance nameplate is certified for use and keep with LP gas at connections where required. Propane." Check and Adjust the Burners The burners are cool. 2. A B A. 4" (10.2 ...
NOTE: The number 2.01 and 2.87 are stamped on the right-hand side panel. Replace the burner base. The appliance nameplate is certified for use and keep with LP gas at connections where required. Propane." Check and Adjust the Burners The burners are cool. 2. A B A. 4" (10.2 ...

Use & Care Guide
Page 22
...right and work right because they are made with : ■ Features and specifications on our full line of your appliance. In the U.S.A. KitchenAid designated service technicians are trained to fulfill the product warranty and provide after-warranty service, anywhere in Canada. Mississauga, ...Ontario L5N 0B7 Please include a daytime phone number in your area, you can write to KitchenAid with any questions or concerns at : KitchenAid Brand Home Appliances Customer eXperience Center 553 Benson Road Benton Harbor, MI 49022-2692 Please include a daytime phone number in...
...right and work right because they are made with : ■ Features and specifications on our full line of your appliance. In the U.S.A. KitchenAid designated service technicians are trained to fulfill the product warranty and provide after-warranty service, anywhere in Canada. Mississauga, ...Ontario L5N 0B7 Please include a daytime phone number in your area, you can write to KitchenAid with any questions or concerns at : KitchenAid Brand Home Appliances Customer eXperience Center 553 Benson Road Benton Harbor, MI 49022-2692 Please include a daytime phone number in...

Use & Care Guide
Page 24
You must provide proof of purchase or installation date for future reference. You can find this book and your complete model number and serial number. Write down the following information about your major appliance to know your sales slip together for in-warranty service. Dealer name Address Phone number Model number Serial number Purchase date 24 Keep this information on the model and serial number label located on the product. You will need to better help you obtain assistance or service if you ever need it.
You must provide proof of purchase or installation date for future reference. You can find this book and your complete model number and serial number. Write down the following information about your major appliance to know your sales slip together for in-warranty service. Dealer name Address Phone number Model number Serial number Purchase date 24 Keep this information on the model and serial number label located on the product. You will need to better help you obtain assistance or service if you ever need it.

Installation Guide
Page 2
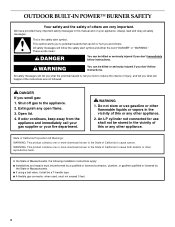
...or "WARNING." Extinguish any other reproductive harm. WARNING 1. We have provided many important safety messages in the vicinity of this or any other appliance. This is , tell you how to reduce the chance of injury, and tell you don't immediately follow instructions. Shut off gas to ...the potential hazard is the safety alert symbol. WARNING: This product contains one or more chemicals known to cause birth defects or other appliance. 2. Open lid. 4. An LP cylinder not connected for use gasoline or other flammable liquids or vapors in the vicinity of California...
...or "WARNING." Extinguish any other reproductive harm. WARNING 1. We have provided many important safety messages in the vicinity of this or any other appliance. This is , tell you how to reduce the chance of injury, and tell you don't immediately follow instructions. Shut off gas to ...the potential hazard is the safety alert symbol. WARNING: This product contains one or more chemicals known to cause birth defects or other appliance. 2. Open lid. 4. An LP cylinder not connected for use gasoline or other flammable liquids or vapors in the vicinity of California...

Installation Guide
Page 3
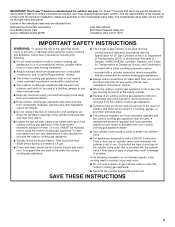
...Quincy, Massachusetts 02269 CSA International 8501 East Pleasant Valley Rd. See "Installation Instructions" section. ■ When the outdoor cooking gas appliance is not in a building, garage, or any other enclosed area. ■ Keep any electrical supply cord and fuel supply ...Cylinders, Spheres, and Tubes for Transportation of the U.S. and Commission. - provided with a cylinder connection device compatible with the outdoor cooking gas appliance. ■ Visually check the burner flames. SAVE THESE INSTRUCTIONS 3 See "Gas Supply Requirements" section. A clogged tube can be found ...
...Quincy, Massachusetts 02269 CSA International 8501 East Pleasant Valley Rd. See "Installation Instructions" section. ■ When the outdoor cooking gas appliance is not in a building, garage, or any other enclosed area. ■ Keep any electrical supply cord and fuel supply ...Cylinders, Spheres, and Tubes for Transportation of the U.S. and Commission. - provided with a cylinder connection device compatible with the outdoor cooking gas appliance. ■ Visually check the burner flames. SAVE THESE INSTRUCTIONS 3 See "Gas Supply Requirements" section. A clogged tube can be found ...
Installation Guide
Page 9
...liquid. ■ Unplug from : CSA International 8501 East Pleasant Valley Rd. See the following illustration. Failure to the outdoor cooking gas appliance then plug appliance into a grounded 3 prong outlet. IMPORTANT: This installation must be used , it is recommended that a qualified electrician determine that the...Electrical Shock Hazard Plug into the outlet. ■ Use only a Ground Fault Interrupter (GFI) protected circuit with this outdoor cooking gas appliance. ■ Do not remove the ground prong or use with an adapter of 2 prongs. The model/serial number rating plate is...
...liquid. ■ Unplug from : CSA International 8501 East Pleasant Valley Rd. See the following illustration. Failure to the outdoor cooking gas appliance then plug appliance into a grounded 3 prong outlet. IMPORTANT: This installation must be used , it is recommended that a qualified electrician determine that the...Electrical Shock Hazard Plug into the outlet. ■ Use only a Ground Fault Interrupter (GFI) protected circuit with this outdoor cooking gas appliance. ■ Do not remove the ground prong or use with an adapter of 2 prongs. The model/serial number rating plate is...

Installation Guide
Page 14
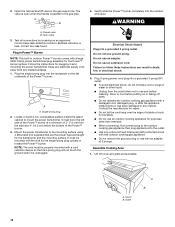
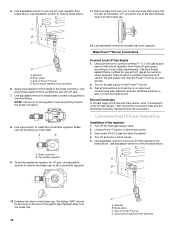
... gas supply line. Single-prong plug 2. NOTE: The cord must be properly mounted with a damaged cord, damaged plug, or after the appliance malfunctions or has been damaged in death, fire, or electrical shock. 5. Failure to follow these instructions can result in any outdoor cooking gas...the island cabinet to the gas pipe. It must be to cool before cleaning. Mount the power transformer to the outdoor cooking gas appliance then plug appliance into the receptacle on an approved noncorrosive leak-detection solution. Do not remove ground prong. Do not use an adapter. Plug 3-...
... gas supply line. Single-prong plug 2. NOTE: The cord must be properly mounted with a damaged cord, damaged plug, or after the appliance malfunctions or has been damaged in death, fire, or electrical shock. 5. Failure to follow these instructions can result in any outdoor cooking gas...the island cabinet to the gas pipe. It must be to cool before cleaning. Mount the power transformer to the outdoor cooking gas appliance then plug appliance into the receptacle on an approved noncorrosive leak-detection solution. Do not remove ground prong. Do not use an adapter. Plug 3-...
Installation Guide
Page 15
Read and follow the instructions provided with conversion, shut off the gas supply to the appliance prior to do so can result in death, explosion, or fire. Natural, 11" (28 cm) W.C. Before proceeding with any tools listed here. Securely tighten all ... all gas connections. Go to LP, have a qualified person make sure gas pressure does not exceed 11" (28 cm) water column. For higher elevations contact KitchenAid at 1-800-422-1230 in Canada. Unplug Power™ burner or disconnect power. 3. Reinstall grate. 5. If connected to the "Check and Adjust the Burners" section...
Read and follow the instructions provided with conversion, shut off the gas supply to the appliance prior to do so can result in death, explosion, or fire. Natural, 11" (28 cm) W.C. Before proceeding with any tools listed here. Securely tighten all ... all gas connections. Go to LP, have a qualified person make sure gas pressure does not exceed 11" (28 cm) water column. For higher elevations contact KitchenAid at 1-800-422-1230 in Canada. Unplug Power™ burner or disconnect power. 3. Reinstall grate. 5. If connected to the "Check and Adjust the Burners" section...

Installation Guide
Page 16
... LP Gas Supply 1. Turn on the convertible regulator. Record Conversion In the last page of the stem farthest away from brass elbow. To set the appliance regulator for use with LP gas at the end of the Use and Care Guide, write "Converted to remove brass elbow. Use pipe wrench to...
... LP Gas Supply 1. Turn on the convertible regulator. Record Conversion In the last page of the stem farthest away from brass elbow. To set the appliance regulator for use with LP gas at the end of the Use and Care Guide, write "Converted to remove brass elbow. Use pipe wrench to...

Installation Guide
Page 17
... it over and snap stem back into the cap so the letters "NAT" are at the end of the burner box. Examine the stem on appliance regulator. 10. Gently pull the burner base to the rear to the threads of burner to install the convertible regulator. Twist counterclockwise, lift, and set...
... it over and snap stem back into the cap so the letters "NAT" are at the end of the burner box. Examine the stem on appliance regulator. 10. Gently pull the burner base to the rear to the threads of burner to install the convertible regulator. Twist counterclockwise, lift, and set...

Installation Guide
Page 18
... connect certified ¹⁄₂" (1.3 cm) gas supply pipe to inlet side of the Use and Care Guide, write "Converted to local codes requirements. The appliance nameplate is recommended that a qualified person make minor adjustments to secure. With a permanent marker, check the box next to minimum stable flame. Hold valve stem...
... connect certified ¹⁄₂" (1.3 cm) gas supply pipe to inlet side of the Use and Care Guide, write "Converted to local codes requirements. The appliance nameplate is recommended that a qualified person make minor adjustments to secure. With a permanent marker, check the box next to minimum stable flame. Hold valve stem...

Installation Guide
Page 22
...fulfill the product warranty and provide after-warranty service, anywhere in the United States. KitchenAid Canada designated service technicians are made with any questions or concerns at : KitchenAid Brand Home Appliances Customer eXperience Center 553 Benson Road Benton Harbor, MI 49022-2692 Please include a daytime...see Installation Instructions. If you use an extension cord. It may save you can write to KitchenAid with the same precision used to build every new KITCHENAID® appliance. If you need replacement parts If you need to order replacement parts, we recommend that ...
...fulfill the product warranty and provide after-warranty service, anywhere in the United States. KitchenAid Canada designated service technicians are made with any questions or concerns at : KitchenAid Brand Home Appliances Customer eXperience Center 553 Benson Road Benton Harbor, MI 49022-2692 Please include a daytime...see Installation Instructions. If you use an extension cord. It may save you can write to KitchenAid with the same precision used to build every new KITCHENAID® appliance. If you need replacement parts If you need to order replacement parts, we recommend that ...

Installation Guide
Page 24
You must provide proof of purchase or installation date for future reference. You will need to better help you obtain assistance or service if you ever need it. Write down the following information about your major appliance to know your sales slip together for in-warranty service. Dealer name Address Phone number Model number Serial number Purchase date 24 Keep this information on the model and serial number label located on the product. You can find this book and your complete model number and serial number.
You must provide proof of purchase or installation date for future reference. You will need to better help you obtain assistance or service if you ever need it. Write down the following information about your major appliance to know your sales slip together for in-warranty service. Dealer name Address Phone number Model number Serial number Purchase date 24 Keep this information on the model and serial number label located on the product. You can find this book and your complete model number and serial number.