
Use & Care Guide
Page 17
... Apply pipe sealant to remove brass cap on the regulator must be facing up when tight. Remove inner burner top ring from the ignition. Remove outer burner top ring from the gas valves and openings. Use pipe wrench to manifold fitting. Inner burner B. Burner base 5. To make...Power™ burner grate. 2. Brass cap will be pointing toward the brass connector. 3. A. A B C 8. Outer burner C. A NAT 11. Remove the wok ring. Outer burner B 17 A b. If the letters "NAT" are at the end of burner to remove the brass orifices from locator hole. 6.
... Apply pipe sealant to remove brass cap on the regulator must be facing up when tight. Remove inner burner top ring from the ignition. Remove outer burner top ring from the gas valves and openings. Use pipe wrench to manifold fitting. Inner burner B. Burner base 5. To make...Power™ burner grate. 2. Brass cap will be pointing toward the brass connector. 3. A. A B C 8. Outer burner C. A NAT 11. Remove the wok ring. Outer burner B 17 A b. If the letters "NAT" are at the end of burner to remove the brass orifices from locator hole. 6.

Use & Care Guide
Page 18
...With a permanent marker, check the box next to HI." Propane." A B A. 4" (10.2 cm) for most efficient operation. Replace inner burner top ring. 11. Low Flame Adjustment If flame goes out on the gas supply to local codes requirements. Turn burner to secure. Watch the flame and slowly...with pliers and insert a small flat-blade screwdriver into the locator hole. B. 3" (7.6 cm) for easy access. 2. Igniter 10. 7. Replace the wok ring, locate the tabs to the slots and twist clockwise to its lowest setting and remove knob. 4. Hook up to minimum stable flame. Repeat steps 3...
...With a permanent marker, check the box next to HI." Propane." A B A. 4" (10.2 cm) for most efficient operation. Replace inner burner top ring. 11. Low Flame Adjustment If flame goes out on the gas supply to local codes requirements. Turn burner to secure. Watch the flame and slowly...with pliers and insert a small flat-blade screwdriver into the locator hole. B. 3" (7.6 cm) for easy access. 2. Igniter 10. 7. Replace the wok ring, locate the tabs to the slots and twist clockwise to its lowest setting and remove knob. 4. Hook up to minimum stable flame. Repeat steps 3...
Use & Care Guide
Page 19
..., all controls are all control knobs off the 20 lb LP gas fuel tank, very slowly open the tank valve. To Remove the Wok Ring 1. Remove the wok ring. Twist counterclockwise, lift, and set aside for cuts, abrasions, or excessive wear. 3. Remove outdoor Power™ burner cover. 2. After...assembly before lighting. 2. For outdoor Power™ burners using extra-large pots and pans. 3. A Wok Ring NOTE: The Power™ burner can be used with or without the wok ring. Set the wok ring into the notches in the gas supply line. Remove the Power™ burner grate. 2. Turn 20...
..., all controls are all control knobs off the 20 lb LP gas fuel tank, very slowly open the tank valve. To Remove the Wok Ring 1. Remove the wok ring. Twist counterclockwise, lift, and set aside for cuts, abrasions, or excessive wear. 3. Remove outdoor Power™ burner cover. 2. After...assembly before lighting. 2. For outdoor Power™ burners using extra-large pots and pans. 3. A Wok Ring NOTE: The Power™ burner can be used with or without the wok ring. Set the wok ring into the notches in the gas supply line. Remove the Power™ burner grate. 2. Turn 20...

Installation Guide
Page 17
... at the end of the brass connector. Reinstall cap onto convertible regulator. Remove the wok ring. A. Igniter wire 6. A A. A B C 8. a. Examine the stem on appliance regulator. 10. Inner burner B. Remove inner burner top ring from burner base. Remove outer burner top ring from burner base. 4. A B A. Brass elbow B. Gently pull the burner base to the rear to...
... at the end of the brass connector. Reinstall cap onto convertible regulator. Remove the wok ring. A. Igniter wire 6. A A. A B C 8. a. Examine the stem on appliance regulator. 10. Inner burner B. Remove inner burner top ring from burner base. Remove outer burner top ring from burner base. 4. A B A. Brass elbow B. Gently pull the burner base to the rear to...

Installation Guide
Page 18
... the gas supply line near the grill for future use with LP gas at connections where required. Replace inner burner top ring. 11. Replace the wok ring, locate the tabs to the slots and twist clockwise to Natural Gas." Hold valve stem with pack containing literature. Replace burner... 8. Test all connections using information in gas supply and other conditions may make burner adjustments. Correct any leak found. Replace outer burner top ring, locate with this kit. Turn off the burner. 8. Adjust flame to Natural gas and Leak Test 1. Replace the burner base. Check and...
... the gas supply line near the grill for future use with LP gas at connections where required. Replace inner burner top ring. 11. Replace the wok ring, locate the tabs to the slots and twist clockwise to Natural Gas." Hold valve stem with pack containing literature. Replace burner... 8. Test all connections using information in gas supply and other conditions may make burner adjustments. Correct any leak found. Replace outer burner top ring, locate with this kit. Turn off the burner. 8. Adjust flame to Natural gas and Leak Test 1. Replace the burner base. Check and...

Installation Guide
Page 19
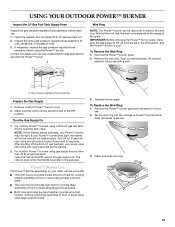
...assembly before each use with the Power™ burner. If necessary, replace the gas pressure regulator/hose assembly before lighting. 2. Remove the wok ring. The valve is parallel to secure. 3. Twist clockwise to the gas pipe. Contact the dealer and use only replacement hoses specified for ... the edges of food or liquid using extra-large pots and pans. 3. After shutting off and wait 30 seconds. Place wok onto wok ring. 19 To Remove the Wok Ring 1. Remove the Power™ burner grate. 2. Twist counterclockwise, lift, and set aside for cooking extra-large quantities of ...
...assembly before each use with the Power™ burner. If necessary, replace the gas pressure regulator/hose assembly before lighting. 2. Remove the wok ring. The valve is parallel to secure. 3. Twist clockwise to the gas pipe. Contact the dealer and use only replacement hoses specified for ... the edges of food or liquid using extra-large pots and pans. 3. After shutting off and wait 30 seconds. Place wok onto wok ring. 19 To Remove the Wok Ring 1. Remove the Power™ burner grate. 2. Twist counterclockwise, lift, and set aside for cooking extra-large quantities of ...