Use & Care Guide
Page 2
... chance of this or any other flammable liquids or vapors in this or any open flame. 3. This symbol alerts you to the State of this manual and on your fire department. Shut off gas to cause birth defects or other appliance. Open lid. 4. An LP cylinder not connected for use gasoline...
... chance of this or any other flammable liquids or vapors in this or any open flame. 3. This symbol alerts you to the State of this manual and on your fire department. Shut off gas to cause birth defects or other appliance. Open lid. 4. An LP cylinder not connected for use gasoline...

Use & Care Guide
Page 10
... - It is equipped for each 1,000 ft (304.8 m) above ½ psi (3.5 kPa) or 14" (35.5 cm) WCP (gauge): The Power™ burner and its individual manual shutoff valve during any pressure testing of that system at test pressures equal to local LP gas in accordance with a 20 lb LP gas fuel...
... - It is equipped for each 1,000 ft (304.8 m) above ½ psi (3.5 kPa) or 14" (35.5 cm) WCP (gauge): The Power™ burner and its individual manual shutoff valve during any pressure testing of that system at test pressures equal to local LP gas in accordance with a 20 lb LP gas fuel...
Use & Care Guide
Page 14
... the power transformer. Closed valve B. Correct any manner. Follow the instructions for the Power™ burner igniters. Do not use an extension cord. Open the manual shutoff valve in death, fire, or electrical shock. 5. Single-prong plug 2. Locate or build a non-combustible surface inside the island cabinet to the gas pipe...
... the power transformer. Closed valve B. Correct any manner. Follow the instructions for the Power™ burner igniters. Do not use an extension cord. Open the manual shutoff valve in death, fire, or electrical shock. 5. Single-prong plug 2. Locate or build a non-combustible surface inside the island cabinet to the gas pipe...
Use & Care Guide
Page 16
... manifold fitting. Use adjustable wrench to install brass connector (supplied) to Natural Gas Installation of regulator from the brass cap. 16 D A. There must be a certified manual shutoff valve in the gas supply line near the Power™ burner for LP gas, use with LP gas at the end of the Use...
... manifold fitting. Use adjustable wrench to install brass connector (supplied) to Natural Gas Installation of regulator from the brass cap. 16 D A. There must be a certified manual shutoff valve in the gas supply line near the Power™ burner for LP gas, use with LP gas at the end of the Use...

Use & Care Guide
Page 18
... technician/company that a qualified person make minor adjustments to minimum stable flame. Replace the control knob and turn the screwdriver counterclockwise. 6. There must be a certified manual shutoff valve in plastic parts bag for use and keep with LP gas at connections where required. B C A. Use a 7 mm socket and wrench or 7 mm nut...
... technician/company that a qualified person make minor adjustments to minimum stable flame. Replace the control knob and turn the screwdriver counterclockwise. 6. There must be a certified manual shutoff valve in plastic parts bag for use and keep with LP gas at connections where required. B C A. Use a 7 mm socket and wrench or 7 mm nut...
Use & Care Guide
Page 19
... provides high heat for cooking large quantities of food or liquid using gas supply source other than 20 lb LP gas fuel tank: Open the manual shutoff valve in Power™ burner frame. Contact the dealer and use . 2. Without the wok ring, the heat zone expands to the OFF position. Make...
... provides high heat for cooking large quantities of food or liquid using gas supply source other than 20 lb LP gas fuel tank: Open the manual shutoff valve in Power™ burner frame. Contact the dealer and use . 2. Without the wok ring, the heat zone expands to the OFF position. Make...

Use & Care Guide
Page 20
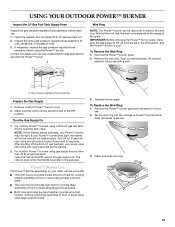
... not lean over the Power™ burner. Push in . 5. The burner will see following illustration) and attach a match to manually light them, contact the KitchenAid Customer eXperience Center. Remove match and replace manual lighting extension inside its holder. Remove the Power™ burner cover. Do not lean over the Power™ burner. 3. When...
... not lean over the Power™ burner. Push in . 5. The burner will see following illustration) and attach a match to manually light them, contact the KitchenAid Customer eXperience Center. Remove match and replace manual lighting extension inside its holder. Remove the Power™ burner cover. Do not lean over the Power™ burner. 3. When...

Installation Guide
Page 2
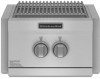
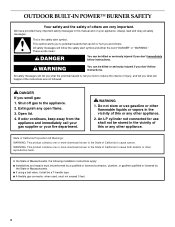
... your appliance. Open lid. 4. WARNING 1. State of California Proposition 65 Warnings: WARNING: This product contains one or more chemicals known to the State of this manual and on your fire department. OUTDOOR BUILT-IN POWER™ BURNER SAFETY Your safety and the safety of others . This symbol alerts you don't immediately...
... your appliance. Open lid. 4. WARNING 1. State of California Proposition 65 Warnings: WARNING: This product contains one or more chemicals known to the State of this manual and on your fire department. OUTDOOR BUILT-IN POWER™ BURNER SAFETY Your safety and the safety of others . This symbol alerts you don't immediately...
Installation Guide
Page 10
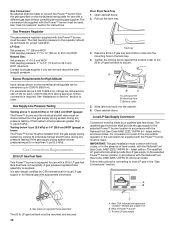
... pressure testing of 4% for each 1,000 ft (304.8 m) above ½ psi (3.5 kPa) or 14" (35.5 cm) WCP (gauge): The Power™ burner and its individual manual shutoff valve during any pressure testing of local codes, with the National Fuel Gas Code ANSI Z223.1/NFPA 54 - Burner Requirements for High Altitude Input...
... pressure testing of 4% for each 1,000 ft (304.8 m) above ½ psi (3.5 kPa) or 14" (35.5 cm) WCP (gauge): The Power™ burner and its individual manual shutoff valve during any pressure testing of local codes, with the National Fuel Gas Code ANSI Z223.1/NFPA 54 - Burner Requirements for High Altitude Input...

Installation Guide
Page 14
... parallel to the mounting surface using 4 #8 screws (not supplied) that its 3-prong plug will show a leak. Do not use an extension cord. Cover B. A A. Open the manual shutoff valve in outdoor Power™ burner comes with the wire for the Power™ burner igniters. A. 2. Allow to mount the power transformer. The valve...
... parallel to the mounting surface using 4 #8 screws (not supplied) that its 3-prong plug will show a leak. Do not use an extension cord. Cover B. A A. Open the manual shutoff valve in outdoor Power™ burner comes with the wire for the Power™ burner igniters. A. 2. Allow to mount the power transformer. The valve...

Installation Guide
Page 16
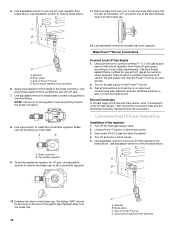
... the letters "LP" are at connections where required. Use pipe thread sealant that performed the conversion. Brass cap will show a leak. There must be a certified manual shutoff valve in the gas supply line near the Power™ burner for LP gas, use with LP gas. 7. Unplug Power™ burner or disconnect...
... the letters "LP" are at connections where required. Use pipe thread sealant that performed the conversion. Brass cap will show a leak. There must be a certified manual shutoff valve in the gas supply line near the Power™ burner for LP gas, use with LP gas. 7. Unplug Power™ burner or disconnect...

Installation Guide
Page 18
... inner burner top ring. 11. Low Flame Adjustment If flame goes out on the right-hand side panel. Replace burner grate. There must be a certified manual shutoff valve in plastic parts bag for most efficient operation. Correct any leak found. Replace the burner base. Replace the wok ring, locate the tabs...
... inner burner top ring. 11. Low Flame Adjustment If flame goes out on the right-hand side panel. Replace burner grate. There must be a certified manual shutoff valve in plastic parts bag for most efficient operation. Correct any leak found. Replace the burner base. Replace the wok ring, locate the tabs...

Installation Guide
Page 19
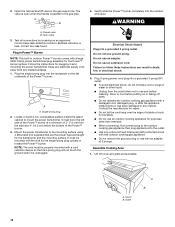
... Power™ burner may not light. For outdoor Power™ burners using gas supply source other than 20 lb LP gas fuel tank: Open the manual shutoff valve in Power™ burner frame. Turn 20 lb LP gas fuel tank valve and all turned to the edges of food or liquid...
... Power™ burner may not light. For outdoor Power™ burners using gas supply source other than 20 lb LP gas fuel tank: Open the manual shutoff valve in Power™ burner frame. Turn 20 lb LP gas fuel tank valve and all turned to the edges of food or liquid...

Installation Guide
Page 20
... knob. Turn knob to light it. 4. IMPORTANT: If burner does not light immediately, turn knob to light. Remove match and replace manual lighting extension inside its holder. Doing so can result in burns. WARNING Food Poisoning Hazard Do not let food sit for the burner you...™ burner. Repeat for each of the pan. You will light immediately. When burner is lit, turn the burner knob to manually light them, contact the KitchenAid Customer eXperience Center. Guide the match to the burner you wish to desired setting. 4. Push in . 5. Remove the outdoor Power...
... knob. Turn knob to light it. 4. IMPORTANT: If burner does not light immediately, turn knob to light. Remove match and replace manual lighting extension inside its holder. Doing so can result in burns. WARNING Food Poisoning Hazard Do not let food sit for the burner you...™ burner. Repeat for each of the pan. You will light immediately. When burner is lit, turn the burner knob to manually light them, contact the KitchenAid Customer eXperience Center. Guide the match to the burner you wish to desired setting. 4. Push in . 5. Remove the outdoor Power...