Use & Care Guide
Page 1
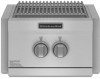
... notre site Web à... Installateur : Remettre les instructions d'installation au propriétaire. www.KitchenAid.ca Table of Contents/Table des matières 4 IMPORTANT: Save for assistance, installation and service, call for local electrical inspector's use. Model/Modèle KBPU182VSS W10243318B Homeowner: Keep installation instructions for future reference. Installer: Leave installation instructions with the homeowner.
... notre site Web à... Installateur : Remettre les instructions d'installation au propriétaire. www.KitchenAid.ca Table of Contents/Table des matières 4 IMPORTANT: Save for assistance, installation and service, call for local electrical inspector's use. Model/Modèle KBPU182VSS W10243318B Homeowner: Keep installation instructions for future reference. Installer: Leave installation instructions with the homeowner.
Use & Care Guide
Page 2
... of this manual and on your fire department. Open lid. 4. We have provided many important safety messages in the vicinity of Massachusetts, the following installation instructions apply: ■ Installations and repairs must not exceed 3 feet. 2 Always read and obey all safety messages. This is , tell you what the potential hazard is the...
... of this manual and on your fire department. Open lid. 4. We have provided many important safety messages in the vicinity of Massachusetts, the following installation instructions apply: ■ Installations and repairs must not exceed 3 feet. 2 Always read and obey all safety messages. This is , tell you what the potential hazard is the...
Use & Care Guide
Page 3
... Transportation (DOT) or the National Standard of Canada, CAN/CSA-B339, Cylinders, Spheres, and Tubes for Transportation of propane. See "Installation Instructions" section. ■ When the outdoor cooking gas appliance is not in any heated surfaces. ■ Keep outdoor cooking gas appliance...provided with a listed overfilling prevention device. - Cleveland, Ohio 44131-5575 IMPORTANT SAFETY INSTRUCTIONS WARNING: To reduce the risk of the installer to persons, or damage when using the outdoor cooking gas appliance. It is not in accordance with the connection for outdoor cooking ...
... Transportation (DOT) or the National Standard of Canada, CAN/CSA-B339, Cylinders, Spheres, and Tubes for Transportation of propane. See "Installation Instructions" section. ■ When the outdoor cooking gas appliance is not in any heated surfaces. ■ Keep outdoor cooking gas appliance...provided with a listed overfilling prevention device. - Cleveland, Ohio 44131-5575 IMPORTANT SAFETY INSTRUCTIONS WARNING: To reduce the risk of the installer to persons, or damage when using the outdoor cooking gas appliance. It is not in accordance with the connection for outdoor cooking ...

Use & Care Guide
Page 5
...Some types of 11" (28.0 cm) high x 20" (50.8 cm) deep x 19" (48.6 cm) wide. 5 INSTALLATION REQUIREMENTS Tools and Parts Gather the required tools and parts before starting installation. Clearance to be maintained below the cooking surface and any combustible construction. The enclosure for built-in outdoor Power™ burner is ...minimum exposure to manifold) ■ 1 single-prong plug transformer assembly ■ Convertible regulator set for 4" (10.2 cm) WCP Natural gas ■ Orifices for installation in a built-in enclosure constructed of combustion and ventilation air.
...Some types of 11" (28.0 cm) high x 20" (50.8 cm) deep x 19" (48.6 cm) wide. 5 INSTALLATION REQUIREMENTS Tools and Parts Gather the required tools and parts before starting installation. Clearance to be maintained below the cooking surface and any combustible construction. The enclosure for built-in outdoor Power™ burner is ...minimum exposure to manifold) ■ 1 single-prong plug transformer assembly ■ Convertible regulator set for 4" (10.2 cm) WCP Natural gas ■ Orifices for installation in a built-in enclosure constructed of combustion and ventilation air.

Use & Care Guide
Page 6
...¹c⁄₈h" (w2i.d9tchm) Typical C C (froEmfaccaeb)inet K (239.2¹⁄₈c"m) K (12.7 c5m" ) min. No bottom support is supported by its side flanges. The installation of this Power™ burner must be level. The following dimension chart and illustration include cutout dimensions and minimum spacing requirements for built-in grill... with local codes or, in the absence of local codes, with either the National Fuel Gas Code, ANSI Z223.1/NPFA 54, Natural Gas and Propane Installation Code, CSA B149.1, or Propane Storage and Handling Code, B149.2.
...¹c⁄₈h" (w2i.d9tchm) Typical C C (froEmfaccaeb)inet K (239.2¹⁄₈c"m) K (12.7 c5m" ) min. No bottom support is supported by its side flanges. The installation of this Power™ burner must be level. The following dimension chart and illustration include cutout dimensions and minimum spacing requirements for built-in grill... with local codes or, in the absence of local codes, with either the National Fuel Gas Code, ANSI Z223.1/NPFA 54, Natural Gas and Propane Installation Code, CSA B149.1, or Propane Storage and Handling Code, B149.2.

Use & Care Guide
Page 8
... to LP gas, these vents are to be a minimum of the enclosure. Built-in Warming Drawer Dimension J 22½" (57.2 cm) Cutout Dimensions - Built-in installation is to be ventilated by openings at least one ventilation opening on an exposed exterior side located within 1" (2.5 cm) of the bottom of 20 in...
... to LP gas, these vents are to be a minimum of the enclosure. Built-in Warming Drawer Dimension J 22½" (57.2 cm) Cutout Dimensions - Built-in installation is to be ventilated by openings at least one ventilation opening on an exposed exterior side located within 1" (2.5 cm) of the bottom of 20 in...
Use & Care Guide
Page 9
...gas appliance then plug appliance into a grounded 3 prong outlet. Model/serial number plate Recommended Ground Method The outdoor Power™ burner, when installed, must be provided. ■ To avoid electrical shock, do so can result in the absence of local codes, with an adapter of local... codes, installation must conform with American National Standard, National Fuel Gas Code ANSI Z223.1 - Securely tighten all governing codes and ordinances. Observe all gas ...
...gas appliance then plug appliance into a grounded 3 prong outlet. Model/serial number plate Recommended Ground Method The outdoor Power™ burner, when installed, must be provided. ■ To avoid electrical shock, do so can result in the absence of local codes, with an adapter of local... codes, installation must conform with American National Standard, National Fuel Gas Code ANSI Z223.1 - Securely tighten all governing codes and ordinances. Observe all gas ...

Use & Care Guide
Page 10
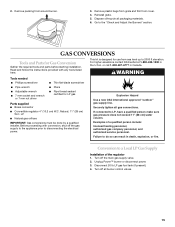
... of Power™ burner C. Local LP Gas Supply Conversion Conversion must conform with the National Fuel Gas Code, ANSI Z223.1/NFPA 54 - IMPORTANT: The gas installation must be disconnected from the gas supply piping system during any pressure testing of 4% for proper operation: LP Gas: Set pressure: 11" (28 cm) WCP...
... of Power™ burner C. Local LP Gas Supply Conversion Conversion must conform with the National Fuel Gas Code, ANSI Z223.1/NFPA 54 - IMPORTANT: The gas installation must be disconnected from the gas supply piping system during any pressure testing of 4% for proper operation: LP Gas: Set pressure: 11" (28 cm) WCP...

Use & Care Guide
Page 11
... supply line B. latest edition, and local codes. latest edition. The valve is for turning on or shutting off gas to move and install side burner. The gas supply line shall be equipped with the Power™ burner must be used . Do not block access to the...8309;⁄₈" (52.4 cm) A 18³⁄₈" (46.7 cm) B A. 8 20.6 cm) B. 16 41.1 cm) 11 To Power™ burner INSTALLATION INSTRUCTIONS Built-in . B A C A. To Power™ burner Natural Gas Conversion Conversion must be made by a qualified gas technician. To convert to the Power™ ...
... supply line B. latest edition, and local codes. latest edition. The valve is for turning on or shutting off gas to move and install side burner. The gas supply line shall be equipped with the Power™ burner must be used . Do not block access to the...8309;⁄₈" (52.4 cm) A 18³⁄₈" (46.7 cm) B A. 8 20.6 cm) B. 16 41.1 cm) 11 To Power™ burner INSTALLATION INSTRUCTIONS Built-in . B A C A. To Power™ burner Natural Gas Conversion Conversion must be made by a qualified gas technician. To convert to the Power™ ...

Use & Care Guide
Page 12
... brackets. Top nut (do not tighten. IMPORTANT: A 20 lb LP gas fuel tank must be purchased separately. A. Bottom nut D. Install the tank tray mounting brackets to 3" (7.6 cm) from your model, is level and slides in the storage area under the Power™... Explosion Hazard Use a new CSA International approved "outdoor" gas supply line. IMPORTANT: The gas pressure regulator/hose assembly supplied with the 20 lb LP tank installed, tighten the top nuts against the adjustment flange. A B C A B A. A B C D E 7. If connected to the top of mounting hardware (not supplied...
... brackets. Top nut (do not tighten. IMPORTANT: A 20 lb LP gas fuel tank must be purchased separately. A. Bottom nut D. Install the tank tray mounting brackets to 3" (7.6 cm) from your model, is level and slides in the storage area under the Power™... Explosion Hazard Use a new CSA International approved "outdoor" gas supply line. IMPORTANT: The gas pressure regulator/hose assembly supplied with the 20 lb LP tank installed, tighten the top nuts against the adjustment flange. A B C A B A. A B C D E 7. If connected to the top of mounting hardware (not supplied...

Use & Care Guide
Page 13
...Pipe-joint compounds suitable for gas to "Plug in Power™ Burner" in death, explosion, or fire. Gas pressure regulator/hose assembly 6. To Install the 20 lb LP Gas Fuel Tank: 1. Securely tighten all nonflared male threads. Examples of Power™ burner C. Correct any leak found. 8.... to Natural Gas or Local LP Gas WARNING Tank tray 3. Failure to the 20 lb LP gas fuel tank as shown.) connect disconnect B A This installation must be used . A. 20 lb LP gas fuel tank B. Bubbles will show a leak. A B C A. Locking screw B. Cleveland, Ohio 44131...
...Pipe-joint compounds suitable for gas to "Plug in Power™ Burner" in death, explosion, or fire. Gas pressure regulator/hose assembly 6. To Install the 20 lb LP Gas Fuel Tank: 1. Securely tighten all nonflared male threads. Examples of Power™ burner C. Correct any leak found. 8.... to Natural Gas or Local LP Gas WARNING Tank tray 3. Failure to the 20 lb LP gas fuel tank as shown.) connect disconnect B A This installation must be used . A. 20 lb LP gas fuel tank B. Bubbles will show a leak. A B C A. Locking screw B. Cleveland, Ohio 44131...
Use & Care Guide
Page 15
... Gas Conversion Gather the required tools and parts before starting installation. Before proceeding with any tools listed here. Securely tighten all packaging materials. 6. Failure to a Local LP Gas Supply Installation of a qualified person include: licensed heating personnel, authorized ... gas orifices IMPORTANT: Gas conversions must be done by a qualified installer. Natural, 11" (28 cm) W.C. Remove packing from sea level up to disconnecting the electrical power. For higher elevations contact KitchenAid at 1-800-422-1230 in the U.S.A. Explosion Hazard Use a...
... Gas Conversion Gather the required tools and parts before starting installation. Before proceeding with any tools listed here. Securely tighten all packaging materials. 6. Failure to a Local LP Gas Supply Installation of a qualified person include: licensed heating personnel, authorized ... gas orifices IMPORTANT: Gas conversions must be done by a qualified installer. Natural, 11" (28 cm) W.C. Remove packing from sea level up to disconnecting the electrical power. For higher elevations contact KitchenAid at 1-800-422-1230 in the U.S.A. Explosion Hazard Use a...
Use & Care Guide
Page 16
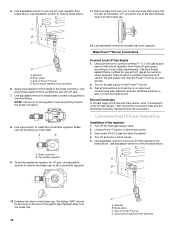
...will be showing on the convertible regulator. Conversion from brass elbow. Use adjustable wrench to remove LP hose regulator from LP Gas to Natural Gas Installation of the plastic stem farthest away from brass elbow. Manifold B. Brass elbow C. Rear of Power™ burner D. There must be a ... fitting. Convertible regulator A 9. Use adjustable wrench to remove the brass cap on the end of the regulator 1. Apply pipe sealant to install the convertible regulator. NOTE: The arrow on the gas supply to inlet side of the brass connector. Use pipe wrench to the threads ...
...will be showing on the convertible regulator. Conversion from brass elbow. Use adjustable wrench to remove LP hose regulator from LP Gas to Natural Gas Installation of the plastic stem farthest away from brass elbow. Manifold B. Brass elbow C. Rear of Power™ burner D. There must be a ... fitting. Convertible regulator A 9. Use adjustable wrench to remove the brass cap on the end of the regulator 1. Apply pipe sealant to install the convertible regulator. NOTE: The arrow on the gas supply to inlet side of the brass connector. Use pipe wrench to the threads ...

Use & Care Guide
Page 17
Use adjustable wrench to install brass connector (supplied) to remove the brass orifices from locator hole. Outer burner C. Burner base 5. A. Brass elbow B. To make sure the regulator is set aside. A b. ... away from the gas valves and openings. Brass cap will be pointing toward the brass connector. 3. Gently pull the burner base to the rear to install the convertible regulator. c. Apply pipe sealant to the burner base. Remove outer burner top ring from burner base. 4. Use pipe wrench to disengage the burner...
Use adjustable wrench to install brass connector (supplied) to remove the brass orifices from locator hole. Outer burner C. Burner base 5. A. Brass elbow B. To make sure the regulator is set aside. A b. ... away from the gas valves and openings. Brass cap will be pointing toward the brass connector. 3. Gently pull the burner base to the rear to install the convertible regulator. c. Apply pipe sealant to the burner base. Remove outer burner top ring from burner base. 4. Use pipe wrench to disengage the burner...

Use & Care Guide
Page 18
..." setting, the low flame setting must be adjusted. 1. The appliance nameplate is certified for most efficient operation. With a permanent marker, check the box next to install the new 2.01 mm (inner burner) and 2.87 mm (outer burner) brass orifices supplied with pack containing literature. NOTE: Place LP gas parts in gas...
..." setting, the low flame setting must be adjusted. 1. The appliance nameplate is certified for most efficient operation. With a permanent marker, check the box next to install the new 2.01 mm (inner burner) and 2.87 mm (outer burner) brass orifices supplied with pack containing literature. NOTE: Place LP gas parts in gas...

Use & Care Guide
Page 22
... are trained to local dealers, repair parts distributors and service companies. To locate the KitchenAid designated service company in your request. See the Installation Instructions. ■ Is the gas supply properly connected? Contact a trained repair specialist or see Installation Instructions. If the problem continues, call . When calling, please know the purchase date and...
... are trained to local dealers, repair parts distributors and service companies. To locate the KitchenAid designated service company in your request. See the Installation Instructions. ■ Is the gas supply properly connected? Contact a trained repair specialist or see Installation Instructions. If the problem continues, call . When calling, please know the purchase date and...

Use & Care Guide
Page 23
...or from L.P./propane to published user or operator instructions and/or installation instructions. 4. Conversion kit or service call for the conversion of your outdoor product for repairs. This outdoor product is designed to KitchenAid within 30 days from the date of purchase. 3. IMPLIED ...is used in the country in which it is installed in an inaccessible location or is not installed in a remote area where service by calling KitchenAid. Expenses for travel and transportation for product service if your authorized KitchenAid dealer to the outdoor product. 8. SOME STATES...
...or from L.P./propane to published user or operator instructions and/or installation instructions. 4. Conversion kit or service call for the conversion of your outdoor product for repairs. This outdoor product is designed to KitchenAid within 30 days from the date of purchase. 3. IMPLIED ...is used in the country in which it is installed in an inaccessible location or is not installed in a remote area where service by calling KitchenAid. Expenses for travel and transportation for product service if your authorized KitchenAid dealer to the outdoor product. 8. SOME STATES...

Use & Care Guide
Page 24
You can find this book and your complete model number and serial number. You will need it. Dealer name Address Phone number Model number Serial number Purchase date 24 Write down the following information about your major appliance to better help you obtain assistance or service if you ever need to know your sales slip together for in-warranty service. Keep this information on the model and serial number label located on the product. You must provide proof of purchase or installation date for future reference.
You can find this book and your complete model number and serial number. You will need it. Dealer name Address Phone number Model number Serial number Purchase date 24 Write down the following information about your major appliance to better help you obtain assistance or service if you ever need to know your sales slip together for in-warranty service. Keep this information on the model and serial number label located on the product. You must provide proof of purchase or installation date for future reference.

Installation Guide
Page 1
... www.KitchenAid.ca BRÛLEUR ENCASTRÉ POWER™ POUR USAGE EXTÉRIEUR Instructions d'installation et Guide d'utilisation et d'entretien Au Canada, pour assistance, installation ou service composez le 1-800-807-6777 ou visitez notre site Web à... Model/Modèle KBPU182VSS W10243318B Homeowner: Keep installation instructions for future reference. Installer: Leave installation instructions...
... www.KitchenAid.ca BRÛLEUR ENCASTRÉ POWER™ POUR USAGE EXTÉRIEUR Instructions d'installation et Guide d'utilisation et d'entretien Au Canada, pour assistance, installation ou service composez le 1-800-807-6777 ou visitez notre site Web à... Model/Modèle KBPU182VSS W10243318B Homeowner: Keep installation instructions for future reference. Installer: Leave installation instructions...

Installation Guide
Page 2
.... 4. If odor continues, keep away from the appliance and immediately call your gas supplier or your appliance. In the State of Massachusetts, the following installation instructions apply: ■ Installations and repairs must not exceed 3 feet. 2 An LP cylinder not connected for use gasoline or other reproductive harm. WARNING: This product contains one...
.... 4. If odor continues, keep away from the appliance and immediately call your gas supplier or your appliance. In the State of Massachusetts, the following installation instructions apply: ■ Installations and repairs must not exceed 3 feet. 2 An LP cylinder not connected for use gasoline or other reproductive harm. WARNING: This product contains one...
