Use & Care Guide
Page 5
... Parts Supplied ■ Convertible regulator set for 4" WCP Natural gas ■ 1 single-prong plug/500 mAmp transformer assembly for the rotisserie motor (on some models) ■ 1 single-prong plug/5000 mAmp transformer assembly for the grill (power supply) ■ 1.5-volt...male pipe thread nipple for connection to manifold). ■ Rotisserie motor mounting bracket ■ Rotisserie motor ■ Rotisserie forks ■ Rotisserie spit ■ Smoker box ■ 1 single-prong plug/500 mAmp transformer assembly for the rotisserie motor ■ 1 single-prong plug/5,000 mAmp transformer...
... Parts Supplied ■ Convertible regulator set for 4" WCP Natural gas ■ 1 single-prong plug/500 mAmp transformer assembly for the rotisserie motor (on some models) ■ 1 single-prong plug/5000 mAmp transformer assembly for the grill (power supply) ■ 1.5-volt...male pipe thread nipple for connection to manifold). ■ Rotisserie motor mounting bracket ■ Rotisserie motor ■ Rotisserie forks ■ Rotisserie spit ■ Smoker box ■ 1 single-prong plug/500 mAmp transformer assembly for the rotisserie motor ■ 1 single-prong plug/5,000 mAmp transformer...
Use & Care Guide
Page 6
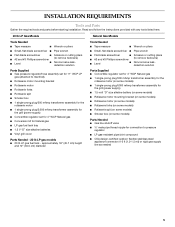
..." (76.0 cm) for 27" (68.6 cm) grills, 39" (99.0 cm) for 36" (91.4 cm) grills and 51" (129.5 cm) for 48" (121.9 cm) grills. Rotisserie A 6" (15.2 cm) minimum clearance is to order. 36¼" (92.1 cm) Product Dimensions Built-in a garage or indoors. See the "Assistance or Service" section to... grill is only for the built-in outdoor grill is an accessory on or near grill. Failure to order the insulated jacket kit for the rotisserie motor. The enclosure for installation in a built-in outdoor grills: ■ A minimum of 24" (58 cm) must be maintained between the front of ...
..." (76.0 cm) for 27" (68.6 cm) grills, 39" (99.0 cm) for 36" (91.4 cm) grills and 51" (129.5 cm) for 48" (121.9 cm) grills. Rotisserie A 6" (15.2 cm) minimum clearance is to order. 36¼" (92.1 cm) Product Dimensions Built-in a garage or indoors. See the "Assistance or Service" section to... grill is only for the built-in outdoor grill is an accessory on or near grill. Failure to order the insulated jacket kit for the rotisserie motor. The enclosure for installation in a built-in outdoor grills: ■ A minimum of 24" (58 cm) must be maintained between the front of ...
Use & Care Guide
Page 21
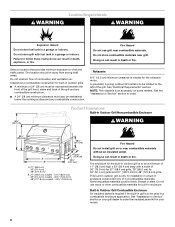
... with sear burner) 1. Replace burner by sliding the middle tube (venturi) over the orifice. A B A. Burner 6. Reattach gas burner using 2 screws. A. For models with 2 rotisserie burners: Install 1.55 mm orifice supplied with the kit to the end of the grill hood with this kit to the end of the supply... the procedure for each rear burner. Use 10 mm wrench to remove the brass orifices from the end of the supply pipe. For models with 1 rotisserie burner: Install 1.9 mm orifice supplied with the 2 screws removed in Step 2. 6. Set the screws and cover aside. Use 6 mm socket and wrench or 6...
... with sear burner) 1. Replace burner by sliding the middle tube (venturi) over the orifice. A B A. Burner 6. Reattach gas burner using 2 screws. A. For models with 2 rotisserie burners: Install 1.55 mm orifice supplied with the kit to the end of the grill hood with this kit to the end of the supply... the procedure for each rear burner. Use 10 mm wrench to remove the brass orifices from the end of the supply pipe. For models with 1 rotisserie burner: Install 1.9 mm orifice supplied with the 2 screws removed in Step 2. 6. Set the screws and cover aside. Use 6 mm socket and wrench or 6...
Use & Care Guide
Page 22
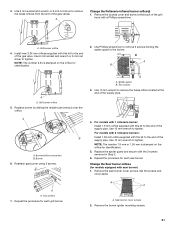
... orifice. Burner igniter mounting screws 4. Use 6 mm socket wrench or 6 mm nut driver to the grill. 3. Turn on some models) should be adjusted. NOTE: The rotisserie burner cannot be blue and stable with burners on flames when the burner is out of the way to local codes requirements. If they are...
... orifice. Burner igniter mounting screws 4. Use 6 mm socket wrench or 6 mm nut driver to the grill. 3. Turn on some models) should be adjusted. NOTE: The rotisserie burner cannot be blue and stable with burners on flames when the burner is out of the way to local codes requirements. If they are...
Use & Care Guide
Page 23
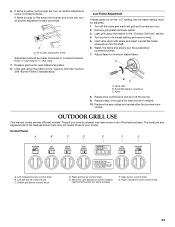
.... Repeat steps 3 through 8 for each burner if needed. 10. The grill you have purchased may not match those of the features listed. Control Panel A B C D E F G A. Left rotisserie burner control knob B. Center grill burner control knob D. Right grill burner control knob E. Sear burner control knob G. Right...
.... Repeat steps 3 through 8 for each burner if needed. 10. The grill you have purchased may not match those of the features listed. Control Panel A B C D E F G A. Left rotisserie burner control knob B. Center grill burner control knob D. Right grill burner control knob E. Sear burner control knob G. Right...
Use & Care Guide
Page 27
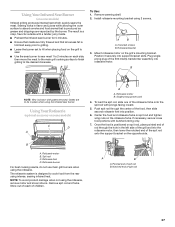
... that meats are fully thawed and that is positioned on the opposite side. Spit rod C. Pointed end of the 500 mAmp transformer assembly into the rotisserie motor, then lower the notched end of spit rod 27 Using Your Infrared Sear Burner (on some models) C D A A A. To Use: 1. Remove warming shelf...grill's mounting bracket. Once the food is produced as grease and drippings are to be in place when using the infrared sear burner. Rotisserie fork D. The rotisserie system is trimmed away prior to grilling. ■ Leave the burner set to HI when placing food on the grill to sear. &#...
... that meats are fully thawed and that is positioned on the opposite side. Spit rod C. Pointed end of the 500 mAmp transformer assembly into the rotisserie motor, then lower the notched end of spit rod 27 Using Your Infrared Sear Burner (on some models) C D A A A. To Use: 1. Remove warming shelf...grill's mounting bracket. Once the food is produced as grease and drippings are to be in place when using the infrared sear burner. Rotisserie fork D. The rotisserie system is trimmed away prior to grilling. ■ Leave the burner set to HI when placing food on the grill to sear. &#...

Use & Care Guide
Page 28
...the outlet. ■ Use only a Ground Fault Interrupter (GFI) protected circuit with this knob in any outdoor cooking gas appliance with the rotisserie burner. Rotisserie burner 5. You may see the igniter glow or hear the "snapping" sound of the spark (depending on your model). Do not lean over...9632; Do not use an outdoor cooking appliance for battery installation instructions. 1. right-hand side flange 3. Push in grills - Manually Lighting the Rotisserie Burner NOTE: Models with an adapter of the spark (depending on your model) until after the burner is turned on and the...
...the outlet. ■ Use only a Ground Fault Interrupter (GFI) protected circuit with this knob in any outdoor cooking gas appliance with the rotisserie burner. Rotisserie burner 5. You may see the igniter glow or hear the "snapping" sound of the spark (depending on your model). Do not lean over...9632; Do not use an outdoor cooking appliance for battery installation instructions. 1. right-hand side flange 3. Push in grills - Manually Lighting the Rotisserie Burner NOTE: Models with an adapter of the spark (depending on your model) until after the burner is turned on and the...

Use & Care Guide
Page 29
... The smoker box is affected by sliding one hour before carving. Reduce the heat setting to keep the smoke at least 1" (2.5 cm) space between rotisserie burner and the food. ■ To make cleanup easier, place a pan under the food to catch drippings. ■ The hood can be closed....smoker the hood should be firmly in natural juices. It is not necessary to the string holding the legs, to preheat when using your rotisserie. 1. Prepare wood chips/pellets following manufacturer's directions. 2. Light the burner below the smoker box and preheat on the second fork pushing the...
... The smoker box is affected by sliding one hour before carving. Reduce the heat setting to keep the smoke at least 1" (2.5 cm) space between rotisserie burner and the food. ■ To make cleanup easier, place a pan under the food to catch drippings. ■ The hood can be closed....smoker the hood should be firmly in natural juices. It is not necessary to the string holding the legs, to preheat when using your rotisserie. 1. Prepare wood chips/pellets following manufacturer's directions. 2. Light the burner below the smoker box and preheat on the second fork pushing the...
Use & Care Guide
Page 30
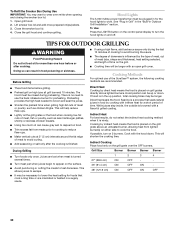
... meat, cut of meat (size, shape and thickness), heat setting selected, and length of time. Indirect Cooking Place food only on high (use the back rotisserie burner for preheating. This allows juices to escape. 48" (121.9 cm) ON OFF ON OFF ■ It may be necessary to lower the heat setting...
... meat, cut of meat (size, shape and thickness), heat setting selected, and length of time. Indirect Cooking Place food only on high (use the back rotisserie burner for preheating. This allows juices to escape. 48" (121.9 cm) ON OFF ON OFF ■ It may be necessary to lower the heat setting...
Use & Care Guide
Page 35
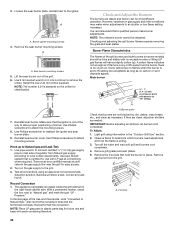
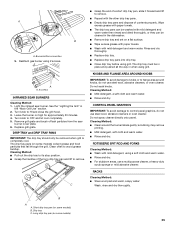
... 30 minutes. 4. Do not soak knobs. Cleaning Method: ■ Clean around knobs, do not use a multipurpose cleaner, a heavy-duty scrub sponge or mild abrasive cleaner. ROTISSERIE SPIT ROD AND FORKS Cleaning Method: ■ Wash with mild detergent and warm water. RACKS Cleaning Method: ■ Steel-wool pad and warm, soapy water...
... 30 minutes. 4. Do not soak knobs. Cleaning Method: ■ Clean around knobs, do not use a multipurpose cleaner, a heavy-duty scrub sponge or mild abrasive cleaner. ROTISSERIE SPIT ROD AND FORKS Cleaning Method: ■ Wash with mild detergent and warm water. RACKS Cleaning Method: ■ Steel-wool pad and warm, soapy water...
Use & Care Guide
Page 36
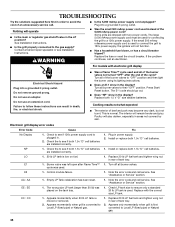
... connected to Local LP (fixed pipe) or Natural gas. 1. Contact a trained repair specialist or see if both 1.5v "D" cell batteries 1. If the small 500 mAmp rotisserie power supply cord is plugged in the off all burner valves to a 120v power supply. The E-1 code should go out. ■ Does "NP" show in...
... connected to Local LP (fixed pipe) or Natural gas. 1. Contact a trained repair specialist or see if both 1.5v "D" cell batteries 1. If the small 500 mAmp rotisserie power supply cord is plugged in the off all burner valves to a 120v power supply. The E-1 code should go out. ■ Does "NP" show in...
Use & Care Guide
Page 37
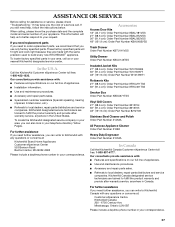
...(68.6 cm): Order Part Number W10136969 36" (91.4 cm): Order Part Number W10136977 48" (121.9 cm): Order Part Number W10136971 Rotisserie Kits 27" (68.6 cm): Order Part Number KFKU271TSS 36" (91.4 cm): Order Part Number KFKU361TSS Smoker Box Order Part Number KBDU271TSS Vinyl...■ Accessory and repair parts sales. ■ Specialized customer assistance (Spanish speaking, hearing impaired, limited vision, etc.). ■ Referrals to KitchenAid with : ■ Features and specifications on our full line of your telephone directory Yellow Pages. It may save you can write to local dealers...
...(68.6 cm): Order Part Number W10136969 36" (91.4 cm): Order Part Number W10136977 48" (121.9 cm): Order Part Number W10136971 Rotisserie Kits 27" (68.6 cm): Order Part Number KFKU271TSS 36" (91.4 cm): Order Part Number KFKU361TSS Smoker Box Order Part Number KBDU271TSS Vinyl...■ Accessory and repair parts sales. ■ Specialized customer assistance (Spanish speaking, hearing impaired, limited vision, etc.). ■ Referrals to KitchenAid with : ■ Features and specifications on our full line of your telephone directory Yellow Pages. It may save you can write to local dealers...

Parts Guide
Page 4
... Regulator, NG 25 W10140747 Connector, NG 26 W10247038 Kit, Orifice NG 27 W10247150 Fork, Spit 28 W10247180 Rod, Spit 29 W10167017 Motor, Rotisserie 30 W10247113 Bracket, Motor 31 W10247115 Transformer, Rotisserie 32 W10244190 Box, Smoker 33 W10134791 Handle, Smoker 34 W10134790 Grate, Smoker Illus. No. Part No. BURNERS, GRATES, AND LIGHTS PARTS...
... Regulator, NG 25 W10140747 Connector, NG 26 W10247038 Kit, Orifice NG 27 W10247150 Fork, Spit 28 W10247180 Rod, Spit 29 W10167017 Motor, Rotisserie 30 W10247113 Bracket, Motor 31 W10247115 Transformer, Rotisserie 32 W10244190 Box, Smoker 33 W10134791 Handle, Smoker 34 W10134790 Grate, Smoker Illus. No. Part No. BURNERS, GRATES, AND LIGHTS PARTS...