Use & Care Guide
Page 1
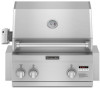
...pour consultation par l'inspecteur local des installations électriques. Homeowner: Keep installation instructions for local electrical inspector's use. Models/Modèles KBNU271VSS, KBNU361VSS, KBNU367VSS, KBNU487VSS, KBNS271TSS, KBNS361TSS, KBNU367TSS, KBNU487TSS W10175730C BUILT-IN OUTDOOR GRILLS Installation Instructions and Use & ...call: 1-800-422-1230 or visit our website at www.kitchenaid.com In Canada, for assistance, installation and service, call: 1-800-807-6777 or visit our website at www.KitchenAid.ca GRILS D'EXTÉRIEUR ENCASTRÉS Instructions d'installation ...
...pour consultation par l'inspecteur local des installations électriques. Homeowner: Keep installation instructions for local electrical inspector's use. Models/Modèles KBNU271VSS, KBNU361VSS, KBNU367VSS, KBNU487VSS, KBNS271TSS, KBNS361TSS, KBNU367TSS, KBNU487TSS W10175730C BUILT-IN OUTDOOR GRILLS Installation Instructions and Use & ...call: 1-800-422-1230 or visit our website at www.kitchenaid.com In Canada, for assistance, installation and service, call: 1-800-807-6777 or visit our website at www.KitchenAid.ca GRILS D'EXTÉRIEUR ENCASTRÉS Instructions d'installation ...

Use & Care Guide
Page 3
... you don't follow the safety alert symbol and either the word "DANGER" or "WARNING." We have provided many important safety messages in models can happen if the instructions are to comply with the minimum installation clearances specified on your fire department. Shut off gas to cause birth defects...can be stored in the vicinity of this or any other flammable liquids or vapors in the vicinity of this manual and on the model/serial rating plate. Extinguish any other reproductive harm. If odor continues, keep away from the appliance and immediately call your gas supplier or...
... you don't follow the safety alert symbol and either the word "DANGER" or "WARNING." We have provided many important safety messages in models can happen if the instructions are to comply with the minimum installation clearances specified on your fire department. Shut off gas to cause birth defects...can be stored in the vicinity of this or any other flammable liquids or vapors in the vicinity of this manual and on the model/serial rating plate. Extinguish any other reproductive harm. If odor continues, keep away from the appliance and immediately call your gas supplier or...
Use & Care Guide
Page 4
.... ■ Do not obstruct the flow of combustion and ventilation air. provided with the cylinder valve. A replacement pressure regulator and hose assembly specific to your model is available from your dealer and use only replacement hoses specified for Transportation of Dangerous Goods; Contact your outdoor cooking gas appliance dealer. ■ Gas...
.... ■ Do not obstruct the flow of combustion and ventilation air. provided with the cylinder valve. A replacement pressure regulator and hose assembly specific to your model is available from your dealer and use only replacement hoses specified for Transportation of Dangerous Goods; Contact your outdoor cooking gas appliance dealer. ■ Gas...
Use & Care Guide
Page 5
...) ■ 1.5-volt "D" size alkaline battery (on some models) ■ Rotisserie motor mounting bracket (on some models) ■ Rotisserie motor (on some models) ■ Rotisserie forks (on some models) ■ Rotisserie spit (on some models) ■ Smoker box (on some models) Parts Needed ■ Gas line shutoff valve ■ ... fuel tank tray ■ 1.5 V "D" size alkaline batteries ■ Vinyl grill cover Parts Needed - 20 lb LP gas models ■ 20 lb LP gas fuel tank - INSTALLATION REQUIREMENTS Tools and Parts Gather the required tools and parts before starting installation.
...) ■ 1.5-volt "D" size alkaline battery (on some models) ■ Rotisserie motor mounting bracket (on some models) ■ Rotisserie motor (on some models) ■ Rotisserie forks (on some models) ■ Rotisserie spit (on some models) ■ Smoker box (on some models) Parts Needed ■ Gas line shutoff valve ■ ... fuel tank tray ■ 1.5 V "D" size alkaline batteries ■ Vinyl grill cover Parts Needed - 20 lb LP gas models ■ 20 lb LP gas fuel tank - INSTALLATION REQUIREMENTS Tools and Parts Gather the required tools and parts before starting installation.
Use & Care Guide
Page 6
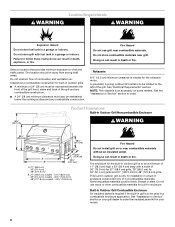
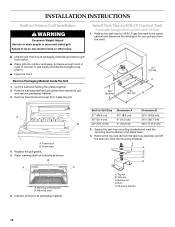
...(68.6 cm) 36" (91.4 cm) 48" (121.9 cm) B. 27" (68.6 cm) models - 31¾" (80.6 cm) 36" (91.4 cm) models - 40¾" (103.4 cm) 48" (121.9 cm) models - 52¾" (133.9 cm) Fire Hazard Do not install grill on some models. Doing so can result in death, explosion, or fire. This built-in... outdoor grill is an accessory on or near grill. See "Electrical Requirements" section. See "Assistance or Service" section or your model. 6 Do not obstruct flow of 11" (28.0 cm) high x 23" (58.4 cm) deep with fuel tank in a garage or indoors. Select a location...
...(68.6 cm) 36" (91.4 cm) 48" (121.9 cm) B. 27" (68.6 cm) models - 31¾" (80.6 cm) 36" (91.4 cm) models - 40¾" (103.4 cm) 48" (121.9 cm) models - 52¾" (133.9 cm) Fire Hazard Do not install grill on some models. Doing so can result in death, explosion, or fire. This built-in... outdoor grill is an accessory on or near grill. See "Electrical Requirements" section. See "Assistance or Service" section or your model. 6 Do not obstruct flow of 11" (28.0 cm) high x 23" (58.4 cm) deep with fuel tank in a garage or indoors. Select a location...
Use & Care Guide
Page 10
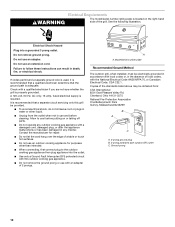
..., or electrical shock. Ground prong 10 Do not use an extension cord. It is recommended that the ground path is adequate. A A. Model/serial number plate Recommended Ground Method The outdoor grill, when installed, must be obtained from the outlet when not in use with a damaged ...polarized type outdoor GFI outlet C. A 120-volt, 60-Hz, AC-only, 15-amp, fused electrical supply is required. Electrical Requirements WARNING The model/serial number rating plate is located on or taking off parts. ■ Do not operate any manner. Electrical Shock Hazard Plug into the outlet...
..., or electrical shock. Ground prong 10 Do not use an extension cord. It is recommended that the ground path is adequate. A A. Model/serial number plate Recommended Ground Method The outdoor grill, when installed, must be obtained from the outlet when not in use with a damaged ...polarized type outdoor GFI outlet C. A 120-volt, 60-Hz, AC-only, 15-amp, fused electrical supply is required. Electrical Requirements WARNING The model/serial number rating plate is located on or taking off parts. ■ Do not operate any manner. Electrical Shock Hazard Plug into the outlet...
Use & Care Guide
Page 11
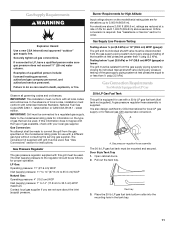
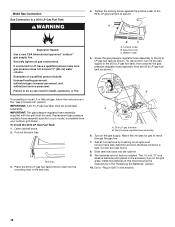
... must conform with American National Standard, National Fuel Gas Code ANSI Z223.1 - Burner Requirements for High Altitude Input ratings shown on the model/serial rating plate for use with this information does not agree with a 20 lb LP gas fuel tank (fuel tank not supplied). ... check with grill must be made to a regulated gas supply. The conversion kit supplied with your local gas supplier. Gas Connection Requirements For Models Equipped for elevations up to the regulator should be mounted and secured. The inlet (supply) pressure to 2,000 ft (609.6 m). In the...
... must conform with American National Standard, National Fuel Gas Code ANSI Z223.1 - Burner Requirements for High Altitude Input ratings shown on the model/serial rating plate for use with this information does not agree with a 20 lb LP gas fuel tank (fuel tank not supplied). ... check with grill must be made to a regulated gas supply. The conversion kit supplied with your local gas supplier. Gas Connection Requirements For Models Equipped for elevations up to the regulator should be mounted and secured. The inlet (supply) pressure to 2,000 ft (609.6 m). In the...
Use & Care Guide
Page 13
...Conversion Kit Part Number W10118099 must be equipped with ½" female pipe threads. Gas Connection Requirements For Models Equipped for Natural Gas Natural Gas LP Gas Conversion Using a Local LP Gas Supply Built-in grill models are equipped for use and have a pressure regulator with an approved shutoff valve. A A B B... approved "outdoor" flexible gas supply line C. Do not block access to the grill. A 20 lb LP gas fuel tank must be in models are set for turning on or shutting off gas to the shutoff valve. To grill 13 The valve is for Natural gas use with the...
...Conversion Kit Part Number W10118099 must be equipped with ½" female pipe threads. Gas Connection Requirements For Models Equipped for Natural Gas Natural Gas LP Gas Conversion Using a Local LP Gas Supply Built-in grill models are equipped for use and have a pressure regulator with an approved shutoff valve. A A B B... approved "outdoor" flexible gas supply line C. Do not block access to the grill. A 20 lb LP gas fuel tank must be in models are set for turning on or shutting off gas to the shutoff valve. To grill 13 The valve is for Natural gas use with the...
Use & Care Guide
Page 14
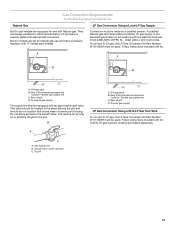
...;⁄₈" (46.7 cm) B A B A. Remove the top nuts (4) from the chart. ■ Unpack grill. Install Tank Tray for 20 lb LP Gas Fuel Tank For Models Equipped for your grill size from the tank tray assembly and lift the tank tray off of /recycle all packaging materials and remove grill from...
...;⁄₈" (46.7 cm) B A B A. Remove the top nuts (4) from the chart. ■ Unpack grill. Install Tank Tray for 20 lb LP Gas Fuel Tank For Models Equipped for your grill size from the tank tray assembly and lift the tank tray off of /recycle all packaging materials and remove grill from...
Use & Care Guide
Page 16
... the 20 lb LP gas fuel tank to the 20 lb LP gas fuel tank, then unscrew the gas pressure regulator/hose assembly from your model, is available from the 20 lb LP gas fuel tank as shown.) connect disconnect B A A. 20 lb LP gas fuel tank B. IMPORTANT: A 20 lb LP gas...
... the 20 lb LP gas fuel tank to the 20 lb LP gas fuel tank, then unscrew the gas pressure regulator/hose assembly from your model, is available from the 20 lb LP gas fuel tank as shown.) connect disconnect B A A. 20 lb LP gas fuel tank B. IMPORTANT: A 20 lb LP gas...

Use & Care Guide
Page 17
... "Replacing the Batteries" section. Single-prong plug 2. It must conform with a large 5000 mAmp power transformer/plug assembly for the grill's lights and, on some models, for the electronic display and igniter. Gas Connection to the mounting surface using 4 #8 screws (not supplied) that its 3-prong plug will show a leak.
... "Replacing the Batteries" section. Single-prong plug 2. It must conform with a large 5000 mAmp power transformer/plug assembly for the grill's lights and, on some models, for the electronic display and igniter. Gas Connection to the mounting surface using 4 #8 screws (not supplied) that its 3-prong plug will show a leak.

Use & Care Guide
Page 18
...cooking gas appliance. ■ Do not remove the ground prong or use from the outlet when not in the kit. For higher elevations contact KitchenAid at 1-800-422-1230 in water or other than intended. ■ When connecting, first connect plug to follow the instructions provided with a ... fire. 18 Natural, 11" W.C. Failure to LP gas. Do not use an adapter. Allow to disconnecting the electrical power. GAS CONVERSIONS For Models Equipped for Use with grills that are converted to 2000 ft elevation. Tools and Parts for LP gas Parts supplied ■ Brass connector ■...
...cooking gas appliance. ■ Do not remove the ground prong or use from the outlet when not in the kit. For higher elevations contact KitchenAid at 1-800-422-1230 in water or other than intended. ■ When connecting, first connect plug to follow the instructions provided with a ... fire. 18 Natural, 11" W.C. Failure to LP gas. Do not use an adapter. Allow to disconnecting the electrical power. GAS CONVERSIONS For Models Equipped for Use with grills that are converted to 2000 ft elevation. Tools and Parts for LP gas Parts supplied ■ Brass connector ■...
Use & Care Guide
Page 21
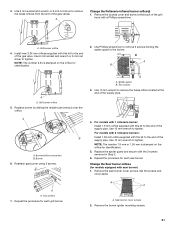
... orifices from the end of the supply pipe. A B A A. Replace burner by sliding the middle tube (venturi) over the orifice. For models with 1 rotisserie burner: Install 1.9 mm orifice supplied with a Phillips screwdriver. Use 6 mm socket and wrench or 6 mm nut driver to ... Grill burner orifice 4. Use 6 mm socket and wrench or 6 mm nut driver to tighten. NOTE: The number 2.34 is stamped on the orifice for models equipped with the 2 screws removed in Step 2. 6. Use Phillips screwdriver to remove 2 screws holding the spider guard to tighten. A B A. Reattach gas burner...
... orifices from the end of the supply pipe. A B A A. Replace burner by sliding the middle tube (venturi) over the orifice. For models with 1 rotisserie burner: Install 1.9 mm orifice supplied with a Phillips screwdriver. Use 6 mm socket and wrench or 6 mm nut driver to ... Grill burner orifice 4. Use 6 mm socket and wrench or 6 mm nut driver to tighten. NOTE: The number 2.34 is stamped on the orifice for models equipped with the 2 screws removed in Step 2. 6. Use Phillips screwdriver to remove 2 screws holding the spider guard to tighten. A B A. Reattach gas burner...
Use & Care Guide
Page 22
... allow proper positioning of regulator from the grill. Use Phillips screwdriver to Natural gas and Leak Test 1. Test all burner ports with burners on some models) should be blue and stable with no carbon or soot deposits appear. Bubbles will have a slightly yellow tip). Check and Adjust the Burners The burners...
... allow proper positioning of regulator from the grill. Use Phillips screwdriver to Natural gas and Leak Test 1. Test all burner ports with burners on some models) should be blue and stable with no carbon or soot deposits appear. Bubbles will have a slightly yellow tip). Check and Adjust the Burners The burners...
Use & Care Guide
Page 23
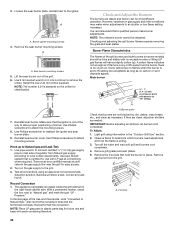
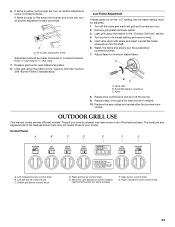
.... 3. Pliers 8. Replace the sear plates and grates after the burners have purchased may not match those of the features listed. Electronic grill display (on some models) F. If flame is noisy or lifts away from ¹⁄₈" (3.2 mm) to ¹⁄₄" (6.4 mm). 7. A B C A. Small flat-blade ... enough air), turn off the valve and wait until grill and burners are cool. 2. Low Flame Adjustment If flame goes out on some models) Light switch button (on the "LO" setting, the low flame setting must be made clockwise or counterclockwise from burner (too much air),...
.... 3. Pliers 8. Replace the sear plates and grates after the burners have purchased may not match those of the features listed. Electronic grill display (on some models) F. If flame is noisy or lifts away from ¹⁄₈" (3.2 mm) to ¹⁄₄" (6.4 mm). 7. A B C A. Small flat-blade ... enough air), turn off the valve and wait until grill and burners are cool. 2. Low Flame Adjustment If flame goes out on some models) Light switch button (on the "LO" setting, the low flame setting must be made clockwise or counterclockwise from burner (too much air),...

Use & Care Guide
Page 24
... a set in hours and minutes up or down the set time has expired. The recommended time for models using a 20 lb LP tank. Press Mode button until the timer indicator light comes on some models To check fuel remaining with the grill OFF: 1. NOTE: This recalculated display of fuel time remaining may...
... a set in hours and minutes up or down the set time has expired. The recommended time for models using a 20 lb LP tank. Press Mode button until the timer indicator light comes on some models To check fuel remaining with the grill OFF: 1. NOTE: This recalculated display of fuel time remaining may...
Use & Care Guide
Page 25
.... Doing so can result in food poisoning or sickness. Press the "Mode" button until the indicator light for Flame Time™ feature comes on some models) Inspect the gas pressure regulator/hose assembly before or after cooking. If the start the Flame Time™ feature timer countdown. Do not store grill...
.... Doing so can result in food poisoning or sickness. Press the "Mode" button until the indicator light for Flame Time™ feature comes on some models) Inspect the gas pressure regulator/hose assembly before or after cooking. If the start the Flame Time™ feature timer countdown. Do not store grill...
Use & Care Guide
Page 26
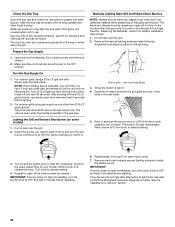
... open tank valve and wait 5 seconds before lighting. 2. Lighting the Grill and Infrared Sear Burner (on your model). Manually Lighting Main Grill and Infrared Sear Burners NOTE: Models with the hood closed. 2. Remove the manual lighting extension (see the igniter glow or hear the "snapping" sound...will be in the sear plate. 5. When burner is not covered when not in . Turn knob to light them manually, contact the KitchenAid Customer eXperience Center. Remove match and replace manual lighting extension inside the plastic pouch. See the "Assistance or Service" section. 26 Water can...
... open tank valve and wait 5 seconds before lighting. 2. Lighting the Grill and Infrared Sear Burner (on your model). Manually Lighting Main Grill and Infrared Sear Burners NOTE: Models with the hood closed. 2. Remove the manual lighting extension (see the igniter glow or hear the "snapping" sound...will be in the sear plate. 5. When burner is not covered when not in . Turn knob to light them manually, contact the KitchenAid Customer eXperience Center. Remove match and replace manual lighting extension inside the plastic pouch. See the "Assistance or Service" section. 26 Water can...
Use & Care Guide
Page 27
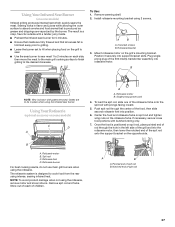
... side of the grill and into position. 6. To Use: 1. If necessary, secure loose food portions with grates removed. Using Your Infrared Sear Burner (on some models) C D A A A. A B A. 2 bracket screws B. B A. Rotisserie motor B. NOTE: To avoid product damage when not using the rotisserie. Store ... outside with prongs facing inward. 5. To load the spit rod, slide one of the spit rod onto the support bracket on some models) Infrared grilling produces intense heat which quickly sears the meat. Spit rod C. Using Your Rotisserie (optional accessory on the opposite side. ...
... side of the grill and into position. 6. To Use: 1. If necessary, secure loose food portions with grates removed. Using Your Infrared Sear Burner (on some models) C D A A A. A B A. 2 bracket screws B. B A. Rotisserie motor B. NOTE: To avoid product damage when not using the rotisserie. Store ... outside with prongs facing inward. 5. To load the spit rod, slide one of the spit rod onto the support bracket on some models) Infrared grilling produces intense heat which quickly sears the meat. Spit rod C. Using Your Rotisserie (optional accessory on the opposite side. ...

Use & Care Guide
Page 28
...the igniter glow or hear the "snapping" sound of the spark (depending on the rotisserie motor and light the rotisserie burner. Turn on your model). Built-in and turn the control knob to the rotisserie burner when the gas valve is released. Rotisserie burner 5. Check that food is ...lit. Manually Lighting the Rotisserie Burner NOTE: Models with a damaged cord, damaged plug, or after the burner is centered with an adapter of a table or touch hot surfaces. ■ Do ...
...the igniter glow or hear the "snapping" sound of the spark (depending on the rotisserie motor and light the rotisserie burner. Turn on your model). Built-in and turn the control knob to the rotisserie burner when the gas valve is released. Rotisserie burner 5. Check that food is ...lit. Manually Lighting the Rotisserie Burner NOTE: Models with a damaged cord, damaged plug, or after the burner is centered with an adapter of a table or touch hot surfaces. ■ Do ...
