Use & Care Guide
Page 1
Models/Modèles KBNU271VSS, KBNU361VSS, KBNU367VSS, KBNU487VSS, KBNS271TSS, KBNS361TSS, KBNU367TSS, KBNU487TSS W10175730C BUILT-IN OUTDOOR GRILLS Installation Instructions and Use & Care Guide For questions about features, operation/performance, parts, accessories or service, call: 1-800-422-1230 or visit our website at www.kitchenaid.com In Canada, for assistance, installation and service, call: 1-800...
Models/Modèles KBNU271VSS, KBNU361VSS, KBNU367VSS, KBNU487VSS, KBNS271TSS, KBNS361TSS, KBNU367TSS, KBNU487TSS W10175730C BUILT-IN OUTDOOR GRILLS Installation Instructions and Use & Care Guide For questions about features, operation/performance, parts, accessories or service, call: 1-800-422-1230 or visit our website at www.kitchenaid.com In Canada, for assistance, installation and service, call: 1-800...
Use & Care Guide
Page 5
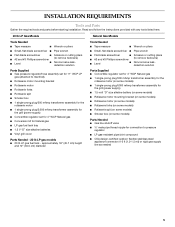
...■ Scissors or cutting pliers ■ #2 and #3 Phillips screwdriver (to remove tiedowns) ■ Level ■ Noncorrosive leakdetection solution Parts Supplied ■ Convertible regulator set for 4" WCP Natural gas ■ 1 single-prong plug/500 mAmp transformer assembly for the rotisserie motor ...9632; Scissors or cutting pliers ■ #2 and #3 Phillips screwdriver (to remove tiedowns) ■ Level ■ Noncorrosive leakdetection solution Parts Supplied ■ Gas pressure regulator/hose assembly set for 4" WCP Natural gas ■ Conversion kit for 11" WCP LP gas (...
...■ Scissors or cutting pliers ■ #2 and #3 Phillips screwdriver (to remove tiedowns) ■ Level ■ Noncorrosive leakdetection solution Parts Supplied ■ Convertible regulator set for 4" WCP Natural gas ■ 1 single-prong plug/500 mAmp transformer assembly for the rotisserie motor ...9632; Scissors or cutting pliers ■ #2 and #3 Phillips screwdriver (to remove tiedowns) ■ Level ■ Noncorrosive leakdetection solution Parts Supplied ■ Gas pressure regulator/hose assembly set for 4" WCP Natural gas ■ Conversion kit for 11" WCP LP gas (...
Use & Care Guide
Page 10
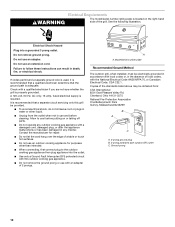
... outlet C. See the following illustration. Do not use an adapter. Electrical Requirements WARNING The model/serial number rating plate is located on or taking off parts. ■ Do not operate any manner. Copies of 2 prongs. Ground prong 10 Model/serial number plate Recommended Ground Method The outdoor grill, when installed, must...
... outlet C. See the following illustration. Do not use an adapter. Electrical Requirements WARNING The model/serial number rating plate is located on or taking off parts. ■ Do not operate any manner. Copies of 2 prongs. Ground prong 10 Model/serial number plate Recommended Ground Method The outdoor grill, when installed, must...
Use & Care Guide
Page 13
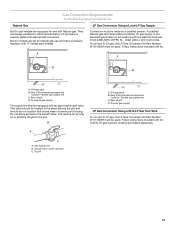
...B. To local gas supply LP Gas Conversion Using a 20 lb LP Gas Fuel Tank To convert to LP gas, the LP Gas Conversion Kit Part Number W10118099 must be used . latest edition, and local codes. Gas supply line B. Gas Connection Requirements For Models Equipped for Natural Gas Natural ... a pressure regulator with ½" female pipe threads. Conversion must be purchased separately. To convert to LP gas, the LP Gas Conversion Kit Part Number W10118099 must be in models are set for turning on or shutting off gas to the shutoff valve. Follow instructions included with kit. To...
...B. To local gas supply LP Gas Conversion Using a 20 lb LP Gas Fuel Tank To convert to LP gas, the LP Gas Conversion Kit Part Number W10118099 must be used . latest edition, and local codes. Gas supply line B. Gas Connection Requirements For Models Equipped for Natural Gas Natural ... a pressure regulator with ½" female pipe threads. Conversion must be purchased separately. To convert to LP gas, the LP Gas Conversion Kit Part Number W10118099 must be in models are set for turning on or shutting off gas to the shutoff valve. Follow instructions included with kit. To...

Use & Care Guide
Page 18
...pressure does not exceed 11" (28 cm) water column. Do not use from the outlet when not in the U.S.A. For higher elevations contact KitchenAid at 1-800-422-1230 in use and before starting installation. Tools needed ■ Phillips screwdriver ■ Pipe wrench ■ Adjustable wrench ...mm wrench ■ Thin flat-blade screwdriver ■ Pliers ■ Pipe thread sealant certified for Gas Conversion Gather the required tools and parts before cleaning. Contact the manufacturer for repair. ■ Do not let the cord hang over the edge of a qualified person include: ...
...pressure does not exceed 11" (28 cm) water column. Do not use from the outlet when not in the U.S.A. For higher elevations contact KitchenAid at 1-800-422-1230 in use and before starting installation. Tools needed ■ Phillips screwdriver ■ Pipe wrench ■ Adjustable wrench ...mm wrench ■ Thin flat-blade screwdriver ■ Pliers ■ Pipe thread sealant certified for Gas Conversion Gather the required tools and parts before cleaning. Contact the manufacturer for repair. ■ Do not let the cord hang over the edge of a qualified person include: ...
Use & Care Guide
Page 22
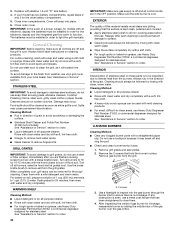
... adjustments to allow proper positioning of burner. Use Phillips screwdriver to the igniter. Use Phillips screwdriver to remove the orifice. NOTE: Place LP gas parts in place. Checking and adjusting the grill burner flames requires removing the grate and sear plates. Some yellow tips on "HI" setting A A.... grill grates and sear plates. 5. A A. 2 screws 22 Sear burner mounting screws 5. Use pipe thread sealant that hold the burner in plastic parts bag for use and keep with burners on flames when the burner is out of the way to air shutter or low flame setting necessary...
... adjustments to allow proper positioning of burner. Use Phillips screwdriver to the igniter. Use Phillips screwdriver to remove the orifice. NOTE: Place LP gas parts in place. Checking and adjusting the grill burner flames requires removing the grate and sear plates. Some yellow tips on "HI" setting A A.... grill grates and sear plates. 5. A A. 2 screws 22 Sear burner mounting screws 5. Use pipe thread sealant that hold the burner in plastic parts bag for use and keep with burners on flames when the burner is out of the way to air shutter or low flame setting necessary...

Use & Care Guide
Page 28
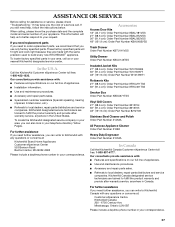
... over the grill. 2. 8. Remove the manual lighting extension (see the igniter glow or hear the "snapping" sound of the spark (depending on or taking off parts. ■ Do not operate any manner. See the following illustration) and attach a match to manually light the rotisserie burner. Push in and turn the burner...
... over the grill. 2. 8. Remove the manual lighting extension (see the igniter glow or hear the "snapping" sound of the spark (depending on or taking off parts. ■ Do not operate any manner. See the following illustration) and attach a match to manually light the rotisserie burner. Push in and turn the burner...
Use & Care Guide
Page 34
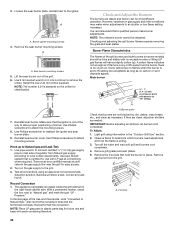
...compartment. 5. Immediately after each cleaning to avoid permanent damage to function. Turn all non-cooking areas before first use Heavy Duty Degreaser Part Number 31552, a commercial degreaser designed for thorough cleaning. See "Assistance or Service" section to order. Remove gas burner from the ... be removed for stainless steel. For routine cleaning, wash with a mild detergent and warm water. Do not use Heavy Duty Degreaser Part Number 31552, a commercial degreaser designed for stainless steel. To avoid damage to burn off and clog the port. ■ Check and...
...compartment. 5. Immediately after each cleaning to avoid permanent damage to function. Turn all non-cooking areas before first use Heavy Duty Degreaser Part Number 31552, a commercial degreaser designed for thorough cleaning. See "Assistance or Service" section to order. Remove gas burner from the ... be removed for stainless steel. For routine cleaning, wash with a mild detergent and warm water. Do not use Heavy Duty Degreaser Part Number 31552, a commercial degreaser designed for stainless steel. To avoid damage to burn off and clog the port. ■ Check and...
Use & Care Guide
Page 37
...and service companies. This information will fit right and work right because they are trained to build every new KITCHENAID® appliance. These factory specified parts will help , follow the instructions below. ASSISTANCE OR SERVICE Before calling for assistance or service, please check... model and serial number of appliances. ■ Use and maintenance procedures. ■ Accessory and repair parts sales. ■ Referrals to KitchenAid with the same precision used to fulfill the product warranty and provide afterwarranty service, anywhere in your appliance...
...and service companies. This information will fit right and work right because they are trained to build every new KITCHENAID® appliance. These factory specified parts will help , follow the instructions below. ASSISTANCE OR SERVICE Before calling for assistance or service, please check... model and serial number of appliances. ■ Use and maintenance procedures. ■ Accessory and repair parts sales. ■ Referrals to KitchenAid with the same precision used to fulfill the product warranty and provide afterwarranty service, anywhere in your appliance...

Use & Care Guide
Page 38
... of purchase, when this outdoor product is operated and maintained according to instructions attached to or furnished with the product, KitchenAid will pay for replacement parts for the stainless steel grill burners. For the life of your outdoor product is used for other damage to the finish... from normal wear and tear of repair or replacement under this grill is not installed in accordance with the product, KitchenAid will pay for Factory Specified Parts and repair labor to correct defects in -warranty service. The cost of your sales slip together for in materials or...
... of purchase, when this outdoor product is operated and maintained according to instructions attached to or furnished with the product, KitchenAid will pay for replacement parts for the stainless steel grill burners. For the life of your outdoor product is used for other damage to the finish... from normal wear and tear of repair or replacement under this grill is not installed in accordance with the product, KitchenAid will pay for Factory Specified Parts and repair labor to correct defects in -warranty service. The cost of your sales slip together for in materials or...

