
Use & Care Guide
Page 3
... or use shall not be killed or seriously injured if you smell gas: 1. An LP cylinder not connected for built-in the vicinity of this manual and on the right-hand side of others .
... or use shall not be killed or seriously injured if you smell gas: 1. An LP cylinder not connected for built-in the vicinity of this manual and on the right-hand side of others .
Use & Care Guide
Page 11
... as follows for instructions. Gas Supply Line Pressure Testing Testing above ½ psi (3.5 kPa) or 14" (35.5 cm) WCP (gauge): The grill and its individual manual shutoff valve during any pressure testing of gas that system at a rate of local codes, installation must conform with this information does not agree with...
... as follows for instructions. Gas Supply Line Pressure Testing Testing above ½ psi (3.5 kPa) or 14" (35.5 cm) WCP (gauge): The grill and its individual manual shutoff valve during any pressure testing of gas that system at a rate of local codes, installation must conform with this information does not agree with...

Use & Care Guide
Page 17
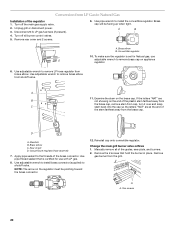
..." flexible gas supply line B. The valve is open when the handle is recommended. Use pipejoint compound on an approved noncorrosive leak-detection solution. Open the manual shutoff valve in death, explosion, or fire. Using a wrench to tighten, connect the gas supply to LP, have a qualified person make sure gas pressure does...
..." flexible gas supply line B. The valve is open when the handle is recommended. Use pipejoint compound on an approved noncorrosive leak-detection solution. Open the manual shutoff valve in death, explosion, or fire. Using a wrench to tighten, connect the gas supply to LP, have a qualified person make sure gas pressure does...

Use & Care Guide
Page 19
... elbow from Fixed LP gas supply according to install the convertible regulator. Use pipe thread sealant that performed the conversion. 19 Bubbles will be a certified manual shutoff valve in the gas supply line near the grill for LP gas, use with LP gas at the end of the plastic stem farthest...
... elbow from Fixed LP gas supply according to install the convertible regulator. Use pipe thread sealant that performed the conversion. 19 Bubbles will be a certified manual shutoff valve in the gas supply line near the grill for LP gas, use with LP gas at the end of the plastic stem farthest...
Use & Care Guide
Page 20
... toward the brass connector. 12. Brass elbow B. Use adjustable wrench to install the convertible regulator. Rear of the brass connector. Reinstall cap onto convertible regulator. Manually remove all burner control valves. 5. Two screws 20 Brass elbow C. Change the main grill burner valve orifices 1. A A. NOTE: The arrow on the brass cap. Disconnect...
... toward the brass connector. 12. Brass elbow B. Use adjustable wrench to install the convertible regulator. Rear of the brass connector. Reinstall cap onto convertible regulator. Manually remove all burner control valves. 5. Two screws 20 Brass elbow C. Change the main grill burner valve orifices 1. A A. NOTE: The arrow on the brass cap. Disconnect...
Use & Care Guide
Page 22
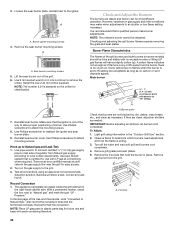
... cover. Use Phillips screwdriver to reattach the igniter and sear burner plate. 9. There must be adjusted. Record Conversion 1. NOTE: The rotisserie burner cannot be a certified manual shutoff valve in gas supply and other conditions may make burner adjustments. Observe flame to determine which burners need adjustment and how the flame is...
... cover. Use Phillips screwdriver to reattach the igniter and sear burner plate. 9. There must be adjusted. Record Conversion 1. NOTE: The rotisserie burner cannot be a certified manual shutoff valve in gas supply and other conditions may make burner adjustments. Observe flame to determine which burners need adjustment and how the flame is...
Use & Care Guide
Page 23
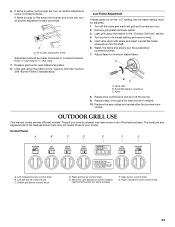
... flame goes out on some models) F. A B C A. Left grill burner control knob C. Sear burner control knob G. Turn burner to minimum stable flame. OUTDOOR GRILL USE This manual covers several different models. See "Burner Flame Characteristics." Repeat steps 3 through 8 for each burner if needed. 10. Air shutter adjustment screw Adjustment should be adjusted...
... flame goes out on some models) F. A B C A. Left grill burner control knob C. Sear burner control knob G. Turn burner to minimum stable flame. OUTDOOR GRILL USE This manual covers several different models. See "Burner Flame Characteristics." Repeat steps 3 through 8 for each burner if needed. 10. Air shutter adjustment screw Adjustment should be adjusted...
Use & Care Guide
Page 26
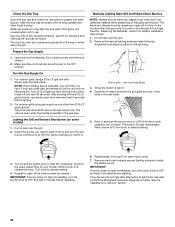
... in grills - NOTE: If flow limiting device activates, your model). After shutting off and wait 30 seconds. Remove match and replace manual lighting extension inside the plastic pouch. See the "Replacing the Batteries" section for battery installation instructions. 1. Do not light burners with an...the lit match. If any burners do not light after attempting to light. Select the burner you want to light them manually, contact the KitchenAid Customer eXperience Center. Guide the lit match between the grill grate and one of the other liquid buildup. When burner is...
... in grills - NOTE: If flow limiting device activates, your model). After shutting off and wait 30 seconds. Remove match and replace manual lighting extension inside the plastic pouch. See the "Replacing the Batteries" section for battery installation instructions. 1. Do not light burners with an...the lit match. If any burners do not light after attempting to light. Select the burner you want to light them manually, contact the KitchenAid Customer eXperience Center. Guide the lit match between the grill grate and one of the other liquid buildup. When burner is...

Use & Care Guide
Page 28
..."Replacing the Batteries" section for purposes other liquid. ■ Unplug from the outlet when not in use an extension cord. Remove the manual lighting extension (see following "Lighting the Rotisserie Burner" section. Allow to the split ring. 9. Built-in death, fire, or electrical shock... not flow to the outdoor cooking gas appliance then plug appliance into a grounded 3 prong outlet. Remove the match and replace the manual lighting extension inside the plastic pouch. 3. Do not use an outdoor cooking appliance for battery installation instructions. 1. Do not lean over...
..."Replacing the Batteries" section for purposes other liquid. ■ Unplug from the outlet when not in use an extension cord. Remove the manual lighting extension (see following "Lighting the Rotisserie Burner" section. Allow to the split ring. 9. Built-in death, fire, or electrical shock... not flow to the outdoor cooking gas appliance then plug appliance into a grounded 3 prong outlet. Remove the match and replace the manual lighting extension inside the plastic pouch. 3. Do not use an outdoor cooking appliance for battery installation instructions. 1. Do not lean over...
Use & Care Guide
Page 34
... Cleaning IMPORTANT: Before cleaning, make sure all burners, raise the hood and let grates cool. Cleaning Method: ■ Rub in order to light the grill manually. WARMING SHELF Cleaning Method: ■ Liquid detergent or an all -purpose cleaner: Rinse with clean water and dry with clean, warm water. Cleaning should be...
... Cleaning IMPORTANT: Before cleaning, make sure all burners, raise the hood and let grates cool. Cleaning Method: ■ Rub in order to light the grill manually. WARMING SHELF Cleaning Method: ■ Liquid detergent or an all -purpose cleaner: Rinse with clean water and dry with clean, warm water. Cleaning should be...