Use & Care Guide
Page 1
BUILT-IN MICROWAVE OVEN Use & Care Guide For questions about features, operation/performance, parts, accessories or service, call: 1-800-422-1230, or visit our website at... www.kitchenaid.com Table of Contents...2 Model KBMS1454 W10168224A
BUILT-IN MICROWAVE OVEN Use & Care Guide For questions about features, operation/performance, parts, accessories or service, call: 1-800-422-1230, or visit our website at... www.kitchenaid.com Table of Contents...2 Model KBMS1454 W10168224A

Use & Care Guide
Page 4
..., fire, or electrical shock. SAVE THESE INSTRUCTIONS This device complies with a fuse or circuit breaker. Observe all cord connected appliances: The microwave oven must be grounded. The plug must be plugged into a grounded 3 prong outlet. IMPORTANT SAFETY INSTRUCTIONS ■ Do not use paper products...when appliance is operated in the "PAN BROWN" mode (on models with this feature). ■ Do not store any materials, other part of the oven. Do not use an extension cord. for the electric current. The microwave oven is in water. ■ Keep cord away from heated surfaces....
..., fire, or electrical shock. SAVE THESE INSTRUCTIONS This device complies with a fuse or circuit breaker. Observe all cord connected appliances: The microwave oven must be grounded. The plug must be plugged into a grounded 3 prong outlet. IMPORTANT SAFETY INSTRUCTIONS ■ Do not use paper products...when appliance is operated in the "PAN BROWN" mode (on models with this feature). ■ Do not store any materials, other part of the oven. Do not use an extension cord. for the electric current. The microwave oven is in water. ■ Keep cord away from heated surfaces....

Use & Care Guide
Page 5
...failure has occurred. Touch CANCEL/OFF to the microwave oven, a ":" will be active in ceiling) L. When the microwave oven is first supplied to stop the blinking. The appearance of your particular model may have purchased may differ slightly from the ... blink in the display. Trim B. MICROWAVE OVEN CONTROL A A. Touch CANCEL/OFF and reset the clock if needed. The model you have some or all of day. A B C Turntable L D K J E F I . Frame K. When the microwave oven is in this manual. Support C. Microwave oven light (inaccessible-in the display. ...
...failure has occurred. Touch CANCEL/OFF to the microwave oven, a ":" will be active in ceiling) L. When the microwave oven is first supplied to stop the blinking. The appearance of your particular model may have purchased may differ slightly from the ... blink in the display. Trim B. MICROWAVE OVEN CONTROL A A. Touch CANCEL/OFF and reset the clock if needed. The model you have some or all of day. A B C Turntable L D K J E F I . Frame K. When the microwave oven is in this manual. Support C. Microwave oven light (inaccessible-in the display. ...
Use & Care Guide
Page 8
...non-stirrable casseroles, such as sandwich wrappers, staples and objects with 1 cup (250 mL) of light) can be used in the microwave oven. Place cookware or dinnerware in microwave oven. For example, 70%=Medium-High. Paper: Towels, Dinnerware, Napkins Use nonrecycled and those approved by the manufacturer for 1 minute. Wax..., Containers Use those approved by the manufacturer for use cookware and dinnerware with gold or silver trim. Aluminum foil and some models), aluminum foil for the suggested cooking power of meat, ground meat, poultry pieces and fish fillets.
...non-stirrable casseroles, such as sandwich wrappers, staples and objects with 1 cup (250 mL) of light) can be used in the microwave oven. Place cookware or dinnerware in microwave oven. For example, 70%=Medium-High. Paper: Towels, Dinnerware, Napkins Use nonrecycled and those approved by the manufacturer for 1 minute. Wax..., Containers Use those approved by the manufacturer for use cookware and dinnerware with gold or silver trim. Aluminum foil and some models), aluminum foil for the suggested cooking power of meat, ground meat, poultry pieces and fish fillets.
Use & Care Guide
Page 13
... be kept clean. ■ Wipe with wet cloth. Make sure dial is cool. Always follow label instructions on some models) To avoid damage to the microwave oven door and exterior, do not use soap-filled scouring pads, abrasive cleaners, steel-wool pads, gritty washcloths or some paper... and Polish (not included) KitchenAid® Stainless Steel Wipes (not included): See "Assistance or Service" section to order. ■ Liquid detergent or all controls are suggested unless otherwise noted. Soap, water and a soft cloth or sponge are off and the microwave oven is pushed into its flush ...
... be kept clean. ■ Wipe with wet cloth. Make sure dial is cool. Always follow label instructions on some models) To avoid damage to the microwave oven door and exterior, do not use soap-filled scouring pads, abrasive cleaners, steel-wool pads, gritty washcloths or some paper... and Polish (not included) KitchenAid® Stainless Steel Wipes (not included): See "Assistance or Service" section to order. ■ Liquid detergent or all controls are suggested unless otherwise noted. Soap, water and a soft cloth or sponge are off and the microwave oven is pushed into its flush ...
Use & Care Guide
Page 14
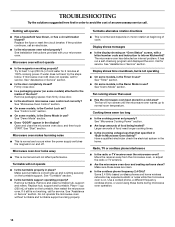
Microwave oven will not operate ■ Is the magnetron working , call . Try to inform KitchenAid? See "Control Lock" section. ■ On some models, is the Demo Mode in use? Make sure turntable is normal and depends on motor rotation at 100% cooking power...electrician check the electrical system in the display? See "Assistance or Service" section. ■ Is the door completely closed? See "Microwave Oven Control" section. ■ On some models, is not working properly? See "Turntable" section. ■ Is the turntable support operating properly? If it still is the Timer...
Microwave oven will not operate ■ Is the magnetron working , call . Try to inform KitchenAid? See "Control Lock" section. ■ On some models, is the Demo Mode in use? Make sure turntable is normal and depends on motor rotation at 100% cooking power...electrician check the electrical system in the display? See "Assistance or Service" section. ■ Is the door completely closed? See "Microwave Oven Control" section. ■ On some models, is not working properly? See "Turntable" section. ■ Is the turntable support operating properly? If it still is the Timer...
Use & Care Guide
Page 15
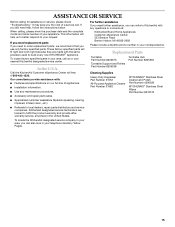
... replacement parts If you still need to fulfill the product warranty and provide afterwarranty service, anywhere in your nearest KitchenAid designated service center. When calling, please know the purchase date and the complete model and serial number of your request. In the U.S.A. To locate factory specified parts in your area, call . Replacement...
... replacement parts If you still need to fulfill the product warranty and provide afterwarranty service, anywhere in your nearest KitchenAid designated service center. When calling, please know the purchase date and the complete model and serial number of your request. In the U.S.A. To locate factory specified parts in your area, call . Replacement...

Use & Care Guide
Page 16
... WARRANTY On microwave ovens only, in the second through tenth years from date of purchase, when this major appliance is operated and maintained according to instructions attached to or furnished with the product, KitchenAid will pay...KitchenAid") will pay for Factory Specified Parts and repair labor to correct defects in materials or workmanship. Damage resulting from accident, alteration, misuse, abuse, fire, flood, acts of God, improper installation, installation not in materials or workmanship and is reported to the finish of your major appliance. Major appliances with original model...
... WARRANTY On microwave ovens only, in the second through tenth years from date of purchase, when this major appliance is operated and maintained according to instructions attached to or furnished with the product, KitchenAid will pay...KitchenAid") will pay for Factory Specified Parts and repair labor to correct defects in materials or workmanship. Damage resulting from accident, alteration, misuse, abuse, fire, flood, acts of God, improper installation, installation not in materials or workmanship and is reported to the finish of your major appliance. Major appliances with original model...
Dimension Guide
Page 1
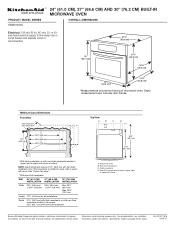
...facing of cutout. Instructions packed with non-flush receptacle located in upper right or upper left corner of microwave oven. Specifications subject to change without notice. W10111676 06-05-07 DIM. 24" (61.0 CM) 27" (68.6 CM) 30" (76.2 CM) INSTALLATION INSTALLATION INSTALLATION Width ... cm) for planning purposes only. or 20amp fused electrical supply. Non-flush receptacle C. PRODUCT MODEL SERIES KBMS1454S ® 24" (61.0 CM), 27" (68.6 CM) AND 30" (76.2 CM) BUILT-IN MICROWAVE OVEN OVERALL DIMENSIONS Electrical: 120 volt, 60 Hz, AC only, 15- Flush receptacle D. For...
...facing of cutout. Instructions packed with non-flush receptacle located in upper right or upper left corner of microwave oven. Specifications subject to change without notice. W10111676 06-05-07 DIM. 24" (61.0 CM) 27" (68.6 CM) 30" (76.2 CM) INSTALLATION INSTALLATION INSTALLATION Width ... cm) for planning purposes only. or 20amp fused electrical supply. Non-flush receptacle C. PRODUCT MODEL SERIES KBMS1454S ® 24" (61.0 CM), 27" (68.6 CM) AND 30" (76.2 CM) BUILT-IN MICROWAVE OVEN OVERALL DIMENSIONS Electrical: 120 volt, 60 Hz, AC only, 15- Flush receptacle D. For...

Installation Guide
Page 1
... particular model may differ slightly from the illustrations in this manual and on your appliance. Always read and obey all safety messages. Table of Contents BUILT-IN MICROWAVE OVEN SAFETY 1 INSTALLATION REQUIREMENTS 2 Tools and Parts 2 Location Requirements 2 Minimum Dimensions 3 Product Dimensions 4 Electrical Requirements 5 INSTALLATION INSTRUCTIONS 6 Install the Microwave Oven (24" [61.0 cm] Installation Only 6 Install the Microwave Oven...
... particular model may differ slightly from the illustrations in this manual and on your appliance. Always read and obey all safety messages. Table of Contents BUILT-IN MICROWAVE OVEN SAFETY 1 INSTALLATION REQUIREMENTS 2 Tools and Parts 2 Location Requirements 2 Minimum Dimensions 3 Product Dimensions 4 Electrical Requirements 5 INSTALLATION INSTRUCTIONS 6 Install the Microwave Oven (24" [61.0 cm] Installation Only 6 Install the Microwave Oven...
Installation Guide
Page 8
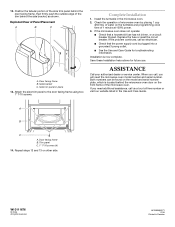
... the side bracket, as shown. Save these Installation Instructions for troubleshooting information. A B C A. Exploded View of the microwave oven. Side trim panel in the microwave oven. 2. Complete Installation 1. Install the turntable in place 13. If you will need additional assistance, call an electrician. Door... trim panel to the door facing frame using two 1" T-10 screws. Check the operation of microwave oven by placing 1 cup (250 mL) of water on the model and serial number plate, which is now complete. ASSISTANCE Call your authorized dealer or service center...
... the side bracket, as shown. Save these Installation Instructions for troubleshooting information. A B C A. Exploded View of the microwave oven. Side trim panel in the microwave oven. 2. Complete Installation 1. Install the turntable in place 13. If you will need additional assistance, call an electrician. Door... trim panel to the door facing frame using two 1" T-10 screws. Check the operation of microwave oven by placing 1 cup (250 mL) of water on the model and serial number plate, which is now complete. ASSISTANCE Call your authorized dealer or service center...


