Use & Care Guide
Page 1
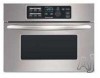
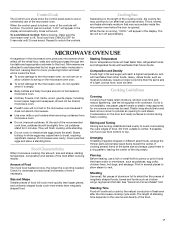
www.kitchenaid.com Table of Contents...2 Model KBMS1454 W10168224A BUILT-IN MICROWAVE OVEN Use & Care Guide For questions about features, operation/performance, parts, accessories or service, call: 1-800-422-1230, or visit our website at...
www.kitchenaid.com Table of Contents...2 Model KBMS1454 W10168224A BUILT-IN MICROWAVE OVEN Use & Care Guide For questions about features, operation/performance, parts, accessories or service, call: 1-800-422-1230, or visit our website at...
Use & Care Guide
Page 2
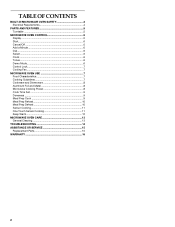
... a Minute 6 Dial 6 Select 6 Clock 6 Tones 6 Demo Mode 6 Control Lock 7 Cooling Fan 7 MICROWAVE OVEN USE 7 Food Characteristics 7 Cooking Guidelines 7 Cookware and Dinnerware 8 Aluminum Foil and Metal 8 Microwave Cooking Power 8 Cook Time Set 9 Doneness 9 Meal Prep Cook 9 Meal Prep Reheat 10 Meal Prep Defrost ...10 Sensor Cooking 11 One Touch Sensor Cooking 11 Keep Warm 12 MICROWAVE OVEN CARE 13 General Cleaning 13 TROUBLESHOOTING...
... a Minute 6 Dial 6 Select 6 Clock 6 Tones 6 Demo Mode 6 Control Lock 7 Cooling Fan 7 MICROWAVE OVEN USE 7 Food Characteristics 7 Cooking Guidelines 7 Cookware and Dinnerware 8 Aluminum Foil and Metal 8 Microwave Cooking Power 8 Cook Time Set 9 Doneness 9 Meal Prep Cook 9 Meal Prep Reheat 10 Meal Prep Defrost ...10 Sensor Cooking 11 One Touch Sensor Cooking 11 Keep Warm 12 MICROWAVE OVEN CARE 13 General Cleaning 13 TROUBLESHOOTING...
Use & Care Guide
Page 3
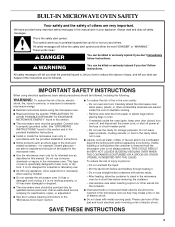
...follow the specific "PRECAUTIONS TO AVOID POSSIBLE EXPOSURE TO EXCESSIVE MICROWAVE ENERGY" found in this section. ■ The microwave oven must be heated in the microwave oven. ■ Use the microwave oven only for example, closed , turn oven off, and disconnect the power cord, or shut off the...of electric shock. See "GROUNDING INSTRUCTIONS" found in this section and in the provided Installation Instructions. ■ Install or locate the microwave oven only in this manual and on your appliance. for its intended use . ■ As with the provided Installation Instructions. ■...
...follow the specific "PRECAUTIONS TO AVOID POSSIBLE EXPOSURE TO EXCESSIVE MICROWAVE ENERGY" found in this section. ■ The microwave oven must be heated in the microwave oven. ■ Use the microwave oven only for example, closed , turn oven off, and disconnect the power cord, or shut off the...of electric shock. See "GROUNDING INSTRUCTIONS" found in this section and in the provided Installation Instructions. ■ Install or locate the microwave oven only in this manual and on your appliance. for its intended use . ■ As with the provided Installation Instructions. ■...

Use & Care Guide
Page 4
...Do not immerse cord or plug in water. ■ Keep cord away from heated surfaces. ■ Do not cover or block any openings on the microwave oven. ■ Do not let cord hang over edge of table or counter. ■ Do not mount over a sink. ■ Do not cover ...a cord having a grounding wire with a grounding plug. SAVE THESE INSTRUCTIONS This device complies with Part 18 of the oven. Do not remove ground prong. Observe all cord connected appliances: The microwave oven must be adjusted or repaired by providing an escape wire for example, near a kitchen sink, in a wet basement,...
...Do not immerse cord or plug in water. ■ Keep cord away from heated surfaces. ■ Do not cover or block any openings on the microwave oven. ■ Do not let cord hang over edge of table or counter. ■ Do not mount over a sink. ■ Do not cover ...a cord having a grounding wire with a grounding plug. SAVE THESE INSTRUCTIONS This device complies with Part 18 of the oven. Do not remove ground prong. Observe all cord connected appliances: The microwave oven must be adjusted or repaired by providing an escape wire for example, near a kitchen sink, in a wet basement,...

Use & Care Guide
Page 5
... of your particular model may differ slightly from the illustrations in this manual. When the microwave oven is not in the display. Door lock system D. Microwave oven light (inaccessible-in use , the display shows the time of the features shown here....shows cooking power, quantities, weights and/or prompts. Metal shielded window I H G A. Hub The turntable can rotate in either direction to the microwave oven, a ":" will be active in the microwave oven. See "Assistance or Service" to stop the blinking. PARTS AND FEATURES This manual may have some or all of day. A B C ...
... of your particular model may differ slightly from the illustrations in this manual. When the microwave oven is not in the display. Door lock system D. Microwave oven light (inaccessible-in use , the display shows the time of the features shown here....shows cooking power, quantities, weights and/or prompts. Metal shielded window I H G A. Hub The turntable can rotate in either direction to the microwave oven, a ":" will be active in the microwave oven. See "Assistance or Service" to stop the blinking. PARTS AND FEATURES This manual may have some or all of day. A B C ...

Use & Care Guide
Page 6
...to set the hour. 3. Touch CANCEL/OFF. Tones Tones are changing the time, the current set time will appear in the display. The microwave oven light will come on using the SELECT pad with the automatic cooking, reheating and defrosting programs. Clock This is interrupted, touching START will not... pop it out. The "minutes" digits will add 1 minute of cook time, up to a total remaining cook time of the microwave oven, a cooking function cannot be started if the microwave oven door has been closed . Touch SELECT or START to exit Demo Mode. 6 When set , "12:00" will appear in the...
...to set the hour. 3. Touch CANCEL/OFF. Tones Tones are changing the time, the current set time will appear in the display. The microwave oven light will come on using the SELECT pad with the automatic cooking, reheating and defrosting programs. Clock This is interrupted, touching START will not... pop it out. The "minutes" digits will add 1 minute of cook time, up to a total remaining cook time of the microwave oven, a cooking function cannot be started if the microwave oven door has been closed . Touch SELECT or START to exit Demo Mode. 6 When set , "12:00" will appear in the...
Use & Care Guide
Page 7
..."COOL" will turn food over from outside to center. They will continue to cook by fat, sugar and water molecules in the microwave oven produces microwaves which cooks the food. ■ To avoid damage to move, producing friction and heat which reflect off . Arranging If heating irregularly ...Prick in several items of the same size and shape, place them to unlock the controls. Let potatoes stand for microwave ovens may cause them in the microwave oven because it is off the metal floor, walls and ceiling and pass through the turntable and appropriate cookware to allow...
..."COOL" will turn food over from outside to center. They will continue to cook by fat, sugar and water molecules in the microwave oven produces microwaves which cooks the food. ■ To avoid damage to move, producing friction and heat which reflect off . Arranging If heating irregularly ...Prick in several items of the same size and shape, place them to unlock the controls. Let potatoes stand for microwave ovens may cause them in the microwave oven because it is off the metal floor, walls and ceiling and pass through the turntable and appropriate cookware to allow...
Use & Care Guide
Page 8
...arcing (a blue flash of meat, ground meat, poultry pieces and fish fillets. Use the following chart as a general guide for microwave oven use . Simmering stews. 40% Melting chocolate. Melamine Follow manufacturer's recommendations. Plastic: Wraps, Bags, Covers, Dinnerware, Containers Use ...those approved by the manufacturer for the suggested cooking power of fruit. 8 Place cookware or dinnerware in microwave oven. For example, 70%=Medium-High. For example, whole fish and meat loaf. 70%, Medium-High Reheating a single serving of...
...arcing (a blue flash of meat, ground meat, poultry pieces and fish fillets. Use the following chart as a general guide for microwave oven use . Simmering stews. 40% Melting chocolate. Melamine Follow manufacturer's recommendations. Plastic: Wraps, Bags, Covers, Dinnerware, Containers Use ...those approved by the manufacturer for the suggested cooking power of fruit. 8 Place cookware or dinnerware in microwave oven. For example, 70%=Medium-High. For example, whole fish and meat loaf. 70%, Medium-High Reheating a single serving of...
Use & Care Guide
Page 9
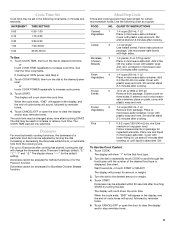
.... Cover with plastic wrap and vent. Let stand in the display, and the end-of -cycle tones will appear in microwave oven for the Popcorn function. Turn the dial to , or subtracts time from the cooking cycle. See chart for certain...and let stand 2-3 minutes after cooking. Cereal 2 1-4 servings/ Use instant cereal. Add 2-4 tbs (30-60 mL) water. Place rice and liquid in microwave-safe container. Follow instructions on plate, cover with loose-fitting lid. If cooking at any time after cooking. Doneness For most automatic cooking functions, the...
.... Cover with plastic wrap and vent. Let stand in the display, and the end-of -cycle tones will appear in microwave oven for the Popcorn function. Turn the dial to , or subtracts time from the cooking cycle. See chart for certain...and let stand 2-3 minutes after cooking. Cereal 2 1-4 servings/ Use instant cereal. Add 2-4 tbs (30-60 mL) water. Place rice and liquid in microwave-safe container. Follow instructions on plate, cover with loose-fitting lid. If cooking at any time after cooking. Doneness For most automatic cooking functions, the...
Use & Care Guide
Page 10
... dial. Pizza 4 (refrigerated) 1-3 pieces, 3 oz (85 g) each/ Place on paper towel. Soup 6 1-4 cups (250 mL-1 L)/ Place in microwave-safe container and cover with smaller openings may be adjusted within 20 seconds after reheating. *For smaller rolls, 2 rolls may heat faster. Cover with plastic... the Reheat Control: 1. The display will count down the reheat time. The automatic defrost function should not be used , or the microwave oven can be manually set to shield parts of aluminum foil to defrost. ■ Unwrap foods and remove lids (e.g. To Use the Defrost...
... dial. Pizza 4 (refrigerated) 1-3 pieces, 3 oz (85 g) each/ Place on paper towel. Soup 6 1-4 cups (250 mL-1 L)/ Place in microwave-safe container and cover with smaller openings may be adjusted within 20 seconds after reheating. *For smaller rolls, 2 rolls may heat faster. Cover with plastic... the Reheat Control: 1. The display will count down the reheat time. The automatic defrost function should not be used , or the microwave oven can be manually set to shield parts of aluminum foil to defrost. ■ Unwrap foods and remove lids (e.g. To Use the Defrost...
Use & Care Guide
Page 11
... Baked Potato 1-4 medium, 10-13 oz (283-369 g) each, similar in size Pierce each one package at least 3 minutes. ■ The microwave oven cavity and the exterior of -cycle tones will show "3.0-" followed by reminder tones. 4. Doneness may be attended at least 1" (2.5 cm) apart. ...be canceled. The sensor animation will be displayed periodically during the first 20 seconds of foods. One Touch Sensor Cooking A sensor in the microwave oven detects humidity released from the food as with a fork. Place popcorn bag on the turntable, correct side up, as a guide for...
... Baked Potato 1-4 medium, 10-13 oz (283-369 g) each, similar in size Pierce each one package at least 3 minutes. ■ The microwave oven cavity and the exterior of -cycle tones will show "3.0-" followed by reminder tones. 4. Doneness may be attended at least 1" (2.5 cm) apart. ...be canceled. The sensor animation will be displayed periodically during the first 20 seconds of foods. One Touch Sensor Cooking A sensor in the microwave oven detects humidity released from the food as with a fork. Place popcorn bag on the turntable, correct side up, as a guide for...
Use & Care Guide
Page 12
... time. The Keep Warm function uses 10% cook power. When the cycle ends, the end-of day mode. Hot cooked food can result in the microwave oven. The display will return to the time of -cycle tones will sound, and the display will show "60:00," which is the maximum default warming... down the warming time, and the Cook Time indicator will flash. Adjust warm time, if desired, then touch START. To Warm Manually: Follow instructions in oven more than one hour before or after cooking. Doing so can be used by turning the dial. The 10% cook power cannot be programmed to...
... time. The Keep Warm function uses 10% cook power. When the cycle ends, the end-of day mode. Hot cooked food can result in the microwave oven. The display will return to the time of -cycle tones will sound, and the display will show "60:00," which is the maximum default warming... down the warming time, and the Cook Time indicator will flash. Adjust warm time, if desired, then touch START. To Warm Manually: Follow instructions in oven more than one hour before or after cooking. Doing so can be used by turning the dial. The 10% cook power cannot be programmed to...
Use & Care Guide
Page 13
...; Stainless Steel Cleaner and Polish (not included) KitchenAid® Stainless Steel Wipes (not included): See "Assistance or Service" section to order. ■ Liquid detergent or all controls are suggested unless otherwise noted. MICROWAVE OVEN CAVITY MICROWAVE OVEN DOOR AND EXTERIOR To avoid damage to the microwave oven door and exterior, do not use abrasive cleaners, steel-wool...
...; Stainless Steel Cleaner and Polish (not included) KitchenAid® Stainless Steel Wipes (not included): See "Assistance or Service" section to order. ■ Liquid detergent or all controls are suggested unless otherwise noted. MICROWAVE OVEN CAVITY MICROWAVE OVEN DOOR AND EXTERIOR To avoid damage to the microwave oven door and exterior, do not use abrasive cleaners, steel-wool...
Use & Care Guide
Page 14
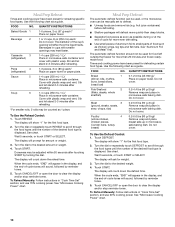
...KitchenAid? See "Control Lock" section. ■ On some models, is the Control Lock set? Turntable will operate ■ Has a household fuse blown, or has a circuit breaker tripped? Replace hub, support and turntable. Display shows messages ■ Is the display showing an "Oven Status" screen, with your microwave oven. The microwave oven... first in order to avoid the cost of an unnecessary service call an electrician. ■ Is the microwave oven wired properly? If microwave oven still does not operate, call for 2 minutes at beginning of cycle. Firmly close door. ■ ...
...KitchenAid? See "Control Lock" section. ■ On some models, is the Control Lock set? Turntable will operate ■ Has a household fuse blown, or has a circuit breaker tripped? Replace hub, support and turntable. Display shows messages ■ Is the display showing an "Oven Status" screen, with your microwave oven. The microwave oven... first in order to avoid the cost of an unnecessary service call an electrician. ■ Is the microwave oven wired properly? If microwave oven still does not operate, call for 2 minutes at beginning of cycle. Firmly close door. ■ ...

Use & Care Guide
Page 16
... reserved. ®Registered Trademark/TM Trademark of your major appliance, to replace or repair house fuses, or to correct house wiring or plumbing. 2. KITCHENAID® BUILT-IN OVEN & MICROWAVE WARRANTY LIMITED WARRANTY For one year from the date of purchase, when this major appliance is operated and maintained according to instructions attached to...
... reserved. ®Registered Trademark/TM Trademark of your major appliance, to replace or repair house fuses, or to correct house wiring or plumbing. 2. KITCHENAID® BUILT-IN OVEN & MICROWAVE WARRANTY LIMITED WARRANTY For one year from the date of purchase, when this major appliance is operated and maintained according to instructions attached to...
Dimension Guide
Page 1
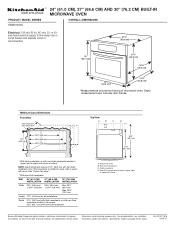
...(54.0 cm)* *Measurements include front facing of cutout. Non-flush receptacle located in upper right or upper left corner of microwave oven. Ref. See "Cutout Top View." **With non-flush receptacle. Flush receptacle D. Specifications subject to change materials and specifications ...(44.8 cm) for planning purposes only. Instructions packed with non-flush receptacle A. Microwave oven B. PRODUCT MODEL SERIES KBMS1454S ® 24" (61.0 CM), 27" (68.6 CM) AND 30" (76.2 CM) BUILT-IN MICROWAVE OVEN OVERALL DIMENSIONS Electrical: 120 volt, 60 Hz, AC only, 15- or 20amp ...
...(54.0 cm)* *Measurements include front facing of cutout. Non-flush receptacle located in upper right or upper left corner of microwave oven. Ref. See "Cutout Top View." **With non-flush receptacle. Flush receptacle D. Specifications subject to change materials and specifications ...(44.8 cm) for planning purposes only. Instructions packed with non-flush receptacle A. Microwave oven B. PRODUCT MODEL SERIES KBMS1454S ® 24" (61.0 CM), 27" (68.6 CM) AND 30" (76.2 CM) BUILT-IN MICROWAVE OVEN OVERALL DIMENSIONS Electrical: 120 volt, 60 Hz, AC only, 15- or 20amp ...

Installation Guide
Page 1
... 2 Tools and Parts 2 Location Requirements 2 Minimum Dimensions 3 Product Dimensions 4 Electrical Requirements 5 INSTALLATION INSTRUCTIONS 6 Install the Microwave Oven (24" [61.0 cm] Installation Only 6 Install the Microwave Oven (27" [68.6 cm] or 30" [76.2 cm] Installation Only 7 Complete Installation 8 ASSISTANCE 8 BUILT-IN MICROWAVE OVEN SAFETY Your safety and the safety of injury, and tell you and others are not...
... 2 Tools and Parts 2 Location Requirements 2 Minimum Dimensions 3 Product Dimensions 4 Electrical Requirements 5 INSTALLATION INSTRUCTIONS 6 Install the Microwave Oven (24" [61.0 cm] Installation Only 6 Install the Microwave Oven (27" [68.6 cm] or 30" [76.2 cm] Installation Only 7 Complete Installation 8 ASSISTANCE 8 BUILT-IN MICROWAVE OVEN SAFETY Your safety and the safety of injury, and tell you and others are not...

Installation Guide
Page 2
...trademark of cabinet cutout. Read and follow the instructions provided with bottom of Textron Innovations Inc. 2 s Cutout opening size will determine which includes microwave oven and items placed inside. Side brackets (2) B. s Grounded electrical outlet. D E A. Narrow side trim panels (2) E. s Measuring tape s ...Minimum installation clearances for each installation. See "Minimum Dimensions" section. Wide side trim panels (2) INSTALLATION PARTS USED 24" (61.0 cm) installation C 27" (68.6 cm) installation* A, C, D 30" (76.2 cm) installation A, B, C, E *...
...trademark of cabinet cutout. Read and follow the instructions provided with bottom of Textron Innovations Inc. 2 s Cutout opening size will determine which includes microwave oven and items placed inside. Side brackets (2) B. s Grounded electrical outlet. D E A. Narrow side trim panels (2) E. s Measuring tape s ...Minimum installation clearances for each installation. See "Minimum Dimensions" section. Wide side trim panels (2) INSTALLATION PARTS USED 24" (61.0 cm) installation C 27" (68.6 cm) installation* A, C, D 30" (76.2 cm) installation A, B, C, E *...
Installation Guide
Page 3
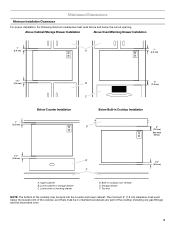
Upper cabinet B. Storage drawer F. Above Cabinet/Storage Drawer Installation Above Oven/Warming Drawer Installation 1" (2.5 cm) A 1" (2.5 cm) 1¹⁄₂" (3.8 cm) 1" (2.5 cm) Below Counter Installation B 3" (7.6 cm) C Below Built-in cooktop... cm) A. Built-in Cooktop Installation D 3" (7.6 cm) See note below the lowest point of the cooktop (including any gas fittings) and the microwave oven. 3 Minimum Dimensions Minimum Installation Clearances For proper installation, the following minimum clearances must be sunk into the counter and lower cabinet. Lower...
Upper cabinet B. Storage drawer F. Above Cabinet/Storage Drawer Installation Above Oven/Warming Drawer Installation 1" (2.5 cm) A 1" (2.5 cm) 1¹⁄₂" (3.8 cm) 1" (2.5 cm) Below Counter Installation B 3" (7.6 cm) C Below Built-in cooktop... cm) A. Built-in Cooktop Installation D 3" (7.6 cm) See note below the lowest point of the cooktop (including any gas fittings) and the microwave oven. 3 Minimum Dimensions Minimum Installation Clearances For proper installation, the following minimum clearances must be sunk into the counter and lower cabinet. Lower...
Installation Guide
Page 4
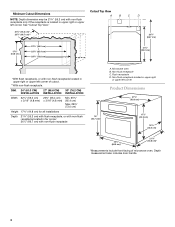
DIM. 24" (61.0 CM) 27" (68.6 CM) 30" (76.2 CM) INSTALLATION INSTALLATION INSTALLATION Width 22¹⁄&#...8324;" (60.3 cm)* 21¹⁄₄" (54.0 cm)* *Measurements include front facing of cutout. **With non-flush receptacle. Microwave oven B. Non-flush receptacle C. Flush receptacle D. See "Cutout Top View." 21³⁄₄" (55.2 cm)* 26¹⁄₄...only if the receptacle is located in upper right or upper left corner of microwave oven. Non-flush receptacle located in far corner; 26¹⁄₄" (66.7 cm) with non-flush receptacle 18" (45...
DIM. 24" (61.0 CM) 27" (68.6 CM) 30" (76.2 CM) INSTALLATION INSTALLATION INSTALLATION Width 22¹⁄&#...8324;" (60.3 cm)* 21¹⁄₄" (54.0 cm)* *Measurements include front facing of cutout. **With non-flush receptacle. Microwave oven B. Non-flush receptacle C. Flush receptacle D. See "Cutout Top View." 21³⁄₄" (55.2 cm)* 26¹⁄₄...only if the receptacle is located in upper right or upper left corner of microwave oven. Non-flush receptacle located in far corner; 26¹⁄₄" (66.7 cm) with non-flush receptacle 18" (45...


