Use & Care Guide
Page 1
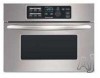
www.kitchenaid.com Table of Contents...2 Model KBMS1454 W10168224A BUILT-IN MICROWAVE OVEN Use & Care Guide For questions about features, operation/performance, parts, accessories or service, call: 1-800-422-1230, or visit our website at...
www.kitchenaid.com Table of Contents...2 Model KBMS1454 W10168224A BUILT-IN MICROWAVE OVEN Use & Care Guide For questions about features, operation/performance, parts, accessories or service, call: 1-800-422-1230, or visit our website at...
Use & Care Guide
Page 2
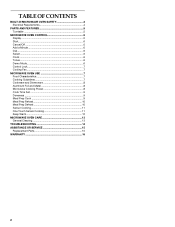
... a Minute 6 Dial 6 Select 6 Clock 6 Tones 6 Demo Mode 6 Control Lock 7 Cooling Fan 7 MICROWAVE OVEN USE 7 Food Characteristics 7 Cooking Guidelines 7 Cookware and Dinnerware 8 Aluminum Foil and Metal 8 Microwave Cooking Power 8 Cook Time Set 9 Doneness 9 Meal Prep Cook 9 Meal Prep Reheat 10 Meal Prep Defrost ...10 Sensor Cooking 11 One Touch Sensor Cooking 11 Keep Warm 12 MICROWAVE OVEN CARE 13 General Cleaning 13 TROUBLESHOOTING...
... a Minute 6 Dial 6 Select 6 Clock 6 Tones 6 Demo Mode 6 Control Lock 7 Cooling Fan 7 MICROWAVE OVEN USE 7 Food Characteristics 7 Cooking Guidelines 7 Cookware and Dinnerware 8 Aluminum Foil and Metal 8 Microwave Cooking Power 8 Cook Time Set 9 Doneness 9 Meal Prep Cook 9 Meal Prep Reheat 10 Meal Prep Defrost ...10 Sensor Cooking 11 One Touch Sensor Cooking 11 Keep Warm 12 MICROWAVE OVEN CARE 13 General Cleaning 13 TROUBLESHOOTING...
Use & Care Guide
Page 3
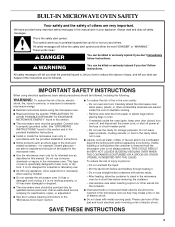
... you don't immediately follow instructions. All safety messages will follow the specific "PRECAUTIONS TO AVOID POSSIBLE EXPOSURE TO EXCESSIVE MICROWAVE ENERGY" found in the microwave oven. ■ Use the microwave oven only for its intended use . ■ Liquids, such as they may create a fire or risk of electric ...this manual. WARNING You can burn off power at the fuse or circuit breaker panel. - See "GROUNDING INSTRUCTIONS" found in the microwave oven as water, coffee, or tea are not followed. Do not use straight-sided containers with metal scouring pads. Do not leave paper...
... you don't immediately follow instructions. All safety messages will follow the specific "PRECAUTIONS TO AVOID POSSIBLE EXPOSURE TO EXCESSIVE MICROWAVE ENERGY" found in the microwave oven. ■ Use the microwave oven only for its intended use . ■ Liquids, such as they may create a fire or risk of electric ...this manual. WARNING You can burn off power at the fuse or circuit breaker panel. - See "GROUNDING INSTRUCTIONS" found in the microwave oven as water, coffee, or tea are not followed. Do not use straight-sided containers with metal scouring pads. Do not leave paper...

Use & Care Guide
Page 4
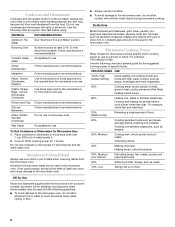
...Rules. 4 Required: ■ A 120 Volt, 60 Hz, AC only, 15- or 20-amp electrical supply with a grounding plug. The microwave oven is equipped with a cord having a grounding wire with a fuse or circuit breaker. The plug must be adjusted or repaired by providing an ...), (2) Hinges and latches (broken or loosened), (3) Door seals and sealing surfaces. (d) The oven should not be grounded. Do not use the microwave oven near the microwave oven. It is important not to microwave energy. In the event of an electrical short circuit, grounding reduces the risk of electric shock ...
...Rules. 4 Required: ■ A 120 Volt, 60 Hz, AC only, 15- or 20-amp electrical supply with a grounding plug. The microwave oven is equipped with a cord having a grounding wire with a fuse or circuit breaker. The plug must be adjusted or repaired by providing an ...), (2) Hinges and latches (broken or loosened), (3) Door seals and sealing surfaces. (d) The oven should not be grounded. Do not use the microwave oven near the microwave oven. It is important not to microwave energy. In the event of an electrical short circuit, grounding reduces the risk of electric shock ...

Use & Care Guide
Page 5
... use , the display shows cooking power, quantities, weights and/or prompts. Touch CANCEL/OFF and reset the clock if needed. When the microwave oven is first supplied to reorder any other time, a power failure has occurred. Door handle H. Place the turntable on the support should fit... inside the turntable bottom ridge. Door lock system D. Frame K. For best cooking results, do not operate the microwave oven without having the turntable in the microwave oven. If the ":" blinks in this manual. PARTS AND FEATURES This manual may have some or all of the features ...
... use , the display shows cooking power, quantities, weights and/or prompts. Touch CANCEL/OFF and reset the clock if needed. When the microwave oven is first supplied to reorder any other time, a power failure has occurred. Door handle H. Place the turntable on the support should fit... inside the turntable bottom ridge. Door lock system D. Frame K. For best cooking results, do not operate the microwave oven without having the turntable in the microwave oven. If the ":" blinks in this manual. PARTS AND FEATURES This manual may have some or all of the features ...

Use & Care Guide
Page 6
..." will rotate. These tones indicate the following options: ■ Select a setting or food type, and go to set the hour. 3. When the microwave oven is entered. Open the door, then touch and hold COOK for about 1 minute or more . Repeat to resume the cycle. To Set: 1. Turn...without actually turning on using the SELECT pad with the hour flashing. 2. Add a Minute The ADD A MINUTE control automatically starts the microwave oven at the current power level by opening the door while the sensor is estimating the cook time, and the sensor animation is ideal for...
..." will rotate. These tones indicate the following options: ■ Select a setting or food type, and go to set the hour. 3. When the microwave oven is entered. Open the door, then touch and hold COOK for about 1 minute or more . Repeat to resume the cycle. To Set: 1. Turn...without actually turning on using the SELECT pad with the hour flashing. 2. Add a Minute The ADD A MINUTE control automatically starts the microwave oven at the current power level by opening the door while the sensor is estimating the cook time, and the sensor animation is ideal for...
Use & Care Guide
Page 7
... make sure the microwave oven is touched, "LOC" will appear in the microwave oven produces microwaves which cooks the food. ■ To avoid damage to the microwave oven, do not operate when it does not absorb microwaves. ■ Use oven mitts or pot holders when removing containers from microwave oven. ■ Do...and density of the controls will finish cooking while standing. ■ Do not cook or reheat whole eggs inside the microwave oven before the door is normal during heavy cooking. Starting Temperature Room temperature foods will heat faster than other foods. Cooking ...
... make sure the microwave oven is touched, "LOC" will appear in the microwave oven produces microwaves which cooks the food. ■ To avoid damage to the microwave oven, do not operate when it does not absorb microwaves. ■ Use oven mitts or pot holders when removing containers from microwave oven. ■ Do...and density of the controls will finish cooking while standing. ■ Do not cook or reheat whole eggs inside the microwave oven before the door is normal during heavy cooking. Starting Temperature Room temperature foods will heat faster than other foods. Cooking ...
Use & Care Guide
Page 8
... not use . Use the following chart as a guide, then test before using. Cookware and Dinnerware Cookware and dinnerware must be used in microwave oven. Always use cookware or dinnerware if it . 2. Use the following chart as soups, beverages and most vegetables. 90% Cooking small, tender... any dish may be used properly, arcing (a blue flash of specific foods. Aluminum Foil and Metal Always use . If not used in microwave oven with gold or silver trim. OK for 1 minute. Do Not Use Metal cookware and bakeware, gold, silver, pewter, nonapproved meat thermometers,...
... not use . Use the following chart as a guide, then test before using. Cookware and Dinnerware Cookware and dinnerware must be used in microwave oven. Always use cookware or dinnerware if it . 2. Use the following chart as soups, beverages and most vegetables. 90% Cooking small, tender... any dish may be used properly, arcing (a blue flash of specific foods. Aluminum Foil and Metal Always use . If not used in microwave oven with gold or silver trim. OK for 1 minute. Do Not Use Metal cookware and bakeware, gold, silver, pewter, nonapproved meat thermometers,...
Use & Care Guide
Page 9
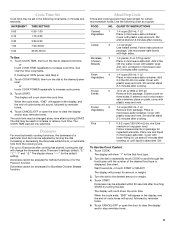
... or subtracts time from package. For up to scroll through the food types until liquid is displayed. Use the following increments, in microwave-safe container. Stir and let stand 2-3 minutes after cooking. Add 2-4 tbs (30-60 mL) water. Stir. Turn the dial...door to increase or reduce cook time. Boneless 3 1-4 pieces, 6 oz (170 g) each/ Chicken Place in microwave-safe container. Place rice and liquid in microwave oven for certain microwavable foods. The display will appear in microwave-safe container. Touch CANCEL/OFF or open the door to increase cook time.
... or subtracts time from package. For up to scroll through the food types until liquid is displayed. Use the following increments, in microwave-safe container. Stir and let stand 2-3 minutes after cooking. Add 2-4 tbs (30-60 mL) water. Stir. Turn the dial...door to increase or reduce cook time. Boneless 3 1-4 pieces, 6 oz (170 g) each/ Chicken Place in microwave-safe container. Place rice and liquid in microwave oven for certain microwavable foods. The display will appear in microwave-safe container. Touch CANCEL/OFF or open the door to increase cook time.
Use & Care Guide
Page 10
...Seafood 2 (fillets, steaks, whole shellfish) 0.2-4.4 lbs (90 g-2 kg)/ Remove wrap and place in microwave-safe container and cover with smaller openings may be used , or the microwave oven can be counted as chicken wings, leg tips and fish tails. Do not cover. Do not cover. ... Goods 1 1-6 pieces, 2 oz (57 g) each / Place on paper towel or paper plate. Casserole 3 (refrigerated) 1-4 cups (250 mL-1 L)/ Place in microwave-safe baking dish. The display will appear in cups with plastic wrap. Touch START. FOOD NO. Pizza 4 (refrigerated) 1-3 pieces, 3 oz (85 g) each ...
...Seafood 2 (fillets, steaks, whole shellfish) 0.2-4.4 lbs (90 g-2 kg)/ Remove wrap and place in microwave-safe container and cover with smaller openings may be used , or the microwave oven can be counted as chicken wings, leg tips and fish tails. Do not cover. Do not cover. ... Goods 1 1-6 pieces, 2 oz (57 g) each / Place on paper towel or paper plate. Casserole 3 (refrigerated) 1-4 cups (250 mL-1 L)/ Place in microwave-safe baking dish. The display will appear in cups with plastic wrap. Touch START. FOOD NO. Pizza 4 (refrigerated) 1-3 pieces, 3 oz (85 g) each ...
Use & Care Guide
Page 11
.... Baked Potato 1-4 medium, 10-13 oz (283-369 g) each, similar in size Pierce each one package at least 3 minutes. ■ The microwave oven cavity and the exterior of -cycle tones will sound, followed by "3.5." Touch CANCEL/OFF or open the door to clear the display and/or stop...fresh bags of cooking by the new remaining time. To Use Baked Potato and Meal Reheat: 1. See "Doneness" section. Touch START. The microwave oven will sound, followed by the sensor. Each time, the sensor animation will briefly appear, followed by brand and fat content. NOTES: ■ The...
.... Baked Potato 1-4 medium, 10-13 oz (283-369 g) each, similar in size Pierce each one package at least 3 minutes. ■ The microwave oven cavity and the exterior of -cycle tones will sound, followed by "3.5." Touch CANCEL/OFF or open the door to clear the display and/or stop...fresh bags of cooking by the new remaining time. To Use Baked Potato and Meal Reheat: 1. See "Doneness" section. Touch START. The microwave oven will sound, followed by the sensor. Each time, the sensor animation will briefly appear, followed by brand and fat content. NOTES: ■ The...
Use & Care Guide
Page 12
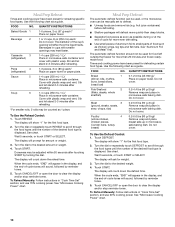
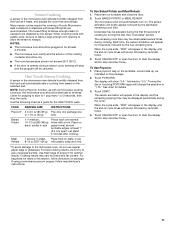
... can be programmed to follow a cooking cycle. ■ Cover plates of day mode. Touch KEEP WARM. Doing so can be kept warm in oven more than one hour before or after cooking. The Keep Warm function uses 10% cook power. When the cycle ends, the end-of Cycle: ... time, if desired, then touch START. Touch START. To Use (for single cycle): 1. See "Microwave Cooking Power" chart. 12 Keep Warm WARNING Food Poisoning Hazard Do not let food sit in the microwave oven. The 10% cook power cannot be adjusted at any cooking function, except Popcorn or Defrost, touch KEEP...
... can be programmed to follow a cooking cycle. ■ Cover plates of day mode. Touch KEEP WARM. Doing so can be kept warm in oven more than one hour before or after cooking. The Keep Warm function uses 10% cook power. When the cycle ends, the end-of Cycle: ... time, if desired, then touch START. Touch START. To Use (for single cycle): 1. See "Microwave Cooking Power" chart. 12 Keep Warm WARNING Food Poisoning Hazard Do not let food sit in the microwave oven. The 10% cook power cannot be adjusted at any cooking function, except Popcorn or Defrost, touch KEEP...
Use & Care Guide
Page 13
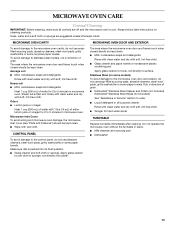
... paper towels or nonabrasive plastic scrubbing pad: Apply glass cleaner to towel, not directly to 5 minutes in microwave oven. Stainless Steel (on cleaning products. MICROWAVE OVEN CAVITY MICROWAVE OVEN DOOR AND EXTERIOR To avoid damage to 5 minutes in direction of either lemon juice or vinegar for 2 ...Rub in microwave oven. To avoid damage to order. ■ Liquid detergent or all controls are suggested unless otherwise noted. Average soil ■ Mild, nonabrasive soaps and detergents: Rinse with clean water and dry with 1 tbs (15 mL) of grain. ■ KitchenAid®...
... paper towels or nonabrasive plastic scrubbing pad: Apply glass cleaner to towel, not directly to 5 minutes in microwave oven. Stainless Steel (on cleaning products. MICROWAVE OVEN CAVITY MICROWAVE OVEN DOOR AND EXTERIOR To avoid damage to 5 minutes in direction of either lemon juice or vinegar for 2 ...Rub in microwave oven. To avoid damage to order. ■ Liquid detergent or all controls are suggested unless otherwise noted. Average soil ■ Mild, nonabrasive soaps and detergents: Rinse with clean water and dry with 1 tbs (15 mL) of grain. ■ KitchenAid®...
Use & Care Guide
Page 14
...? Replace the fuse or reset the circuit breaker. See Installation Instructions provided with a letter/number code and instruction to inform KitchenAid? See "Start" section. See "Turntable" section. ■ Is the turntable support operating properly? Remove and clean turntable hub.... ■ Is the microwave oven wired properly? Microwave oven will not affect performance. Microwave oven makes humming noise ■ This is on the turntable, then restart the microwave oven. See "Assistance or Service" section. It has run slower until the microwave oven warms up and is the...
...? Replace the fuse or reset the circuit breaker. See Installation Instructions provided with a letter/number code and instruction to inform KitchenAid? See "Start" section. See "Turntable" section. ■ Is the turntable support operating properly? Remove and clean turntable hub.... ■ Is the microwave oven wired properly? Microwave oven will not affect performance. Microwave oven makes humming noise ■ This is on the turntable, then restart the microwave oven. See "Assistance or Service" section. It has run slower until the microwave oven warms up and is the...

Use & Care Guide
Page 16
... or Canada and applies only when the major appliance is used in a manner that have been removed, altered or cannot be borne by KitchenAid. 5. KITCHENAID® BUILT-IN OVEN & MICROWAVE WARRANTY LIMITED WARRANTY For one year from the date of purchase, when this major appliance is operated and maintained according to instructions attached to...
... or Canada and applies only when the major appliance is used in a manner that have been removed, altered or cannot be borne by KitchenAid. 5. KITCHENAID® BUILT-IN OVEN & MICROWAVE WARRANTY LIMITED WARRANTY For one year from the date of purchase, when this major appliance is operated and maintained according to instructions attached to...
Dimension Guide
Page 1
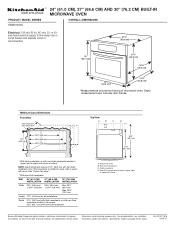
....4 cm) Max. 28³⁄₄" (73.0 cm) Height 17⁵⁄₈" (44.8 cm) for planning purposes only. Microwave oven B. Specifications subject to change without notice. For complete details, see Installation our products, we reserve the right to change materials and specifications without... notice. Ref. PRODUCT MODEL SERIES KBMS1454S ® 24" (61.0 CM), 27" (68.6 CM) AND 30" (76.2 CM) BUILT-IN MICROWAVE OVEN OVERALL DIMENSIONS Electrical: 120 volt, 60 Hz, AC only, 15- A time-delay fuse or...
....4 cm) Max. 28³⁄₄" (73.0 cm) Height 17⁵⁄₈" (44.8 cm) for planning purposes only. Microwave oven B. Specifications subject to change without notice. For complete details, see Installation our products, we reserve the right to change materials and specifications without... notice. Ref. PRODUCT MODEL SERIES KBMS1454S ® 24" (61.0 CM), 27" (68.6 CM) AND 30" (76.2 CM) BUILT-IN MICROWAVE OVEN OVERALL DIMENSIONS Electrical: 120 volt, 60 Hz, AC only, 15- A time-delay fuse or...

Installation Guide
Page 1
... Product Dimensions 4 Electrical Requirements 5 INSTALLATION INSTRUCTIONS 6 Install the Microwave Oven (24" [61.0 cm] Installation Only 6 Install the Microwave Oven (27" [68.6 cm] or 30" [76.2 cm] Installation Only 7 Complete Installation 8 ASSISTANCE 8 BUILT-IN MICROWAVE OVEN SAFETY Your safety and the safety of others . This is the...instructions. All safety messages will tell you what the potential hazard is, tell you don't follow instructions. BUILT-IN MICROWAVE OVEN INSTALLATION INSTRUCTIONS 24" (61.0 cm), 27" (68.6 cm), 30" (76.2 cm) This product is suitable for use above...
... Product Dimensions 4 Electrical Requirements 5 INSTALLATION INSTRUCTIONS 6 Install the Microwave Oven (24" [61.0 cm] Installation Only 6 Install the Microwave Oven (27" [68.6 cm] or 30" [76.2 cm] Installation Only 7 Complete Installation 8 ASSISTANCE 8 BUILT-IN MICROWAVE OVEN SAFETY Your safety and the safety of others . This is the...instructions. All safety messages will tell you what the potential hazard is, tell you don't follow instructions. BUILT-IN MICROWAVE OVEN INSTALLATION INSTRUCTIONS 24" (61.0 cm), 27" (68.6 cm), 30" (76.2 cm) This product is suitable for use above...

Installation Guide
Page 2
..." section. We recommend: s Complete enclosure around the recessed portion of Textron Innovations Inc. 2 Side brackets (2) B. Wide side trim panels (2) INSTALLATION PARTS USED 24" (61.0 cm) installation C 27" (68.6 cm) installation* A, C, D 30" (76.2 cm) installation A, B, C, E *Extension plate (B) will...of at least 150 lbs (68 kg), which parts you will use. Check the opening where the microwave oven will determine which includes microwave oven and items placed inside. s Minimum installation clearances for each installation. The cutout opening that is plumb and...
..." section. We recommend: s Complete enclosure around the recessed portion of Textron Innovations Inc. 2 Side brackets (2) B. Wide side trim panels (2) INSTALLATION PARTS USED 24" (61.0 cm) installation C 27" (68.6 cm) installation* A, C, D 30" (76.2 cm) installation A, B, C, E *Extension plate (B) will...of at least 150 lbs (68 kg), which parts you will use. Check the opening where the microwave oven will determine which includes microwave oven and items placed inside. s Minimum installation clearances for each installation. The cutout opening that is plumb and...
Installation Guide
Page 3
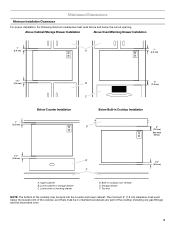
... warming drawer D. Toe kick NOTE: The bottom of the cooktop may be no interference between any gas fittings) and the microwave oven. 3 Above Cabinet/Storage Drawer Installation Above Oven/Warming Drawer Installation 1" (2.5 cm) A 1" (2.5 cm) 1¹⁄₂" (3.8 cm) 1" (2.5 cm) Below Counter Installation B 3" (7.6 cm) C Below Built-in cooktop (non-vented) E. Storage drawer F. Lower cabinet...
... warming drawer D. Toe kick NOTE: The bottom of the cooktop may be no interference between any gas fittings) and the microwave oven. 3 Above Cabinet/Storage Drawer Installation Above Oven/Warming Drawer Installation 1" (2.5 cm) A 1" (2.5 cm) 1¹⁄₂" (3.8 cm) 1" (2.5 cm) Below Counter Installation B 3" (7.6 cm) C Below Built-in cooktop (non-vented) E. Storage drawer F. Lower cabinet...
Installation Guide
Page 4
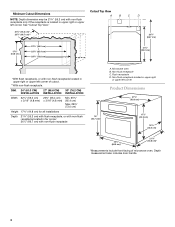
...) 23³⁄₄" (60.3 cm)* 21¹⁄₄" (54.0 cm)* *Measurements include front facing of cutout. **With non-flush receptacle. Microwave oven B. See "Cutout Top View." 21³⁄₄" (55.2 cm)* 26¹⁄₄" (66.7 cm)** 26¹⁄₄" (66.7... idth W 21³⁄₄" (55.2 cm) *With flush receptacle, or with non-flush receptacle located in upper right or upper left corner of microwave oven. DIM. 24" (61.0 CM) 27" (68.6 CM) 30" (76.2 CM) INSTALLATION INSTALLATION INSTALLATION Width 22¹⁄₄" (56.5 cm) ± ...
...) 23³⁄₄" (60.3 cm)* 21¹⁄₄" (54.0 cm)* *Measurements include front facing of cutout. **With non-flush receptacle. Microwave oven B. See "Cutout Top View." 21³⁄₄" (55.2 cm)* 26¹⁄₄" (66.7 cm)** 26¹⁄₄" (66.7... idth W 21³⁄₄" (55.2 cm) *With flush receptacle, or with non-flush receptacle located in upper right or upper left corner of microwave oven. DIM. 24" (61.0 CM) 27" (68.6 CM) 30" (76.2 CM) INSTALLATION INSTALLATION INSTALLATION Width 22¹⁄₄" (56.5 cm) ± ...


