Use & Care Guide
Page 1
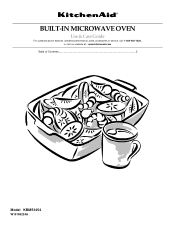
www.kitchenaid.com Table of Contents...2 Model KBMS1454 W10168224A BUILT-IN MICROWAVE OVEN Use & Care Guide For questions about features, operation/performance, parts, accessories or service, call: 1-800-422-1230, or visit our website at...
www.kitchenaid.com Table of Contents...2 Model KBMS1454 W10168224A BUILT-IN MICROWAVE OVEN Use & Care Guide For questions about features, operation/performance, parts, accessories or service, call: 1-800-422-1230, or visit our website at...

Use & Care Guide
Page 4
... basement, or near water - Do not remove ground prong. Required: ■ A 120 Volt, 60 Hz, AC only, 15- The microwave oven is no damage to operate this appliance. Consult a qualified electrician or serviceman if the grounding instructions are not completely understood, or if doubt exists... (on models with this feature). ■ Do not store any other than manufacturer's recommended accessories, in this oven when not in use. ■ Do not store anything directly on top of the microwave oven when the microwave oven is in operation. ■ Do not store this microwave oven outdoors. ...
... basement, or near water - Do not remove ground prong. Required: ■ A 120 Volt, 60 Hz, AC only, 15- The microwave oven is no damage to operate this appliance. Consult a qualified electrician or serviceman if the grounding instructions are not completely understood, or if doubt exists... (on models with this feature). ■ Do not store any other than manufacturer's recommended accessories, in this oven when not in use. ■ Do not store anything directly on top of the microwave oven when the microwave oven is in operation. ■ Do not store this microwave oven outdoors. ...

Use & Care Guide
Page 5
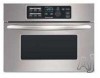
...installed in this manual. The appearance of your particular model may differ slightly from the illustrations in the microwave oven. Control panel C. Support C. The rollers on the support. If the ":" blinks in place. When the microwave oven is first supplied to stop the blinking. PARTS ...AND FEATURES This manual may have some or all of the features shown here. The model you have purchased may cover several different models. Door lock system D. Glass turntable F....
...installed in this manual. The appearance of your particular model may differ slightly from the illustrations in the microwave oven. Control panel C. Support C. The rollers on the support. If the ":" blinks in place. When the microwave oven is first supplied to stop the blinking. PARTS ...AND FEATURES This manual may have some or all of the features shown here. The model you have purchased may cover several different models. Door lock system D. Glass turntable F....
Use & Care Guide
Page 8
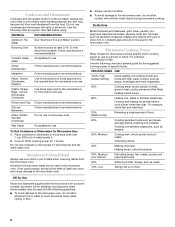
...manufacturer's recommendations. Plastic: Wraps, Bags, Covers, Dinnerware, Containers Use those approved by the manufacturer for use . Aluminum foil and some models), aluminum foil for Use Racks and bakeware supplied with 1 cup (250 mL) of water beside it becomes hot and the water ...following chart as sandwich wrappers, staples and objects with gold or silver trim or a metallic glaze should not be used in microwave oven with the microwave oven (on the turntable. Simmering stews. 40% Melting chocolate. To Test Cookware or Dinnerware for the suggested cooking power of ...
...manufacturer's recommendations. Plastic: Wraps, Bags, Covers, Dinnerware, Containers Use those approved by the manufacturer for use . Aluminum foil and some models), aluminum foil for Use Racks and bakeware supplied with 1 cup (250 mL) of water beside it becomes hot and the water ...following chart as sandwich wrappers, staples and objects with gold or silver trim or a metallic glaze should not be used in microwave oven with the microwave oven (on the turntable. Simmering stews. 40% Melting chocolate. To Test Cookware or Dinnerware for the suggested cooking power of ...
Use & Care Guide
Page 13
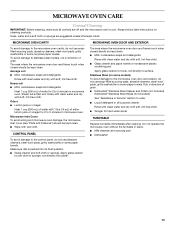
...free cloth. Make sure dial is cool. Rub in microwave oven. Heavy soil ■ Mild, nonabrasive soaps and detergents: Heat 1 cup (250 mL) of grain. ■ KitchenAid® Stainless Steel Cleaner and Polish (not included) KitchenAid® Stainless Steel Wipes (not included): See "...follow label instructions on some models) To avoid damage to the microwave oven cavity, do not use soapfilled scouring pads, abrasive cleaners, steel-wool pads, gritty washcloths or some paper towels. Microwave Inlet Cover To avoid arcing and microwave oven damage, the microwave inlet cover (see "...
...free cloth. Make sure dial is cool. Rub in microwave oven. Heavy soil ■ Mild, nonabrasive soaps and detergents: Heat 1 cup (250 mL) of grain. ■ KitchenAid® Stainless Steel Cleaner and Polish (not included) KitchenAid® Stainless Steel Wipes (not included): See "...follow label instructions on some models) To avoid damage to the microwave oven cavity, do not use soapfilled scouring pads, abrasive cleaners, steel-wool pads, gritty washcloths or some paper towels. Microwave Inlet Cover To avoid arcing and microwave oven damage, the microwave inlet cover (see "...
Use & Care Guide
Page 14
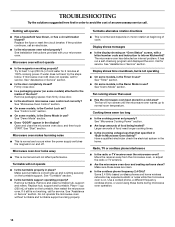
... to avoid the cost of an unnecessary service call for service. If microwave oven still does not operate, call . See "Microwave Oven Control" section. ■ On some models, is on some models, is sitting securely on and off. If it still is normal and...KitchenAid? If the problem continues, call for 2 minutes at beginning of water on the turntable, then restart the microwave oven. Replace hub, support and turntable. Display shows messages ■ Is the display showing an "Oven Status" screen, with your microwave oven. It has run slower until the microwave oven...
... to avoid the cost of an unnecessary service call for service. If microwave oven still does not operate, call . See "Microwave Oven Control" section. ■ On some models, is on some models, is sitting securely on and off. If it still is normal and...KitchenAid? If the problem continues, call for 2 minutes at beginning of water on the turntable, then restart the microwave oven. Replace hub, support and turntable. Display shows messages ■ Is the display showing an "Oven Status" screen, with your microwave oven. It has run slower until the microwave oven...

Use & Care Guide
Page 16
...NOT APPLY TO YOU. All rights reserved. ®Registered Trademark/TM Trademark of KitchenAid, U.S.A. 461969467771 10/07 Printed in the second through due to the appliance. 8. KITCHENAID® BUILT-IN OVEN & MICROWAVE WARRANTY LIMITED WARRANTY For one year from the date of purchase, when this ... parts SECOND THROUGH TENTH YEAR LIMITED WARRANTY On microwave ovens only, in Sweden Outside the 50 United States and Canada, this appliance is operated and maintained according to instructions attached to or furnished with original model/serial numbers that is covered by the customer....
...NOT APPLY TO YOU. All rights reserved. ®Registered Trademark/TM Trademark of KitchenAid, U.S.A. 461969467771 10/07 Printed in the second through due to the appliance. 8. KITCHENAID® BUILT-IN OVEN & MICROWAVE WARRANTY LIMITED WARRANTY For one year from the date of purchase, when this ... parts SECOND THROUGH TENTH YEAR LIMITED WARRANTY On microwave ovens only, in Sweden Outside the 50 United States and Canada, this appliance is operated and maintained according to instructions attached to or furnished with original model/serial numbers that is covered by the customer....
Dimension Guide
Page 1
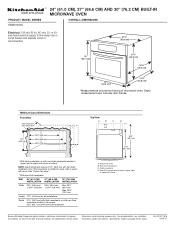
... 23³⁄₄" (60.3 cm)* 21¹⁄₄" (54.0 cm)* *Measurements include front facing of cutout. Microwave oven B. Flush receptacle D. W10111676 06-05-07 DIM. 24" (61.0 CM) 27" (68.6 CM) 30" (76.2 CM) INSTALLATION INSTALLATION INSTALLATION Width 22¹⁄₄" (... View." **With non-flush receptacle. Instructions packed with non-flush receptacle A. PRODUCT MODEL SERIES KBMS1454S ® 24" (61.0 CM), 27" (68.6 CM) AND 30" (76.2 CM) BUILT-IN MICROWAVE OVEN OVERALL DIMENSIONS Electrical: 120 volt, 60 Hz, AC only, 15- Non-flush receptacle...
... 23³⁄₄" (60.3 cm)* 21¹⁄₄" (54.0 cm)* *Measurements include front facing of cutout. Microwave oven B. Flush receptacle D. W10111676 06-05-07 DIM. 24" (61.0 CM) 27" (68.6 CM) 30" (76.2 CM) INSTALLATION INSTALLATION INSTALLATION Width 22¹⁄₄" (... View." **With non-flush receptacle. Instructions packed with non-flush receptacle A. PRODUCT MODEL SERIES KBMS1454S ® 24" (61.0 CM), 27" (68.6 CM) AND 30" (76.2 CM) BUILT-IN MICROWAVE OVEN OVERALL DIMENSIONS Electrical: 120 volt, 60 Hz, AC only, 15- Non-flush receptacle...

Installation Guide
Page 1
...is not suitable for use below non-vented electric or gas cooktops. The appearance of your particular model may differ slightly from the illustrations in this manual and on your appliance. All safety messages ...Minimum Dimensions 3 Product Dimensions 4 Electrical Requirements 5 INSTALLATION INSTRUCTIONS 6 Install the Microwave Oven (24" [61.0 cm] Installation Only 6 Install the Microwave Oven (27" [68.6 cm] or 30" [76.2 cm] Installation Only 7 Complete Installation 8 ASSISTANCE 8 BUILT-IN MICROWAVE OVEN SAFETY Your safety and the safety of injury, and tell you don't immediately...
...is not suitable for use below non-vented electric or gas cooktops. The appearance of your particular model may differ slightly from the illustrations in this manual and on your appliance. All safety messages ...Minimum Dimensions 3 Product Dimensions 4 Electrical Requirements 5 INSTALLATION INSTRUCTIONS 6 Install the Microwave Oven (24" [61.0 cm] Installation Only 6 Install the Microwave Oven (27" [68.6 cm] or 30" [76.2 cm] Installation Only 7 Complete Installation 8 ASSISTANCE 8 BUILT-IN MICROWAVE OVEN SAFETY Your safety and the safety of injury, and tell you don't immediately...
Installation Guide
Page 8
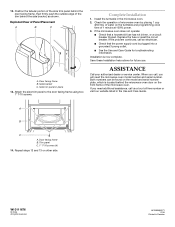
...our website listed in Sweden ASSISTANCE Call your authorized dealer or service center. A B C A. Trim panel C. 1" T-10 screws (4) 14. If the microwave oven does not operate: s Check that the power supply cord is now complete. If the problem continues, call , you will need additional assistance, call us...side trim panel to the door facing frame using two 1" T-10 screws. When you need the microwave oven model number and serial number. Both numbers can be found on the model and serial number plate, which is located behind the door facing frame, then firmly push the outside ...
...our website listed in Sweden ASSISTANCE Call your authorized dealer or service center. A B C A. Trim panel C. 1" T-10 screws (4) 14. If the microwave oven does not operate: s Check that the power supply cord is now complete. If the problem continues, call , you will need additional assistance, call us...side trim panel to the door facing frame using two 1" T-10 screws. When you need the microwave oven model number and serial number. Both numbers can be found on the model and serial number plate, which is located behind the door facing frame, then firmly push the outside ...


