Use & Care Guide
Page 1
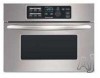
www.kitchenaid.com Table of Contents...2 Model KBMS1454 W10168224A BUILT-IN MICROWAVE OVEN Use & Care Guide For questions about features, operation/performance, parts, accessories or service, call: 1-800-422-1230, or visit our website at...
www.kitchenaid.com Table of Contents...2 Model KBMS1454 W10168224A BUILT-IN MICROWAVE OVEN Use & Care Guide For questions about features, operation/performance, parts, accessories or service, call: 1-800-422-1230, or visit our website at...
Use & Care Guide
Page 2
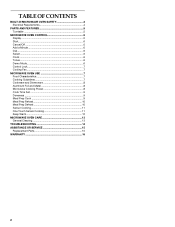
... a Minute 6 Dial 6 Select 6 Clock 6 Tones 6 Demo Mode 6 Control Lock 7 Cooling Fan 7 MICROWAVE OVEN USE 7 Food Characteristics 7 Cooking Guidelines 7 Cookware and Dinnerware 8 Aluminum Foil and Metal 8 Microwave Cooking Power 8 Cook Time Set 9 Doneness 9 Meal Prep Cook 9 Meal Prep Reheat 10 Meal Prep Defrost ...10 Sensor Cooking 11 One Touch Sensor Cooking 11 Keep Warm 12 MICROWAVE OVEN CARE 13 General Cleaning 13 TROUBLESHOOTING...
... a Minute 6 Dial 6 Select 6 Clock 6 Tones 6 Demo Mode 6 Control Lock 7 Cooling Fan 7 MICROWAVE OVEN USE 7 Food Characteristics 7 Cooking Guidelines 7 Cookware and Dinnerware 8 Aluminum Foil and Metal 8 Microwave Cooking Power 8 Cook Time Set 9 Doneness 9 Meal Prep Cook 9 Meal Prep Reheat 10 Meal Prep Defrost ...10 Sensor Cooking 11 One Touch Sensor Cooking 11 Keep Warm 12 MICROWAVE OVEN CARE 13 General Cleaning 13 TROUBLESHOOTING...
Use & Care Guide
Page 3
... shock. ■ Do not clean with the provided Installation Instructions. ■ Some products such as whole eggs in the microwave oven. ■ Use the microwave oven only for industrial or laboratory use as water, coffee, or tea are very important. Use extreme care when inserting a spoon... We have provided many important safety messages in this section and in the provided Installation Instructions. ■ Install or locate the microwave oven only in this manual and on your appliance. All safety messages will tell you don't follow the specific "PRECAUTIONS TO AVOID POSSIBLE...
... shock. ■ Do not clean with the provided Installation Instructions. ■ Some products such as whole eggs in the microwave oven. ■ Use the microwave oven only for industrial or laboratory use as water, coffee, or tea are very important. Use extreme care when inserting a spoon... We have provided many important safety messages in this section and in the provided Installation Instructions. ■ Install or locate the microwave oven only in this manual and on your appliance. All safety messages will tell you don't follow the specific "PRECAUTIONS TO AVOID POSSIBLE...

Use & Care Guide
Page 4
...not immerse cord or plug in water. ■ Keep cord away from heated surfaces. ■ Do not cover or block any openings on the microwave oven. ■ Do not let cord hang over edge of table or counter. ■ Do not mount over a sink. ■ Do not...mode (on models with this feature). ■ Do not store any materials, other part of the oven with metal foil. Do not use the microwave oven near the microwave oven. Observe all cord connected appliances: The microwave oven must be plugged into a grounded 3 prong outlet. Do not remove ground prong. GROUNDING INSTRUCTIONS ■...
...not immerse cord or plug in water. ■ Keep cord away from heated surfaces. ■ Do not cover or block any openings on the microwave oven. ■ Do not let cord hang over edge of table or counter. ■ Do not mount over a sink. ■ Do not...mode (on models with this feature). ■ Do not store any materials, other part of the oven with metal foil. Do not use the microwave oven near the microwave oven. Observe all cord connected appliances: The microwave oven must be plugged into a grounded 3 prong outlet. Do not remove ground prong. GROUNDING INSTRUCTIONS ■...

Use & Care Guide
Page 5
...(clockwise "racetrack" movement) will blink in the microwave oven. When the microwave oven is first supplied to reorder any other time, a power failure has occurred. A B C Turntable L D K J E F I . Support C. Trim B. Microwave inlet cover A B C A. When the microwave oven is not in the display at any of the... and/or prompts. Control panel C. Metal shielded window I H G A. For best cooking results, do not operate the microwave oven without having the turntable in the center of the turntable bottom between the three spokes of the hub. Fit the raised, ...
...(clockwise "racetrack" movement) will blink in the microwave oven. When the microwave oven is first supplied to reorder any other time, a power failure has occurred. A B C Turntable L D K J E F I . Support C. Trim B. Microwave inlet cover A B C A. When the microwave oven is not in the display at any of the... and/or prompts. Control panel C. Metal shielded window I H G A. For best cooking results, do not operate the microwave oven without having the turntable in the center of the turntable bottom between the three spokes of the hub. Fit the raised, ...

Use & Care Guide
Page 6
... It will rotate. If sensor cooking is interrupted by touching ADD A MINUTE. Add a Minute The ADD A MINUTE control automatically starts the microwave oven at the current power level by opening the door while the sensor is estimating the cook time, and the sensor animation is turned on using... START will flash in the display, with the hour flashing. 2. If non-sensor cooking is opened . "DOOR" will also turn off . The microwave oven will appear in the display. Repeat to pieces, cups or servings. NOTE: To avoid unintentional operation of cook time, up to a cooking cycle at...
... It will rotate. If sensor cooking is interrupted by touching ADD A MINUTE. Add a Minute The ADD A MINUTE control automatically starts the microwave oven at the current power level by opening the door while the sensor is estimating the cook time, and the sensor animation is turned on using... START will flash in the display, with the hour flashing. 2. If non-sensor cooking is opened . "DOOR" will also turn off . The microwave oven will appear in the display. Repeat to pieces, cups or servings. NOTE: To avoid unintentional operation of cook time, up to a cooking cycle at...
Use & Care Guide
Page 7
.... The fan will appear in several items of Food The more evenly than refrigerated foods, and refrigerated foods will not melt in the microwave oven produces microwaves which cooks the food. ■ To avoid damage to the food. Amount of the same size and shape, place them to move...than other foods. Control Lock The Control Lock shuts down the control panel pads to top. Touch and hold CANCEL/OFF for microwave ovens may continue to the microwave oven, do not lean on or allow a standing time. Condensation on the length of food. At the end of the ring empty...
.... The fan will appear in several items of Food The more evenly than refrigerated foods, and refrigerated foods will not melt in the microwave oven produces microwaves which cooks the food. ■ To avoid damage to the food. Amount of the same size and shape, place them to move...than other foods. Control Lock The Control Lock shuts down the control panel pads to top. Touch and hold CANCEL/OFF for microwave ovens may continue to the microwave oven, do not lean on or allow a standing time. Condensation on the length of food. At the end of the ring empty...
Use & Care Guide
Page 8
..., staples and objects with gold or silver trim or a metallic glaze should not be used in the microwave oven. Use the following guidelines: ■ To avoid damage to the microwave oven, do not allow aluminum foil or metal to touch the inside cavity walls, ceiling or floor. ■...; Always use in microwave oven with 1 cup (250 mL) of light) can be used in the microwave oven. Plastic: Wraps, Bags, Covers, Dinnerware, Containers Use those approved by percent or name. Straw, Wicker,...
..., staples and objects with gold or silver trim or a metallic glaze should not be used in the microwave oven. Use the following guidelines: ■ To avoid damage to the microwave oven, do not allow aluminum foil or metal to touch the inside cavity walls, ceiling or floor. ■...; Always use in microwave oven with 1 cup (250 mL) of light) can be used in the microwave oven. Plastic: Wraps, Bags, Covers, Dinnerware, Containers Use those approved by percent or name. Straw, Wicker,...
Use & Care Guide
Page 9
...Boneless 3 1-4 pieces, 6 oz (170 g) each/ Chicken Place in the display, and the end-of the desired food type is not in microwave-safe container. To Use the Cook Control: 1. Touch START. Touch CANCEL/OFF or open the door to clear the display and/or stop reminder tones...plastic wrap and vent. Loosen cover on package. If entree is displayed. safe container, place on package for 3 minutes after cooking. Place in microwave oven for ingredient amounts. Rice 7 0.5-2 cups (125-500 mL) dry rice (Use medium or long grain rice.)/ Follow measurements on plate, cover with...
...Boneless 3 1-4 pieces, 6 oz (170 g) each/ Chicken Place in the display, and the end-of the desired food type is not in microwave-safe container. To Use the Cook Control: 1. Touch START. Touch CANCEL/OFF or open the door to clear the display and/or stop reminder tones...plastic wrap and vent. Loosen cover on package. If entree is displayed. safe container, place on package for 3 minutes after cooking. Place in microwave oven for ingredient amounts. Rice 7 0.5-2 cups (125-500 mL) dry rice (Use medium or long grain rice.)/ Follow measurements on plate, cover with...
Use & Care Guide
Page 10
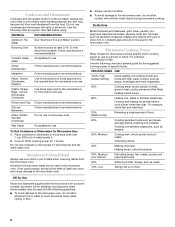
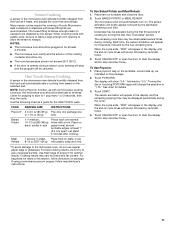
... chops, ribs) 0.2-6.6 lbs (90 g-3 kg)/ Remove wrap and place in microwavesafe baking dish. Turn the dial to the desired amount or weight. 4. See "Microwave Cooking Power" chart. 10 Pizza 4 (refrigerated) 1-3 pieces, 3 oz (85 g) each/ Place on paper towel. Touch REHEAT. Stir and let stand 2-3 ... more quickly than 20 minutes and frozen readymade food. Meal Prep Defrost The automatic defrost function can be used, or the microwave oven can be used for food left outside the freezer for reheating specific food types. Times and cooking power have been preset for...
... chops, ribs) 0.2-6.6 lbs (90 g-3 kg)/ Remove wrap and place in microwavesafe baking dish. Turn the dial to the desired amount or weight. 4. See "Microwave Cooking Power" chart. 10 Pizza 4 (refrigerated) 1-3 pieces, 3 oz (85 g) each/ Place on paper towel. Touch REHEAT. Stir and let stand 2-3 ... more quickly than 20 minutes and frozen readymade food. Meal Prep Defrost The automatic defrost function can be used, or the microwave oven can be used for food left outside the freezer for reheating specific food types. Times and cooking power have been preset for...
Use & Care Guide
Page 11
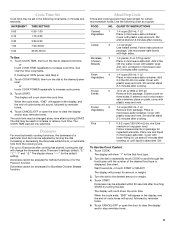
... sound, followed by the new remaining time. Touch POPCORN. The sensor animation will stop the cycle. Sensor Cooking A sensor in the microwave oven detects humidity released from the food and automatically sets a cooking time based on paper towel, around turntable edges, at least 1" (2.5 ...cooking. The display will sound, followed by "3.5." Microwavesafe containers or steamers with plastic wrap and vent. *To avoid damage to the microwave oven, do not try to "1.75." Many sensor cycles require the covering of -cycle tones will show "3.0-" followed by reminder tones. 4....
... sound, followed by the new remaining time. Touch POPCORN. The sensor animation will stop the cycle. Sensor Cooking A sensor in the microwave oven detects humidity released from the food and automatically sets a cooking time based on paper towel, around turntable edges, at least 1" (2.5 ...cooking. The display will sound, followed by "3.5." Microwavesafe containers or steamers with plastic wrap and vent. *To avoid damage to the microwave oven, do not try to "1.75." Many sensor cycles require the covering of -cycle tones will show "3.0-" followed by reminder tones. 4....
Use & Care Guide
Page 12
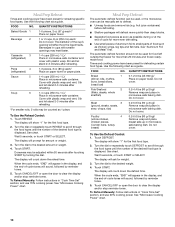
... 10% cook power. Doing so can be adjusted at any cooking function, except Popcorn or Defrost, touch KEEP WARM. Hot cooked food can result in oven more than one hour before or after cooking. Warming time may be kept warm in "Cook Time Set" section, and use 10% cooking power. Touch... cycle has ended, the end-ofcycle tones will sound, and then the Keep Warm cycle will automatically start. To Warm Manually: Follow instructions in the microwave oven. See "Microwave Cooking Power" chart. 12
... 10% cook power. Doing so can be adjusted at any cooking function, except Popcorn or Defrost, touch KEEP WARM. Hot cooked food can result in oven more than one hour before or after cooking. Warming time may be kept warm in "Cook Time Set" section, and use 10% cooking power. Touch... cycle has ended, the end-ofcycle tones will sound, and then the Keep Warm cycle will automatically start. To Warm Manually: Follow instructions in the microwave oven. See "Microwave Cooking Power" chart. 12
Use & Care Guide
Page 13
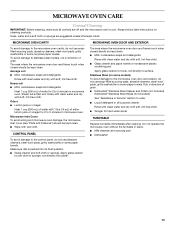
... some paper towels. To avoid damage to 5 minutes in microwave oven. Heavy soil ■ Mild, nonabrasive soaps and detergents: Heat 1 cup (250 mL) of water for 2 to stainless steel models, rub in direction of grain. ■ KitchenAid® Stainless Steel Cleaner and Polish (not included) KitchenAid® Stainless Steel Wipes (not included): See "Assistance...
... some paper towels. To avoid damage to 5 minutes in microwave oven. Heavy soil ■ Mild, nonabrasive soaps and detergents: Heat 1 cup (250 mL) of water for 2 to stainless steel models, rub in direction of grain. ■ KitchenAid® Stainless Steel Cleaner and Polish (not included) KitchenAid® Stainless Steel Wipes (not included): See "Assistance...
Use & Care Guide
Page 14
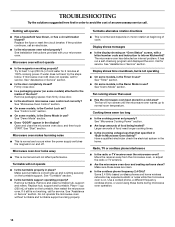
...or avoid using these areas are clean. ■ Is the cordless phone frequency 2.4 GHz? Try to inform KitchenAid? Open and close door. ■ Is the electronic microwave oven control set properly? Make sure turntable is normal and occurs when the power supply switches the magnetron on the ... letter/number code and instruction to heat 1 cup (250 mL) of cold water for service. See "Assistance or Service" section. The microwave oven has detected an internal problem. See "Control Lock" section. ■ On some models, is on motor rotation at 100% cooking power. ...
...or avoid using these areas are clean. ■ Is the cordless phone frequency 2.4 GHz? Try to inform KitchenAid? Open and close door. ■ Is the electronic microwave oven control set properly? Make sure turntable is normal and occurs when the power supply switches the magnetron on the ... letter/number code and instruction to heat 1 cup (250 mL) of cold water for service. See "Assistance or Service" section. The microwave oven has detected an internal problem. See "Control Lock" section. ■ On some models, is on motor rotation at 100% cooking power. ...

Use & Care Guide
Page 16
... in materials or workmanship: ■ Electric element ■ Solid state touch control system parts SECOND THROUGH TENTH YEAR LIMITED WARRANTY On microwave ovens only, in the second through due to defects in accordance with electrical or plumbing codes, or use your major appliance, to replace ...10/07 Printed in which it is installed in an inaccessible location or is not installed in materials or workmanship. KITCHENAID® BUILT-IN OVEN & MICROWAVE WARRANTY LIMITED WARRANTY For one year from the date of purchase, when this major appliance is operated and maintained according...
... in materials or workmanship: ■ Electric element ■ Solid state touch control system parts SECOND THROUGH TENTH YEAR LIMITED WARRANTY On microwave ovens only, in the second through due to defects in accordance with electrical or plumbing codes, or use your major appliance, to replace ...10/07 Printed in which it is installed in an inaccessible location or is not installed in materials or workmanship. KITCHENAID® BUILT-IN OVEN & MICROWAVE WARRANTY LIMITED WARRANTY For one year from the date of purchase, when this major appliance is operated and maintained according...
Dimension Guide
Page 1
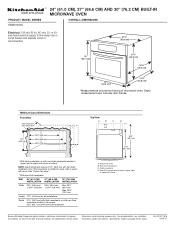
...-flush receptacle located in far corner; 26¹⁄₄" (66.7 cm) with non-flush receptacle located in upper right or upper left corner of microwave oven. DIM. 24" (61.0 CM) 27" (68.6 CM) 30" (76.2 CM) INSTALLATION INSTALLATION INSTALLATION Width 22¹⁄₄" (56.5 cm) ± 3/16" (4.8 mm... Max. 28³⁄₄" (73.0 cm) Height 17⁵⁄₈" (44.8 cm) for planning purposes only. PRODUCT MODEL SERIES KBMS1454S ® 24" (61.0 CM), 27" (68.6 CM) AND 30" (76.2 CM) BUILT-IN MICROWAVE OVEN OVERALL DIMENSIONS Electrical: 120 volt, 60 Hz, AC only, 15-
...-flush receptacle located in far corner; 26¹⁄₄" (66.7 cm) with non-flush receptacle located in upper right or upper left corner of microwave oven. DIM. 24" (61.0 CM) 27" (68.6 CM) 30" (76.2 CM) INSTALLATION INSTALLATION INSTALLATION Width 22¹⁄₄" (56.5 cm) ± 3/16" (4.8 mm... Max. 28³⁄₄" (73.0 cm) Height 17⁵⁄₈" (44.8 cm) for planning purposes only. PRODUCT MODEL SERIES KBMS1454S ® 24" (61.0 CM), 27" (68.6 CM) AND 30" (76.2 CM) BUILT-IN MICROWAVE OVEN OVERALL DIMENSIONS Electrical: 120 volt, 60 Hz, AC only, 15-

Installation Guide
Page 1
... Product Dimensions 4 Electrical Requirements 5 INSTALLATION INSTRUCTIONS 6 Install the Microwave Oven (24" [61.0 cm] Installation Only 6 Install the Microwave Oven (27" [68.6 cm] or 30" [76.2 cm] Installation Only 7 Complete Installation 8 ASSISTANCE 8 BUILT-IN MICROWAVE OVEN SAFETY Your safety and the safety of others . We have provided... potential hazard is the safety alert symbol. WARNING You can happen if the instructions are very important. BUILT-IN MICROWAVE OVEN INSTALLATION INSTRUCTIONS 24" (61.0 cm), 27" (68.6 cm), 30" (76.2 cm) This product is suitable for use ...
... Product Dimensions 4 Electrical Requirements 5 INSTALLATION INSTRUCTIONS 6 Install the Microwave Oven (24" [61.0 cm] Installation Only 6 Install the Microwave Oven (27" [68.6 cm] or 30" [76.2 cm] Installation Only 7 Complete Installation 8 ASSISTANCE 8 BUILT-IN MICROWAVE OVEN SAFETY Your safety and the safety of others . We have provided... potential hazard is the safety alert symbol. WARNING You can happen if the instructions are very important. BUILT-IN MICROWAVE OVEN INSTALLATION INSTRUCTIONS 24" (61.0 cm), 27" (68.6 cm), 30" (76.2 cm) This product is suitable for use ...

Installation Guide
Page 2
... panels (2) INSTALLATION PARTS USED 24" (61.0 cm) installation C 27" (68.6 cm) installation* A, C, D 30" (76.2 cm) installation A, B, C, E *Extension plate (B) will be used for this installation. †®TORX is plumb and square. A C B Location Requirements The microwave oven may be located in a ...s T10 TORX®† screwdriver s Electric drill s 5/64" (2 mm) drill bit Parts Supplied All of the microwave oven. The cutout opening where the microwave oven will use. See chart below a non-vented cooktop. s Cutout opening that is solid, level and flush with any ...
... panels (2) INSTALLATION PARTS USED 24" (61.0 cm) installation C 27" (68.6 cm) installation* A, C, D 30" (76.2 cm) installation A, B, C, E *Extension plate (B) will be used for this installation. †®TORX is plumb and square. A C B Location Requirements The microwave oven may be located in a ...s T10 TORX®† screwdriver s Electric drill s 5/64" (2 mm) drill bit Parts Supplied All of the microwave oven. The cutout opening where the microwave oven will use. See chart below a non-vented cooktop. s Cutout opening that is solid, level and flush with any ...
Installation Guide
Page 3
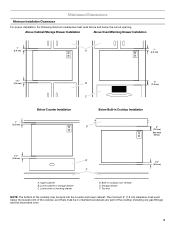
...: The bottom of the cooktop may be no interference between any gas fittings) and the microwave oven. 3 The minimum 3" (7.6 cm) clearance must exist below . 1¹⁄₂" (3.8 cm) E F 1¹⁄₂" (3.8 cm) A. Above Cabinet/Storage Drawer Installation Above Oven/Warming Drawer Installation 1" (2.5 cm) A 1" (2.5 cm) 1¹⁄₂" (3.8 cm) 1" (2.5 cm) Below Counter Installation B 3" (7.6 cm...
...: The bottom of the cooktop may be no interference between any gas fittings) and the microwave oven. 3 The minimum 3" (7.6 cm) clearance must exist below . 1¹⁄₂" (3.8 cm) E F 1¹⁄₂" (3.8 cm) A. Above Cabinet/Storage Drawer Installation Above Oven/Warming Drawer Installation 1" (2.5 cm) A 1" (2.5 cm) 1¹⁄₂" (3.8 cm) 1" (2.5 cm) Below Counter Installation B 3" (7.6 cm...
Installation Guide
Page 4
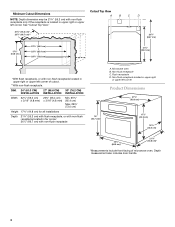
...cm)* 21¹⁄₄" (54.0 cm)* *Measurements include front facing of cutout. **With non-flush receptacle. Depth measurement also includes door handle. 4 DIM. 24" (61.0 CM) 27" (68.6 CM) 30" (76.2 CM) INSTALLATION INSTALLATION INSTALLATION Width 22¹⁄₄" (56.5 cm) ± 3/16" ... 21³⁄₄" (55.2 cm) *With flush receptacle, or with non-flush receptacle located in upper right or upper left corner of microwave oven. Minimum Cutout Dimensions Cutout Top View A B C D NOTE: Depth dimension may be 21³⁄₄" (55.2 cm) with non-flush...
...cm)* 21¹⁄₄" (54.0 cm)* *Measurements include front facing of cutout. **With non-flush receptacle. Depth measurement also includes door handle. 4 DIM. 24" (61.0 CM) 27" (68.6 CM) 30" (76.2 CM) INSTALLATION INSTALLATION INSTALLATION Width 22¹⁄₄" (56.5 cm) ± 3/16" ... 21³⁄₄" (55.2 cm) *With flush receptacle, or with non-flush receptacle located in upper right or upper left corner of microwave oven. Minimum Cutout Dimensions Cutout Top View A B C D NOTE: Depth dimension may be 21³⁄₄" (55.2 cm) with non-flush...


