Use & Care Guide
Page 1
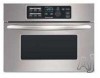
BUILT-IN MICROWAVE OVEN Use & Care Guide For questions about features, operation/performance, parts, accessories or service, call: 1-800-422-1230, or visit our website at... www.kitchenaid.com Table of Contents...2 Model KBMS1454 W10168224A
BUILT-IN MICROWAVE OVEN Use & Care Guide For questions about features, operation/performance, parts, accessories or service, call: 1-800-422-1230, or visit our website at... www.kitchenaid.com Table of Contents...2 Model KBMS1454 W10168224A
Use & Care Guide
Page 2
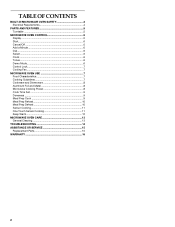
TABLE OF CONTENTS BUILT-IN MICROWAVE OVEN SAFETY 3 Electrical Requirements 4 PARTS AND FEATURES 5 Turntable 5 MICROWAVE OVEN CONTROL 5 Display 5 Start 6 Cancel/Off 6 Add a Minute 6 Dial 6 Select 6 Clock 6 Tones 6 Demo Mode 6 Control Lock 7 Cooling Fan 7 MICROWAVE OVEN USE 7 Food Characteristics 7 Cooking Guidelines 7 Cookware and Dinnerware 8 Aluminum Foil and Metal 8 Microwave Cooking Power 8 Cook Time Set 9 Doneness 9 Meal Prep Cook 9 Meal Prep...
TABLE OF CONTENTS BUILT-IN MICROWAVE OVEN SAFETY 3 Electrical Requirements 4 PARTS AND FEATURES 5 Turntable 5 MICROWAVE OVEN CONTROL 5 Display 5 Start 6 Cancel/Off 6 Add a Minute 6 Dial 6 Select 6 Clock 6 Tones 6 Demo Mode 6 Control Lock 7 Cooling Fan 7 MICROWAVE OVEN USE 7 Food Characteristics 7 Cooking Guidelines 7 Cookware and Dinnerware 8 Aluminum Foil and Metal 8 Microwave Cooking Power 8 Cook Time Set 9 Doneness 9 Meal Prep Cook 9 Meal Prep...
Use & Care Guide
Page 3
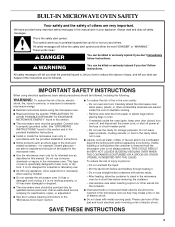
BUILT-IN MICROWAVE OVEN SAFETY Your safety and the safety of burns, electric shock, fire, injury to persons, or exposure to excessive microwave energy: ■ Read all safety messages. Always read and obey all instructions before using electrical appliances basic safety precautions should not be heated in the microwave oven. ■ Use the microwave oven...the provided Installation Instructions. ■ Install or locate the microwave oven only in the microwave oven for storage purposes. Remove wire twist-ties from the microwave oven is , tell you what the potential hazard is not ...
BUILT-IN MICROWAVE OVEN SAFETY Your safety and the safety of burns, electric shock, fire, injury to persons, or exposure to excessive microwave energy: ■ Read all safety messages. Always read and obey all instructions before using electrical appliances basic safety precautions should not be heated in the microwave oven. ■ Use the microwave oven...the provided Installation Instructions. ■ Install or locate the microwave oven only in the microwave oven for storage purposes. Remove wire twist-ties from the microwave oven is , tell you what the potential hazard is not ...
Use & Care Guide
Page 14
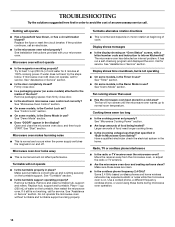
...cooking power set ? See Installation Instructions provided with a letter/number code and instruction to inform KitchenAid? Try to heat 1 cup (250 mL) of cold water for service. See "Microwave Oven Control" section. ■ On some models) attached to the inside of the door? ...food need longer cooking times. ■ Is the incoming voltage less than usual ■ Has the microwave oven been stored in "Built-In Microwave Oven Safety?" Make sure these items during microwave oven operation. 14 See "Assistance or Service" section. ■ Is the door completely closed? Open and...
...cooking power set ? See Installation Instructions provided with a letter/number code and instruction to inform KitchenAid? Try to heat 1 cup (250 mL) of cold water for service. See "Microwave Oven Control" section. ■ On some models) attached to the inside of the door? ...food need longer cooking times. ■ Is the incoming voltage less than usual ■ Has the microwave oven been stored in "Built-In Microwave Oven Safety?" Make sure these items during microwave oven operation. 14 See "Assistance or Service" section. ■ Is the door completely closed? Open and...

Use & Care Guide
Page 16
...■ Solid state touch control system parts SECOND THROUGH TENTH YEAR LIMITED WARRANTY On microwave ovens only, in the second through due to defects in materials or workmanship and is reported to KitchenAid within 30 days from the date of purchase. 6. Damage resulting from accident, alteration,...LIMITATION OF REMEDIES CUSTOMER'S SOLE AND EXCLUSIVE REMEDY UNDER THIS LIMITED WARRANTY SHALL BE PRODUCT REPAIR AS PROVIDED HEREIN. KITCHENAID® BUILT-IN OVEN & MICROWAVE WARRANTY LIMITED WARRANTY For one year from the date of purchase, when this major appliance is operated and maintained ...
...■ Solid state touch control system parts SECOND THROUGH TENTH YEAR LIMITED WARRANTY On microwave ovens only, in the second through due to defects in materials or workmanship and is reported to KitchenAid within 30 days from the date of purchase. 6. Damage resulting from accident, alteration,...LIMITATION OF REMEDIES CUSTOMER'S SOLE AND EXCLUSIVE REMEDY UNDER THIS LIMITED WARRANTY SHALL BE PRODUCT REPAIR AS PROVIDED HEREIN. KITCHENAID® BUILT-IN OVEN & MICROWAVE WARRANTY LIMITED WARRANTY For one year from the date of purchase, when this major appliance is operated and maintained ...
Dimension Guide
Page 1
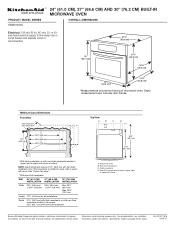
... in upper right or upper left corner. Ref. Depth measurement also includes door handle. Microwave oven B. or 20amp fused electrical supply. See "Cutout Top View." **With non-flush receptacle...179;⁄₄" (55.2 cm) with flush receptacle, or with product. W10111676 06-05-07 DIM. 24" (61.0 CM) 27" (68.6 CM) 30" (76.2 CM) INSTALLATION INSTALLATION INSTALLATION Width 22¹... breaker and separate circuit is located in upper right or upper left corner of microwave oven. Non-flush receptacle located in upper right or upper left corner Because Whirlpool Corporation...
... in upper right or upper left corner. Ref. Depth measurement also includes door handle. Microwave oven B. or 20amp fused electrical supply. See "Cutout Top View." **With non-flush receptacle...179;⁄₄" (55.2 cm) with flush receptacle, or with product. W10111676 06-05-07 DIM. 24" (61.0 CM) 27" (68.6 CM) 30" (76.2 CM) INSTALLATION INSTALLATION INSTALLATION Width 22¹... breaker and separate circuit is located in upper right or upper left corner of microwave oven. Non-flush receptacle located in upper right or upper left corner Because Whirlpool Corporation...

Installation Guide
Page 1
... 3 Product Dimensions 4 Electrical Requirements 5 INSTALLATION INSTRUCTIONS 6 Install the Microwave Oven (24" [61.0 cm] Installation Only 6 Install the Microwave Oven (27" [68.6 cm] or 30" [76.2 cm] Installation Only 7 Complete Installation 8 ASSISTANCE 8 BUILT-IN MICROWAVE OVEN SAFETY Your safety and the safety of your appliance. This is not...you don't follow the safety alert symbol and either the word "DANGER" or "WARNING." W10111676 BUILT-IN MICROWAVE OVEN INSTALLATION INSTRUCTIONS 24" (61.0 cm), 27" (68.6 cm), 30" (76.2 cm) This product is suitable for use above ...
... 3 Product Dimensions 4 Electrical Requirements 5 INSTALLATION INSTRUCTIONS 6 Install the Microwave Oven (24" [61.0 cm] Installation Only 6 Install the Microwave Oven (27" [68.6 cm] or 30" [76.2 cm] Installation Only 7 Complete Installation 8 ASSISTANCE 8 BUILT-IN MICROWAVE OVEN SAFETY Your safety and the safety of your appliance. This is not...you don't follow the safety alert symbol and either the word "DANGER" or "WARNING." W10111676 BUILT-IN MICROWAVE OVEN INSTALLATION INSTRUCTIONS 24" (61.0 cm), 27" (68.6 cm), 30" (76.2 cm) This product is suitable for use above ...

Installation Guide
Page 2
... Dimensions" in oven, or below the counter and/or below parts list to be used for this installation. †®TORX is plumb and square. D E A. Wide side trim panels (2) INSTALLATION PARTS USED 24" (61.0 ...C. 1" T-10 screws (6) D. Narrow side trim panels (2) E. s Cutout opening size will determine which includes microwave oven and items placed inside. s Measuring tape s Pencil s T10 TORX®† screwdriver s Electric drill s ...parts you will be located in a cabinet, and/or above a built-in "Minimum Dimensions" section. See chart below a non-vented cooktop. Read...
... Dimensions" in oven, or below the counter and/or below parts list to be used for this installation. †®TORX is plumb and square. D E A. Wide side trim panels (2) INSTALLATION PARTS USED 24" (61.0 ...C. 1" T-10 screws (6) D. Narrow side trim panels (2) E. s Cutout opening size will determine which includes microwave oven and items placed inside. s Measuring tape s Pencil s T10 TORX®† screwdriver s Electric drill s ...parts you will be located in a cabinet, and/or above a built-in "Minimum Dimensions" section. See chart below a non-vented cooktop. Read...
Installation Guide
Page 3
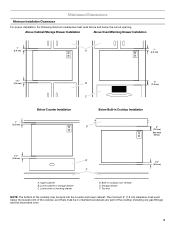
...) A 1" (2.5 cm) 1¹⁄₂" (3.8 cm) 1" (2.5 cm) Below Counter Installation B 3" (7.6 cm) C Below Built-in cooktop (non-vented) E. Lower cabinet or storage drawer C. Built-in Cooktop Installation D 3" (7.6 cm) See note below the lowest point of the cooktop (including any gas fittings) and the microwave oven. 3 Upper cabinet B. Toe kick NOTE: The bottom of the cooktop may...
...) A 1" (2.5 cm) 1¹⁄₂" (3.8 cm) 1" (2.5 cm) Below Counter Installation B 3" (7.6 cm) C Below Built-in cooktop (non-vented) E. Lower cabinet or storage drawer C. Built-in Cooktop Installation D 3" (7.6 cm) See note below the lowest point of the cooktop (including any gas fittings) and the microwave oven. 3 Upper cabinet B. Toe kick NOTE: The bottom of the cooktop may...


