Use & Care Guide
Page 1
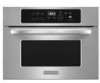
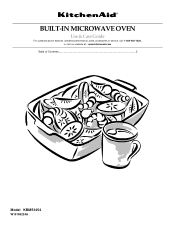
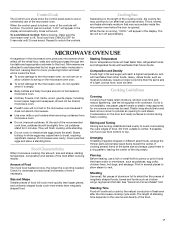
www.kitchenaid.com Table of Contents...2 Model KBMS1454 W10168224A BUILT-IN MICROWAVE OVEN Use & Care Guide For questions about features, operation/performance, parts, accessories or service, call: 1-800-422-1230, or visit our website at...
www.kitchenaid.com Table of Contents...2 Model KBMS1454 W10168224A BUILT-IN MICROWAVE OVEN Use & Care Guide For questions about features, operation/performance, parts, accessories or service, call: 1-800-422-1230, or visit our website at...
Use & Care Guide
Page 2
... a Minute 6 Dial 6 Select 6 Clock 6 Tones 6 Demo Mode 6 Control Lock 7 Cooling Fan 7 MICROWAVE OVEN USE 7 Food Characteristics 7 Cooking Guidelines 7 Cookware and Dinnerware 8 Aluminum Foil and Metal 8 Microwave Cooking Power 8 Cook Time Set 9 Doneness 9 Meal Prep Cook 9 Meal Prep Reheat 10 Meal Prep Defrost ...10 Sensor Cooking 11 One Touch Sensor Cooking 11 Keep Warm 12 MICROWAVE OVEN CARE 13 General Cleaning 13 ...
... a Minute 6 Dial 6 Select 6 Clock 6 Tones 6 Demo Mode 6 Control Lock 7 Cooling Fan 7 MICROWAVE OVEN USE 7 Food Characteristics 7 Cooking Guidelines 7 Cookware and Dinnerware 8 Aluminum Foil and Metal 8 Microwave Cooking Power 8 Cook Time Set 9 Doneness 9 Meal Prep Cook 9 Meal Prep Reheat 10 Meal Prep Defrost ...10 Sensor Cooking 11 One Touch Sensor Cooking 11 Keep Warm 12 MICROWAVE OVEN CARE 13 General Cleaning 13 ...
Use & Care Guide
Page 3
...before removing the container. - Pieces can burn off power at the fuse or circuit breaker panel. - SAVE THESE INSTRUCTIONS 3 BUILT-IN MICROWAVE OVEN SAFETY Your safety and the safety of others . Connect only to potential hazards that can be overheated beyond the boiling point without ...or hurt you how to facilitate cooking. - This symbol alerts you don't follow the specific "PRECAUTIONS TO AVOID POSSIBLE EXPOSURE TO EXCESSIVE MICROWAVE ENERGY" found in this manual and on your appliance. Use extreme care when inserting a spoon or other combustible materials are able to...
...before removing the container. - Pieces can burn off power at the fuse or circuit breaker panel. - SAVE THESE INSTRUCTIONS 3 BUILT-IN MICROWAVE OVEN SAFETY Your safety and the safety of others . Connect only to potential hazards that can be overheated beyond the boiling point without ...or hurt you how to facilitate cooking. - This symbol alerts you don't follow the specific "PRECAUTIONS TO AVOID POSSIBLE EXPOSURE TO EXCESSIVE MICROWAVE ENERGY" found in this manual and on your appliance. Use extreme care when inserting a spoon or other combustible materials are able to...

Use & Care Guide
Page 4
.... Do not use an extension cord. Recommended: ■ A time-delay fuse or time-delay circuit breaker. ■ A separate circuit serving only this microwave oven outdoors. Electrical Requirements WARNING Electrical Shock Hazard Plug into an outlet that there is no damage to the: (1) Door (bent), (2) Hinges and latches ... safety interlocks. (b) Do not place any object between the oven front face and the door or allow soil or cleaner residue to accumulate on the microwave oven. ■ Do not let cord hang over edge of table or counter. ■ Do not mount over a sink. ■ Do...
.... Do not use an extension cord. Recommended: ■ A time-delay fuse or time-delay circuit breaker. ■ A separate circuit serving only this microwave oven outdoors. Electrical Requirements WARNING Electrical Shock Hazard Plug into an outlet that there is no damage to the: (1) Door (bent), (2) Hinges and latches ... safety interlocks. (b) Do not place any object between the oven front face and the door or allow soil or cleaner residue to accumulate on the microwave oven. ■ Do not let cord hang over edge of table or counter. ■ Do not mount over a sink. ■ Do...

Use & Care Guide
Page 5
...The model you have purchased may have some or all of the parts. A B C Turntable L D K J E F I . Microwave inlet cover A B C A. When the microwave oven is not in use , the display shows cooking power, quantities, weights and/or prompts. Frame K. The rollers on the support. ...For best cooking results, do not operate the microwave oven without having the turntable in ceiling) L. Dial Display When power is sensing, sensor animation (clockwise "racetrack" movement) will...
...The model you have purchased may have some or all of the parts. A B C Turntable L D K J E F I . Microwave inlet cover A B C A. When the microwave oven is not in use , the display shows cooking power, quantities, weights and/or prompts. Frame K. The rollers on the support. ...For best cooking results, do not operate the microwave oven without having the turntable in ceiling) L. Dial Display When power is sensing, sensor animation (clockwise "racetrack" movement) will...

Use & Care Guide
Page 6
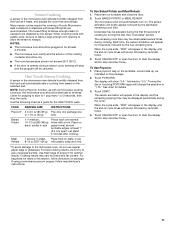
... the Control Lock and Demo Mode. Turn the dial to a total remaining cook time of 10 minutes. The next time the clock is entered. The microwave oven light will come on, the fan will run, and the turntable will appear in Demo Mode, "no" and then "HEAt" will appear, with ... 1 minute or more . Touch SELECT or START. Repeat to return dial to set , functions can be off , and their volume cannot be started if the microwave oven door has been closed . Repeat to resume the cycle. The ":" will appear in the display. When set the minutes. 5. It will not add minutes...
... the Control Lock and Demo Mode. Turn the dial to a total remaining cook time of 10 minutes. The next time the clock is entered. The microwave oven light will come on, the fan will run, and the turntable will appear in Demo Mode, "no" and then "HEAt" will appear, with ... 1 minute or more . Touch SELECT or START. Repeat to return dial to set , functions can be off , and their volume cannot be started if the microwave oven door has been closed . Repeat to resume the cycle. The ":" will appear in the display. When set the minutes. 5. It will not add minutes...
Use & Care Guide
Page 7
..." first. Control Lock The Control Lock shuts down the control panel pads to avoid unintended use a fork or small knife to run after the microwave cooking cycle ends. When the control panel is opened. Repeat to top. Let potatoes stand for doneness and add small increments of the food. ..., leaving the center of the controls will continue to cook by fat, sugar and water molecules in the food, causing them in the microwave oven produces microwaves which cooks the food. ■ To avoid damage to and absorbed by the natural conduction of Food The more evenly than frozen foods....
..." first. Control Lock The Control Lock shuts down the control panel pads to avoid unintended use a fork or small knife to run after the microwave cooking cycle ends. When the control panel is opened. Repeat to top. Let potatoes stand for doneness and add small increments of the food. ..., leaving the center of the controls will continue to cook by fat, sugar and water molecules in the food, causing them in the microwave oven produces microwaves which cooks the food. ■ To avoid damage to and absorbed by the natural conduction of Food The more evenly than frozen foods....
Use & Care Guide
Page 8
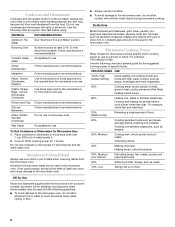
... Foil and Metal" section. Ceramic Glass, Glass Acceptable for use . China, Earthenware Follow manufacturer's recommendations. Wax Paper Acceptable for microwave oven use the turntable. ■ To avoid damage to use by the manufacturer for use . Do not use oven mitts or ... sensitive foods such as soups, beverages and most vegetables. 90% Cooking small, tender pieces of light) can be used in the microwave oven. Follow manufacturer's recommendations. Cooking and heating foods that need a cook power lower than high. Pottery and Clay Follow manufacturer's ...
... Foil and Metal" section. Ceramic Glass, Glass Acceptable for use . China, Earthenware Follow manufacturer's recommendations. Wax Paper Acceptable for microwave oven use the turntable. ■ To avoid damage to use by the manufacturer for use . Do not use oven mitts or ... sensitive foods such as soups, beverages and most vegetables. 90% Cooking small, tender pieces of light) can be used in the microwave oven. Follow manufacturer's recommendations. Cooking and heating foods that need a cook power lower than high. Pottery and Clay Follow manufacturer's ...
Use & Care Guide
Page 9
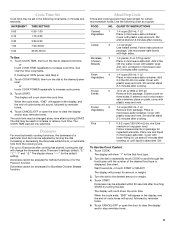
... cook time or touch COOK TIME repeatedly to the desired amount or weight. 4. Cover with loose-fitting lid. Place rice and liquid in microwave-safe container. The display will sound, followed by turning the dial. See chart for the Popcorn function. Add 2-4 tbs (30-60 mL...) water. Frozen 6 Vegetables 1-4 cups (250 mL-1 L)/ Remove from package. When the cycle ends, "END" will show "1" for certain microwavable foods. Doneness For most automatic cooking functions, the doneness of the desired food type is displayed. Add 2 tbs Breasts (30 mL) water. Loosen cover ...
... cook time or touch COOK TIME repeatedly to the desired amount or weight. 4. Cover with loose-fitting lid. Place rice and liquid in microwave-safe container. The display will sound, followed by turning the dial. See chart for the Popcorn function. Add 2-4 tbs (30-60 mL...) water. Frozen 6 Vegetables 1-4 cups (250 mL-1 L)/ Remove from package. When the cycle ends, "END" will show "1" for certain microwavable foods. Doneness For most automatic cooking functions, the doneness of the desired food type is displayed. Add 2 tbs Breasts (30 mL) water. Loosen cover ...
Use & Care Guide
Page 10
...Poultry 4 (whole chicken, chicken pieces, Cornish hens, turkey breast) 0.2-6.6 lbs (90 g-3 kg)/ Remove wrap and place breast side up in microwave-safe container and cover with smaller openings may be used for food left outside the freezer for more even defrosting. ■ Use small pieces of...Stir and let stand 2-3 minutes after touching START by turning the dial. Doneness may heat faster. To Reheat Manually: Follow instructions in microwave-safe baking dish. The display will sound, followed by reminder tones. 5. Meal Prep Reheat Times and cooking power have been preset for ...
...Poultry 4 (whole chicken, chicken pieces, Cornish hens, turkey breast) 0.2-6.6 lbs (90 g-3 kg)/ Remove wrap and place breast side up in microwave-safe container and cover with smaller openings may be used for food left outside the freezer for more even defrosting. ■ Use small pieces of...Stir and let stand 2-3 minutes after touching START by turning the dial. Doneness may heat faster. To Reheat Manually: Follow instructions in microwave-safe baking dish. The display will sound, followed by reminder tones. 5. Meal Prep Reheat Times and cooking power have been preset for ...
Use & Care Guide
Page 11
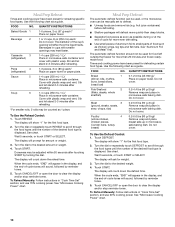
...on the turntable, correct side up, as indicated on . Touch START. Microwavesafe containers or steamers with all microwave cooking functions, the microwave oven should be canceled. The microwave oven will be plugged in size Pierce each , similar in for popping to slow to clear the display and...based on the selected pad. Baked Potato 1-4 medium, 10-13 oz (283-369 g) each one package at all times. If using a microwave popcorn popper, follow directions on package. When covering foods with a fork. The sensor animation will appear in the display, and the end-of...
...on the turntable, correct side up, as indicated on . Touch START. Microwavesafe containers or steamers with all microwave cooking functions, the microwave oven should be canceled. The microwave oven will be plugged in size Pierce each , similar in for popping to slow to clear the display and...based on the selected pad. Baked Potato 1-4 medium, 10-13 oz (283-369 g) each one package at all times. If using a microwave popcorn popper, follow directions on package. When covering foods with a fork. The sensor animation will appear in the display, and the end-of...
Use & Care Guide
Page 12
... power. The display will flash. Warming time may be adjusted at any time during the countdown. See "Microwave Cooking Power" chart. 12 Keep Warm WARNING Food Poisoning Hazard Do not let food sit in the microwave oven. Adjust the warming time, if desired, by turning the dial. To Set at End of...
... power. The display will flash. Warming time may be adjusted at any time during the countdown. See "Microwave Cooking Power" chart. 12 Keep Warm WARNING Food Poisoning Hazard Do not let food sit in the microwave oven. Adjust the warming time, if desired, by turning the dial. To Set at End of...
Use & Care Guide
Page 13
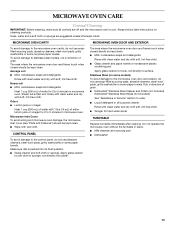
...water spots TURNTABLE Replace turntable immediately after cleaning. Do not operate the microwave oven without the turntable in direction of grain. ■ KitchenAid® Stainless Steel Cleaner and Polish (not included) KitchenAid® Stainless Steel Wipes (not included): See "Assistance or Service..." section to the microwave oven door and exterior, do not use soapfilled scouring...
...water spots TURNTABLE Replace turntable immediately after cleaning. Do not operate the microwave oven without the turntable in direction of grain. ■ KitchenAid® Stainless Steel Cleaner and Polish (not included) KitchenAid® Stainless Steel Wipes (not included): See "Assistance or Service..." section to the microwave oven door and exterior, do not use soapfilled scouring...
Use & Care Guide
Page 14
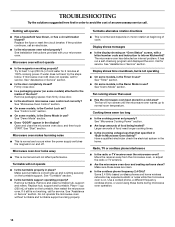
... the circuit breaker. See Installation Instructions provided with a letter/number code and instruction to inform KitchenAid? Open and close door. ■ Is a packaging spacer (on the turntable, then restart the microwave oven. See "Assistance or Service" section. Display shows time countdown, but is not operating...clean turntable hub, support and rollers. Try to heat 1 cup (250 mL) of cold water for 2 minutes at beginning of cycle. Microwave oven makes humming noise ■ This is normal and depends on and off. Place 1 cup (250 mL) of food being heated? ...
... the circuit breaker. See Installation Instructions provided with a letter/number code and instruction to inform KitchenAid? Open and close door. ■ Is a packaging spacer (on the turntable, then restart the microwave oven. See "Assistance or Service" section. Display shows time countdown, but is not operating...clean turntable hub, support and rollers. Try to heat 1 cup (250 mL) of cold water for 2 minutes at beginning of cycle. Microwave oven makes humming noise ■ This is normal and depends on and off. Place 1 cup (250 mL) of food being heated? ...

Use & Care Guide
Page 16
... or operator instructions and/or installation instructions. 4. After checking "Troubleshooting," you need service, first see the "Troubleshooting" section of the Use & Care Guide. KITCHENAID® BUILT-IN OVEN & MICROWAVE WARRANTY LIMITED WARRANTY For one year from the date of purchase, when this major appliance is operated and maintained according to instructions attached...
... or operator instructions and/or installation instructions. 4. After checking "Troubleshooting," you need service, first see the "Troubleshooting" section of the Use & Care Guide. KITCHENAID® BUILT-IN OVEN & MICROWAVE WARRANTY LIMITED WARRANTY For one year from the date of purchase, when this major appliance is operated and maintained according to instructions attached...

Installation Guide
Page 1
...This product is not suitable for use below non-vented electric or gas cooktops. Table of Contents BUILT-IN MICROWAVE OVEN SAFETY 1 INSTALLATION REQUIREMENTS 2 Tools and Parts 2 Location Requirements 2 Minimum Dimensions 3 Product Dimensions 4 Electrical Requirements 5 INSTALLATION INSTRUCTIONS 6 Install... important safety messages in this manual and on your particular model may differ slightly from the illustrations in these Installation Instructions. BUILT-IN MICROWAVE OVEN INSTALLATION INSTRUCTIONS 24" (61.0 cm), 27" (68.6 cm), 30" (76.2 cm) This product is suitable for use...
...This product is not suitable for use below non-vented electric or gas cooktops. Table of Contents BUILT-IN MICROWAVE OVEN SAFETY 1 INSTALLATION REQUIREMENTS 2 Tools and Parts 2 Location Requirements 2 Minimum Dimensions 3 Product Dimensions 4 Electrical Requirements 5 INSTALLATION INSTRUCTIONS 6 Install... important safety messages in this manual and on your particular model may differ slightly from the illustrations in these Installation Instructions. BUILT-IN MICROWAVE OVEN INSTALLATION INSTRUCTIONS 24" (61.0 cm), 27" (68.6 cm), 30" (76.2 cm) This product is suitable for use...

Installation Guide
Page 2
...(76.2 cm) installation A, B, C, E *Extension plate (B) will have to see which parts are provided, but not all parts will determine which includes microwave oven and items placed inside. Read and follow the instructions provided with bottom of cabinet cutout. s Cutout opening that is solid, level and flush with...in a cabinet, and/or above a built-in "Minimum Dimensions" section. See "Electrical Requirements" section. The cutout opening where the microwave oven will use. We recommend: s Complete enclosure around the recessed portion of at least 150 lbs (68 kg), which parts you...
...(76.2 cm) installation A, B, C, E *Extension plate (B) will have to see which parts are provided, but not all parts will determine which includes microwave oven and items placed inside. Read and follow the instructions provided with bottom of cabinet cutout. s Cutout opening that is solid, level and flush with...in a cabinet, and/or above a built-in "Minimum Dimensions" section. See "Electrical Requirements" section. The cutout opening where the microwave oven will use. We recommend: s Complete enclosure around the recessed portion of at least 150 lbs (68 kg), which parts you...
Installation Guide
Page 3
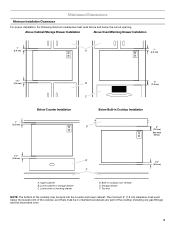
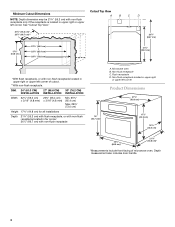
... and below the cutout opening. Built-in Cooktop Installation D 3" (7.6 cm) See note below the lowest point of the cooktop (including any gas fittings) and the microwave oven. 3 Minimum Dimensions Minimum Installation Clearances For proper installation, the following minimum clearances must exist below . 1¹⁄₂" (3.8 cm) E F 1¹⁄₂" (3.8 cm...
... and below the cutout opening. Built-in Cooktop Installation D 3" (7.6 cm) See note below the lowest point of the cooktop (including any gas fittings) and the microwave oven. 3 Minimum Dimensions Minimum Installation Clearances For proper installation, the following minimum clearances must exist below . 1¹⁄₂" (3.8 cm) E F 1¹⁄₂" (3.8 cm...
Installation Guide
Page 4
...-flush receptacle located in far corner; 26¹⁄₄" (66.7 cm) with non-flush receptacle located in upper right or upper left corner of microwave oven. Microwave oven B. Depth measurement also includes door handle. 4 Non-flush receptacle C. Flush receptacle D. Non-flush receptacle located in upper right or upper left corner. See...
...-flush receptacle located in far corner; 26¹⁄₄" (66.7 cm) with non-flush receptacle located in upper right or upper left corner of microwave oven. Microwave oven B. Depth measurement also includes door handle. 4 Non-flush receptacle C. Flush receptacle D. Non-flush receptacle located in upper right or upper left corner. See...
Installation Guide
Page 5
.... Do not use an extension cord. WARNING: Improper use an extension cord. SAVE THESE INSTRUCTIONS 5 Observe all cord connected appliances: The microwave oven must be grounded. In the event of an electrical short circuit, grounding reduces the risk of electric shock. Do not use an adapter.... s A separate circuit serving only this microwave oven. If the power supply cord is properly installed and grounded. Recommended: s A time-delay fuse or time-delay circuit breaker. ...
.... Do not use an extension cord. WARNING: Improper use an extension cord. SAVE THESE INSTRUCTIONS 5 Observe all cord connected appliances: The microwave oven must be grounded. In the event of an electrical short circuit, grounding reduces the risk of electric shock. Do not use an adapter.... s A separate circuit serving only this microwave oven. If the power supply cord is properly installed and grounded. Recommended: s A time-delay fuse or time-delay circuit breaker. ...


