
Use & Care Guide
Page 4
...refrigerator or disconnect power. 2. Pipe clamp C. Slip the compression sleeve and compression nut on copper tubing. 2. Do not overtighten. 8. Flush the tubing until water is less than 40 to 60 psi (276 to 414 kPa): ■ Check to allow for your model. Follow the connection instructions for cleaning. Attach...watertight seal. Remove plastic cap from the bottom. Compression sleeve E. Create a service loop (minimum diameter of refrigerator to the cold water pipe with a...tubing into the port to refrigerator cabinet with the pipe clamp. Add 7 ft (2.1 m) to see ...
...refrigerator or disconnect power. 2. Pipe clamp C. Slip the compression sleeve and compression nut on copper tubing. 2. Do not overtighten. 8. Flush the tubing until water is less than 40 to 60 psi (276 to 414 kPa): ■ Check to allow for your model. Follow the connection instructions for cleaning. Attach...watertight seal. Remove plastic cap from the bottom. Compression sleeve E. Create a service loop (minimum diameter of refrigerator to the cold water pipe with a...tubing into the port to refrigerator cabinet with the pipe clamp. Add 7 ft (2.1 m) to see ...

Use & Care Guide
Page 5
...the door gasket magnets to hold the nut on the side of the refrigerator door handle upward with a "P" clamp. Remove the door handle seal screw front. Copper tubing E. Make sure the bottom door cap is installed. Slide the handle down until you are included later...9632; You must remove the handles to remove the decorator panels or to refrigerator cabinet with a rubber mallet. 3. NOTE: Provide additional support for the bottom hinge as shown in Graphic 1-2. See Graphic 2. 2. Attach copper tubing to reverse the door swing. Correct any adjustable door bins or...
...the door gasket magnets to hold the nut on the side of the refrigerator door handle upward with a "P" clamp. Remove the door handle seal screw front. Copper tubing E. Make sure the bottom door cap is installed. Slide the handle down until you are included later...9632; You must remove the handles to remove the decorator panels or to refrigerator cabinet with a rubber mallet. 3. NOTE: Provide additional support for the bottom hinge as shown in Graphic 1-2. See Graphic 2. 2. Attach copper tubing to reverse the door swing. Correct any adjustable door bins or...

Use & Care Guide
Page 6
.... See Graphic 3. Assemble the parts for the top hinge as shown in place. Loosen the four screws attaching the drawer glides to remove and replace the freezer drawer. See Drawer Front Removal graphic. See Drawer Front Replacement graphic. 2. Check all removable door parts to...from top door extension. See Top Hinge Graphic. Drive two set screws in Bottom Hinge graphic. Tighten all screws. Open the freezer drawer to four turns. See Graphic 5. 8. Replace the parts for the refrigerator door while the hinges are in Graphic 1. 2. NOTE: Provide additional support ...
.... See Graphic 3. Assemble the parts for the top hinge as shown in place. Loosen the four screws attaching the drawer glides to remove and replace the freezer drawer. See Drawer Front Removal graphic. See Drawer Front Replacement graphic. 2. Check all removable door parts to...from top door extension. See Top Hinge Graphic. Drive two set screws in Bottom Hinge graphic. Tighten all screws. Open the freezer drawer to four turns. See Graphic 5. 8. Replace the parts for the refrigerator door while the hinges are in Graphic 1. 2. NOTE: Provide additional support ...

Use & Care Guide
Page 9
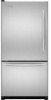
...decorator panel C. Remove the refrigerator handle: ■ Using a Phillips screwdriver, remove the top door cap. ■ Tap the bottom edge of the refrigerator Turn the brake foot clockwise...freezer drawer is firmly against the floor to avoid scratching. Grasp the grille firmly and pull it easier to turn the leveling screw on each side to adjust the tilt of the refrigerator...to close more to the right. Attach the handle and trim. 3. Replace the base grille. Style 1 - NOTE: Having someone push against the top of the refrigerator. Replace the Door Panel 1. Leveling ...
...decorator panel C. Remove the refrigerator handle: ■ Using a Phillips screwdriver, remove the top door cap. ■ Tap the bottom edge of the refrigerator Turn the brake foot clockwise...freezer drawer is firmly against the floor to avoid scratching. Grasp the grille firmly and pull it easier to turn the leveling screw on each side to adjust the tilt of the refrigerator...to close more to the right. Attach the handle and trim. 3. Replace the base grille. Style 1 - NOTE: Having someone push against the top of the refrigerator. Replace the Door Panel 1. Leveling ...

Use & Care Guide
Page 19
... CONSEQUENTIAL DAMAGES. KITCHENAID® REFRIGERATOR WARRANTY ONE YEAR LIMITED WARRANTY For one year from the date of purchase, when this major appliance is operated and maintained according to instructions attached to or furnished with the product, KitchenAid or KitchenAid Canada (hereafter "KitchenAid") will pay ... MAY NOT APPLY TO YOU. On models with the product, KitchenAid will pay for replacement or repair of your major appliance, to defective materials or workmanship. Service calls to refrigerator or freezer product failures. 6. In Canada, call 1-800-422-1230. Any...
... CONSEQUENTIAL DAMAGES. KITCHENAID® REFRIGERATOR WARRANTY ONE YEAR LIMITED WARRANTY For one year from the date of purchase, when this major appliance is operated and maintained according to instructions attached to or furnished with the product, KitchenAid or KitchenAid Canada (hereafter "KitchenAid") will pay ... MAY NOT APPLY TO YOU. On models with the product, KitchenAid will pay for replacement or repair of your major appliance, to defective materials or workmanship. Service calls to refrigerator or freezer product failures. 6. In Canada, call 1-800-422-1230. Any...