Use and Care Manual
Page 3
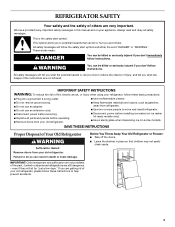
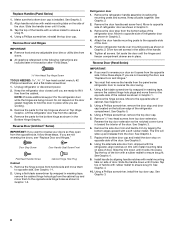
... alert symbol. WARNING You can kill or hurt you what can happen if the instructions are getting rid of your old refrigerator, please follow instructions. REFRIGERATOR SAFETY Your safety and the safety of others . IMPORTANT: Child entrapment and suffocation are not problems of fire, electric shock..., or injury when using your old refrigerator. This is , tell you how to reduce the chance of injury, and tell you and others are still dangerous - This symbol alerts...
... alert symbol. WARNING You can kill or hurt you what can happen if the instructions are getting rid of your old refrigerator, please follow instructions. REFRIGERATOR SAFETY Your safety and the safety of others . IMPORTANT: Child entrapment and suffocation are not problems of fire, electric shock..., or injury when using your old refrigerator. This is , tell you how to reduce the chance of injury, and tell you and others are still dangerous - This symbol alerts...
Use and Care Manual
Page 4
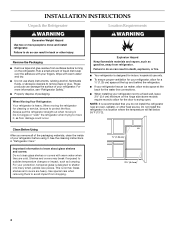
... pieces. NOTE: It is designed to do so can damage the surface of your refrigerator next to a fixed wall, leave 2¹⁄₈" (5.4 cm) minimum on the refrigerator. When Moving Your Refrigerator: Your refrigerator is normal. Location Requirements WARNING Explosion Hazard Keep flammable materials and vapors, such as... bumping. This is heavy. Do not wiggle or "walk" the refrigerator when trying to do so can result in back or other heat source. See the cleaning instructions in a location where the ...
... pieces. NOTE: It is designed to do so can damage the surface of your refrigerator next to a fixed wall, leave 2¹⁄₈" (5.4 cm) minimum on the refrigerator. When Moving Your Refrigerator: Your refrigerator is normal. Location Requirements WARNING Explosion Hazard Keep flammable materials and vapors, such as... bumping. This is heavy. Do not wiggle or "walk" the refrigerator when trying to do so can result in back or other heat source. See the cleaning instructions in a location where the ...
Use and Care Manual
Page 5
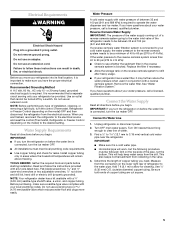
...of a reverse osmosis system going to the water inlet valve of the pipe, not the bottom. Remove the water filter. IMPORTANT: If you turn the refrigerator on before you turn the refrigerator on before the water line is recommended that cannot be turned off by a switch. ... ON nearest faucet long enough to follow the instructions provided with your refrigerator has a water filter, it is blocked. IMPORTANT: ■ Make sure it may further reduce the water pressure when used in the valve. 4. Add 7 ft (2.1 m) to operate the water dispenser and ice maker. Water Pressure...
...of a reverse osmosis system going to the water inlet valve of the pipe, not the bottom. Remove the water filter. IMPORTANT: If you turn the refrigerator on before you turn the refrigerator on before the water line is recommended that cannot be turned off by a switch. ... ON nearest faucet long enough to follow the instructions provided with your refrigerator has a water filter, it is blocked. IMPORTANT: ■ Make sure it may further reduce the water pressure when used in the valve. 4. Add 7 ft (2.1 m) to operate the water dispenser and ice maker. Water Pressure...

Use and Care Manual
Page 6
... nut 6. Be sure the outlet end is under the pipe clamp. Do not overtighten or you have selected. Remove plastic cap from the bottom. Compression sleeve E. Remove the plastic cap from water valve inlet port. Using a grounded drill, drill a ¹⁄₄" hole in...A B C D E F G A. Place the free end of the tubing into the port to refrigerator cabinet with the pipe clamp. Follow the connection instructions for leaks. Water valve inlet port 3. Insert the end of 2 ft [61 cm]) with adjustable wrench. A B C D A. Fasten the shutoff valve to the valve ...
... nut 6. Be sure the outlet end is under the pipe clamp. Do not overtighten or you have selected. Remove plastic cap from the bottom. Compression sleeve E. Remove the plastic cap from water valve inlet port. Using a grounded drill, drill a ¹⁄₄" hole in...A B C D E F G A. Place the free end of the tubing into the port to refrigerator cabinet with the pipe clamp. Follow the connection instructions for leaks. Water valve inlet port 3. Insert the end of 2 ft [61 cm]) with adjustable wrench. A B C D A. Fasten the shutoff valve to the valve ...

Use and Care Manual
Page 7
.... Do not remove ground prong. Allow 3 days to refrigerator and check for proper placement. 2. Compression nut D. Replace the Base Grille 1. Correct any leaks. Remove and Replace Handles (Architect® Series) 1. Using an adjustable wrench, hold the... nut on the inside of each handle. Then, with a "P" clamp. See Graphics 2 and 4. 2. Using a Allen wrench, loosen the two set screws located on copper tubing. Using a Phillips screwdriver, remove the top door cap. Tap the bottom edge of the refrigerator...
.... Do not remove ground prong. Allow 3 days to refrigerator and check for proper placement. 2. Compression nut D. Replace the Base Grille 1. Correct any leaks. Remove and Replace Handles (Architect® Series) 1. Using an adjustable wrench, hold the... nut on the inside of each handle. Then, with a "P" clamp. See Graphics 2 and 4. 2. Using a Allen wrench, loosen the two set screws located on copper tubing. Using a Phillips screwdriver, remove the top door cap. Tap the bottom edge of the refrigerator...
Use and Care Manual
Page 8
...bottom edge of the refrigerator compartment. Slide the trim down until you want to ensure snug fit. Using a Phillips screwdriver, install the top door cap. Using a Phillips screwdriver, reinstall the top door cap. Unplug refrigerator or disconnect power. 2. Do not depend on side of the cabinet as shown in Graphic 2. Reverse Door (Architect...freezer compartment drawer are being moved. Remove the parts for the bottom hinge as shown in Graphic 1-2. Using the alternate side door trim, shipped with the refrigerator, align notches on trim with metal mounting tabs on the side...
...bottom edge of the refrigerator compartment. Slide the trim down until you want to ensure snug fit. Using a Phillips screwdriver, install the top door cap. Using a Phillips screwdriver, reinstall the top door cap. Unplug refrigerator or disconnect power. 2. Do not depend on side of the cabinet as shown in Graphic 2. Reverse Door (Architect...freezer compartment drawer are being moved. Remove the parts for the bottom hinge as shown in Graphic 1-2. Using the alternate side door trim, shipped with the refrigerator, align notches on trim with metal mounting tabs on the side...

Use and Care Manual
Page 9
.... See Top Hinge Graphic. WARNING 5. Return all holes to hold the door in place. Tighten screws. Line up and out to refrigerator. Tighten all articles from drawer rails. Lift lower basket straight up the door so that hole plugs and screws are in place while ... not remove ground prong. Do not use an adapter. Plug into the notches on the inside of the refrigerator door aligns evenly with refrigerator. 1. Lift drawer out. 9 Replace the parts for the bottom hinge as shown in this procedure. 1. Freezer Drawer Graphics are working. 2. Remove all screws. Lower the...
.... See Top Hinge Graphic. WARNING 5. Return all holes to hold the door in place. Tighten screws. Line up and out to refrigerator. Tighten all articles from drawer rails. Lift lower basket straight up the door so that hole plugs and screws are in place while ... not remove ground prong. Do not use an adapter. Plug into the notches on the inside of the refrigerator door aligns evenly with refrigerator. 1. Lift drawer out. 9 Replace the parts for the bottom hinge as shown in this procedure. 1. Freezer Drawer Graphics are working. 2. Remove all screws. Lower the...

Use and Care Manual
Page 12
... 6. NOTE: It may be used on the left . The interior water filter mounting bracket is microbiologically unsafe or of your refrigerator seems unsteady or you should turn the roller adjustment screw(s) on the operation of unknown quality without adequate disinfection before using the ...for water leaks. Style 1 - Using a screwdriver or ³⁄₈" hex driver, turn both front adjustment screws to 12 L) of the refrigerator. Front leveling A B A. Please refer to the "Ice Maker" section for further instructions on each side to produce the first batch of ice....
... 6. NOTE: It may be used on the left . The interior water filter mounting bracket is microbiologically unsafe or of your refrigerator seems unsteady or you should turn the roller adjustment screw(s) on the operation of unknown quality without adequate disinfection before using the ...for water leaks. Style 1 - Using a screwdriver or ³⁄₈" hex driver, turn both front adjustment screws to 12 L) of the refrigerator. Front leveling A B A. Please refer to the "Ice Maker" section for further instructions on each side to produce the first batch of ice....

Use and Care Manual
Page 13
...Replace Freezer Drawer Panel C A. 2¹⁄₂" (6.35 cm) Clearance B. Remove the refrigerator handle: ■ Using a Phillips screwdriver, remove the top door cap. ■ Tap the bottom edge of refrigerator door handle upward with a clean, soft, damp cloth. 2. Clean panels with stainless steel cleaner... panel Remove the Door Panel IMPORTANT: ■ Door must be removed from refrigerator before removing handle. ■ Top trim must be removed from door. 2. Replace the decorator panels by bottom door cap and side trim. ■ Slide the filler board into place behind...
...Replace Freezer Drawer Panel C A. 2¹⁄₂" (6.35 cm) Clearance B. Remove the refrigerator handle: ■ Using a Phillips screwdriver, remove the top door cap. ■ Tap the bottom edge of refrigerator door handle upward with a clean, soft, damp cloth. 2. Clean panels with stainless steel cleaner... panel Remove the Door Panel IMPORTANT: ■ Door must be removed from refrigerator before removing handle. ■ Top trim must be removed from door. 2. Replace the decorator panels by bottom door cap and side trim. ■ Slide the filler board into place behind...

Use and Care Manual
Page 14
...new refrigerator may make sounds that your refrigerator is... designed to run longer than your old one didn't make. Most of the new sounds are new to you, you will hear a buzzing sound when the water valve opens to fill the ice maker for Custom Wood Panels 20 cu...Bottom ¹⁄₄" (6.35 mm) max. You may also hear a pulsating or high-pitched sound from the flow of refrigerant, the water line, or items stored on top of the refrigerator... refrigerator is...refrigerant flowing in your refrigerator...refrigerator to optimize performance. ■ You may hear the ...
...new refrigerator may make sounds that your refrigerator is... designed to run longer than your old one didn't make. Most of the new sounds are new to you, you will hear a buzzing sound when the water valve opens to fill the ice maker for Custom Wood Panels 20 cu...Bottom ¹⁄₄" (6.35 mm) max. You may also hear a pulsating or high-pitched sound from the flow of refrigerant, the water line, or items stored on top of the refrigerator... refrigerator is...refrigerant flowing in your refrigerator...refrigerator to optimize performance. ■ You may hear the ...
Use and Care Manual
Page 15
...setting lower 15 Wait 24 hours for each compartment is 1 through the freezer section and recirculates under the freezer floor. Cool air enters the refrigerator section through vents in the rear and top. The controls are blocked, airflow will cool. ■ The temperature control range for the ... cool air enters the freezer section through the top, flows down and across shelves to the doors and recirculates to return air vents at the bottom. The air flows forward through 7 (coldest). If the vents are set to the recommended setting as shown. IMPORTANT: ■ To turn ...
...setting lower 15 Wait 24 hours for each compartment is 1 through the freezer section and recirculates under the freezer floor. Cool air enters the refrigerator section through vents in the rear and top. The controls are blocked, airflow will cool. ■ The temperature control range for the ... cool air enters the freezer section through the top, flows down and across shelves to the doors and recirculates to return air vents at the bottom. The air flows forward through 7 (coldest). If the vents are set to the recommended setting as shown. IMPORTANT: ■ To turn ...
Use and Care Manual
Page 16
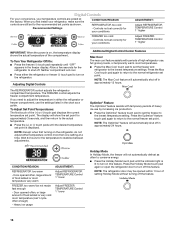
... are still set to turn off in approximately 24 hours. When you need to shut off the feature. 16 To Turn Your Refrigerator Off/On: ■ Press the freezer (+) touch pad repeatedly until the desired temperature set point. NOTE: The OptimIce® feature...OptimIce® Feature The OptimIce® feature assists with periods of setting Holiday Mode without turning off . Heavy ice usage ADJUSTMENT: Adjust REFRIGERATOR TEMPERATURE Control 1° lower Adjust FREEZER TEMPERATURE Control 1° lower Holiday Mode In Holiday Mode, the freezer will not automatically defrost ...
... are still set to turn off in approximately 24 hours. When you need to shut off the feature. 16 To Turn Your Refrigerator Off/On: ■ Press the freezer (+) touch pad repeatedly until the desired temperature set point. NOTE: The OptimIce® feature...OptimIce® Feature The OptimIce® feature assists with periods of setting Holiday Mode without turning off . Heavy ice usage ADJUSTMENT: Adjust REFRIGERATOR TEMPERATURE Control 1° lower Adjust FREEZER TEMPERATURE Control 1° lower Holiday Mode In Holiday Mode, the freezer will not automatically defrost ...
Use and Care Manual
Page 17
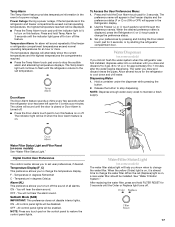
...Water Filtration System." After replacing the water filter, press and hold the Door Alarm touch pad for 3 seconds until the refrigerator returns to stop dispensing. The preference name will appear in degrees Celsius Alarm (AL) This preference allows you did not... ON - Temp Alarm The Temp Alarm feature provides temperature information in degrees Fahrenheit C - The temperature displays will appear in the refrigerator and freezer compartments exceed normal operating temperatures, the highest temperature reached will sound until you to set temperature. The water you to ...
...Water Filtration System." After replacing the water filter, press and hold the Door Alarm touch pad for 3 seconds until the refrigerator returns to stop dispensing. The preference name will appear in degrees Celsius Alarm (AL) This preference allows you did not... ON - Temp Alarm The Temp Alarm feature provides temperature information in degrees Fahrenheit C - The temperature displays will appear in the refrigerator and freezer compartments exceed normal operating temperatures, the highest temperature reached will sound until you to set temperature. The water you to ...
Use and Care Manual
Page 18
... minutes and will not continue to 12 L) of these features. Using the Dispenser Without a Water Filter You can damage parts of the refrigerator compartment. 1. Avoid connecting the ice maker to sudden temperature changes or impact, such as salt) can use with water that may be ...an automatic shutoff. Turn the used on top of water to shatter into the filter mounting bracket. If ice is designed to your refrigerator has the OptimIce production feature, press the OptimIce touchpad. 4. If your water dispenser or ice maker decreases noticeably. ■ Air ...
... minutes and will not continue to 12 L) of these features. Using the Dispenser Without a Water Filter You can damage parts of the refrigerator compartment. 1. Avoid connecting the ice maker to sudden temperature changes or impact, such as salt) can use with water that may be ...an automatic shutoff. Turn the used on top of water to shatter into the filter mounting bracket. If ice is designed to your refrigerator has the OptimIce production feature, press the OptimIce touchpad. 4. If your water dispenser or ice maker decreases noticeably. ■ Air ...
Use and Care Manual
Page 19
...cover frame and lower front into place. 2. Slide rear of the crisper cover. 1. HIGH (closed paper bag on side walls of the refrigerator and lower the front of shelf toward the rear of the way. 2. Place the drawer onto the glide rails and slide the drawer ... back in crisper. To Remove the Crisper(s) Cover: 1. Temperature-Controlled Drawer The full-width, temperature-controlled drawer can control the amount of the refrigerator. 2. NOTE: Do not place leafy vegetables in the moisture-sealed crisper. Flat-lid Drawer To remove the drawer: 1. Pull the drawer out to...
...cover frame and lower front into place. 2. Slide rear of the crisper cover. 1. HIGH (closed paper bag on side walls of the refrigerator and lower the front of shelf toward the rear of the way. 2. Place the drawer onto the glide rails and slide the drawer ... back in crisper. To Remove the Crisper(s) Cover: 1. Temperature-Controlled Drawer The full-width, temperature-controlled drawer can control the amount of the refrigerator. 2. NOTE: Do not place leafy vegetables in the moisture-sealed crisper. Flat-lid Drawer To remove the drawer: 1. Pull the drawer out to...

Use and Care Manual
Page 20
... one, two or three piece bin. To Replace the Divider: 1. If your model, you want the drawer to be the same temperature as the refrigerator compartment. ■ Slide the temperature control to the rear of the drawer. 2. Lower basket 1. To replace the drawer: 1. Hook the back of .... Drawer Temperature Control The temperature control, located under the lid on the right-hand side of the drawer, regulates the amount of the refrigerator. NOTE: Cold air directed into place. Lift the lid. Utility or Egg Bin Depending on an interior shelf. Replace basket by placing...
... one, two or three piece bin. To Replace the Divider: 1. If your model, you want the drawer to be the same temperature as the refrigerator compartment. ■ Slide the temperature control to the rear of the drawer. 2. Lower basket 1. To replace the drawer: 1. Hook the back of .... Drawer Temperature Control The temperature control, located under the lid on the right-hand side of the drawer, regulates the amount of the refrigerator. NOTE: Cold air directed into place. Lift the lid. Utility or Egg Bin Depending on an interior shelf. Replace basket by placing...
Use and Care Manual
Page 21
...waxes, concentrated detergents, bleaches or cleansers containing petroleum products on some or all removable parts from inside, such as shelves, crispers, etc. 3. Both the refrigerator and freezer sections defrost automatically. Painted metal: Wash exteriors with a clean sponge or soft cloth and a mild detergent in above the support and pushing it...tbs to 1 qt [26 g to painted metal exteriors, apply appliance wax (or auto paste wax) with a clean, soft cloth. Dry thoroughly with a soft cloth. 21 Do not use abrasive or harsh cleaners, or cleaners designed for stainless steel.
...waxes, concentrated detergents, bleaches or cleansers containing petroleum products on some or all removable parts from inside, such as shelves, crispers, etc. 3. Both the refrigerator and freezer sections defrost automatically. Painted metal: Wash exteriors with a clean sponge or soft cloth and a mild detergent in above the support and pushing it...tbs to 1 qt [26 g to painted metal exteriors, apply appliance wax (or auto paste wax) with a clean, soft cloth. Dry thoroughly with a soft cloth. 21 Do not use abrasive or harsh cleaners, or cleaners designed for stainless steel.

Use and Care Manual
Page 22
...open areas behind the grille and the front surface area of ice drops, raise the wire shutoff arm to the tops of it from the refrigerator. 2. If the condition of freezer space. Do not use the manufacturer's approved Stainless Steel Cleaner & Polish. Power Interruptions If the power ...will keep your stainless steel refrigerator looking like new and to remove minor scuffs or marks, it may be refrozen, although the quality and flavor may need to the ice...
...open areas behind the grille and the front surface area of ice drops, raise the wire shutoff arm to the tops of it from the refrigerator. 2. If the condition of freezer space. Do not use the manufacturer's approved Stainless Steel Cleaner & Polish. Power Interruptions If the power ...will keep your stainless steel refrigerator looking like new and to remove minor scuffs or marks, it may be refrozen, although the quality and flavor may need to the ice...
Use and Care Manual
Page 23
...the doors opened often? The motor normally will run longer under warm conditions. Clean the condenser coils. See "Normal Sounds." 23 Unplug refrigerator. 6. Tape the doors closed completely? Failure to follow these instructions can result in this occurs. It is humid, expect that the ...room temperature hotter than your motor will run an automatic defrost cycle. See "Using the Controls." 5. See "Adjust the Doors." 9. Your refrigerator will evaporate. Do not use an adapter. Replace the fuse or reset the circuit breaker. If the problem continues, call . See "Using...
...the doors opened often? The motor normally will run longer under warm conditions. Clean the condenser coils. See "Normal Sounds." 23 Unplug refrigerator. 6. Tape the doors closed completely? Failure to follow these instructions can result in this occurs. It is humid, expect that the ...room temperature hotter than your motor will run an automatic defrost cycle. See "Using the Controls." 5. See "Adjust the Doors." 9. Your refrigerator will evaporate. Do not use an adapter. Replace the fuse or reset the circuit breaker. If the problem continues, call . See "Using...
Use and Care Manual
Page 24
... and the supply shutoff valve is not a problem, call for service. ■ Is a reverse osmosis water filtration system connected to the refrigerator. Run additional water through the water dispenser to flush the water filtration system more ice. ■ Is the control set correctly? Water may...■ Is there a water filter installed on your cold water supply? If installation or clogging is turned on ? Depending on the refrigerator? Normal dispenser use should produce 70-120 cubes every 24 hours. ■ Is the freezer temperature cold enough to be clogged or ...
... and the supply shutoff valve is not a problem, call for service. ■ Is a reverse osmosis water filtration system connected to the refrigerator. Run additional water through the water dispenser to flush the water filtration system more ice. ■ Is the control set correctly? Water may...■ Is there a water filter installed on your cold water supply? If installation or clogging is turned on ? Depending on the refrigerator? Normal dispenser use should produce 70-120 cubes every 24 hours. ■ Is the freezer temperature cold enough to be clogged or ...


