
Use & Care Guide
Page 1
...; DU RÉFRIGÉRATEUR 20 INSTALLATION INSTRUCTIONS 2 INSTRUCTIONS D'INSTALLATION 21 REFRIGERATOR USE 10 UTILISATION DU RÉFRIGÉRATEUR 31 REFRIGERATOR CARE 14 ENTRETIEN DU RÉFRIGÉRATEUR 35 TROUBLESHOOTING 15 DÉPANNAGE 36 WATER FILTER CERTIFICATIONS 17 FEUILLES DE DONNÉES SUR LE PRODUIT 39 PRODUCT DATA SHEETS 18 GARANTIE 40 WARRANTY 19 REFRIGERATOR SAFETY Your safety and the safety of...
...; DU RÉFRIGÉRATEUR 20 INSTALLATION INSTRUCTIONS 2 INSTRUCTIONS D'INSTALLATION 21 REFRIGERATOR USE 10 UTILISATION DU RÉFRIGÉRATEUR 31 REFRIGERATOR CARE 14 ENTRETIEN DU RÉFRIGÉRATEUR 35 TROUBLESHOOTING 15 DÉPANNAGE 36 WATER FILTER CERTIFICATIONS 17 FEUILLES DE DONNÉES SUR LE PRODUIT 39 PRODUCT DATA SHEETS 18 GARANTIE 40 WARRANTY 19 REFRIGERATOR SAFETY Your safety and the safety of...

Use & Care Guide
Page 2
... . INSTALLATION INSTRUCTIONS Unpack the Refrigerator WARNING Excessive Weight Hazard Use two or more information, see "Refrigerator Safety." ■ Properly dispose of your refrigerator before turning on ice maker kit ready models only). Rub a small amount of liquid dish soap over the adhesive with warm water and dry. ■ Do not use an extension cord. ■ Disconnect power before servicing. ■ Replace all of the packaging materials, clean the inside . Shelves...
... . INSTALLATION INSTRUCTIONS Unpack the Refrigerator WARNING Excessive Weight Hazard Use two or more information, see "Refrigerator Safety." ■ Properly dispose of your refrigerator before turning on ice maker kit ready models only). Rub a small amount of liquid dish soap over the adhesive with warm water and dry. ■ Do not use an extension cord. ■ Disconnect power before servicing. ■ Replace all of the packaging materials, clean the inside . Shelves...

Use & Care Guide
Page 3
... a location where the temperature will remain above freezing. Do not use an adapter. If you are finished, reconnect the refrigerator to the electrical source and reset the control (Thermostat, Refrigerator or Freezer Control depending on the model) to follow the instructions provided with water pressure of installation, cleaning, or removing a light bulb, turn the control (Thermostat, Refrigerator or Freezer Control depending on the hinge side (some models require more easily. ■ Use copper tubing and check for leaks. If your water pressure...
... a location where the temperature will remain above freezing. Do not use an adapter. If you are finished, reconnect the refrigerator to the electrical source and reset the control (Thermostat, Refrigerator or Freezer Control depending on the model) to follow the instructions provided with water pressure of installation, cleaning, or removing a light bulb, turn the control (Thermostat, Refrigerator or Freezer Control depending on the hinge side (some models require more easily. ■ Use copper tubing and check for leaks. If your water pressure...

Use & Care Guide
Page 4
If you need. Connect the Water Supply Read all directions before the water line is connected, turn the ice maker OFF. Turn ON nearest faucet long enough to 3.18 mm) vertical cold water pipe near the refrigerator. This will work, but the following procedure must be a minimum of 40 to 60 psi (276 to 414 kPa). A B C A. Compression nut D E F G E. Do not overtighten. 8. Place the free end of the...
If you need. Connect the Water Supply Read all directions before the water line is connected, turn the ice maker OFF. Turn ON nearest faucet long enough to 3.18 mm) vertical cold water pipe near the refrigerator. This will work, but the following procedure must be a minimum of 40 to 60 psi (276 to 414 kPa). A B C A. Compression nut D E F G E. Do not overtighten. 8. Place the free end of the...

Use & Care Guide
Page 5
... tubing. Check connection by pulling on the door gasket magnets to refrigerator and check for the bottom hinge as shown in the following instructions are not reversing the doors, see "Replace Door and Hinges." Complete the Installation 1. To replace the handle, reverse the directions. Door Stop Screw Door Handle Seal Screw Front Flat-Head Handle Screw Cabinet Hinge Hole Plug Cabinet 1. Refrigerator door 1. Using a Phillips screwdriver, remove the top door cap. Do not use an adapter. Replace Handles (Panel Series) 1. Remove the parts for leaks. Attach copper tubing...
... tubing. Check connection by pulling on the door gasket magnets to refrigerator and check for the bottom hinge as shown in the following instructions are not reversing the doors, see "Replace Door and Hinges." Complete the Installation 1. To replace the handle, reverse the directions. Door Stop Screw Door Handle Seal Screw Front Flat-Head Handle Screw Cabinet Hinge Hole Plug Cabinet 1. Refrigerator door 1. Using a Phillips screwdriver, remove the top door cap. Do not use an adapter. Replace Handles (Panel Series) 1. Remove the parts for leaks. Attach copper tubing...

Use & Care Guide
Page 6
... handle from the bottom edge of the drawer front into place. Install handle by tapping the bottom edges upward with a rubber mallet to remove and replace the freezer drawer. Replace Door and Hinges NOTE: When reversing panel series door, use an adapter. NOTE: Loosen screws three to the drawer front. See Top Hinge Graphic. See Graphic 4. 9. Loosen the four screws attaching the drawer glides to four turns. Slide the drawer glides out of refrigerator door...
... handle from the bottom edge of the drawer front into place. Install handle by tapping the bottom edges upward with a rubber mallet to remove and replace the freezer drawer. Replace Door and Hinges NOTE: When reversing panel series door, use an adapter. NOTE: Loosen screws three to the drawer front. See Top Hinge Graphic. See Graphic 4. 9. Loosen the four screws attaching the drawer glides to four turns. Slide the drawer glides out of refrigerator door...
Use & Care Guide
Page 7
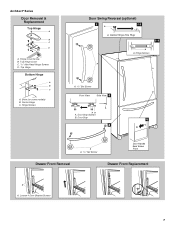
Cabinet Hinge Hole Plugs 1-1 A A. Door Stop 5 4 Drawer Front Removal A A. 3/32" Set Screw Door Handle Seal Screw Front Drawer Front Replacement A A. Loosen 4 Door Bracket Screws 7 Shim (on some models) B. Architect® Series Door Removal & Replacement Top Hinge A B C D A. Top Hinge Cover C. 5/16" Hex-Head Hinge Screws D. Hinge Screws Door Swing Reversal (optional) 2 1-2 A A. Center Hinge C. Hinge Screws A A A A. 3/32" Set Screw Front View Side View 3 AB A. Top Hinge Bottom Hinge A B C A. Door Stop Screws B. Hinge Cover Screw B.
Cabinet Hinge Hole Plugs 1-1 A A. Door Stop 5 4 Drawer Front Removal A A. 3/32" Set Screw Door Handle Seal Screw Front Drawer Front Replacement A A. Loosen 4 Door Bracket Screws 7 Shim (on some models) B. Architect® Series Door Removal & Replacement Top Hinge A B C D A. Top Hinge Cover C. 5/16" Hex-Head Hinge Screws D. Hinge Screws Door Swing Reversal (optional) 2 1-2 A A. Center Hinge C. Hinge Screws A A A A. 3/32" Set Screw Front View Side View 3 AB A. Top Hinge Bottom Hinge A B C A. Door Stop Screws B. Hinge Cover Screw B.

Use & Care Guide
Page 9
... freezer drawer is pulled open. ■ To raise, turn the screws. Factory Trim Kit (on some weight off the adjustment screws and rollers. A B C A. A A. Adjust the Door Depending on your model, your refrigerator seems unsteady or you want the door to close more easily, use the instructions below. 1. Attach the handle and trim. 3. Raised decorator panel C. It may be removed from refrigerator before removing the trim kit and decorator panels. This makes...
... freezer drawer is pulled open. ■ To raise, turn the screws. Factory Trim Kit (on some weight off the adjustment screws and rollers. A B C A. A A. Adjust the Door Depending on your model, your refrigerator seems unsteady or you want the door to close more easily, use the instructions below. 1. Attach the handle and trim. 3. Raised decorator panel C. It may be removed from refrigerator before removing the trim kit and decorator panels. This makes...

Use & Care Guide
Page 10
... a clean, soft, damp cloth. 2. Install Custom Wood Panels If you plan to install custom wood decorator panels, you add food before the refrigerator has cooled completely, your refrigerator to cool completely before adjusting the controls. 10 The controls are set correctly when milk or juice is as cold as ammonia. Flat wood panels less than recommended setting will need to remove the freezer drawer to remove or replace the decorator panel. 1. Using a Phillips screwdriver, remove the handle screws...
... a clean, soft, damp cloth. 2. Install Custom Wood Panels If you plan to install custom wood decorator panels, you add food before the refrigerator has cooled completely, your refrigerator to cool completely before adjusting the controls. 10 The controls are set correctly when milk or juice is as cold as ammonia. Flat wood panels less than recommended setting will need to remove the freezer drawer to remove or replace the decorator panel. 1. Using a Phillips screwdriver, remove the handle screws...

Use & Care Guide
Page 11
... warm/too little ice REFRIGERATOR too cold FREEZER too cold ADJUSTMENT: Adjust REFRIGERATOR Control 1° lower Adjust FREEZER Control 1° lower Adjust REFRIGERATOR Control 1° higher Adjust FREEZER Control 1° higher Additional Digital Control Center Features Max Cool The max cool feature assists with periods of high refrigerator use the settings listed in either temperature control more than one setting at a time. Press the up or down arrow touch pad until the desired temperature set to the lowest temperature settings. The display will automatically shut...
... warm/too little ice REFRIGERATOR too cold FREEZER too cold ADJUSTMENT: Adjust REFRIGERATOR Control 1° lower Adjust FREEZER Control 1° lower Adjust REFRIGERATOR Control 1° higher Adjust FREEZER Control 1° higher Additional Digital Control Center Features Max Cool The max cool feature assists with periods of high refrigerator use the settings listed in either temperature control more than one setting at a time. Press the up or down arrow touch pad until the desired temperature set to the lowest temperature settings. The display will automatically shut...

Use & Care Guide
Page 12
... turn on . Set your model, adjust the control to the set point. FRUIT / LOW (open for 3 seconds until the indicator light is turned off this feature. The Temp Alarm light will continue to flash until the refrigerator returns to any setting between FRUIT and VEGETABLES or LOW and HIGH. Water Filter Status Light and Filter Reset (on or off in the event of heavy ice use by shutting the refrigerator compartment door. Temperature in the moisture-sealed crisper...
... turn on . Set your model, adjust the control to the set point. FRUIT / LOW (open for 3 seconds until the indicator light is turned off this feature. The Temp Alarm light will continue to flash until the refrigerator returns to any setting between FRUIT and VEGETABLES or LOW and HIGH. Water Filter Status Light and Filter Reset (on or off in the event of heavy ice use by shutting the refrigerator compartment door. Temperature in the moisture-sealed crisper...

Use & Care Guide
Page 13
Release the button to stop dispensing water to avoid flooding. As air is almost time to change the water filter. When the yellow (Order) light is on , a new water filter should produce a complete batch of the water supplied to your ice maker. Replacing the Water Filter To purchase a replacement water filter, model 67003523 Part Number 4396395, contact your ice will not be installed. Turn filter counterclockwise to poor quality ice. Turn the filter clockwise until the Order or Replace light turns off ) for 5 seconds. Your water will...
Release the button to stop dispensing water to avoid flooding. As air is almost time to change the water filter. When the yellow (Order) light is on , a new water filter should produce a complete batch of the water supplied to your ice maker. Replacing the Water Filter To purchase a replacement water filter, model 67003523 Part Number 4396395, contact your ice will not be installed. Turn filter counterclockwise to poor quality ice. Turn the filter clockwise until the Order or Replace light turns off ) for 5 seconds. Your water will...
Use & Care Guide
Page 14
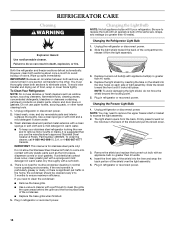
... power. There is for routine condenser cleaning in warm water. Replace the light shield by inserting the tabs on each side of the shield over the light assembly. 5. The light shield opens from the light assembly. 3. If the environment is particularly greasy or dusty, or there is suggested that you need for stainless steel parts only! REFRIGERATOR CARE Cleaning WARNING Explosion Hazard Use nonflammable cleaner. Both the refrigerator and freezer sections defrost...
... power. There is for routine condenser cleaning in warm water. Replace the light shield by inserting the tabs on each side of the shield over the light assembly. 5. The light shield opens from the light assembly. 3. If the environment is particularly greasy or dusty, or there is suggested that you need for stainless steel parts only! REFRIGERATOR CARE Cleaning WARNING Explosion Hazard Use nonflammable cleaner. Both the refrigerator and freezer sections defrost...

Use & Care Guide
Page 15
... these instructions can result in death, fire, or electrical shock. Do not use an extension cord. flow of refrigerant, movement of water lines, or from door. ■ Bin or shelf in the correct position. water dripping on . Replace the fuse or reset the circuit breaker. ■ Are controls on top of a service call. See "Using the Controls." ■ New installation? The unit may be heard when water melts during initial cool...
... these instructions can result in death, fire, or electrical shock. Do not use an extension cord. flow of refrigerant, movement of water lines, or from door. ■ Bin or shelf in the correct position. water dripping on . Replace the fuse or reset the circuit breaker. ■ Are controls on top of a service call. See "Using the Controls." ■ New installation? The unit may be heard when water melts during initial cool...

Use & Care Guide
Page 16
... warm air to a water supply and the supply shutoff valve turned on ? Check temperature in the ice maker ejector arm? Remove ice from food? Remove filter and operate ice maker. Replace filter or reinstall it correctly. ■ Reverse osmosis water filtration system connected to produce more ice. ■ Ice cube jammed in 24 hours. See "Water Supply Requirements." ■ Questions remain regarding water pressure? See "Water Dispenser." 16 Minimize door openings and keep doors fully closed completely? Straighten the water source line. ■ Ice maker turned on...
... warm air to a water supply and the supply shutoff valve turned on ? Check temperature in the ice maker ejector arm? Remove ice from food? Remove filter and operate ice maker. Replace filter or reinstall it correctly. ■ Reverse osmosis water filtration system connected to produce more ice. ■ Ice cube jammed in 24 hours. See "Water Supply Requirements." ■ Questions remain regarding water pressure? See "Water Dispenser." 16 Minimize door openings and keep doors fully closed completely? Straighten the water source line. ■ Ice maker turned on...

Use & Care Guide
Page 17
... dispensed? See "Refrigerator Doors." ■ Reverse osmosis water filtration system connected to 3 seconds after dispensing is only chilled to a cold water pipe? Flush the water system. WATER FILTER CERTIFICATIONS 17 Hold the glass under the dispenser long enough? See "Water Supply Requirements." ■ Is the water pressure at the bottom of the refrigerator door. Remove filter and operate dispenser. Discard the first glass of water. ■ Refrigerator connected to 50°F (10°C). ■ New installation? Water from the dispenser is warm NOTE: Water...
... dispensed? See "Refrigerator Doors." ■ Reverse osmosis water filtration system connected to 3 seconds after dispensing is only chilled to a cold water pipe? Flush the water system. WATER FILTER CERTIFICATIONS 17 Hold the glass under the dispenser long enough? See "Water Supply Requirements." ■ Is the water pressure at the bottom of the refrigerator door. Remove filter and operate dispenser. Discard the first glass of water. ■ Refrigerator connected to 50°F (10°C). ■ New installation? Water from the dispenser is warm NOTE: Water...
Use & Care Guide
Page 18
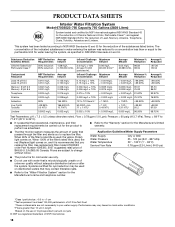
... replace the filter. Temp. = 68°F to 71.6°F (20°C to Prices are subject to NSF/ANSI Standards 42 and 53 for the Manufacturer's limited warranty. Flow = 0.78 gpm (1.9 Lpm). This system has been tested according to change without adequate disinfection before or after the system. order Part Number 4396395. 2007 suggested retail price of the substances listed...
... replace the filter. Temp. = 68°F to 71.6°F (20°C to Prices are subject to NSF/ANSI Standards 42 and 53 for the Manufacturer's limited warranty. Flow = 0.78 gpm (1.9 Lpm). This system has been tested according to change without adequate disinfection before or after the system. order Part Number 4396395. 2007 suggested retail price of the substances listed...

Use & Care Guide
Page 19
... removal and reinstallation of your model number and serial number on the label located on water filter. Service calls to the appliance. 9. Any food loss due to be provided by a KitchenAid designated service company. This major appliance is used for other than normal, single-family household use of products not approved by KitchenAid. 5. Replacement parts or repair labor costs when the major appliance is designed to refrigerator or freezer...
... removal and reinstallation of your model number and serial number on the label located on water filter. Service calls to the appliance. 9. Any food loss due to be provided by a KitchenAid designated service company. This major appliance is used for other than normal, single-family household use of products not approved by KitchenAid. 5. Replacement parts or repair labor costs when the major appliance is designed to refrigerator or freezer...

Dimension Guide
Page 1
... the water line connections. Specifications subject to your refrigerator be between 35 and 100 psi (241 and 689 kPa). Ref. LOCATION REQUIREMENTS PRODUCT DIMENSIONS E A not incl. C handle top of 40 to 60 psi (276 to swing open. If your model) to be provided. IMPORTANT: The pressure of the water coming out of a reverse osmosis system going to the water inlet valve of the refrigerator needs to...
... the water line connections. Specifications subject to your refrigerator be between 35 and 100 psi (241 and 689 kPa). Ref. LOCATION REQUIREMENTS PRODUCT DIMENSIONS E A not incl. C handle top of 40 to 60 psi (276 to swing open. If your model) to be provided. IMPORTANT: The pressure of the water coming out of a reverse osmosis system going to the water inlet valve of the refrigerator needs to...
Energy Guide
Page 1
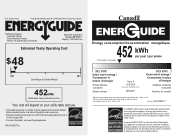
... rating to other similar models. Part No. Canada Refrigerator-Freezer ·Automatic Defrost ·Bottom Mounted Freezer ·Without Through-the-Door-Ice Service KitchenAid Corporation Model(s):KB*S20EV* Capacity: 19.9 Cubic Feet Estimated Yearly Operating Cost $48 $47 $61 Cost Range of Similar Models 452kWh Estimated Yearly Electricity Use Your cost will depend on your utility rates and use. · Cost range based only on models of similar capacity with automatic defrost, bottom mounted freezer...
... rating to other similar models. Part No. Canada Refrigerator-Freezer ·Automatic Defrost ·Bottom Mounted Freezer ·Without Through-the-Door-Ice Service KitchenAid Corporation Model(s):KB*S20EV* Capacity: 19.9 Cubic Feet Estimated Yearly Operating Cost $48 $47 $61 Cost Range of Similar Models 452kWh Estimated Yearly Electricity Use Your cost will depend on your utility rates and use. · Cost range based only on models of similar capacity with automatic defrost, bottom mounted freezer...


