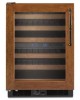
KitchenAid KBLS19KCMS Support and Manuals
Get Help and Manuals for this KitchenAid item
View All Support Options Below
Free KitchenAid KBLS19KCMS manuals!
Problems with KitchenAid KBLS19KCMS?
Ask a Question
Free KitchenAid KBLS19KCMS manuals!
Problems with KitchenAid KBLS19KCMS?
Ask a Question
Popular KitchenAid KBLS19KCMS Manual Pages
Use & Care Guide - Page 3

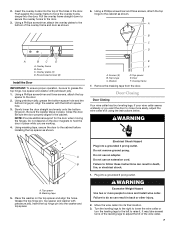
...: To reduce the risk of fire, electric shock, or injury when using your wine cellar, follow instructions. WINE CELLAR SAFETY
Your safety and the safety of your appliance.
Always read and obey all parts and panels before servicing.
■ Keep flammable materials and vapors, such as gasoline, away from your old wine cellar...
Use & Care Guide - Page 4
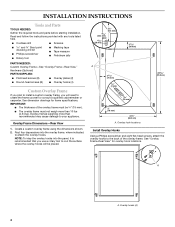
... Using a Phillips screwdriver and eight flat-head screws, attach the overlay hooks to your appliance. INSTALLATION INSTRUCTIONS
Tools and Parts
TOOLS NEEDED:
Gather the required tools and parts before starting installation. See "Overlay Frame-Rear View" for frame specifications. Overlay Frame Dimensions-Rear View
1. See dimension drawings for overlay hook locations. Create a custom...
Use & Care Guide - Page 5
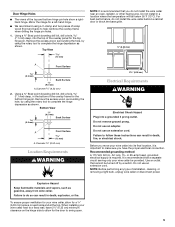
... pin hole show a righthand hinge. Failure to follow these instructions can result in death, fire, or electrical shock. When installing your wine cellar, allow for the door to complete the ... excess wood, surrounding the hole, by a switch. Do not remove ground prong. Before you do not install the wine cellar behind a cabinet door or block the base grille.
¹⁄₄" (6.35 mm)...
Use & Care Guide - Page 6
... 1. For more people to the specifications
in the "Custom Overlay Frame" section. ■ KitchenAid is heavy. Door
2.
Be sure ...for cleaning or service, be sure to do so can damage...instructions in back or other injury. Using a Phillips screwdriver, remove the three screws from surfaces before using it , as shown. Attach the Overlay Frame
NOTE: If the overlay hooks are not installed...
Use & Care Guide - Page 7
...attach the overlay plates to the cabinet before installing the top spacer as shown. Close the door. NOTE: Provide additional support for the door when moving the hinges. ...
2. Insert the overlay hooks into the door. Push against the overlay frame to follow these instructions can result in place. Pull the overlay frame straight down to secure the overlay hooks to ...
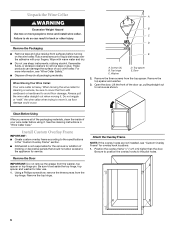
Use & Care Guide - Page 8
... your bottle of refrigerant or items stored inside the wine cellar.
8
■ As each cycle ends, you first install your old one ... base grille so that the control is set correctly when beverages are new to the refrigerant flowing in this section. Hard surfaces, ... cellar starts or stops running into place. Replace the Base Grille
1. Replace the two screws. Because the sounds are as...
Use & Care Guide - Page 9
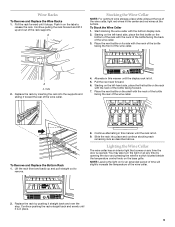
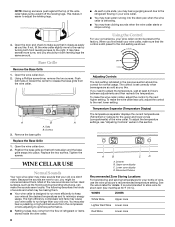
...supports. To Stock the Wine Cellar
1. Tabs
2. Starting on the left -hand side, place the first bottle on its side with the bottom display rack.
2. Continue alternating in place.
9
A
A. To Remove and Replace...the left -hand side, place the first bottle on the tabs to remove.
8. Replace the rack by opening the door and pressing the exterior switch located beside the temperature...
Use & Care Guide - Page 10
... odors, you are moving your new home, put everything back and refer to the "Installation Instructions" section for air to turn the wine cellar off before you use abrasive or harsh ... Hand wash, rinse, and dry removable parts and interior surfaces thoroughly. Tape the doors shut and tape the power cord to replace the bulb with any plastic parts such as window sprays, scouring cleansers, ...
Use & Care Guide - Page 11

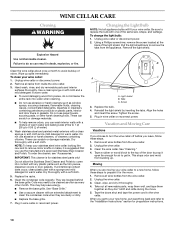
...set correctly for the surrounding conditions? Rub a thin coat of an unnecessary service call. The motor seems to run about 40% to do not install...temperatures, expect your motor to follow these instructions can result in death, explosion, or ...TROUBLESHOOTING
Try the solutions suggested here first in order to open
WARNING
Explosion Hazard Use nonflammable cleaner. See "Cleaning." Replace...
Use & Care Guide - Page 12

...-422-1230.
KitchenAid designated service technicians are made with the same precision used to build every new KITCHENAID® appliance.
Clean the gasket and the surface that you only use factory specified replacement parts. Factory specified replacement parts will not close completely
■ Are the racks out of appliances.
■ Installation information.
In Canada
Call the...
Use & Care Guide - Page 13
... Service" section or by KitchenAid.
5.
Any food or medicine loss due to refrigerator or freezer product failures.
7. This warranty gives you specific legal rights, and you ever need it is installed in an inaccessible location or is required to obtain service under this limited warranty. You will need repair service, first see the "Troubleshooting" section of the Use & Care Guide...
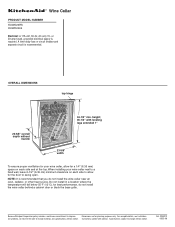
Dimension Guide - Page 1
...
handle
34-1/2" min. Ref. 2300273 08-22-06 OVERALL DIMENSIONS
top hinge
23-5/8" overall depth without notice. Specifications subject to change without notice.
height; 35-1/2" with product.
® Wine Cellar
PRODUCT MODEL NUMBER KUWO24RS KUWO24LS
Electrical: A 115-volt, 60-Hz, AC-only 15- or 20-amp fused, grounded electrical supply is recommended...
Warranty Information - Page 1

... merchantability or fitness, so this information on the model and serial number label located on major appliances with the product, KitchenAid will need repair service, first see the "Troubleshooting" section of purchase.
6. This warranty gives you specific legal rights, and you ever need it is installed in the sealed refrigeration system that existed when this book and your...
KitchenAid KBLS19KCMS Reviews
We have not received any reviews for KitchenAid yet.