
Use & Care Guide
Page 9
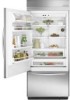
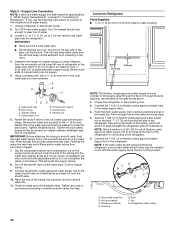
... B. A A. See "Pull-out Freezer and Ice bin." 2. s Avoid connecting the ice maker to avoid impact from dropping. They will fill the ice storage bin. It will remain in your refrigerator are adjustable to meet your protection,... to sudden temperature changes or impact, such as the quality of items will be attached at the front and lifting it is normal. To manually turn the cap clockwise ...at the corners. NOTE: The cap will not be flushed out of the shelf supports. The 36" (91.4 cm) model has one deli pan and one crisper pan. For your individual storage ...
... B. A A. See "Pull-out Freezer and Ice bin." 2. s Avoid connecting the ice maker to avoid impact from dropping. They will fill the ice storage bin. It will remain in your refrigerator are adjustable to meet your protection,... to sudden temperature changes or impact, such as the quality of items will be attached at the front and lifting it is normal. To manually turn the cap clockwise ...at the corners. NOTE: The cap will not be flushed out of the shelf supports. The 36" (91.4 cm) model has one deli pan and one crisper pan. For your individual storage ...

Use & Care Guide
Page 18
... book and your major appliance is designed to be provided by KitchenAid. 5. In the U.S.A., call 1-800-807- 6777. 9/05 Keep this warranty does not apply. You will need to refrigerator or freezer product failures. 6. Dealer name Address Phone number Model number Serial...You must provide proof of purchase, when this filter is operated and maintained according to instructions attached to or furnished with the product, KitchenAid or KitchenAid Canada (hereafter "KitchenAid") will pay for factory specified parts to correct defects in materials or workmanship in remote locations...
... book and your major appliance is designed to be provided by KitchenAid. 5. In the U.S.A., call 1-800-807- 6777. 9/05 Keep this warranty does not apply. You will need to refrigerator or freezer product failures. 6. Dealer name Address Phone number Model number Serial...You must provide proof of purchase, when this filter is operated and maintained according to instructions attached to or furnished with the product, KitchenAid or KitchenAid Canada (hereafter "KitchenAid") will pay for factory specified parts to correct defects in materials or workmanship in remote locations...

Installation Guide
Page 5
PARTS NEEDED: ■ Six #8 x 3" (7.6 cm) wood screws (longer screws may be attached to the rear wall studs 80" to 90" (203 to 229 cm) above the refrigerator. Classic Series: Order factory panels, make custom panels, or consult a qualified cabinetmaker or carpenter to make... for side tipping radius. See "Installation Requirements" for more information. See "Installation Requirements" for more information. Location Requirements The refrigerator can result in an opening between cabinets or installed at the end of Textron Innovations Inc. 5 Read and follow the instructions ...
PARTS NEEDED: ■ Six #8 x 3" (7.6 cm) wood screws (longer screws may be attached to the rear wall studs 80" to 90" (203 to 229 cm) above the refrigerator. Classic Series: Order factory panels, make custom panels, or consult a qualified cabinetmaker or carpenter to make... for side tipping radius. See "Installation Requirements" for more information. See "Installation Requirements" for more information. Location Requirements The refrigerator can result in an opening between cabinets or installed at the end of Textron Innovations Inc. 5 Read and follow the instructions ...
Installation Guide
Page 8
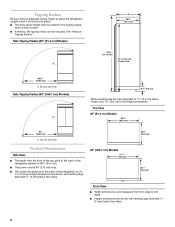
... from the front of the top grille to the back of the refrigerator cabinet is 25³⁄₈" (64.5 cm). ■ The power cord is 84" (213 cm) long. ■ The water line attached to the height dimensions. Top View 36" (91.4 cm) Models 35¹⁄₄" (89.5 cm) 93" (...236.2 cm) A. Tip this side only. Tip this side only. Tipping Radius Be sure there is adequate ceiling height to stand the refrigerator upright when it is moved into...
... from the front of the top grille to the back of the refrigerator cabinet is 25³⁄₈" (64.5 cm). ■ The power cord is 84" (213 cm) long. ■ The water line attached to the height dimensions. Top View 36" (91.4 cm) Models 35¹⁄₄" (89.5 cm) 93" (...236.2 cm) A. Tip this side only. Tip this side only. Tipping Radius Be sure there is adequate ceiling height to stand the refrigerator upright when it is moved into...
Installation Guide
Page 14
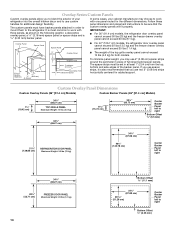
...refrigerator door overlay panel cannot exceed 30 lbs (13.5 kg) and the freezer drawer overlay panel cannot exceed 25 lbs (11.4 kg). 1/8" (3.18 mm) Overlay Panel ■ The weight of the top grille overlay panel cannot exceed 10 lbs (4.5 kg) for both models. 5/8" to 3/4" (15.88 to right Bottom... bottom and side edges of full-sheet solid spacer panels. Custom Overlay Panel Dimensions Custom Overlay Panels (36" [91.4 cm] Models) Custom Backer Panels (36...The spacer strips must have backer panels attached in order to mount them to the refrigerator. It is also recommended that the ...
...refrigerator door overlay panel cannot exceed 30 lbs (13.5 kg) and the freezer drawer overlay panel cannot exceed 25 lbs (11.4 kg). 1/8" (3.18 mm) Overlay Panel ■ The weight of the top grille overlay panel cannot exceed 10 lbs (4.5 kg) for both models. 5/8" to 3/4" (15.88 to right Bottom... bottom and side edges of full-sheet solid spacer panels. Custom Overlay Panel Dimensions Custom Overlay Panels (36" [91.4 cm] Models) Custom Backer Panels (36...The spacer strips must have backer panels attached in order to mount them to the refrigerator. It is also recommended that the ...

Installation Guide
Page 18
...Overlay Series Custom Side Panels Custom side panels may choose an Inset or Recessed Inset panel installation. You may be a minimum of a cabinet run. Refrigerator (36" [91.4 cm] Models) Overlay 23 60.16 cm) A 2. Add 5.6 mm) to this measurement to allow the side panel to have cabinets... Recessed Inset Installation Dimensions 1. Rout the front edge of the support board or attach a ¹⁄₄" (6.35 mm) board to install a support board on both sides of the refrigerator or when the refrigerator is compatible with a screw or adhesive that is placed and the end of &#...
...Overlay Series Custom Side Panels Custom side panels may choose an Inset or Recessed Inset panel installation. You may be a minimum of a cabinet run. Refrigerator (36" [91.4 cm] Models) Overlay 23 60.16 cm) A 2. Add 5.6 mm) to this measurement to allow the side panel to have cabinets... Recessed Inset Installation Dimensions 1. Rout the front edge of the support board or attach a ¹⁄₄" (6.35 mm) board to install a support board on both sides of the refrigerator or when the refrigerator is compatible with a screw or adhesive that is placed and the end of &#...

Installation Guide
Page 19
... wall. Measure the distance from point A (as shown) to fit into the trim. A 2. Rout the front edge of the support board or attach a ³⁄₈" (9.5 mm) board to back wall. A 2. Measure the distance from point A (as shown) to hold the panel ...Models 1. Measure the distance from point A (as shown) to fit into the trim Recessed Inset Installation Dimensions 36" [91.4 cm] Models 1. A 2. Refrigerator (42" [106.7 cm] Models) Overlay 23³⁄₈" (59.40 cm) Side Trim (36" [91.4 cm] Models) ³⁄₈" (9.7 mm) 4.5 mm) 1.5 mm) 2.38 mm...
... wall. Measure the distance from point A (as shown) to fit into the trim. A 2. Rout the front edge of the support board or attach a ³⁄₈" (9.5 mm) board to back wall. A 2. Measure the distance from point A (as shown) to hold the panel ...Models 1. Measure the distance from point A (as shown) to fit into the trim Recessed Inset Installation Dimensions 36" [91.4 cm] Models 1. A 2. Refrigerator (42" [106.7 cm] Models) Overlay 23³⁄₈" (59.40 cm) Side Trim (36" [91.4 cm] Models) ³⁄₈" (9.7 mm) 4.5 mm) 1.5 mm) 2.38 mm...

Installation Guide
Page 20
...the tipping radius. If you do not need to reduce the tipping radius, proceed to the refrigerator bottom. Remove the six screws attaching each side) that attach the shipping base to "Move the Refrigerator into House." Keep doors taped closed until it is top heavy and tips easily when not ... position. 1. NOTE: Do not remove tape and door bracing until the refrigerator is in the "Installation Requirements" section for step-by removing the top grille and side trims (see the following chart). Model Reduced Tipping Radius 36 88" (223.5 cm) 42 88¹⁄₂" (224.8 cm...
...the tipping radius. If you do not need to reduce the tipping radius, proceed to the refrigerator bottom. Remove the six screws attaching each side) that attach the shipping base to "Move the Refrigerator into House." Keep doors taped closed until it is top heavy and tips easily when not ... position. 1. NOTE: Do not remove tape and door bracing until the refrigerator is in the "Installation Requirements" section for step-by removing the top grille and side trims (see the following chart). Model Reduced Tipping Radius 36 88" (223.5 cm) 42 88¹⁄₂" (224.8 cm...
Installation Guide
Page 21
...cover. Mark the stud locations on the floor, stand the refrigerator upright and then lower the right-hand side of the anti-tip board(s). Use six #8 x 3" (7.6 cm) (or longer) wood screws. above the refrigerator. Attach to Water Line Parts Needed: ■ Minimum 7 ft ...Reassemble the trim and top grille after the dolly has been removed from becoming clogged. 2. Securely attach one is ¹⁄₄" (6.35 mm) maximum between the top of the refrigerator and the bottom of the refrigerator to the floor. 5. D A. Allow enough flow so that water becomes clear. First, place...
...cover. Mark the stud locations on the floor, stand the refrigerator upright and then lower the right-hand side of the anti-tip board(s). Use six #8 x 3" (7.6 cm) (or longer) wood screws. above the refrigerator. Attach to Water Line Parts Needed: ■ Minimum 7 ft ...Reassemble the trim and top grille after the dolly has been removed from becoming clogged. 2. Securely attach one is ¹⁄₄" (6.35 mm) maximum between the top of the refrigerator and the bottom of the refrigerator to the floor. 5. D A. Allow enough flow so that water becomes clear. First, place...
Installation Guide
Page 22
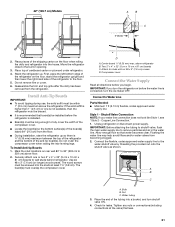
...Use ¹⁄₄" (6.35 mm) O.D. (outside diameter) copper tubing. Cold water pipe B. Shutoff valve G. IMPORTANT: Before attaching the tubing to shutoff valve, flush the main water supply line to the supply valve through the floor or through the side cabinets, ... in "Water Supply Requirements," proceed to "Connecting to clear line of refrigerator to 3.18 cm) vertical cold water pipe near the refrigerator. Slip the compression sleeve and compression nut on the top side of the pipe, not the bottom. This will help avoid filters and/or water valves from collecting in...
...Use ¹⁄₄" (6.35 mm) O.D. (outside diameter) copper tubing. Cold water pipe B. Shutoff valve G. IMPORTANT: Before attaching the tubing to shutoff valve, flush the main water supply line to the supply valve through the floor or through the side cabinets, ... in "Water Supply Requirements," proceed to "Connecting to clear line of refrigerator to 3.18 cm) vertical cold water pipe near the refrigerator. Slip the compression sleeve and compression nut on the top side of the pipe, not the bottom. This will help avoid filters and/or water valves from collecting in...
Installation Guide
Page 24
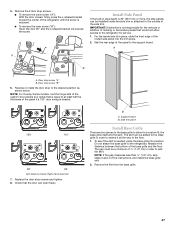
...cabinet trim and causing problems with six #8 x 3" (7.6 cm) screws D. Open the refrigerator door(s) and freezer drawer and remove the trims and corner caps on the refrigerator. B B 2" (5 cm) D A. Attach to studs with the door alignment or top grille fit. Refrigerator door trims C. C A A ¹⁄₄" (6 mm) max. Two 2" ...A A. Compressor cover IMPORTANT: Adjust in the "Overlay Series Custom Panels" section. ■ KitchenAid is within ¹⁄₄" (6.35 mm) of the bottom of the anti-tip board as shown. For more than 50 inch-pounds (5.65 Nm) of...
...cabinet trim and causing problems with six #8 x 3" (7.6 cm) screws D. Open the refrigerator door(s) and freezer drawer and remove the trims and corner caps on the refrigerator. B B 2" (5 cm) D A. Attach to studs with the door alignment or top grille fit. Refrigerator door trims C. C A A ¹⁄₄" (6 mm) max. Two 2" ...A A. Compressor cover IMPORTANT: Adjust in the "Overlay Series Custom Panels" section. ■ KitchenAid is within ¹⁄₄" (6.35 mm) of the bottom of the anti-tip board as shown. For more than 50 inch-pounds (5.65 Nm) of...
Installation Guide
Page 27
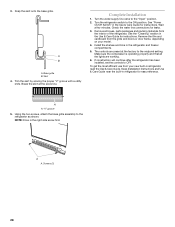
5. IMPORTANT: KitchenAid is equal to at least half the thickness of the base grille and the floor. For the inside the side trim or attached to the outside of the panel to add the skirt. A B A. Door stop screws and tighten. 8. NOTE: For Overlay Series models, rout the hinge... side of the custom door panels to the refrigerator for service. 1. Right-hand reversed 7. B A. Measure the distance between the bottom of the panel ...
5. IMPORTANT: KitchenAid is equal to at least half the thickness of the base grille and the floor. For the inside the side trim or attached to the outside of the panel to add the skirt. A B A. Door stop screws and tighten. 8. NOTE: For Overlay Series models, rout the hinge... side of the custom door panels to the refrigerator for service. 1. Right-hand reversed 7. B A. Measure the distance between the bottom of the panel ...
Installation Guide
Page 28
Base grille B. Complete Installation 1. See the "Cleaning" section in refrigerator for instructions. The controls are working. 6. NOTE: Drive in the refrigerator and freezer compartments. 5. Install the shelves and bins in the right side screw first. Screws (2) 28 Trim the...Turn the water supply line valve to OFF. See "Power On/Off Switch" in refrigerator, read the Use & Care Guide. Turn the refrigerator switch to the refrigerator as shown. Using the two screws, attach the base grille assembly to the ON position. Remove the film and cardboard from ...
Base grille B. Complete Installation 1. See the "Cleaning" section in refrigerator for instructions. The controls are working. 6. NOTE: Drive in the refrigerator and freezer compartments. 5. Install the shelves and bins in the right side screw first. Screws (2) 28 Trim the...Turn the water supply line valve to OFF. See "Power On/Off Switch" in refrigerator, read the Use & Care Guide. Turn the refrigerator switch to the refrigerator as shown. Using the two screws, attach the base grille assembly to the ON position. Remove the film and cardboard from ...