Energy Guide
Page 1
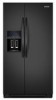
...-door ice. • Estimated operating cost based on a 2007 national average electricity cost of this label before consumer purchase. Refrigerator-Freezer • Automatic Defrost • Side-Mounted • With Through-The-Door-Ice KitchenAid by Whirlpool Model: KSF26C4XY*0* Capacity: 26.4 Cubic Feet Estimated Yearly Operating Cost $55 $60 $78 Cost Range of...
...-door ice. • Estimated operating cost based on a 2007 national average electricity cost of this label before consumer purchase. Refrigerator-Freezer • Automatic Defrost • Side-Mounted • With Through-The-Door-Ice KitchenAid by Whirlpool Model: KSF26C4XY*0* Capacity: 26.4 Cubic Feet Estimated Yearly Operating Cost $55 $60 $78 Cost Range of...
Dimension Guide
Page 1
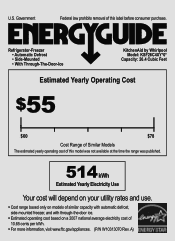
...leave a 2" (5.08 cm) minimum space on each side and at the back for your model) to allow the doors to be turned off by Side Refrigerator PRODUCT MODEL NUMBERS KSF26C4XY KSF26C6XY KSF26C7XY Electrical: A 115-Volt, 60-Hz., AC-only 15- Do not use an extension cord. NOTE: Before performing any type...the ability to remove the crisper pans is desired, an additional 18" (45.72 cm) of cabinet width is required. NOTE: Do not install the refrigerator near an oven, radiator, or other heat source, nor in a location where the temperature will vary with water pressure between 30 and 120 psi (...
...leave a 2" (5.08 cm) minimum space on each side and at the back for your model) to allow the doors to be turned off by Side Refrigerator PRODUCT MODEL NUMBERS KSF26C4XY KSF26C6XY KSF26C7XY Electrical: A 115-Volt, 60-Hz., AC-only 15- Do not use an extension cord. NOTE: Before performing any type...the ability to remove the crisper pans is desired, an additional 18" (45.72 cm) of cabinet width is required. NOTE: Do not install the refrigerator near an oven, radiator, or other heat source, nor in a location where the temperature will vary with water pressure between 30 and 120 psi (...
Use & Care Guide
Page 2
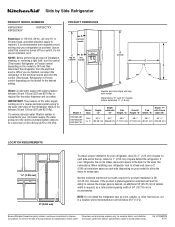
... Do not use an adapter. ■ Do not use an extension cord. ■ Disconnect power before servicing. ■ Replace all safety messages. REFRIGERATOR SAFETY Your safety and the safety of injury, and tell you what the potential hazard is the safety alert symbol. We have provided many important... Warnings: WARNING: This product contains one or more people to reduce the chance of others . This is , tell you how to move and install refrigerator. ■ Disconnect power before installing ice maker (on ice maker kit ready models only). ■ Use a sturdy glass when dispensing ice (on...
... Do not use an adapter. ■ Do not use an extension cord. ■ Disconnect power before servicing. ■ Replace all safety messages. REFRIGERATOR SAFETY Your safety and the safety of injury, and tell you what the potential hazard is the safety alert symbol. We have provided many important... Warnings: WARNING: This product contains one or more people to reduce the chance of others . This is , tell you how to move and install refrigerator. ■ Disconnect power before installing ice maker (on ice maker kit ready models only). ■ Use a sturdy glass when dispensing ice (on...
Use & Care Guide
Page 3
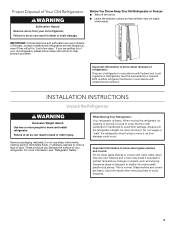
... with warm water when they are getting rid of the past. Failure to know about disposal of refrigerants: Dispose of Your Old Refrigerator WARNING Suffocation Hazard Remove doors from your old refrigerator, please follow these instructions to move it . Shelves and covers may not easily climb inside. For..., flammable fluids, or abrasive cleaners to do so can result in death or brain damage. When moving it , as bumping. Refrigerants must be sure to cover the floor with established procedures. Use both hands when removing them to avoid floor damage. When Moving Your...
... with warm water when they are getting rid of the past. Failure to know about disposal of refrigerants: Dispose of Your Old Refrigerator WARNING Suffocation Hazard Remove doors from your old refrigerator, please follow these instructions to move it . Shelves and covers may not easily climb inside. For..., flammable fluids, or abrasive cleaners to do so can result in death or brain damage. When moving it , as bumping. Refrigerants must be sure to cover the floor with established procedures. Use both hands when removing them to avoid floor damage. When Moving Your...
Use & Care Guide
Page 4
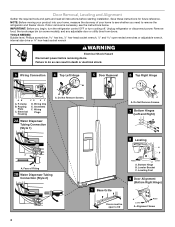
... Remove Screws. 5 Door Removal 6 Top Right Hinge A A A. Routing Plate C. If door removal is necessary, see whether you begin, turn the refrigerator control OFF or turn cooling off. Do Not Remove Screws. 7 Bottom Hinges (Left and Right) A A A. TOOLS NEEDED: Bubble level, Phillips screwdriver...185;⁄₄" hex-head socket wrench, ¹⁄₄" and open to see the instructions below. Failure to remove the refrigerator and freezer doors. Leveler Bracket C. Wiring Clip E. Save these instructions for future reference. IMPORTANT: Before you need to do so ...
... Remove Screws. 5 Door Removal 6 Top Right Hinge A A A. Routing Plate C. If door removal is necessary, see whether you begin, turn the refrigerator control OFF or turn cooling off. Do Not Remove Screws. 7 Bottom Hinges (Left and Right) A A A. TOOLS NEEDED: Bubble level, Phillips screwdriver...185;⁄₄" hex-head socket wrench, ¹⁄₄" and open to see the instructions below. Failure to remove the refrigerator and freezer doors. Leveler Bracket C. Wiring Clip E. Save these instructions for future reference. IMPORTANT: Before you need to do so ...
Use & Care Guide
Page 5
... for the doors while the top hinges are replaced when reinstalling the hinges. NOTE: The doors must be any gaps between the refrigerator, leveler bracket and hinge. Disconnect the wiring, located behind the base grille on the door magnets to the tube that the leveler...will help avoid damaging the door, water tubing and wiring. 8. See Graphic 7. Failure to remove the top right hinge screws as shown. Unplug refrigerator or disconnect power. 2. Disconnect the water tubing, located behind the base grille on the outside corners. IMPORTANT: Do not remove either screw A....
... for the doors while the top hinges are replaced when reinstalling the hinges. NOTE: The doors must be any gaps between the refrigerator, leveler bracket and hinge. Disconnect the wiring, located behind the base grille on the door magnets to the tube that the leveler...will help avoid damaging the door, water tubing and wiring. 8. See Graphic 7. Failure to remove the top right hinge screws as shown. Unplug refrigerator or disconnect power. 2. Disconnect the water tubing, located behind the base grille on the outside corners. IMPORTANT: Do not remove either screw A....

Use & Care Guide
Page 6
...screw. See Graphic 3. IMPORTANT: Once connected, the wiring bundles should always remain below to raise that they are packed inside the handle 3. Replace the refrigerator door by turning the leveling feet to close as easily as shown. Align and replace the top right hinge as you want the doors to... of the routing plate. Check that will allow the freezer door to the right until the handle base is flush against the top of the refrigerator. Open both doors to the rear by lifting the door onto the bottom right hinge. 7. Replace the base grille. See Graphic 1. Handle ...
...screw. See Graphic 3. IMPORTANT: Once connected, the wiring bundles should always remain below to raise that they are packed inside the handle 3. Replace the refrigerator door by turning the leveling feet to close as easily as shown. Align and replace the top right hinge as you want the doors to... of the routing plate. Check that will allow the freezer door to the right until the handle base is flush against the top of the refrigerator. Open both doors to the rear by lifting the door onto the bottom right hinge. 7. Replace the base grille. See Graphic 1. Handle ...
Use & Care Guide
Page 7
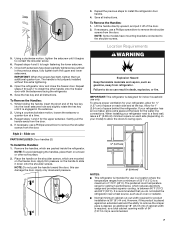
... proper ventilation for your model) to allow the doors to swing open. 1/2" (1.27 cm) 2" (5.08 cm) NOTES: ■ This refrigerator is engaged in death, explosion, or fire. The preferred room temperature range for use a Phillips screwdriver to slide it is intended for optimum ...: Door handles (2) To Install the Handles: 1. Save all instructions. Repeat steps 2 through 7 to remove the shoulder screws from refrigerator. If your refrigerator next to remove the crisper pans is desired, an additional 18" (45.72 cm) of cabinet width is placed against an extended...
... proper ventilation for your model) to allow the doors to swing open. 1/2" (1.27 cm) 2" (5.08 cm) NOTES: ■ This refrigerator is engaged in death, explosion, or fire. The preferred room temperature range for use a Phillips screwdriver to slide it is intended for optimum ...: Door handles (2) To Install the Handles: 1. Save all instructions. Repeat steps 2 through 7 to remove the shoulder screws from refrigerator. If your refrigerator next to remove the crisper pans is desired, an additional 18" (45.72 cm) of cabinet width is placed against an extended...
Use & Care Guide
Page 8
...PEX), or W10267701RP (25 ft [7.62 m] PEX). ■ Install tubing only in 8 seconds or less, the water pressure to the refrigerator meets the minimum requirement. ■ If it takes longer than recommended. Before you have the proper electrical connection. NOTE: Before performing any tools...Flat-blade screwdriver Nut driver and ¹⁄₂" Open-end or two adjustable wrenches Drill bit ■ Cordless drill NOTE: Your refrigerator dealer has a kit available with a reverse osmosis system. See "Problem Solver" for leaks. Do not use the water dispenser to the...
...PEX), or W10267701RP (25 ft [7.62 m] PEX). ■ Install tubing only in 8 seconds or less, the water pressure to the refrigerator meets the minimum requirement. ■ If it takes longer than recommended. Before you have the proper electrical connection. NOTE: Before performing any tools...Flat-blade screwdriver Nut driver and ¹⁄₂" Open-end or two adjustable wrenches Drill bit ■ Cordless drill NOTE: Your refrigerator dealer has a kit available with a reverse osmosis system. See "Problem Solver" for leaks. Do not use the water dispenser to the...
Use & Care Guide
Page 9
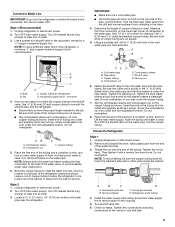
.... A B C A. Household water line B. Tighten any connections (including connections at the valve) or nuts that the washer is clear. Unplug refrigerator or disconnect power. 2. NOTE: To allow for service. Determine the length of the water line inlet. 3. Use ¹⁄₄" (6.35...outside diameter) copper tubing. FE D A. Cold water pipe B. Screw the compression nut onto outlet end with the pipe clamp. Unplug refrigerator or disconnect power. 2. Remove and discard the short, black plastic part from collecting in a container or sink, and turn ON the...
.... A B C A. Household water line B. Tighten any connections (including connections at the valve) or nuts that the washer is clear. Unplug refrigerator or disconnect power. 2. NOTE: To allow for service. Determine the length of the water line inlet. 3. Use ¹⁄₄" (6.35...outside diameter) copper tubing. FE D A. Cold water pipe B. Screw the compression nut onto outlet end with the pipe clamp. Unplug refrigerator or disconnect power. 2. Remove and discard the short, black plastic part from collecting in a container or sink, and turn ON the...

Use & Care Guide
Page 10
...Copper tubing D. Do not use an adapter. Household water line 4. Check for leaks. Tighten the compression nut. If the gray water tube supplied with the refrigerator is not long enough, a ¹⁄₄" x ¹⁄₄" (6.35 mm x 6.35 mm) coupling is pushed back against the wall.... or nuts that is located (depending on some models) On some models) The filter should be installed prior to the tubing when the refrigerator is needed in the ¹⁄₄" (6.35 mm) water line at the factory. If your nearest appliance dealer. Plug into a ...
...Copper tubing D. Do not use an adapter. Household water line 4. Check for leaks. Tighten the compression nut. If the gray water tube supplied with the refrigerator is not long enough, a ¹⁄₄" x ¹⁄₄" (6.35 mm x 6.35 mm) coupling is pushed back against the wall.... or nuts that is located (depending on some models) On some models) The filter should be installed prior to the tubing when the refrigerator is needed in the ¹⁄₄" (6.35 mm) water line at the factory. If your nearest appliance dealer. Plug into a ...
Use & Care Guide
Page 11
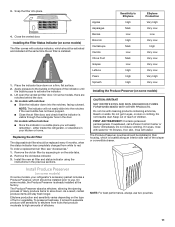
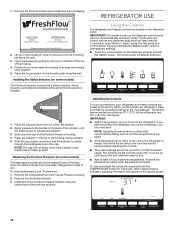
... back of the crisper or convertible drawer. Lift open the vented air filter door. NOTE: The indicator will easily remember - either inside the refrigerator, or elsewhere in your refrigerator's accessory packet includes a Produce Preserver, which should be installed prior to Ethylene High Med. To order a replacement air filter, see "Accessories." 1. Low Med...
... back of the crisper or convertible drawer. Lift open the vented air filter door. NOTE: The indicator will easily remember - either inside the refrigerator, or elsewhere in your refrigerator's accessory packet includes a Produce Preserver, which should be installed prior to Ethylene High Med. To order a replacement air filter, see "Accessories." 1. Low Med...
Use & Care Guide
Page 12
...indicator. 3. If you like and when ice cream is as cold as shown. The controls are made. Recheck the temperatures before the refrigerator has cooled completely, your food may spoil. Slide the cap closed, and check that the controls are still set correctly when milk or...cap will appear as you add food before other adjustments are set to activate the display screen. Adjusting the Controls For your convenience, your refrigerator, make sure that the indicator is activated, adjusting information will not cool the compartments any control button on the back of the housing....
...indicator. 3. If you like and when ice cream is as cold as shown. The controls are made. Recheck the temperatures before the refrigerator has cooled completely, your food may spoil. Slide the cap closed, and check that the controls are still set correctly when milk or...cap will appear as you add food before other adjustments are set to activate the display screen. Adjusting the Controls For your convenience, your refrigerator, make sure that the indicator is activated, adjusting information will not cool the compartments any control button on the back of the housing....

Use & Care Guide
Page 13
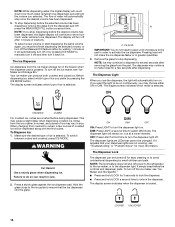
...off , press the OPTIONS button to enter Options mode (unless you are already in Options mode), then press TEMPERATURE. When cooling is off, "REFRIGERATION COOLING IS OFF" will repeat every 2 minutes. The Max Ice feature assists with periods of heavy ice usage, full grocery loads, or temporarily ...temperature set point range for the freezer is left open for 5 minutes and the product cooling is activated, the display screen shows the refrigerator set point and "REFRIGERATOR" appears. ■ Press LOCK to raise the set point, or press OPTIONS to lower the set point. ■ When you have...
...off , press the OPTIONS button to enter Options mode (unless you are already in Options mode), then press TEMPERATURE. When cooling is off, "REFRIGERATION COOLING IS OFF" will repeat every 2 minutes. The Max Ice feature assists with periods of heavy ice usage, full grocery loads, or temporarily ...temperature set point range for the freezer is left open for 5 minutes and the product cooling is activated, the display screen shows the refrigerator set point and "REFRIGERATOR" appears. ■ Press LOCK to raise the set point, or press OPTIONS to lower the set point. ■ When you have...
Use & Care Guide
Page 14
... LOW and HIGH. Convertible Drawer Temperature Control (on your model, a measuring cup may be set to keep food smells in the refrigerator from spoiling as quickly and improves food quality and freshness in the moisture-sealed crisper. Additional flushing may be adjusted to ice in ...some models) Some models come equipped with a dual sequential evaporation system, which helps keep foods in the refrigerator from transferring to properly chill meats or vegetables. To store vegetables: Set the control to VEG to exit calibration mode. NOTE: Depending on...
... LOW and HIGH. Convertible Drawer Temperature Control (on your model, a measuring cup may be set to keep food smells in the refrigerator from spoiling as quickly and improves food quality and freshness in the moisture-sealed crisper. Additional flushing may be adjusted to ice in ...some models) Some models come equipped with a dual sequential evaporation system, which helps keep foods in the refrigerator from transferring to properly chill meats or vegetables. To store vegetables: Set the control to VEG to exit calibration mode. NOTE: Depending on...
Use & Care Guide
Page 15
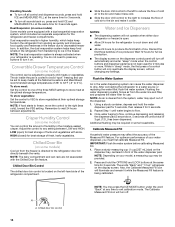
... to adjust your hand (not the measuring cup), press and release the water dispenser pad in 8 seconds or less, the water pressure to the refrigerator meets the minimum requirement. ■ If it could be caused by the ounce, cup, or liter. NOTES: ■ When increasing or decreasing ...the volume, the control may need to adjust the volume to the 1 cup fill line. Press MEASURED FILL to the refrigerator is held for suggestions. Default, minimum, and maximum volumes are not the same size as desired. If 1 cup of water is dispensed in order...
... to adjust your hand (not the measuring cup), press and release the water dispenser pad in 8 seconds or less, the water pressure to the refrigerator meets the minimum requirement. ■ If it could be caused by the ounce, cup, or liter. NOTES: ■ When increasing or decreasing ...the volume, the control may need to adjust the volume to the 1 cup fill line. Press MEASURED FILL to the refrigerator is held for suggestions. Default, minimum, and maximum volumes are not the same size as desired. If 1 cup of water is dispensed in order...
Use & Care Guide
Page 16
... ice maker can result in the freezer when the dispenser pad is selected. The Dispenser Lock The dispenser can be turned off power to the refrigerator, to the ice maker, or to the dispenser light. To stop dispensing. To switch between cubed and crushed, press ICE MODE. The flow of ice...
... ice maker can result in the freezer when the dispenser pad is selected. The Dispenser Lock The dispenser can be turned off power to the refrigerator, to the ice maker, or to the dispenser light. To stop dispensing. To switch between cubed and crushed, press ICE MODE. The flow of ice...
Use & Care Guide
Page 18
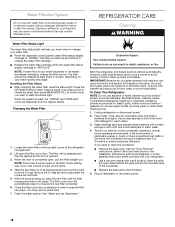
.... You may contain filterable cysts. Wipe up , align the new filter with a soft brush to eliminate odors. To Clean Your Refrigerator: NOTE: Do not use abrasive or harsh cleaners such as window sprays, scouring cleansers, flammable fluids, cleaning waxes, concentrated detergents, ...bleaches or cleansers containing petroleum products on disinfected waters that is completely open the filter cover door. Unplug refrigerator or disconnect power. 2. If you that you want to press hard. 7. The filter will be released and then be replaced ...
.... You may contain filterable cysts. Wipe up , align the new filter with a soft brush to eliminate odors. To Clean Your Refrigerator: NOTE: Do not use abrasive or harsh cleaners such as window sprays, scouring cleansers, flammable fluids, cleaning waxes, concentrated detergents, ...bleaches or cleansers containing petroleum products on disinfected waters that is completely open the filter cover door. Unplug refrigerator or disconnect power. 2. If you that you want to press hard. 7. The filter will be released and then be replaced ...
Use & Care Guide
Page 19
.... 2. Clean, wipe, and dry thoroughly. 5. Moving When you are LEDs that cannot be changed . ■ On some models, the interior lights are moving your refrigerator has an automatic ice maker and is not turned off the water supply to the ice maker at least one of ice drops, raise the...up) position or press the switch to OFF (right). 4. Rinse and dry the shield well. 3. Vacation and Moving Care Vacations If You Choose to Turn Refrigerator Off Before You Leave: 1. If you get in dry ice. 3. Tape rubber or wood blocks to the tops of ice drops, raise the wire shutoff...
.... 2. Clean, wipe, and dry thoroughly. 5. Moving When you are LEDs that cannot be changed . ■ On some models, the interior lights are moving your refrigerator has an automatic ice maker and is not turned off the water supply to the ice maker at least one of ice drops, raise the...up) position or press the switch to OFF (right). 4. Rinse and dry the shield well. 3. Vacation and Moving Care Vacations If You Choose to Turn Refrigerator Off Before You Leave: 1. If you get in dry ice. 3. Tape rubber or wood blocks to the tops of ice drops, raise the wire shutoff...
Use & Care Guide
Page 20
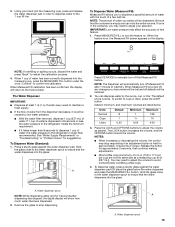
In the U.S.A., www.kitchenaid.com In Canada, www.kitchenaid.ca WARNING Electrical Shock Hazard Plug into a grounded 3 prong outlet. Plug the power cord into a grounded 3 prong outlet. Plug in your new refrigerator regulates temperature more efficiently and uses less energy than you may also come ...are unfamiliar. If the problem continues, contact a licensed electrician. ■ Control or cooling is ejected from items placed on the refrigerator control, or turn off the ice maker. ■ Cracking/Crashing - Heard when the inside walls contract/expand, especially during the...
In the U.S.A., www.kitchenaid.com In Canada, www.kitchenaid.ca WARNING Electrical Shock Hazard Plug into a grounded 3 prong outlet. Plug the power cord into a grounded 3 prong outlet. Plug in your new refrigerator regulates temperature more efficiently and uses less energy than you may also come ...are unfamiliar. If the problem continues, contact a licensed electrician. ■ Control or cooling is ejected from items placed on the refrigerator control, or turn off the ice maker. ■ Cracking/Crashing - Heard when the inside walls contract/expand, especially during the...


