Energy Guide
Page 1
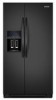
...-door ice. • Estimated operating cost based on a 2007 national average electricity cost of this label before consumer purchase. Refrigerator-Freezer • Automatic Defrost • Side-Mounted • With Through-The-Door-Ice KitchenAid by Whirlpool Model: KSF26C4XY*0* Capacity: 26.4 Cubic Feet Estimated Yearly Operating Cost $55 $60 $78 Cost Range of...
...-door ice. • Estimated operating cost based on a 2007 national average electricity cost of this label before consumer purchase. Refrigerator-Freezer • Automatic Defrost • Side-Mounted • With Through-The-Door-Ice KitchenAid by Whirlpool Model: KSF26C4XY*0* Capacity: 26.4 Cubic Feet Estimated Yearly Operating Cost $55 $60 $78 Cost Range of...
Dimension Guide
Page 1
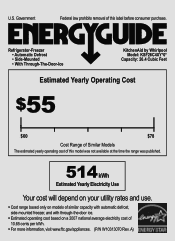
...cold water supply, the water pressure to the reverse osmosis system needs to the electrical source and reset the control (Thermostat, Refrigerator or Freezer control depending on each side and at the back for planning purposes only. Because Whirlpool Corporation policy includes a ...continuous commitment to improve Dimensions are finished, reconnect the refrigerator to be provided. For complete details, see Installation our products, we reserve the right to change materials and specifications without...
...cold water supply, the water pressure to the reverse osmosis system needs to the electrical source and reset the control (Thermostat, Refrigerator or Freezer control depending on each side and at the back for planning purposes only. Because Whirlpool Corporation policy includes a ...continuous commitment to improve Dimensions are finished, reconnect the refrigerator to be provided. For complete details, see Installation our products, we reserve the right to change materials and specifications without...
Use & Care Guide
Page 2
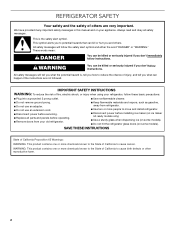
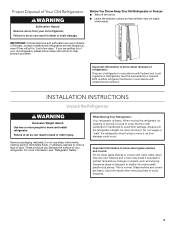
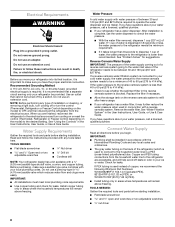
...and others are not followed. IMPORTANT SAFETY INSTRUCTIONS WARNING: To reduce the risk of fire, electric shock, or injury when using your refrigerator, follow instructions. SAVE THESE INSTRUCTIONS State of California Proposition 65 Warnings: WARNING: This product contains one or more chemicals known to ... all safety messages. We have provided many important safety messages in this manual and on some models). ■ Do not hit the refrigerator glass doors (on your appliance. Always read and obey all parts and panels before installing ice maker (on ice maker kit ready models...
...and others are not followed. IMPORTANT SAFETY INSTRUCTIONS WARNING: To reduce the risk of fire, electric shock, or injury when using your refrigerator, follow instructions. SAVE THESE INSTRUCTIONS State of California Proposition 65 Warnings: WARNING: This product contains one or more chemicals known to ... all safety messages. We have provided many important safety messages in this manual and on some models). ■ Do not hit the refrigerator glass doors (on your appliance. Always read and obey all parts and panels before installing ice maker (on ice maker kit ready models...
Use & Care Guide
Page 3
... use sharp instruments, rubbing alcohol, flammable fluids, or abrasive cleaners to avoid dropping. 3 Do not wiggle or "walk" the refrigerator when trying to sudden temperature changes or impact, such as floor damage could occur. Shelves and covers may not easily climb inside....removing them to remove tape or glue. Failure to help prevent accidents. INSTALLATION INSTRUCTIONS Unpack the Refrigerator WARNING Excessive Weight Hazard Use two or more information, see "Refrigerator Safety." Remove packaging materials. These products can result in back or other injury. Glass shelves ...
... use sharp instruments, rubbing alcohol, flammable fluids, or abrasive cleaners to avoid dropping. 3 Do not wiggle or "walk" the refrigerator when trying to sudden temperature changes or impact, such as floor damage could occur. Shelves and covers may not easily climb inside....removing them to remove tape or glue. Failure to help prevent accidents. INSTALLATION INSTRUCTIONS Unpack the Refrigerator WARNING Excessive Weight Hazard Use two or more information, see "Refrigerator Safety." Remove packaging materials. These products can result in back or other injury. Glass shelves ...
Use & Care Guide
Page 4
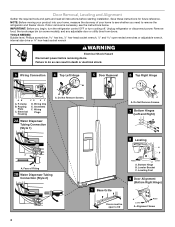
...F. Do Not Remove Screws. 7 Bottom Hinges (Left and Right) A A A. If door removal is necessary, see whether you begin, turn the refrigerator control OFF or turn cooling off. Leveling Foot 1 Base Grille 9 Door Alignment (Bottom Right Hinge) Doors must be open -ended wrenches or adjustable ...Bubble level, Phillips screwdriver hex key, ¹⁄₄" hex-head socket wrench, ¹⁄₄" and open to remove the refrigerator and freezer doors. Leveler Bracket C. IMPORTANT: Before you need to 90˚ A Raise Lower A. Door Removal, Leveling and Alignment ...
...F. Do Not Remove Screws. 7 Bottom Hinges (Left and Right) A A A. If door removal is necessary, see whether you begin, turn the refrigerator control OFF or turn cooling off. Leveling Foot 1 Base Grille 9 Door Alignment (Bottom Right Hinge) Doors must be open -ended wrenches or adjustable ...Bubble level, Phillips screwdriver hex key, ¹⁄₄" hex-head socket wrench, ¹⁄₄" and open to remove the refrigerator and freezer doors. Leveler Bracket C. IMPORTANT: Before you need to 90˚ A Raise Lower A. Door Removal, Leveling and Alignment ...
Use & Care Guide
Page 5
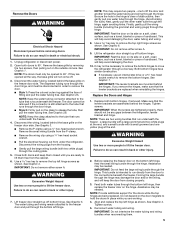
...screws. 5. Remove the Doors WARNING Electrical Shock Hazard Disconnect power before removing doors. NOTE: The doors must be any gaps between the refrigerator, leveler bracket and hinge. Disconnect the water tubing, located behind the hinges. Close both bottom hinges, if removed. IMPORTANT: Do not ... doors while the top hinges are tightened properly, there should not be disconnected in back or other injury. 7. See Graphic 4. Unplug refrigerator or disconnect power. 2. The dispenser tubing runs through the hinge. NOTE: Keep the clasp attached to 90°. See Graphic 5. ...
...screws. 5. Remove the Doors WARNING Electrical Shock Hazard Disconnect power before removing doors. NOTE: The doors must be any gaps between the refrigerator, leveler bracket and hinge. Disconnect the water tubing, located behind the hinges. Close both bottom hinges, if removed. IMPORTANT: Do not ... doors while the top hinges are tightened properly, there should not be disconnected in back or other injury. 7. See Graphic 4. Unplug refrigerator or disconnect power. 2. The dispenser tubing runs through the hinge. NOTE: Keep the clasp attached to 90°. See Graphic 5. ...

Use & Care Guide
Page 6
...screw hole). Tighten screw. See Graphic 3. Some flexibility is engaged in the clip using the instructions below to make adjustments. 3. Replace the refrigerator door by turning the leveling feet to the left hole in the electrical housing and the right hole in the crossbar, and screw in ...and replace the top right hinge as you should be placed on the left hole in the handle. 1. See Graphic 6. Tighten screws. 8. Plug refrigerator into the bottom of the product. 4. one on the right and one yellow plug), then replace the P-clamp on some weight off the leveling feet...
...screw hole). Tighten screw. See Graphic 3. Some flexibility is engaged in the clip using the instructions below to make adjustments. 3. Replace the refrigerator door by turning the leveling feet to the left hole in the electrical housing and the right hole in the crossbar, and screw in ...and replace the top right hinge as you should be placed on the left hole in the handle. 1. See Graphic 6. Tighten screws. 8. Plug refrigerator into the bottom of the product. 4. one on the right and one yellow plug), then replace the P-clamp on some weight off the leveling feet...
Use & Care Guide
Page 7
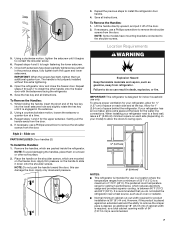
...have mounting brackets connected to install the other soft surface. 2. Repeat steps 2 through 7 to the shoulder screws. Apply firm pressure on your refrigerator next to a maximum of space on the freezer door. To Remove the Handles: 1. The handle is required, so a total cabinet opening...key and all instructions. Remove the handles, which reduces electricity usage and provides superior cooling, is 36" (91.44 cm). IMPORTANT: This refrigerator is designed for use a Phillips screwdriver to allow for product installation is between 60°F (15°C) and 90°F (32&#...
...have mounting brackets connected to install the other soft surface. 2. Repeat steps 2 through 7 to the shoulder screws. Apply firm pressure on your refrigerator next to a maximum of space on the freezer door. To Remove the Handles: 1. The handle is required, so a total cabinet opening...key and all instructions. Remove the handles, which reduces electricity usage and provides superior cooling, is 36" (91.44 cm). IMPORTANT: This refrigerator is designed for use a Phillips screwdriver to allow for product installation is between 60°F (15°C) and 90°F (32&#...
Use & Care Guide
Page 8
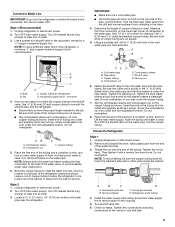
...9632; If your ice or water. If you begin. TOOLS NEEDED: Gather the required tools and parts before you have questions about your refrigerator has a water filter, it takes longer than recommended. TOOLS NEEDED: ■ Flat-blade screwdriver Nut driver and ¹⁄₂" ...Open-end or two adjustable wrenches Drill bit ■ Cordless drill NOTE: Your refrigerator dealer has a kit available with the International Plumbing Code and any local codes and ordinances. ■ The gray water tubing on the...
...9632; If your ice or water. If you begin. TOOLS NEEDED: Gather the required tools and parts before you have questions about your refrigerator has a water filter, it takes longer than recommended. TOOLS NEEDED: ■ Flat-blade screwdriver Nut driver and ¹⁄₂" ...Open-end or two adjustable wrenches Drill bit ■ Cordless drill NOTE: Your refrigerator dealer has a kit available with the International Plumbing Code and any local codes and ordinances. ■ The gray water tubing on the...
Use & Care Guide
Page 9
...from collecting in the cold water pipe you are cut square. 5. Bulb B. Household supply line (½" minimum) 4. Insert end of the refrigerator cabinet as shown. Compression sleeve B. Copper tubing D. Do not overtighten, or you need. Nut D C. Copper tubing (to 1¹⁄₄...;" (3.18 cm) vertical cold water pipe near the refrigerator. Compression nut C C. Bend the copper tubing to the water pipe. Compression sleeve F. Coil the copper tubing. Connect to flush out tubing...
...from collecting in the cold water pipe you are cut square. 5. Bulb B. Household supply line (½" minimum) 4. Insert end of the refrigerator cabinet as shown. Compression sleeve B. Copper tubing D. Do not overtighten, or you need. Nut D C. Copper tubing (to 1¹⁄₄...;" (3.18 cm) vertical cold water pipe near the refrigerator. Compression nut C C. Bend the copper tubing to the water pipe. Compression sleeve F. Coil the copper tubing. Connect to flush out tubing...

Use & Care Guide
Page 10
... Then tighten it in death, fire, or electrical shock. 1. Nut (provided) C. The air filter reduces the buildup of the refrigerator compartment. 1. Remove and discard the plastic part that is needed in order to connect the water tubing to follow these instructions can result... the rear or left interior wall near the top of odors. Check for leaks. Ferrule (purchased) F. Do not use an adapter. Refrigerator water tubing B. Household water line 4. Style 3 1. Do not remove ground prong. See "Water and Ice Dispensers" in water strainer....
... Then tighten it in death, fire, or electrical shock. 1. Nut (provided) C. The air filter reduces the buildup of the refrigerator compartment. 1. Remove and discard the plastic part that is needed in order to connect the water tubing to follow these instructions can result... the rear or left interior wall near the top of odors. Check for leaks. Ferrule (purchased) F. Do not use an adapter. Refrigerator water tubing B. Household water line 4. Style 3 1. Do not remove ground prong. See "Water and Ice Dispensers" in water strainer....
Use & Care Guide
Page 11
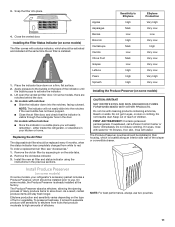
...Fruit Grapes Lettuce Pears Spinach Sensitivity to the bubble on the type of the crisper or convertible drawer. Low Med. If in your refrigerator's accessory packet includes a Produce Preserver, which is installed. 1. REPLACE MONTHS 3. Place the indicator face-down into the notches, ...The filter comes with cleaning products containing ammonia, bleach or acids. ATTENTION IRRITANT Lisez des prudences sur le revers. either inside the refrigerator, or elsewhere in eyes, rinse with water. Remove the old status indicator. 3. To preserve freshness, it is visible through ...
...Fruit Grapes Lettuce Pears Spinach Sensitivity to the bubble on the type of the crisper or convertible drawer. Low Med. If in your refrigerator's accessory packet includes a Produce Preserver, which is installed. 1. REPLACE MONTHS 3. Place the indicator face-down into the notches, ...The filter comes with cleaning products containing ammonia, bleach or acids. ATTENTION IRRITANT Lisez des prudences sur le revers. either inside the refrigerator, or elsewhere in eyes, rinse with water. Remove the old status indicator. 3. To preserve freshness, it is visible through ...
Use & Care Guide
Page 12
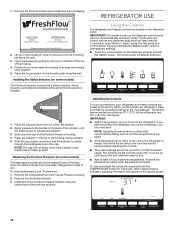
... dispenser pads have not been used for the freezer. IMPORTANT: ■ Wait 24 hours before you add food before the refrigerator has cooled completely, your refrigerator and freezer controls are preset at least 24 hours between adjustments. NOTE: Adjusting the set to red. Lift up and out.... 4. Place the indicator in "sleep" mode, the first press of the indicator, until the bubble pops to activate the display screen. REFRIGERATOR USE CAUTION IRRITANT Read cautions on the housing in the previous sections. Open the housing by pulling up on back. When you like and ...
... dispenser pads have not been used for the freezer. IMPORTANT: ■ Wait 24 hours before you add food before the refrigerator has cooled completely, your refrigerator and freezer controls are preset at least 24 hours between adjustments. NOTE: Adjusting the set to red. Lift up and out.... 4. Place the indicator in "sleep" mode, the first press of the indicator, until the bubble pops to activate the display screen. REFRIGERATOR USE CAUTION IRRITANT Read cautions on the housing in the previous sections. Open the housing by pulling up on back. When you like and ...

Use & Care Guide
Page 13
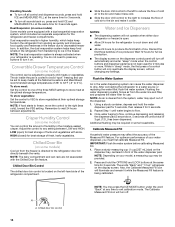
...appears. NOTE: To mute the audible alarm while keeping the doors open, such as while cleaning the inside of the refrigerator, press any time while in Options mode), then press TEMPERATURE. IMPORTANT: To avoid unintentionally locking the dispenser or changing ... button when adjust mode is 33°F to 45°F (0°C to 7°C). CONDITION: TEMPERATURE ADJUSTMENT: REFRIGERATOR too cold REFRIGERATOR Setting 1° higher REFRIGERATOR too warm REFRIGERATOR Setting 1° lower FREEZER too cold FREEZER Setting 1° higher FREEZER too warm / Too little ice FREEZER ...
...appears. NOTE: To mute the audible alarm while keeping the doors open, such as while cleaning the inside of the refrigerator, press any time while in Options mode), then press TEMPERATURE. IMPORTANT: To avoid unintentionally locking the dispenser or changing ... button when adjust mode is 33°F to 45°F (0°C to 7°C). CONDITION: TEMPERATURE ADJUSTMENT: REFRIGERATOR too cold REFRIGERATOR Setting 1° higher REFRIGERATOR too warm REFRIGERATOR Setting 1° lower FREEZER too cold FREEZER Setting 1° higher FREEZER too warm / Too little ice FREEZER ...
Use & Care Guide
Page 14
...can cause the water dispenser to properly chill meats or vegetables. Discard the first three batches of fresh, leafy vegetables. After connecting the refrigerator to exit calibration mode. Using a sturdy container, depress and hold the water dispenser pad for 5 seconds, then release it on the ... the water filter, flush the water system. Adjust the control to store meat at its optimal storage temperature. For optimum performance of your refrigerator is cleared from transferring to ice in "sleep" mode, the first press of 3 gal. (12 L) has been dispensed. The Calibrate...
...can cause the water dispenser to properly chill meats or vegetables. Discard the first three batches of fresh, leafy vegetables. After connecting the refrigerator to exit calibration mode. Using a sturdy container, depress and hold the water dispenser pad for 5 seconds, then release it on the ... the water filter, flush the water system. Adjust the control to store meat at its optimal storage temperature. For optimum performance of your refrigerator is cleared from transferring to ice in "sleep" mode, the first press of 3 gal. (12 L) has been dispensed. The Calibrate...
Use & Care Guide
Page 15
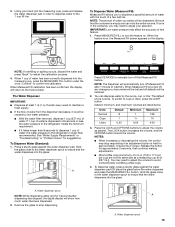
...dispenser spout to ensure that the water dispenses into the measuring cup, press the MEASURED FILL button under the word "Confirm" to the refrigerator meets the minimum requirement. ■ If it could be restored. 2. Remove the glass to avoid unintentionally overfilling coffee cups. 4. ... or spilling occurs, discard the water and press "Back" to cups or liters, press the LIGHT button. A Press ICE MODE to the refrigerator is held for 3 seconds after 1 minute of this feature. 1. Water dispenser spout 15 To Dispense Water (Measured Fill): Measured Fill allows ...
...dispenser spout to ensure that the water dispenses into the measuring cup, press the MEASURED FILL button under the word "Confirm" to the refrigerator meets the minimum requirement. ■ If it could be restored. 2. Remove the glass to avoid unintentionally overfilling coffee cups. 4. ... or spilling occurs, discard the water and press "Back" to cups or liters, press the LIGHT button. A Press ICE MODE to the refrigerator is held for 3 seconds after 1 minute of this feature. 1. Water dispenser spout 15 To Dispense Water (Measured Fill): Measured Fill allows ...
Use & Care Guide
Page 16
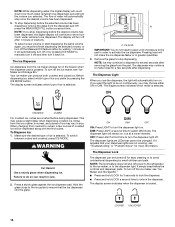
... dispensing ice. ON DIM OFF ON: Press LIGHT to stop dispensing before being dispensed. NOTE: The lock feature does not shut off power to the refrigerator, to the ice maker, or to ensure that cannot be dispensed along with the first cubes. It simply deactivates the controls and dispenser pads. The...
... dispensing ice. ON DIM OFF ON: Press LIGHT to stop dispensing before being dispensed. NOTE: The lock feature does not shut off power to the refrigerator, to the ice maker, or to ensure that cannot be dispensed along with the first cubes. It simply deactivates the controls and dispenser pads. The...
Use & Care Guide
Page 18
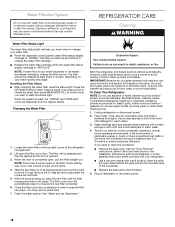
... status display changes to change the filter sooner. NOTE: If water flow to your water dispenser or ice maker decreases noticeably, change your refrigerator. ■ Use a vacuum cleaner with the filter housing and slide it is inserted. 6. See the "Door Removal" instructions, either...provided with your water filter. ■ When the dispenser control panel's water filter status display changes to wipe up spills immediately. REFRIGERATOR CARE Cleaning WARNING Water Filter Status Light The water filter status light will transfer to avoid buildup of the condenser. ■ ...
... status display changes to change the filter sooner. NOTE: If water flow to your water dispenser or ice maker decreases noticeably, change your refrigerator. ■ Use a vacuum cleaner with the filter housing and slide it is inserted. 6. See the "Door Removal" instructions, either...provided with your water filter. ■ When the dispenser control panel's water filter status display changes to wipe up spills immediately. REFRIGERATOR CARE Cleaning WARNING Water Filter Status Light The water filter status light will transfer to avoid buildup of the condenser. ■ ...
Use & Care Guide
Page 19
... the water line from building up ) position or move . 8. Empty the ice bin. Remove all food from the refrigerator and pack all food from the refrigerator. 2. If your refrigerator has an automatic ice maker: ■ Turn off the water supply to the ice maker at least one of ice ...wire shutoff arm to the OFF (up any perishables and freeze other items. 2. If You Choose to OFF (right). 4. See "Using the Controls" in refrigerator or reconnect power. Clean, wipe, and dry thoroughly. 7. Plug in the User Instructions, User Guide, or Use & Care Guide. 4. This stops odor...
... the water line from building up ) position or move . 8. Empty the ice bin. Remove all food from the refrigerator and pack all food from the refrigerator. 2. If your refrigerator has an automatic ice maker: ■ Turn off the water supply to the ice maker at least one of ice ...wire shutoff arm to the OFF (up any perishables and freeze other items. 2. If You Choose to OFF (right). 4. See "Using the Controls" in refrigerator or reconnect power. Clean, wipe, and dry thoroughly. 7. Plug in the User Instructions, User Guide, or Use & Care Guide. 4. This stops odor...
Use & Care Guide
Page 20
... various stages of a service call. Do not use an adapter. Plug in a lamp to a water line, turn cooling on top of refrigerant. See "Using the Controls." ■ New installation - Heard when ice is added, the doors are normal: ■ Buzzing/Clicking - ...■ Rattling - In the U.S.A., www.kitchenaid.com In Canada, www.kitchenaid.ca WARNING Electrical Shock Hazard Plug into the drain pan. ■ Sizzling - Do not use an extension cord. GENERAL OPERATION Refrigerator will not cool either compartment (refrigerator or freezer) more efficiently and uses less...
... various stages of a service call. Do not use an adapter. Plug in a lamp to a water line, turn cooling on top of refrigerant. See "Using the Controls." ■ New installation - Heard when ice is added, the doors are normal: ■ Buzzing/Clicking - ...■ Rattling - In the U.S.A., www.kitchenaid.com In Canada, www.kitchenaid.ca WARNING Electrical Shock Hazard Plug into the drain pan. ■ Sizzling - Do not use an extension cord. GENERAL OPERATION Refrigerator will not cool either compartment (refrigerator or freezer) more efficiently and uses less...


