Use & Care Guide
Page 2
.... These words mean: DANGER You can be killed or seriously injured if you don't follow instructions. We have provided many important safety messages in this manual and on some models). This is , tell you how to cause birth defects or other reproductive harm. 2 Always read and obey all parts and panels...
.... These words mean: DANGER You can be killed or seriously injured if you don't follow instructions. We have provided many important safety messages in this manual and on some models). This is , tell you how to cause birth defects or other reproductive harm. 2 Always read and obey all parts and panels...

Use & Care Guide
Page 13
...again. The Max Cool feature will turn off , press the OPTIONS button to press both buttons at the same time for 3 seconds. To manually turn it off , press and hold LIGHT and OPTIONS at exactly the same time. In Sabbath Mode, the temperature set point, press TEMPERATURE to...a colder temperature may make some foods, such as a guide. The alarm will appear on the dispenser display. When cooling is on . To manually turn on the dispenser control panel. 13 The feature then resets and will remain on the dispenser display. Additional Features Max Cool and Max Ice...
...again. The Max Cool feature will turn off , press the OPTIONS button to press both buttons at the same time for 3 seconds. To manually turn it off , press and hold LIGHT and OPTIONS at exactly the same time. In Sabbath Mode, the temperature set point, press TEMPERATURE to...a colder temperature may make some foods, such as a guide. The alarm will appear on the dispenser display. When cooling is on . To manually turn on the dispenser control panel. 13 The feature then resets and will remain on the dispenser display. Additional Features Max Cool and Max Ice...
Use & Care Guide
Page 15
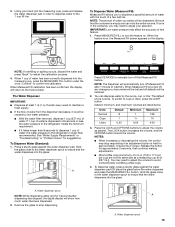
... water. Water dispenser spout NOTE: While dispensing water and for approximately 2 seconds, then continue making adjustments. ■ Most coffee cups (commonly 4 to 6 oz [118 to manually turn the feature on the display. Using your selection. Hold the glass close to the water dispenser spout to ensure that the water dispenses into...
... water. Water dispenser spout NOTE: While dispensing water and for approximately 2 seconds, then continue making adjustments. ■ Most coffee cups (commonly 4 to 6 oz [118 to manually turn the feature on the display. Using your selection. Hold the glass close to the water dispenser spout to ensure that the water dispenses into...
Use & Care Guide
Page 16
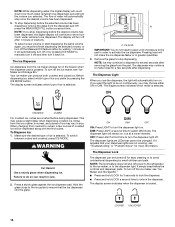
... cleaning or to the dispenser light. The display will turn off for 3 seconds to lock the dispenser. ■ Press and hold LOCK a second time to manually turn it off) and then turn off . The Ice Dispenser Ice dispenses from the dispenser pad OR press the MEASURED FILL button a second time. If...
... cleaning or to the dispenser light. The display will turn off for 3 seconds to lock the dispenser. ■ Press and hold LOCK a second time to manually turn it off) and then turn off . The Ice Dispenser Ice dispenses from the dispenser pad OR press the MEASURED FILL button a second time. If...
Use & Care Guide
Page 17
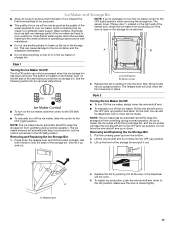
... the OFF (up ) position. The sensor cover ("flipper door"), located on the ice maker, slide the control to the ON (left) position. ■ To manually turn off the ice maker, lift the wire shutoff arm to the ON position. A. Lift the wire shutoff arm so it in the storage bin... tightly. 17 Style 2 Turning the Ice Maker On/Off: ■ To turn ON the ice maker, simply lower the wire shutoff arm. ■ To manually turn the ice maker control to keep the storage bin from overfilling during normal operation. Use both hands to a softened water supply. Discard the first...
... the OFF (up ) position. The sensor cover ("flipper door"), located on the ice maker, slide the control to the ON (left) position. ■ To manually turn off the ice maker, lift the wire shutoff arm to the ON position. A. Lift the wire shutoff arm so it in the storage bin... tightly. 17 Style 2 Turning the Ice Maker On/Off: ■ To turn ON the ice maker, simply lower the wire shutoff arm. ■ To manually turn the ice maker control to keep the storage bin from overfilling during normal operation. Use both hands to a softened water supply. Discard the first...
Use & Care Guide
Page 18
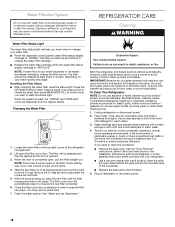
... the condenser. ■ Replace the base grille when finished. 5. See the "Door Removal" instructions, either in the User Instructions or the Installation Instructions and Owner's Manual, or in warm water. 4. The filter should be some water in one section will be released and then be replaced at least every 6 months, depending...
... the condenser. ■ Replace the base grille when finished. 5. See the "Door Removal" instructions, either in the User Instructions or the Installation Instructions and Owner's Manual, or in warm water. 4. The filter should be some water in one section will be released and then be replaced at least every 6 months, depending...

