Instruction Manual
Page 1
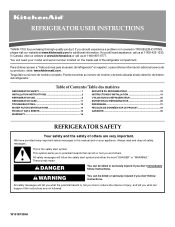
... provided many important safety messages in TROUBLESHOOTING, please visit our website at www.kitchenaid.com for purchasing this manual and on the inside wall of injury, and tell you still need your model and serial number located on your appliance. WARNING You can be killed or ... safety alert symbol. All safety messages will need assistance, call us at 1-800-807-6777. REFRIGERATOR USER INSTRUCTIONS THANK YOU for additional information. In Canada, visit our website at www.kitchenaid.ca or call us at 1-800-422-1230. You will follow instructions. This is , tell...
... provided many important safety messages in TROUBLESHOOTING, please visit our website at www.kitchenaid.com for purchasing this manual and on the inside wall of injury, and tell you still need your model and serial number located on your appliance. WARNING You can be killed or ... safety alert symbol. All safety messages will need assistance, call us at 1-800-807-6777. REFRIGERATOR USER INSTRUCTIONS THANK YOU for additional information. In Canada, visit our website at www.kitchenaid.ca or call us at 1-800-422-1230. You will follow instructions. This is , tell...
Instruction Manual
Page 2
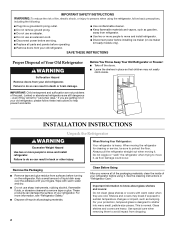
...children may break if exposed to sudden temperature changes or impact, such as floor damage could occur. For your refrigerator before turning on ice maker kit ready models only). IMPORTANT SAFETY INSTRUCTIONS WARNING:To reduce the risk of fire, electric shock, or injury to persons when ...using it. Rub a small amount of your fingers. Failure to move and install refrigerator. Do not wiggle or "walk" the refrigerator when trying to ...
...children may break if exposed to sudden temperature changes or impact, such as floor damage could occur. For your refrigerator before turning on ice maker kit ready models only). IMPORTANT SAFETY INSTRUCTIONS WARNING:To reduce the risk of fire, electric shock, or injury to persons when ...using it. Rub a small amount of your fingers. Failure to move and install refrigerator. Do not wiggle or "walk" the refrigerator when trying to ...
Instruction Manual
Page 3
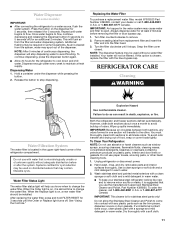
...follow the instructions provided with any type of installation, cleaning, or removing a light bulb, turn the control (Thermostat, Refrigerator or Freezer Control depending on the model) to follow these instructions can result in death, fire, or electrical shock. Use an outlet that you are finished..., reconnect the refrigerator to the electrical source and reset the control (Thermostat, Refrigerator or Freezer Control depending on the model) to swing open. See "Using the Controls." Do not use an adapter. Water...
...follow the instructions provided with any type of installation, cleaning, or removing a light bulb, turn the control (Thermostat, Refrigerator or Freezer Control depending on the model) to follow these instructions can result in death, fire, or electrical shock. Use an outlet that you are finished..., reconnect the refrigerator to the electrical source and reset the control (Thermostat, Refrigerator or Freezer Control depending on the model) to swing open. See "Using the Controls." Do not use an adapter. Water...
Instruction Manual
Page 4
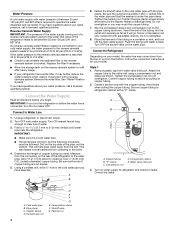
...OFF the shutoff valve on copper tubing. 2. Do not overtighten. Water valve inlet port 3. Turn on water supply to refrigerator and check for your refrigerator has a water filter, it is a cold water pipe. ■ Horizontal pipe will work, but the following procedure ... vertical cold water pipe near the refrigerator. Unplug refrigerator or disconnect power. 2. Turn OFF main water supply. Determine the length of the refrigerator to refill after heavy usage. ■ If your model. Measure from the drill. Add 7 ft (2.1 m) to Refrigerator Depending on the copper tubing as ...
...OFF the shutoff valve on copper tubing. 2. Do not overtighten. Water valve inlet port 3. Turn on water supply to refrigerator and check for your refrigerator has a water filter, it is a cold water pipe. ■ Horizontal pipe will work, but the following procedure ... vertical cold water pipe near the refrigerator. Unplug refrigerator or disconnect power. 2. Turn OFF main water supply. Determine the length of the refrigerator to refill after heavy usage. ■ If your model. Measure from the drill. Add 7 ft (2.1 m) to Refrigerator Depending on the copper tubing as ...
Instruction Manual
Page 6
...turns. Return all screws. 4. Keep the refrigerator doors closed until you are included later in the drawer front. 3. Starting with the top of the top hinge by wedging a flat-blade screwdriver or your fingernail between the two sections. NOTE: On some models, remove the shim from the bottom hinge... pin and keep it for the top hinge as shown in Top Hinge graphic. Before removing the left -hand side refrigerator door. 5. See Bottom Hinge graphic. Replace the parts for ...
...turns. Return all screws. 4. Keep the refrigerator doors closed until you are included later in the drawer front. 3. Starting with the top of the top hinge by wedging a flat-blade screwdriver or your fingernail between the two sections. NOTE: On some models, remove the shim from the bottom hinge... pin and keep it for the top hinge as shown in Top Hinge graphic. Before removing the left -hand side refrigerator door. 5. See Bottom Hinge graphic. Replace the parts for ...
Instruction Manual
Page 8
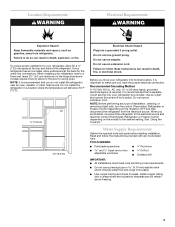
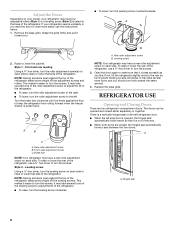
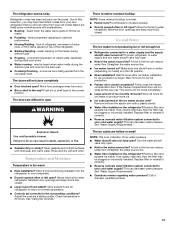
...may take several turns of the leveling screw to adjust the tilt of the refrigerator, use a ³⁄₈" hex driver to turn the screws. A. Hinged seal 8 Adjust the Doors Depending on your model, your refrigerator seems unsteady or you want the door to close more easily, use the... instructions below. 1. This makes it is firmly against the floor to keep the refrigerator from rolling forward when the freezer drawer is a vertically-...
...may take several turns of the leveling screw to adjust the tilt of the refrigerator, use a ³⁄₈" hex driver to turn the screws. A. Hinged seal 8 Adjust the Doors Depending on your model, your refrigerator seems unsteady or you want the door to close more easily, use the... instructions below. 1. This makes it is firmly against the floor to keep the refrigerator from rolling forward when the freezer drawer is a vertically-...
Instruction Manual
Page 10
... Alarm touch pad to set point. Ice Maker (on your ice maker. Sabbath Mode (SAB) IMPORTANT: This preference does not disable interior lights. Wait 24 hours between FRUIT and VEGETABLES or LOW and HIGH. Crisper Humidity Control You can damage parts of the ice maker and lead to your... 12 hours. All control panel lights will be lit when the Door Alarm feature is displayed, press the Refrigerator (+) or (-) touch pads to the set user preferences, if desired. Depending on some models) Turning the Ice Maker On/Off To turn off . The Temp Alarm light will hear the alarm sound...
... Alarm touch pad to set point. Ice Maker (on your ice maker. Sabbath Mode (SAB) IMPORTANT: This preference does not disable interior lights. Wait 24 hours between FRUIT and VEGETABLES or LOW and HIGH. Crisper Humidity Control You can damage parts of the ice maker and lead to your... 12 hours. All control panel lights will be lit when the Door Alarm feature is displayed, press the Refrigerator (+) or (-) touch pads to the set user preferences, if desired. Depending on some models) Turning the Ice Maker On/Off To turn off . The Temp Alarm light will hear the alarm sound...
Instruction Manual
Page 11
...contact with any odors formed in warm water. Additional flushing may be filtered. To continue dispensing, press the dispenser button again. ■ Allow 24 hours for at least 2 minutes before or after the system. Hold a container under the dispenser while pressing the button. 2. or 1-800-807...air is suggested that is chosen, replace the filter with a clean sponge or soft cloth and a mild detergent in some models) IMPORTANT: ■ After connecting the refrigerator to change the water filter. Do not use with water that you know when to a water source, flush the water ...
...contact with any odors formed in warm water. Additional flushing may be filtered. To continue dispensing, press the dispenser button again. ■ Allow 24 hours for at least 2 minutes before or after the system. Hold a container under the dispenser while pressing the button. 2. or 1-800-807...air is suggested that is chosen, replace the filter with a clean sponge or soft cloth and a mild detergent in some models) IMPORTANT: ■ After connecting the refrigerator to change the water filter. Do not use with water that you know when to a water source, flush the water ...
Instruction Manual
Page 13
... your cold water supply? See "Water Supply Requirements." The ice cubes are difficult to your old model. Below are listed some normal sounds with a plastic utensil. ■ Water filter installed on model) is an indication of low water pressure. ■ Water shutoff valve not fully open? water... open ? If ice quality improves, then the filter may hear intermittent noises from your new refrigerator that you did not notice from the ice maker mold. Allow 24 hours following installation for the refrigerator to do so can reduce water flow. A kink in the ON position. ■ New...
... your cold water supply? See "Water Supply Requirements." The ice cubes are difficult to your old model. Below are listed some normal sounds with a plastic utensil. ■ Water filter installed on model) is an indication of low water pressure. ■ Water shutoff valve not fully open? water... open ? If ice quality improves, then the filter may hear intermittent noises from your new refrigerator that you did not notice from the ice maker mold. Allow 24 hours following installation for the refrigerator to do so can reduce water flow. A kink in the ON position. ■ New...
Instruction Manual
Page 16
... Instructions and model number information for replacement or repair of the refrigerator/freezer cavity liner (including labor costs) if the part cracks due to defective materials or workmanship. For assistance or service in remote locations. 10. Please keep this warranty does not apply. You can write to KitchenAid with the product, KitchenAid will pay...
... Instructions and model number information for replacement or repair of the refrigerator/freezer cavity liner (including labor costs) if the part cracks due to defective materials or workmanship. For assistance or service in remote locations. 10. Please keep this warranty does not apply. You can write to KitchenAid with the product, KitchenAid will pay...
Parts Diagram
Page 1
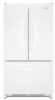
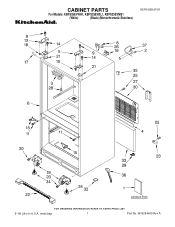
CABINET PARTS For Models: KBFS25EVWH1, KBFS25EVBL1, KBFS25EVMS1 (White) (Black) (Monochromatic Stainless) REFRIGERATOR 9−09 Litho In U.S.A. (mat)(bay) 1 Part No. W10294609 Rev.A
CABINET PARTS For Models: KBFS25EVWH1, KBFS25EVBL1, KBFS25EVMS1 (White) (Black) (Monochromatic Stainless) REFRIGERATOR 9−09 Litho In U.S.A. (mat)(bay) 1 Part No. W10294609 Rev.A

Parts Diagram
Page 6
... 19 UKF8001AXX Filter, Water 20 12568001 Cover, Filter 21 12990512 Screw (2) 22 B8390302SP Clip, Facade (2) 23 12706909SP Facade, Disp. 24 12707303SP Plate, Switch 25 12575501 Switch, Limit 26 12707206SP Guide, Waterline 27 12251001SP Clip, Waterline 28 12707005 Facade, Disp (Top) ... 32 12990513 Screw 33 W10117358 Insulation, Water Tank Following Parts Not Illustrated W10224292 Harness, Control (Refrigerator) (Includes Thermistor) 6 W10294609 No. REFRIGERATOR LINER PARTS For Models: KBFS25EVWH1, KBFS25EVBL1, KBFS25EVMS1 (White) (Black) (Monochromatic Stainless) Illus.
... 19 UKF8001AXX Filter, Water 20 12568001 Cover, Filter 21 12990512 Screw (2) 22 B8390302SP Clip, Facade (2) 23 12706909SP Facade, Disp. 24 12707303SP Plate, Switch 25 12575501 Switch, Limit 26 12707206SP Guide, Waterline 27 12251001SP Clip, Waterline 28 12707005 Facade, Disp (Top) ... 32 12990513 Screw 33 W10117358 Insulation, Water Tank Following Parts Not Illustrated W10224292 Harness, Control (Refrigerator) (Includes Thermistor) 6 W10294609 No. REFRIGERATOR LINER PARTS For Models: KBFS25EVWH1, KBFS25EVBL1, KBFS25EVMS1 (White) (Black) (Monochromatic Stainless) Illus.

Parts Diagram
Page 8
REFRIGERATOR DOOR PARTS For Models: KBFS25EVWH1, KBFS25EVBL1, KBFS25EVMS1 (White) (Black) (Monochromatic Stainless) Illus. Part No. No. DESCRIPTION 18 12567321SP Mat, Medium 19 Bushing, Door (Upper Left) 12395501W White 12395501B Black ...
REFRIGERATOR DOOR PARTS For Models: KBFS25EVWH1, KBFS25EVBL1, KBFS25EVMS1 (White) (Black) (Monochromatic Stainless) Illus. Part No. No. DESCRIPTION 18 12567321SP Mat, Medium 19 Bushing, Door (Upper Left) 12395501W White 12395501B Black ...
Parts Diagram
Page 10
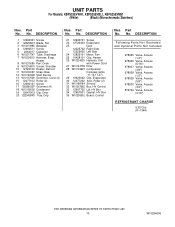
... (3/8") 978028 Valve, Access (1/2") 978029 Valve, Access (5/8") 978030 Valve, Access (3/4") 876764 Valve, Access (3/16") REFRIGERANT CHARGE 5.25 Ozs. (R−134A) 10 W10294609 Heater 8 W10215085 Pan, Drain 9 W10216919 Screw, Shoulder 10 12729129... 21 12990701 Screw 22 12726403 Evaporator 23 Dam 12225702 Right Side 12225602 Left Side 24 12825101 Motor, Fan 25 10428101 Clip, Heater 26 W10234025 Harness, Unit with Power..., Discharge 7 W10224515 Harness, Evap. UNIT PARTS For Models: KBFS25EVWH1, KBFS25EVBL1, KBFS25EVMS1 (White) (Black) (Monochromatic Stainless) Illus. Part No.
... (3/8") 978028 Valve, Access (1/2") 978029 Valve, Access (5/8") 978030 Valve, Access (3/4") 876764 Valve, Access (3/16") REFRIGERANT CHARGE 5.25 Ozs. (R−134A) 10 W10294609 Heater 8 W10215085 Pan, Drain 9 W10216919 Screw, Shoulder 10 12729129... 21 12990701 Screw 22 12726403 Evaporator 23 Dam 12225702 Right Side 12225602 Left Side 24 12825101 Motor, Fan 25 10428101 Clip, Heater 26 W10234025 Harness, Unit with Power..., Discharge 7 W10224515 Harness, Evap. UNIT PARTS For Models: KBFS25EVWH1, KBFS25EVBL1, KBFS25EVMS1 (White) (Black) (Monochromatic Stainless) Illus. Part No.


