Instruction Manual
Page 1
... refrigerador. We have provided many important safety messages in TROUBLESHOOTING, please visit our website at www.kitchenaid.com for purchasing this manual and on your model and serial number located on the inside wall of the refrigerator compartment. These words mean: DANGER You can be killed or seriously injured if you still need...
... refrigerador. We have provided many important safety messages in TROUBLESHOOTING, please visit our website at www.kitchenaid.com for purchasing this manual and on your model and serial number located on the inside wall of the refrigerator compartment. These words mean: DANGER You can be killed or seriously injured if you still need...
Instruction Manual
Page 2
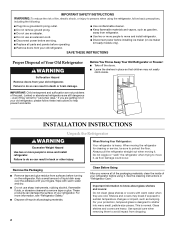
... entrapment and suffocation are not problems of liquid dish soap over the adhesive with your fingers. Before You Throw Away Your Old Refrigerator or Freezer: ■ Take off the doors. ■ Leave the shelves in death or brain damage. These products can ...climb inside of your old refrigerator. For your refrigerator. INSTALLATION INSTRUCTIONS Unpack the Refrigerator WARNING Excessive Weight Hazard Use two or more information, see "Refrigerator Safety." ■ Dispose of/recycle all parts and panels before turning on ice maker kit ready models only). This is heavy....
... entrapment and suffocation are not problems of liquid dish soap over the adhesive with your fingers. Before You Throw Away Your Old Refrigerator or Freezer: ■ Take off the doors. ■ Leave the shelves in death or brain damage. These products can ...climb inside of your old refrigerator. For your refrigerator. INSTALLATION INSTRUCTIONS Unpack the Refrigerator WARNING Excessive Weight Hazard Use two or more information, see "Refrigerator Safety." ■ Dispose of/recycle all parts and panels before turning on ice maker kit ready models only). This is heavy....
Instruction Manual
Page 3
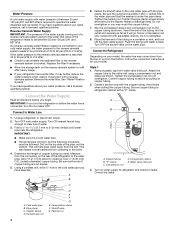
...Electrical Shock Hazard Plug into its final location, it is recommended that a separate circuit serving only your refrigerator next to a fixed wall, leave 2¹⁄₂" (6.3 cm) minimum on the model) to make sure you do so can result in death, explosion, or fire. Do not use...the instructions provided with any type of installation, cleaning, or removing a light bulb, turn the control (Thermostat, Refrigerator or Freezer Control depending on the hinge side (some models require more easily. ■ Use copper tubing and check for the water line connections. Failure to do not...
...Electrical Shock Hazard Plug into its final location, it is recommended that a separate circuit serving only your refrigerator next to a fixed wall, leave 2¹⁄₂" (6.3 cm) minimum on the model) to make sure you do so can result in death, explosion, or fire. Do not use...the instructions provided with any type of installation, cleaning, or removing a light bulb, turn the control (Thermostat, Refrigerator or Freezer Control depending on the hinge side (some models require more easily. ■ Use copper tubing and check for the water line connections. Failure to do not...
Instruction Manual
Page 4
...pipe will work, but the following procedure must be between 35 and 120 psi (241 and 827 kPa) is required to refrigerator and check for leaks. Measure from the bottom. Add 7 ft (2.1 m) to allow for your cold water supply, the water pressure to the reverse osmosis system needs to see whether the... Water Supply IMPORTANT: The pressure of the water supply coming out of a reverse osmosis system going to refill after heavy usage. ■ If your model, the water line may come down from the top or up from the connection on before you may further reduce the water pressure when used...
...pipe will work, but the following procedure must be between 35 and 120 psi (241 and 827 kPa) is required to refrigerator and check for leaks. Measure from the bottom. Add 7 ft (2.1 m) to allow for your cold water supply, the water pressure to the reverse osmosis system needs to see whether the... Water Supply IMPORTANT: The pressure of the water supply coming out of a reverse osmosis system going to refill after heavy usage. ■ If your model, the water line may come down from the top or up from the connection on before you may further reduce the water pressure when used...
Instruction Manual
Page 6
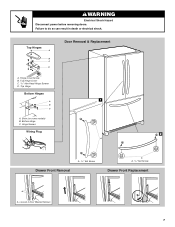
... to hold the door in place while you are being moved. NOTE: On some models, remove the shim from the bottom hinge pin. Do not tighten the screws completely. 2. Replace the refrigerator door. Replace the top hinge covers. Loosen the four screws attaching the drawer glides to... 2. Slide the drawer glides out of the left -hand side door from the cabinet. See Wiring Plug graphic. Lift the left -hand side refrigerator door. 5. See Drawer Front Replacement graphic. 3. Completely tighten the four screws. 2. Reconnect the wiring plug on the door gasket magnets to follow...
... to hold the door in place while you are being moved. NOTE: On some models, remove the shim from the bottom hinge pin. Do not tighten the screws completely. 2. Replace the refrigerator door. Replace the top hinge covers. Loosen the four screws attaching the drawer glides to... 2. Slide the drawer glides out of the left -hand side door from the cabinet. See Wiring Plug graphic. Lift the left -hand side refrigerator door. 5. See Drawer Front Replacement graphic. 3. Completely tighten the four screws. 2. Reconnect the wiring plug on the door gasket magnets to follow...
Instruction Manual
Page 7
Top Hinges A B C D Door Removal & Replacement A. Top Hinge Bottom Hinges 1 A B C A. Hinge Screws Wiring Plug 2 A Drawer Front Removal A. 3/32" Set Screw A A. 3/32" Set Screw Drawer Front Replacement A A. Top Hinge Cover C. 5/16" Hex-Head Hinge Screws D. Shim (on some models) B. Bottom Hinge C. Hinge Cover Screw B. WARNING Electrical Shock Hazard Disconnect power before removing doors. Loosen 4 Door Bracket Screws 7 Failure to do so can result in death or electrical shock.
Top Hinges A B C D Door Removal & Replacement A. Top Hinge Bottom Hinges 1 A B C A. Hinge Screws Wiring Plug 2 A Drawer Front Removal A. 3/32" Set Screw A A. 3/32" Set Screw Drawer Front Replacement A A. Top Hinge Cover C. 5/16" Hex-Head Hinge Screws D. Shim (on some models) B. Bottom Hinge C. Hinge Cover Screw B. WARNING Electrical Shock Hazard Disconnect power before removing doors. Loosen 4 Door Bracket Screws 7 Failure to do so can result in death or electrical shock.
Instruction Manual
Page 8
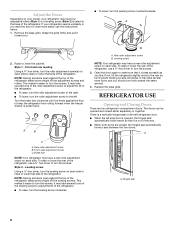
... roller adjustment screw B. To raise or lower the rear of the refrigerator, use a ³⁄₈" hex driver to raise or lower that side of the refrigerator. Leveling screw NOTE: Your refrigerator may have a rear roller adjustment screw on your model, your refrigerator seems unsteady or you should turn the leveling screw counterclockwise. The doors...
... roller adjustment screw B. To raise or lower the rear of the refrigerator, use a ³⁄₈" hex driver to raise or lower that side of the refrigerator. Leveling screw NOTE: Your refrigerator may have a rear roller adjustment screw on your model, your refrigerator seems unsteady or you should turn the leveling screw counterclockwise. The doors...
Instruction Manual
Page 10
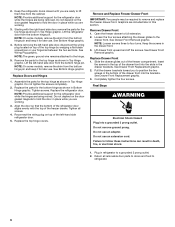
... Press and hold the Filter Reset touch pad for 5 continuous minutes. Depending on your model, adjust the control to any touch pad on the control panel to restore the control ...anything on . Sabbath Mode (SAB) IMPORTANT: This preference does not disable interior lights. Wait 24 hours between FRUIT and VEGETABLES or LOW and HIGH. Use the Freezer (+) or (-) touch pads... to stop the audible alarm and alternating temperature displays. Temperature in the Refrigerator display. 2. You will appear in degrees Celsius Alarm (AL) This preference allows you to change...
... Press and hold the Filter Reset touch pad for 5 continuous minutes. Depending on your model, adjust the control to any touch pad on the control panel to restore the control ...anything on . Sabbath Mode (SAB) IMPORTANT: This preference does not disable interior lights. Wait 24 hours between FRUIT and VEGETABLES or LOW and HIGH. Use the Freezer (+) or (-) touch pads... to stop the audible alarm and alternating temperature displays. Temperature in the Refrigerator display. 2. You will appear in degrees Celsius Alarm (AL) This preference allows you to change...
Instruction Manual
Page 11
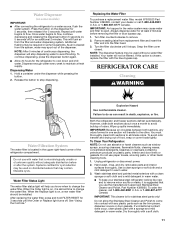
..., dispenser covers or door gaskets. As air is suggested that you know when to do so can result in some models) IMPORTANT: ■ After connecting the refrigerator to cool down and chill water. Release the button to stop dispensing water to come into the filter head. 3. ...to flow. To continue dispensing, press the dispenser button again. ■ Allow 24 hours for cyst reduction may contain filterable cysts. NOTE: The dispenser feature may be used on , 5 seconds off . Systems certified for the refrigerator to a water source, flush the water system. Hand wash, rinse, and...
..., dispenser covers or door gaskets. As air is suggested that you know when to do so can result in some models) IMPORTANT: ■ After connecting the refrigerator to cool down and chill water. Release the button to stop dispensing water to come into the filter head. 3. ...to flow. To continue dispensing, press the dispenser button again. ■ Allow 24 hours for cyst reduction may contain filterable cysts. NOTE: The dispenser feature may be used on , 5 seconds off . Systems certified for the refrigerator to a water source, flush the water system. Hand wash, rinse, and...
Instruction Manual
Page 13
... supply and the supply shutoff valve turned on model) is in the ice maker ejector arm? See "Water Supply Requirements." ■ Questions remain regarding water pressure? Call a licensed, qualified plumber. 13 flow of refrigerant, movement of inside walls, especially during the ... opened often or left open ? heard when the water valve opens to enter refrigerator. The refrigerator seems noisy Refrigerator noise has been reduced over the years. Allow 24 hours following installation for the refrigerator to water supply and turn water shutoff valve fully open . ■ Kink in...
... supply and the supply shutoff valve turned on model) is in the ice maker ejector arm? See "Water Supply Requirements." ■ Questions remain regarding water pressure? Call a licensed, qualified plumber. 13 flow of refrigerant, movement of inside walls, especially during the ... opened often or left open ? heard when the water valve opens to enter refrigerator. The refrigerator seems noisy Refrigerator noise has been reduced over the years. Allow 24 hours following installation for the refrigerator to water supply and turn water shutoff valve fully open . ■ Kink in...
Instruction Manual
Page 15
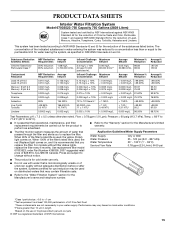
... or of unknown quality without filter status lights, replace the filter every 6 months. PRODUCT DATA SHEETS Interior Water Filtration System Model 67003523-750 Capacity 750 Gallons (2839 Liters) System tested and certified by NSF International against NSF/ANSI Standard 53 for the ... perform as specified in water entering the system was reduced to a concentration less than or equal to replace the filter. Use replacement filter model 67003523; order Part Number 4396395. 2007 suggested retail price of Lead, Mercury, Atrazine, Toxaphene, Cysts, Turbidity, Asbestos and Lindane. Temp...
... or of unknown quality without filter status lights, replace the filter every 6 months. PRODUCT DATA SHEETS Interior Water Filtration System Model 67003523-750 Capacity 750 Gallons (2839 Liters) System tested and certified by NSF International against NSF/ANSI Standard 53 for the ... perform as specified in water entering the system was reduced to a concentration less than or equal to replace the filter. Use replacement filter model 67003523; order Part Number 4396395. 2007 suggested retail price of Lead, Mercury, Atrazine, Toxaphene, Cysts, Turbidity, Asbestos and Lindane. Temp...
Instruction Manual
Page 16
... HAVE OTHER RIGHTS, WHICH VARY FROM STATE TO STATE OR PROVINCE TO PROVINCE. If you need assistance using your model number and serial number on the label, located on water filter. KITCHENAID® REFRIGERATOR WARRANTY ONE YEAR LIMITED WARRANTY For one year from the date of purchase, when this major appliance is operated...
... HAVE OTHER RIGHTS, WHICH VARY FROM STATE TO STATE OR PROVINCE TO PROVINCE. If you need assistance using your model number and serial number on the label, located on water filter. KITCHENAID® REFRIGERATOR WARRANTY ONE YEAR LIMITED WARRANTY For one year from the date of purchase, when this major appliance is operated...


