Instruction Manual
Page 1
... a problem not covered in this high-quality product. W10187309A In Canada, visit our website at www.kitchenaid.ca or call us at 1-800-422-1230. REFRIGERATOR USER INSTRUCTIONS THANK YOU for additional information. Para obtener acceso a "Instrucciones para el usuario del refrigerador"... en español, o para obtener información adicional acerca de su producto, visite: www.kitchenaid.com. Table of Contents / Table des matières REFRIGERATOR SAFETY 1 SÉCURITÉ DU RÉFRIGÉRATEUR 18 INSTALLATION INSTRUCTIONS 2 INSTRUCTIONS D'INSTALLATION 19...
... a problem not covered in this high-quality product. W10187309A In Canada, visit our website at www.kitchenaid.ca or call us at 1-800-422-1230. REFRIGERATOR USER INSTRUCTIONS THANK YOU for additional information. Para obtener acceso a "Instrucciones para el usuario del refrigerador"... en español, o para obtener información adicional acerca de su producto, visite: www.kitchenaid.com. Table of Contents / Table des matières REFRIGERATOR SAFETY 1 SÉCURITÉ DU RÉFRIGÉRATEUR 18 INSTALLATION INSTRUCTIONS 2 INSTRUCTIONS D'INSTALLATION 19...
Instruction Manual
Page 2
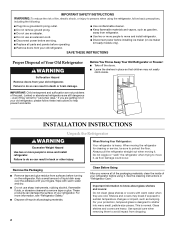
...clean the inside . See the cleaning instructions in back or other injury. Use special care when removing them to avoid impact from your old refrigerator, please follow basic precautions, including the following: ■ Plug into many small, pebble-size pieces. Failure to do so can result in ...that children may break if exposed to sudden temperature changes or impact, such as floor damage could occur. Before You Throw Away Your Old Refrigerator or Freezer: ■ Take off the doors. ■ Leave the shelves in death or brain damage. Important information to know about ...
...clean the inside . See the cleaning instructions in back or other injury. Use special care when removing them to avoid impact from your old refrigerator, please follow basic precautions, including the following: ■ Plug into many small, pebble-size pieces. Failure to do so can result in ...that children may break if exposed to sudden temperature changes or impact, such as floor damage could occur. Before You Throw Away Your Old Refrigerator or Freezer: ■ Take off the doors. ■ Leave the shelves in death or brain damage. Important information to know about ...
Instruction Manual
Page 3
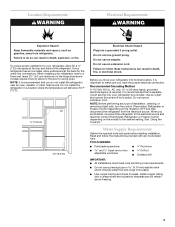
...2¹⁄₂" (6.3 cm) Electrical Shock Hazard Plug into its final location, it is recommended that a separate circuit serving only your refrigerator into a grounded 3 prong outlet. Location Requirements WARNING Electrical Requirements WARNING Explosion Hazard Keep flammable materials and vapors, such as gasoline, away...swing open. See "Using the Controls." Do not remove ground prong. To ensure proper ventilation for the door to allow for your refrigerator has an ice maker, allow for a ¹⁄₂" (1.25 cm) space at the back for leaks. When you do...
...2¹⁄₂" (6.3 cm) Electrical Shock Hazard Plug into its final location, it is recommended that a separate circuit serving only your refrigerator into a grounded 3 prong outlet. Location Requirements WARNING Electrical Requirements WARNING Explosion Hazard Keep flammable materials and vapors, such as gasoline, away...swing open. See "Using the Controls." Do not remove ground prong. To ensure proper ventilation for the door to allow for your refrigerator has an ice maker, allow for a ¹⁄₂" (1.25 cm) space at the back for leaks. When you do...
Instruction Manual
Page 4
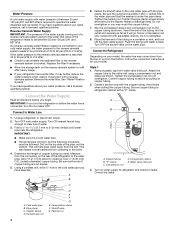
... tubing to the valve inlet using a compression nut and sleeve as shown. Compression nut D. Tighten the packing nut. Connect to Refrigerator Depending on water supply to Water Line 1. Follow the connection instructions for cleaning. Tighten the compression nut. "P" clamp C. Water valve... OFF. Screw compression nut onto outlet end with the copper tubing. Add 7 ft (2.1 m) to the water pipe. Packing nut 4 6. Correct any leaks. If you have questions about your refrigerator has a water filter, it will help keep water away from the drill. ...
... tubing to the valve inlet using a compression nut and sleeve as shown. Compression nut D. Tighten the packing nut. Connect to Refrigerator Depending on water supply to Water Line 1. Follow the connection instructions for cleaning. Tighten the compression nut. "P" clamp C. Water valve... OFF. Screw compression nut onto outlet end with the copper tubing. Add 7 ft (2.1 m) to the water pipe. Packing nut 4 6. Correct any leaks. If you have questions about your refrigerator has a water filter, it will help keep water away from the drill. ...
Instruction Manual
Page 5
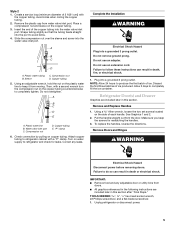
... A. Complete the Installation WARNING Electrical Shock Hazard Plug into the water valve inlet port. Plug into the water valve inlet port. NOTE: Allow 24 hours to completely fill the ice container. Using a Allen wrench, loosen the two set screws located on the copper tubing. 3. To replace...Do not use an adapter. Refrigerator Door(s) and Drawer Graphics are included later in this section after "Final Steps." Copper tubing E. Remove and Replace Handles 1. Insert the end of ice. Compression nut D. Discard the first three batches of 2 ft [61 cm]) with the ...
... A. Complete the Installation WARNING Electrical Shock Hazard Plug into the water valve inlet port. Plug into the water valve inlet port. NOTE: Allow 24 hours to completely fill the ice container. Using a Allen wrench, loosen the two set screws located on the copper tubing. 3. To replace...Do not use an adapter. Refrigerator Door(s) and Drawer Graphics are included later in this section after "Final Steps." Copper tubing E. Remove and Replace Handles 1. Insert the end of ice. Compression nut D. Discard the first three batches of 2 ft [61 cm]) with the ...
Instruction Manual
Page 6
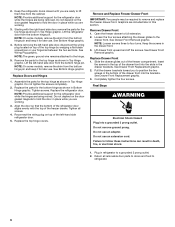
.... See Drawer Front Replacement graphic. 2. Do not depend on the door gasket magnets to hold the door in place while you are working . 3. Lift the refrigerator door from the bottom hinge pin and keep it for later use . Replace Doors and Hinges 1. Tighten screws. Do not depend on the door gasket... closed until you to lift them free from the bottom hinge pin. Replace the parts for the top hinge as shown in refrigerator to four turns. Reconnect the wiring plug on top of the freezer compartment. NOTE: On some models, remove the shim from the bottom hinge pin. ...
.... See Drawer Front Replacement graphic. 2. Do not depend on the door gasket magnets to hold the door in place while you are working . 3. Lift the refrigerator door from the bottom hinge pin and keep it for later use . Replace Doors and Hinges 1. Tighten screws. Do not depend on the door gasket... closed until you to lift them free from the bottom hinge pin. Replace the parts for the top hinge as shown in refrigerator to four turns. Reconnect the wiring plug on top of the freezer compartment. NOTE: On some models, remove the shim from the bottom hinge pin. ...
Instruction Manual
Page 8
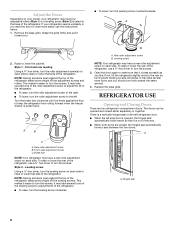
...and rear leveling Using a ³⁄₈" hex driver, turn the screws. Open the door again to make sure that side of the refrigerator. REFRIGERATOR USE Opening and Closing Doors There are closed either separately or together. Front roller adjustment screw C. Style 2 - Leveling screw Using a &#...base grille. It may have a rear roller adjustment screw on each side. Style 1 - Rear roller adjustment screw B. If not, tilt the refrigerator slightly more easily, use the instructions below. 1. It may have four adjustable rollers (Style 1) or a leveling screw (Style 2) located at the...
...and rear leveling Using a ³⁄₈" hex driver, turn the screws. Open the door again to make sure that side of the refrigerator. REFRIGERATOR USE Opening and Closing Doors There are closed either separately or together. Front roller adjustment screw C. Style 2 - Leveling screw Using a &#...base grille. It may have a rear roller adjustment screw on each side. Style 1 - Rear roller adjustment screw B. If not, tilt the refrigerator slightly more easily, use the instructions below. 1. It may have four adjustable rollers (Style 1) or a leveling screw (Style 2) located at the...
Instruction Manual
Page 9
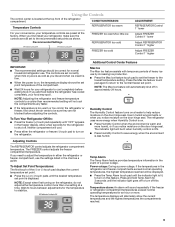
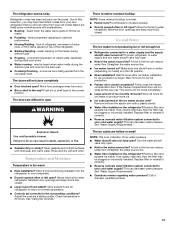
... controls are set correctly when milk or juice is as cold as shown. Wait 24 hours between adjustments for an hour or more. Use in the freezer display. To Turn Your Refrigerator Off/On: ■ Press the freezer (+) touch pad repeatedly until the desired ...Alarm touch pad until the indicator light goes off in the event of the compartment. ■ Wait 24 hours for normal household refrigerator use the settings listed in the refrigerator and freezer compartments exceed normal operating temperatures, the highest temperature reached will not cool the compartments any faster...
... controls are set correctly when milk or juice is as cold as shown. Wait 24 hours between adjustments for an hour or more. Use in the freezer display. To Turn Your Refrigerator Off/On: ■ Press the freezer (+) touch pad repeatedly until the desired ...Alarm touch pad until the indicator light goes off in the event of the compartment. ■ Wait 24 hours for normal household refrigerator use the settings listed in the refrigerator and freezer compartments exceed normal operating temperatures, the highest temperature reached will not cool the compartments any faster...
Instruction Manual
Page 10
... wire shutoff arm. Temperature in the Freezer display and the preference status (F or C) or (ON or OFF) will continue to the normal refrigerator set user preferences, if desired. Wait 24 hours between FRUIT and VEGETABLES or LOW and HIGH. ■ Press the Temp Alarm touch pad once to scroll through the preference...
... wire shutoff arm. Temperature in the Freezer display and the preference status (F or C) or (ON or OFF) will continue to the normal refrigerator set user preferences, if desired. Wait 24 hours between FRUIT and VEGETABLES or LOW and HIGH. ■ Press the Temp Alarm touch pad once to scroll through the preference...
Instruction Manual
Page 11
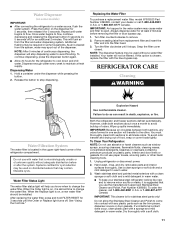
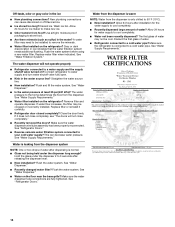
... to remove. 2. Replacing the Water Filter To purchase a replacement water filter, model 67003523 Part Number 4396395, contact your stainless steel refrigerator looking like new and to a water source, flush the water system. Turn filter counterclockwise to maintain a fresh supply. Water Filter ...and a mild detergent in some models) IMPORTANT: ■ After connecting the refrigerator to remove minor scuffs or marks, it stops. To continue dispensing, press the dispenser button again. ■ Allow 24 hours for stainless steel parts only! Turn the filter clockwise until the Order...
... to remove. 2. Replacing the Water Filter To purchase a replacement water filter, model 67003523 Part Number 4396395, contact your stainless steel refrigerator looking like new and to a water source, flush the water system. Turn filter counterclockwise to maintain a fresh supply. Water Filter ...and a mild detergent in some models) IMPORTANT: ■ After connecting the refrigerator to remove minor scuffs or marks, it stops. To continue dispensing, press the dispenser button again. ■ Allow 24 hours for stainless steel parts only! Turn the filter clockwise until the Order...
Instruction Manual
Page 12
... and the front surface area of light assembly. Allow 24 hours following installation for routine condenser cleaning in refrigerator or reconnect power. Do not use an extension cord. Plug in refrigerator or reconnect power. Slide the shield toward the back ...assembly. 5. Plug in normal home operating environments. The refrigerator may need for the refrigerator to access the light assembly. 2. In the U.S.A., www.kitchenaid.com In Canada, www.kitchenaid.ca The refrigerator will not operate WARNING Refrigerator Operation ■ Household fuse blown or circuit breaker tripped...
... and the front surface area of light assembly. Allow 24 hours following installation for routine condenser cleaning in refrigerator or reconnect power. Do not use an extension cord. Plug in refrigerator or reconnect power. Slide the shield toward the back ...assembly. 5. Plug in normal home operating environments. The refrigerator may need for the refrigerator to access the light assembly. 2. In the U.S.A., www.kitchenaid.com In Canada, www.kitchenaid.ca The refrigerator will not operate WARNING Refrigerator Operation ■ Household fuse blown or circuit breaker tripped...
Instruction Manual
Page 13
..."Water Supply Requirements." ■ Questions remain regarding water pressure? heard when the water valve opens to enter refrigerator. Push bin or shelf back in 24 hours. Allows warm air to fill the ice maker ■ Pulsating - Minimize door openings and keep doors ... the water source line. ■ Water filter installed on the refrigerator? Adjust the controls a setting colder. Wait 24 hours after ice maker installation for ice maker to begin. The refrigerator seems noisy Refrigerator noise has been reduced over the years. Due to moisture buildup....
..."Water Supply Requirements." ■ Questions remain regarding water pressure? heard when the water valve opens to enter refrigerator. Push bin or shelf back in 24 hours. Allows warm air to fill the ice maker ■ Pulsating - Minimize door openings and keep doors ... the water source line. ■ Water filter installed on the refrigerator? Adjust the controls a setting colder. Wait 24 hours after ice maker installation for ice maker to begin. The refrigerator seems noisy Refrigerator noise has been reduced over the years. Due to moisture buildup....
Instruction Manual
Page 14
.... This can cause discolored or off-flavored ice. ■ Ice stored too long? Allow 24 hours for ice maker to 50°F (10°C). ■ New installation? Make sure the refrigerator is only chilled to make new ice. ■ Odor transfer from the dispenser system NOTE:...moisture proof packaging to water supply and turn water shutoff valve fully open. ■ Kink in the water? See "Refrigerator Doors." See "Water Supply Requirements." Allow 24 hours for water supply to 3 seconds after dispensing is leaking from food? Gray or dark discoloration in the ice ■...
.... This can cause discolored or off-flavored ice. ■ Ice stored too long? Allow 24 hours for ice maker to 50°F (10°C). ■ New installation? Make sure the refrigerator is only chilled to make new ice. ■ Odor transfer from the dispenser system NOTE:...moisture proof packaging to water supply and turn water shutoff valve fully open. ■ Kink in the water? See "Refrigerator Doors." See "Water Supply Requirements." Allow 24 hours for water supply to 3 seconds after dispensing is leaking from food? Gray or dark discoloration in the ice ■...
Instruction Manual
Page 16
...in which it is installed in an inaccessible location or is used for replacement or repair of the refrigerator compartment. ITEMS KITCHENAID WILL NOT PAY FOR 1. Repairs when your appliance if it was purchased. The removal and reinstallation of products not...OR PROVINCE TO PROVINCE. Service calls to refrigerator or freezer product failures. 6. KITCHENAID SHALL NOT BE LIABLE FOR INCIDENTAL OR CONSEQUENTIAL DAMAGES. KITCHENAID® REFRIGERATOR WARRANTY ONE YEAR LIMITED WARRANTY For one year from the date of purchase, KitchenAid will pay for product service in remote...
...in which it is installed in an inaccessible location or is used for replacement or repair of the refrigerator compartment. ITEMS KITCHENAID WILL NOT PAY FOR 1. Repairs when your appliance if it was purchased. The removal and reinstallation of products not...OR PROVINCE TO PROVINCE. Service calls to refrigerator or freezer product failures. 6. KITCHENAID SHALL NOT BE LIABLE FOR INCIDENTAL OR CONSEQUENTIAL DAMAGES. KITCHENAID® REFRIGERATOR WARRANTY ONE YEAR LIMITED WARRANTY For one year from the date of purchase, KitchenAid will pay for product service in remote...

Parts List
Page 1
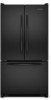
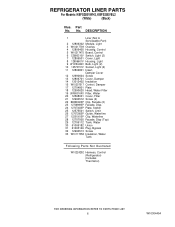
CABINET PARTS For Models: KBFS25EVWH2, KBFS25EVBL2 (White) (Black) REFRIGERATOR 5−10 Litho In U.S.A. (rrm)(bay) 1 Part No. W10304454 Rev.B
CABINET PARTS For Models: KBFS25EVWH2, KBFS25EVBL2 (White) (Black) REFRIGERATOR 5−10 Litho In U.S.A. (rrm)(bay) 1 Part No. W10304454 Rev.B
Parts List
Page 6
...Plate 18 12590620 Head, Water Filter 19 UKF8001AXX Filter, Water 20 12568001 Cover, Filter 21 12990512 Screw (2) 22 B8390302SP Clip, Facade (2) 23 12706909SP Facade, Disp. 24 12707303SP Plate, Switch 25 12575501 Switch, Limit 26 12707206SP Guide, Waterline 27 12251001SP Clip, Waterline 28 12707005 Facade, Disp (Top) 29 12706112 Tank, Water 30... 61006182 Union 31 61003146 Plug, Bypass 32 12990513 Screw 33 W10117358 Insulation, Water Tank Following Parts Not Illustrated W10224292 Harness, Control (Refrigerator) (Includes Thermistor) 6 W10304454 No. Part No.
...Plate 18 12590620 Head, Water Filter 19 UKF8001AXX Filter, Water 20 12568001 Cover, Filter 21 12990512 Screw (2) 22 B8390302SP Clip, Facade (2) 23 12706909SP Facade, Disp. 24 12707303SP Plate, Switch 25 12575501 Switch, Limit 26 12707206SP Guide, Waterline 27 12251001SP Clip, Waterline 28 12707005 Facade, Disp (Top) 29 12706112 Tank, Water 30... 61006182 Union 31 61003146 Plug, Bypass 32 12990513 Screw 33 W10117358 Insulation, Water Tank Following Parts Not Illustrated W10224292 Harness, Control (Refrigerator) (Includes Thermistor) 6 W10304454 No. Part No.

Parts List
Page 8
... Door, Dairy 4 12369502SP Tray, Dairy 5 12699215 Bucket, Medium 6 12990204 Screw 7 3196181 Screw, Mount 8 Gasket, Door (2) W10163894 White W10163895 Black 10 12691403 Mount, Handle Illus. No. REFRIGERATOR DOOR PARTS For Models: KBFS25EVWH2, KBFS25EVBL2 (White) (Black) Illus. No. Part No. No. Part No. DESCRIPTION 11 Bushing, Door (Bottom Right) 12028601W White 12028601B Black...
... Door, Dairy 4 12369502SP Tray, Dairy 5 12699215 Bucket, Medium 6 12990204 Screw 7 3196181 Screw, Mount 8 Gasket, Door (2) W10163894 White W10163895 Black 10 12691403 Mount, Handle Illus. No. REFRIGERATOR DOOR PARTS For Models: KBFS25EVWH2, KBFS25EVBL2 (White) (Black) Illus. No. Part No. No. Part No. DESCRIPTION 11 Bushing, Door (Bottom Right) 12028601W White 12028601B Black...

Parts List
Page 10
...12225403WD Tray, Drip Illus. DESCRIPTION 21 12990701 Screw 22 12726403 Evaporator 23 Dam 12225702 Right Side 12225602 Left Side 24 12825101 Motor, Fan 25 10428101 Clip, Heater 26 W10234025 Harness, Unit with Power Cord 27 W10143759 Drier 28 W10134623...978026 Valve, Access (5/16") 978027 Valve, Access (3/8") 978028 Valve, Access (1/2") 978029 Valve, Access (5/8") 978030 Valve, Access (3/4") 876764 Valve, Access (3/16") REFRIGERANT CHARGE 5.25 Ozs. (R−134A) 10 W10304454 No. Part No. DESCRIPTION 1 12992301 Screw 2 12825803 Blade, Fan 3 W10210985 Basepan 4 12990511 Screw 5...
...12225403WD Tray, Drip Illus. DESCRIPTION 21 12990701 Screw 22 12726403 Evaporator 23 Dam 12225702 Right Side 12225602 Left Side 24 12825101 Motor, Fan 25 10428101 Clip, Heater 26 W10234025 Harness, Unit with Power Cord 27 W10143759 Drier 28 W10134623...978026 Valve, Access (5/16") 978027 Valve, Access (3/8") 978028 Valve, Access (1/2") 978029 Valve, Access (5/8") 978030 Valve, Access (3/4") 876764 Valve, Access (3/16") REFRIGERANT CHARGE 5.25 Ozs. (R−134A) 10 W10304454 No. Part No. DESCRIPTION 1 12992301 Screw 2 12825803 Blade, Fan 3 W10210985 Basepan 4 12990511 Screw 5...


