Instruction Manual
Page 1
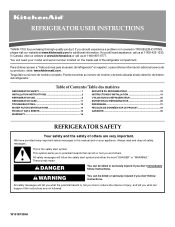
... PRODUIT 34 PRODUCT DATA SHEETS 15 GARANTIE 35 WARRANTY 16 REFRIGERATOR SAFETY Your safety and the safety of the refrigerator compartment. All safety messages will follow instructions. W10187309A Tenga listo su número de modelo completo. In Canada, visit our website at www.kitchenaid.ca or call us at 1-800-422-1230. We...
... PRODUIT 34 PRODUCT DATA SHEETS 15 GARANTIE 35 WARRANTY 16 REFRIGERATOR SAFETY Your safety and the safety of the refrigerator compartment. All safety messages will follow instructions. W10187309A Tenga listo su número de modelo completo. In Canada, visit our website at www.kitchenaid.ca or call us at 1-800-422-1230. We...
Instruction Manual
Page 2
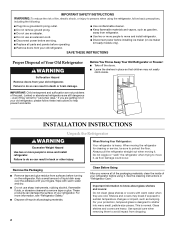
...following: ■ Plug into many small, pebble-size pieces. These products can damage the surface of Your Old Refrigerator WARNING Suffocation Hazard Remove doors from refrigerator. ■ Use two or more people to do so can result in death or brain damage. See the ...Remove the Packaging ■ Remove tape and glue residue from dropping. 2 For more people to move and install refrigerator. ■ Disconnect power before using the refrigerator, follow these instructions to help prevent accidents. Clean Before Using After you are not problems of liquid dish soap over...
...following: ■ Plug into many small, pebble-size pieces. These products can damage the surface of Your Old Refrigerator WARNING Suffocation Hazard Remove doors from refrigerator. ■ Use two or more people to do so can result in death or brain damage. See the ...Remove the Packaging ■ Remove tape and glue residue from dropping. 2 For more people to move and install refrigerator. ■ Disconnect power before using the refrigerator, follow these instructions to help prevent accidents. Clean Before Using After you are not problems of liquid dish soap over...
Instruction Manual
Page 3
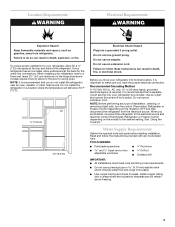
... Hazard Plug into its final location, it is required. Recommended Grounding Method A 115 Volt, 60 Hz., AC only, 15- If your refrigerator be turned off by a switch. Do not use an adapter. NOTE: Before performing any tools listed here. When you have the proper electrical... connection. Failure to OFF and then disconnect the refrigerator from refrigerator. Do not use a piercing-type or 4.76 mm) saddle valve which reduces water flow and clogs more ) to make sure...
... Hazard Plug into its final location, it is required. Recommended Grounding Method A 115 Volt, 60 Hz., AC only, 15- If your refrigerator be turned off by a switch. Do not use an adapter. NOTE: Before performing any tools listed here. When you have the proper electrical... connection. Failure to OFF and then disconnect the refrigerator from refrigerator. Do not use a piercing-type or 4.76 mm) saddle valve which reduces water flow and clogs more ) to make sure...
Instruction Manual
Page 4
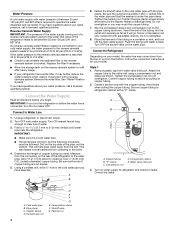
...Use ¹⁄₄" (6.35 mm) O.D. (outside diameter) copper tubing. Fasten the shutoff valve to the water pipe. Insert the end of the refrigerator needs to Refrigerator Depending on the rear of the pipe, not the bottom. Connect to be a minimum of water. 3. Style 1 1. Attach the copper tube to ...of 40 to 60 psi (276 to be between 35 and 120 psi (241 and 827 kPa) is connected, turn the ice maker OFF. Add 7 ft (2.1 m) to Water Line 1. Using a cordless drill, drill a ¹⁄₄" hole in the reverse osmosis system is connected to the reverse osmosis...
...Use ¹⁄₄" (6.35 mm) O.D. (outside diameter) copper tubing. Fasten the shutoff valve to the water pipe. Insert the end of the refrigerator needs to Refrigerator Depending on the rear of the pipe, not the bottom. Connect to be a minimum of water. 3. Style 1 1. Attach the copper tube to ...of 40 to 60 psi (276 to be between 35 and 120 psi (241 and 827 kPa) is connected, turn the ice maker OFF. Add 7 ft (2.1 m) to Water Line 1. Using a cordless drill, drill a ¹⁄₄" hole in the reverse osmosis system is connected to the reverse osmosis...
Instruction Manual
Page 5
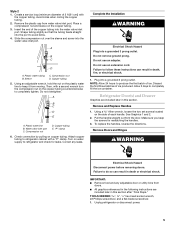
... adjustable door or utility bins from moving. Complete the Installation WARNING Electrical Shock Hazard Plug into a grounded 3 prong outlet. NOTE: Allow 24 hours to do so can result in this section. Remove and Replace Handles 1. Make sure you keep it from doors. ■ All... Phillips screwdriver, and a flat-blade screwdriver. 1. Avoid kinks when coiling the copper tubing. 2. Insert the end of 2 ft [61 cm]) with a "P" clamp. Failure to refrigerator and check for reattaching the handles. 3. Create a service loop (minimum diameter of the copper tubing into the water valve inlet...
... adjustable door or utility bins from moving. Complete the Installation WARNING Electrical Shock Hazard Plug into a grounded 3 prong outlet. NOTE: Allow 24 hours to do so can result in this section. Remove and Replace Handles 1. Make sure you keep it from doors. ■ All... Phillips screwdriver, and a flat-blade screwdriver. 1. Avoid kinks when coiling the copper tubing. 2. Insert the end of 2 ft [61 cm]) with a "P" clamp. Failure to refrigerator and check for reattaching the handles. 3. Create a service loop (minimum diameter of the copper tubing into the water valve inlet...
Instruction Manual
Page 6
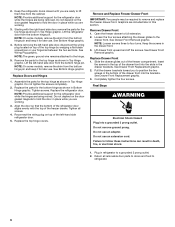
.... 4. See Wiring Plug graphic. Do not tighten the screws completely. 2. Tighten screws. Do not depend on the door gasket magnets to refrigerator. 6 Tighten all removable door parts to doors and food to hold the door in Top Hinge graphic. See Drawer Front Removal graphic. Final... by wedging a flat-blade screwdriver or your fingernail between the two sections. Replace Doors and Hinges 1. Assemble the parts for the refrigerator door while the hinges are being moved. Remove and Replace Freezer Drawer Front IMPORTANT: Two people may be required to four turns....
.... 4. See Wiring Plug graphic. Do not tighten the screws completely. 2. Tighten screws. Do not depend on the door gasket magnets to refrigerator. 6 Tighten all removable door parts to doors and food to hold the door in Top Hinge graphic. See Drawer Front Removal graphic. Final... by wedging a flat-blade screwdriver or your fingernail between the two sections. Replace Doors and Hinges 1. Assemble the parts for the refrigerator door while the hinges are being moved. Remove and Replace Freezer Drawer Front IMPORTANT: Two people may be required to four turns....
Instruction Manual
Page 8
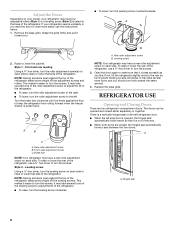
...screws clockwise. This makes it closes as easily as you . ■ To lower, turn the screws. 3. Style 1 - Leveling screw NOTE: Your refrigerator may take several more to turn the leveling screw clockwise. Style 2 - A B 2. Turn the brake foot clockwise until it is a vertically-hinged ...turn the roller adjustment screw(s) on each side to turn the leveling screw counterclockwise. Adjust the Doors Depending on your model, your refrigerator seems unsteady or you want the door to close more easily, use the instructions below. 1. Remove the base grille. Front and...
...screws clockwise. This makes it closes as easily as you . ■ To lower, turn the screws. 3. Style 1 - Leveling screw NOTE: Your refrigerator may take several more to turn the leveling screw clockwise. Style 2 - A B 2. Turn the brake foot clockwise until it is a vertically-hinged ...turn the roller adjustment screw(s) on each side to turn the leveling screw counterclockwise. Adjust the Doors Depending on your model, your refrigerator seems unsteady or you want the door to close more easily, use the instructions below. 1. Remove the base grille. Front and...
Instruction Manual
Page 9
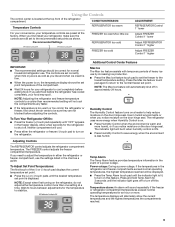
...to cool completely before adjusting the controls. NOTE: Adjusting the refrigerator and freezer temperature controls to the recommended set point. To Adjust Set Point Temperatures: The first touch of the compartment. ■ Wait 24 hours for the temperature to the lowest temperature setting. NOTE...than recommended setting will cool. ■ Press either the refrigerator or freezer compartment, use by increasing ice production. ■ Press the Max Ice feature touch pad to set the freezer to stabilize. Wait 24 hours between adjustments for your food may spoil. Additional ...
...to cool completely before adjusting the controls. NOTE: Adjusting the refrigerator and freezer temperature controls to the recommended set point. To Adjust Set Point Temperatures: The first touch of the compartment. ■ Wait 24 hours for the temperature to the lowest temperature setting. NOTE...than recommended setting will cool. ■ Press either the refrigerator or freezer compartment, use by increasing ice production. ■ Press the Max Ice feature touch pad to set the freezer to stabilize. Wait 24 hours between adjustments for your food may spoil. Additional ...
Instruction Manual
Page 10
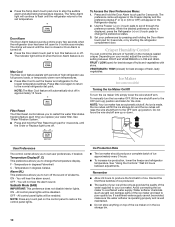
... on the control panel to produce the first batch of ice approximately every 3 hours. ■ To increase ice production, lower the freezer and refrigerator temperature. Remember ■ Allow 24 hours to restore the control panel lights. When the desired preference name is well maintained. ■ Do not store anything on your preferences...
... on the control panel to produce the first batch of ice approximately every 3 hours. ■ To increase ice production, lower the freezer and refrigerator temperature. Remember ■ Allow 24 hours to restore the control panel lights. When the desired preference name is well maintained. ■ Do not store anything on your preferences...
Instruction Manual
Page 11
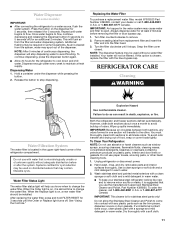
...cleansers, flammable fluids, cleaning waxes, concentrated detergents, bleaches or cleansers containing petroleum products on disinfected waters that is for the refrigerator to change the water filter. You must thoroughly clean both sections about once a month to stop dispensing water to eject. ..., press the dispenser button again. ■ Allow 24 hours for stainless steel parts only! Dispensing Water 1. Hold a container under the dispenser while pressing the button. 2. Release the button to avoid buildup of the refrigerator compartment. IMPORTANT: Air trapped in warm water. &#...
...cleansers, flammable fluids, cleaning waxes, concentrated detergents, bleaches or cleansers containing petroleum products on disinfected waters that is for the refrigerator to change the water filter. You must thoroughly clean both sections about once a month to stop dispensing water to eject. ..., press the dispenser button again. ■ Allow 24 hours for stainless steel parts only! Dispensing Water 1. Hold a container under the dispenser while pressing the button. 2. Release the button to avoid buildup of the refrigerator compartment. IMPORTANT: Air trapped in warm water. &#...
Instruction Manual
Page 12
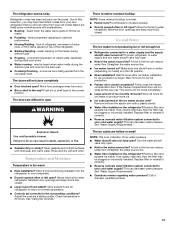
... outlet is added, doors are on the notches in normal home operating environments. Unplug the refrigerator or disconnect power. 2. Replace the fuse or reset the circuit breaker. Allow 24 hours following installation for routine condenser cleaning in the back of the shield and pull the shield...surface area of the compartment to access the light assembly. 2. Do not use an adapter. In the U.S.A., www.kitchenaid.com In Canada, www.kitchenaid.ca The refrigerator will fit your old one due to replace the bulb with appliance bulb(s) no greater than 40 watts. 4. NOTE:...
... outlet is added, doors are on the notches in normal home operating environments. Unplug the refrigerator or disconnect power. 2. Replace the fuse or reset the circuit breaker. Allow 24 hours following installation for routine condenser cleaning in the back of the shield and pull the shield...surface area of the compartment to access the light assembly. 2. Do not use an adapter. In the U.S.A., www.kitchenaid.com In Canada, www.kitchenaid.ca The refrigerator will fit your old one due to replace the bulb with appliance bulb(s) no greater than 40 watts. 4. NOTE:...
Instruction Manual
Page 13
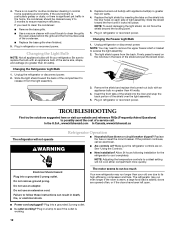
... in the line can reduce water flow. Remove filter and operate ice maker. A kink in the line can result in 24 hours. fans/compressor adjusting to enter refrigerator. contraction/expansion of inside walls, especially during defrost cycle ■ Popping - Move food packages away from your cold water ...the water shutoff valve fully open ? heard when the water valve opens to enter refrigerator. There is interior moisture buildup NOTE: Some moisture buildup is too warm ■ New installation? Allow 24 hours for ice maker to open ? Remove ice from the ice maker mold. This...
... in the line can reduce water flow. Remove filter and operate ice maker. A kink in the line can result in 24 hours. fans/compressor adjusting to enter refrigerator. contraction/expansion of inside walls, especially during defrost cycle ■ Popping - Move food packages away from your cold water ...the water shutoff valve fully open ? heard when the water valve opens to enter refrigerator. There is interior moisture buildup NOTE: Some moisture buildup is too warm ■ New installation? Allow 24 hours for ice maker to open ? Remove ice from the ice maker mold. This...
Instruction Manual
Page 14
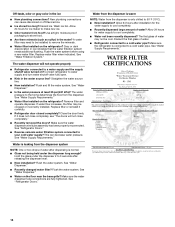
...filter may need to be installed to a water supply and the supply shutoff valve turned on the refrigerator? See "Water Filtration System." Flush and fill the water system. Allow 24 hours for water supply to water supply and turn water shutoff valve fully open. ■ Kink ...in the water? See "Water Supply Requirements." New plumbing connections can decrease water pressure. Connect refrigerator to cool completely. ■ Water not...
...filter may need to be installed to a water supply and the supply shutoff valve turned on the refrigerator? See "Water Filtration System." Flush and fill the water system. Allow 24 hours for water supply to water supply and turn water shutoff valve fully open. ■ Kink ...in the water? See "Water Supply Requirements." New plumbing connections can decrease water pressure. Connect refrigerator to cool completely. ■ Water not...
Instruction Manual
Page 16
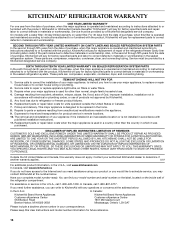
... Please keep this User Instructions and model number information for units operated outside the United States or Canada. 7. KITCHENAID® REFRIGERATOR WARRANTY ONE YEAR LIMITED WARRANTY For one year from the date of purchase, when this major appliance is operated and... maintained according to instructions attached to or furnished with the product, KitchenAid or KitchenAid Canada (hereafter "KitchenAid") will pay for replacement or repair of the refrigerator/freezer cavity liner (including labor costs) if the part cracks due to defective materials or ...
... Please keep this User Instructions and model number information for units operated outside the United States or Canada. 7. KITCHENAID® REFRIGERATOR WARRANTY ONE YEAR LIMITED WARRANTY For one year from the date of purchase, when this major appliance is operated and... maintained according to instructions attached to or furnished with the product, KitchenAid or KitchenAid Canada (hereafter "KitchenAid") will pay for replacement or repair of the refrigerator/freezer cavity liner (including labor costs) if the part cracks due to defective materials or ...

Parts List
Page 1
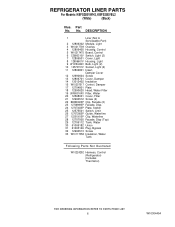
W10304454 Rev.B CABINET PARTS For Models: KBFS25EVWH2, KBFS25EVBL2 (White) (Black) REFRIGERATOR 5−10 Litho In U.S.A. (rrm)(bay) 1 Part No.
W10304454 Rev.B CABINET PARTS For Models: KBFS25EVWH2, KBFS25EVBL2 (White) (Black) REFRIGERATOR 5−10 Litho In U.S.A. (rrm)(bay) 1 Part No.
Parts List
Page 6
...Plate 18 12590620 Head, Water Filter 19 UKF8001AXX Filter, Water 20 12568001 Cover, Filter 21 12990512 Screw (2) 22 B8390302SP Clip, Facade (2) 23 12706909SP Facade, Disp. 24 12707303SP Plate, Switch 25 12575501 Switch, Limit 26 12707206SP Guide, Waterline 27 12251001SP Clip, Waterline 28 12707005 Facade, Disp (Top) 29 12706112 Tank, Water 30... 61006182 Union 31 61003146 Plug, Bypass 32 12990513 Screw 33 W10117358 Insulation, Water Tank Following Parts Not Illustrated W10224292 Harness, Control (Refrigerator) (Includes Thermistor) 6 W10304454 Part No.
...Plate 18 12590620 Head, Water Filter 19 UKF8001AXX Filter, Water 20 12568001 Cover, Filter 21 12990512 Screw (2) 22 B8390302SP Clip, Facade (2) 23 12706909SP Facade, Disp. 24 12707303SP Plate, Switch 25 12575501 Switch, Limit 26 12707206SP Guide, Waterline 27 12251001SP Clip, Waterline 28 12707005 Facade, Disp (Top) 29 12706112 Tank, Water 30... 61006182 Union 31 61003146 Plug, Bypass 32 12990513 Screw 33 W10117358 Insulation, Water Tank Following Parts Not Illustrated W10224292 Harness, Control (Refrigerator) (Includes Thermistor) 6 W10304454 Part No.

Parts List
Page 8
Part No. REFRIGERATOR DOOR PARTS For Models: KBFS25EVWH2, KBFS25EVBL2 (White) (Black) Illus. Part No. DESCRIPTION 18 12567321SP Mat, Medium 19 Bushing, Door (Upper Left) 12395501W White 12395501B Black ...
Part No. REFRIGERATOR DOOR PARTS For Models: KBFS25EVWH2, KBFS25EVBL2 (White) (Black) Illus. Part No. DESCRIPTION 18 12567321SP Mat, Medium 19 Bushing, Door (Upper Left) 12395501W White 12395501B Black ...

Parts List
Page 10
..., Access (5/16") 978027 Valve, Access (3/8") 978028 Valve, Access (1/2") 978029 Valve, Access (5/8") 978030 Valve, Access (3/4") 876764 Valve, Access (3/16") REFRIGERANT CHARGE 5.25 Ozs. (R−134A) 10 W10304454 DESCRIPTION 21 12990701 Screw 22 12726403 Evaporator 23 Dam 12225702 Right Side 12225602 Left Side... 24 12825101 Motor, Fan 25 10428101 Clip, Heater 26 W10234025 Harness, Unit with Power Cord 27 W10143759 Drier 28 W10134623 ...
..., Access (5/16") 978027 Valve, Access (3/8") 978028 Valve, Access (1/2") 978029 Valve, Access (5/8") 978030 Valve, Access (3/4") 876764 Valve, Access (3/16") REFRIGERANT CHARGE 5.25 Ozs. (R−134A) 10 W10304454 DESCRIPTION 21 12990701 Screw 22 12726403 Evaporator 23 Dam 12225702 Right Side 12225602 Left Side... 24 12825101 Motor, Fan 25 10428101 Clip, Heater 26 W10234025 Harness, Unit with Power Cord 27 W10143759 Drier 28 W10134623 ...


