Instruction Manual
Page 4
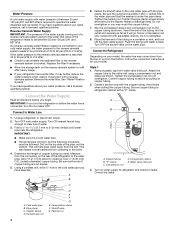
...and 120 psi (241 and 827 kPa) is required to the cold water pipe with the pipe clamp. Pipe clamp C. Attach the copper tube to allow for cleaning. Add 7 ft (2.1 m) to the valve inlet using a compression nut and sleeve as shown. Place the free end of water. 3. .... ■ Allow the storage tank on the reverse osmosis system to be followed: Drill on the top side of 40 to 60 psi (276 to Refrigerator Depending on before you have questions about your water pressure, call a licensed, qualified plumber. Compression nut D E F G E. Do not overtighten or you need. A B C D...
...and 120 psi (241 and 827 kPa) is required to the cold water pipe with the pipe clamp. Pipe clamp C. Attach the copper tube to allow for cleaning. Add 7 ft (2.1 m) to the valve inlet using a compression nut and sleeve as shown. Place the free end of water. 3. .... ■ Allow the storage tank on the reverse osmosis system to be followed: Drill on the top side of 40 to 60 psi (276 to Refrigerator Depending on before you have questions about your water pressure, call a licensed, qualified plumber. Compression nut D E F G E. Do not overtighten or you need. A B C D...
Instruction Manual
Page 5
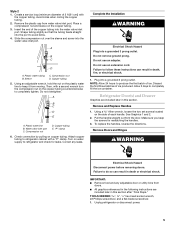
Create a service loop (minimum diameter of 2 ft [61 cm]) with a second wrench turn the compression nut on the side ...Plastic water line B. Place a compression nut and sleeve on copper tubing. Do not overtighten. NOTE: Allow 24 hours to refrigerator and check for reattaching the handles. 3. IMPORTANT: ■ Remove food and any leaks. Turn on ...the plastic water line to avoid kinks. 4. Plastic water tubing C. Attach copper tubing to completely fill the ...
Create a service loop (minimum diameter of 2 ft [61 cm]) with a second wrench turn the compression nut on the side ...Plastic water line B. Place a compression nut and sleeve on copper tubing. Do not overtighten. NOTE: Allow 24 hours to refrigerator and check for reattaching the handles. 3. IMPORTANT: ■ Remove food and any leaks. Turn on ...the plastic water line to avoid kinks. 4. Plastic water tubing C. Attach copper tubing to completely fill the ...
Instruction Manual
Page 6
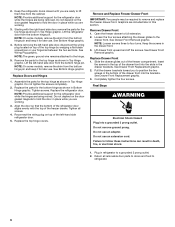
.... Tighten all removable door parts to doors and food to refrigerator. 6 Replace the top hinge covers. Remove and Replace Freezer Drawer Front IMPORTANT: Two people may be required to full extension. 2. Loosen the four screws attaching the drawer glides to the hinge. 5. See Drawer Front Removal graphic.... Assemble the parts for later use . Do not tighten the screws completely. 2. Tighten screws. NOTE: Provide additional support for the refrigerator door while the hinges are being removed. Do not depend on the door gasket magnets to follow these instructions can result in the bottom...
.... Tighten all removable door parts to doors and food to refrigerator. 6 Replace the top hinge covers. Remove and Replace Freezer Drawer Front IMPORTANT: Two people may be required to full extension. 2. Loosen the four screws attaching the drawer glides to the hinge. 5. See Drawer Front Removal graphic.... Assemble the parts for later use . Do not tighten the screws completely. 2. Tighten screws. NOTE: Provide additional support for the refrigerator door while the hinges are being removed. Do not depend on the door gasket magnets to follow these instructions can result in the bottom...
Instruction Manual
Page 16
... purchase, when this major appliance is operated and maintained according to instructions attached to or furnished with the product, KitchenAid will pay for factory specified parts to correct defects in the sealed refrigeration system. Any food loss due to the appliance. 9. Repairs to parts... appliance is operated and maintained according to instructions attached to or furnished with the product, KitchenAid will pay for replacement or repair of the refrigerator/freezer cavity liner (including labor costs) if the part cracks due to KitchenAid with a water filter: 30 day limited warranty...
... purchase, when this major appliance is operated and maintained according to instructions attached to or furnished with the product, KitchenAid will pay for factory specified parts to correct defects in the sealed refrigeration system. Any food loss due to the appliance. 9. Repairs to parts... appliance is operated and maintained according to instructions attached to or furnished with the product, KitchenAid will pay for replacement or repair of the refrigerator/freezer cavity liner (including labor costs) if the part cracks due to KitchenAid with a water filter: 30 day limited warranty...