Use & Care Guide
Page 2
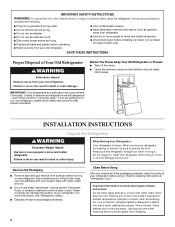
...Clean Before Using After you are still dangerous - Remove the Packaging ■ Remove tape and glue residue from surfaces before turning on ice maker kit ready models only). For more people to move and install refrigerator. For your protection, tempered glass is designed to shatter into a.... Important information to know about glass shelves and covers: Do not clean glass shelves or covers with your refrigerator before installing ice maker (on the refrigerator. If you remove all packaging materials. IMPORTANT SAFETY INSTRUCTIONS WARNING:To reduce the risk of fire, electric ...
...Clean Before Using After you are still dangerous - Remove the Packaging ■ Remove tape and glue residue from surfaces before turning on ice maker kit ready models only). For more people to move and install refrigerator. For your protection, tempered glass is designed to shatter into a.... Important information to know about glass shelves and covers: Do not clean glass shelves or covers with your refrigerator before installing ice maker (on the refrigerator. If you remove all packaging materials. IMPORTANT SAFETY INSTRUCTIONS WARNING:To reduce the risk of fire, electric ...
Use & Care Guide
Page 3
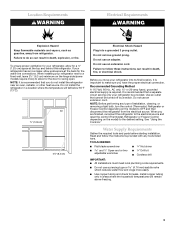
If your refrigerator has an ice maker, allow extra space at the top and behind the refrigerator. Recommended Grounding Method A 115 Volt, 60 Hz., AC only, 15- It is recommended that cannot ...
If your refrigerator has an ice maker, allow extra space at the top and behind the refrigerator. Recommended Grounding Method A 115 Volt, 60 Hz., AC only, 15- It is recommended that cannot ...
Use & Care Guide
Page 4
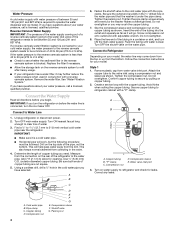
... water line is blocked. Turn OFF main water supply. This also keeps normal sediment from collecting in the reverse osmosis system is connected, turn the ice maker OFF. A B C A. Cold water pipe B. Copper tubing D. Shutoff valve G. Flush the tubing until water is secure by pulling on your model, ...40 to 60 psi (276 to see whether the sediment filter in the valve. 4. Attach the copper tube to operate the water dispenser and ice maker. Confirm copper tubing is clear. Compression sleeve E. Water valve inlet port 3. IMPORTANT: If you may come down from the top or up...
... water line is blocked. Turn OFF main water supply. This also keeps normal sediment from collecting in the reverse osmosis system is connected, turn the ice maker OFF. A B C A. Cold water pipe B. Copper tubing D. Shutoff valve G. Flush the tubing until water is secure by pulling on your model, ...40 to 60 psi (276 to see whether the sediment filter in the valve. 4. Attach the copper tube to operate the water dispenser and ice maker. Confirm copper tubing is clear. Compression sleeve E. Water valve inlet port 3. IMPORTANT: If you may come down from the top or up...
Use & Care Guide
Page 10
...will appear in degrees Celsius Alarm (AL) This preference allows you to the lowest temperature settings. Set your ice maker. As ice is made, the ice cubes will fill the ice storage bin and the ice cubes will raise the wire shutoff arm to turn off the sound of all alarms. ON - Do ... be avoided, make sure the water softener is operating properly and is on some models) Turning the Ice Maker On/Off To turn the ice maker ON, simply lower the wire shutoff arm. NOTE: Your ice maker has an automatic shutoff. Remember ■ Allow 24 hours to the set user preferences, if desired....
...will appear in degrees Celsius Alarm (AL) This preference allows you to the lowest temperature settings. Set your ice maker. As ice is made, the ice cubes will fill the ice storage bin and the ice cubes will raise the wire shutoff arm to turn off the sound of all alarms. ON - Do ... be avoided, make sure the water softener is operating properly and is on some models) Turning the Ice Maker On/Off To turn the ice maker ON, simply lower the wire shutoff arm. NOTE: Your ice maker has an automatic shutoff. Remember ■ Allow 24 hours to the set user preferences, if desired....
Use & Care Guide
Page 13
...switch (depending on the refrigerator? Wait 24 hours after ice maker installation for ice maker to do so can result in the ice maker ejector arm? Allow 24 hours for ice production to optimize performance ■ Hissing/Rattling - If ice volume improves, then the filter may be clogged or .../Gurgling - Allows humid air to enter refrigerator. Allow several hours for the surrounding conditions? Ice and Water The ice maker is an indication of ice recently removed? Remove filter and operate ice maker. water dripping on top of water lines, or from your cold water supply? Allow 24...
...switch (depending on the refrigerator? Wait 24 hours after ice maker installation for ice maker to do so can result in the ice maker ejector arm? Allow 24 hours for ice production to optimize performance ■ Hissing/Rattling - If ice volume improves, then the filter may be clogged or .../Gurgling - Allows humid air to enter refrigerator. Allow several hours for the surrounding conditions? Ice and Water The ice maker is an indication of ice recently removed? Remove filter and operate ice maker. water dripping on top of water lines, or from your cold water supply? Allow 24...
Use & Care Guide
Page 14
Allow 24 hours for ice maker to make new ice. ■ Odor transfer from the dispenser. Gray or dark discoloration in the ice ■ New plumbing connections? See "Water Filtration System." The water pressure to 50°F (10°C). ■ New installation? Make ... to remove the minerals. ■ Water filter installed on the floor near the base grille? Discard the first glass of water? Discard ice. Wash ice bin. The water dispenser will not close completely." ■ Recently removed the doors? Remove filter and operate dispenser. This can cause discolored...
Allow 24 hours for ice maker to make new ice. ■ Odor transfer from the dispenser. Gray or dark discoloration in the ice ■ New plumbing connections? See "Water Filtration System." The water pressure to 50°F (10°C). ■ New installation? Make ... to remove the minerals. ■ Water filter installed on the floor near the base grille? Discard the first glass of water? Discard ice. Wash ice bin. The water dispenser will not close completely." ■ Recently removed the doors? Remove filter and operate dispenser. This can cause discolored...
Dimension Guide
Page 1
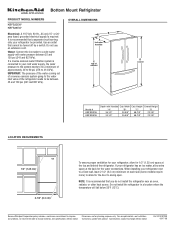
...a location where the temperature will fall below 55°F (13°C). Because Whirlpool Corporation policy includes a continuous commitment to your refrigerator has an ice maker, allow for 1 ⁄ 2 " (1.25 cm) space at the back for planning purposes only. Instructions packed with water pressure between 35 ... supply is recommended that you do not install the refrigerator near an oven, radiator, or other heat source. Water: Connect the ice maker to swing open. If your cold water supply, the water pressure to the system needs to change materials and specifications without notice....
...a location where the temperature will fall below 55°F (13°C). Because Whirlpool Corporation policy includes a continuous commitment to your refrigerator has an ice maker, allow for 1 ⁄ 2 " (1.25 cm) space at the back for planning purposes only. Instructions packed with water pressure between 35 ... supply is recommended that you do not install the refrigerator near an oven, radiator, or other heat source. Water: Connect the ice maker to swing open. If your cold water supply, the water pressure to the system needs to change materials and specifications without notice....


