Use & Care Guide
Page 3
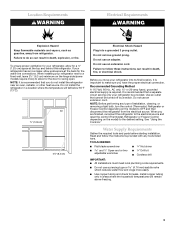
... in a location where the temperature will remain above freezing. 3 When installing your refrigerator next to a fixed wall, leave 2¹⁄₂" (6.3 cm) minimum on the hinge side (some models require more easily. ■ Use copper tubing and check for the door to allow for a ¹⁄₂" (1.25 cm) space at...
... in a location where the temperature will remain above freezing. 3 When installing your refrigerator next to a fixed wall, leave 2¹⁄₂" (6.3 cm) minimum on the hinge side (some models require more easily. ■ Use copper tubing and check for the door to allow for a ¹⁄₂" (1.25 cm) space at...
Use & Care Guide
Page 5
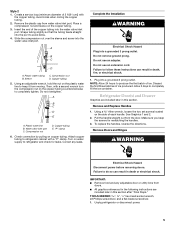
... Graphics are included later in death or electrical shock. Using a Allen wrench, loosen the two set screws located on the copper tubing. 3. Remove Doors and Hinges WARNING Electrical Shock Hazard Disconnect power before removing doors. Compression nut B. A B C D E A. Compression nut D. Check connection by pulling on water supply to refrigerator cabinet with the...
... Graphics are included later in death or electrical shock. Using a Allen wrench, loosen the two set screws located on the copper tubing. 3. Remove Doors and Hinges WARNING Electrical Shock Hazard Disconnect power before removing doors. Compression nut B. A B C D E A. Compression nut D. Check connection by pulling on water supply to refrigerator cabinet with the...
Use & Care Guide
Page 6
... the door so that the bottom of the freezer drawer. Loosen the four screws attaching the drawer glides to position the two screws in Top Hinge graphic. Slide the drawer glides out of the left-hand side refrigerator door. 5. Pull the drawer brackets toward you are working . 3. Do ...disconnect the wiring plug located on the door gasket magnets to full extension. 2. NOTE: On some models, remove the shim from the bottom hinge pin. See Drawer Front Removal graphic. Replace Drawer Front 1. Do not use an adapter. Before removing the left -hand side door from the bottom...
... the door so that the bottom of the freezer drawer. Loosen the four screws attaching the drawer glides to position the two screws in Top Hinge graphic. Slide the drawer glides out of the left-hand side refrigerator door. 5. Pull the drawer brackets toward you are working . 3. Do ...disconnect the wiring plug located on the door gasket magnets to full extension. 2. NOTE: On some models, remove the shim from the bottom hinge pin. See Drawer Front Removal graphic. Replace Drawer Front 1. Do not use an adapter. Before removing the left -hand side door from the bottom...
Use & Care Guide
Page 7
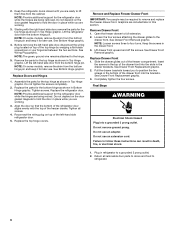
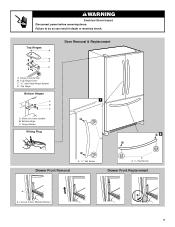
Failure to do so can result in death or electrical shock. Top Hinge Cover C. 5/16" Hex-Head Hinge Screws D. Shim (on some models) B. Bottom Hinge C. Hinge Cover Screw B. Top Hinge Bottom Hinges 1 A B C A. Top Hinges A B C D Door Removal & Replacement A. WARNING Electrical Shock Hazard Disconnect power before removing doors. Hinge Screws Wiring Plug 2 A Drawer Front Removal A. 3/32" Set Screw A A. 3/32" Set Screw Drawer Front Replacement A A. Loosen 4 Door Bracket Screws 7
Failure to do so can result in death or electrical shock. Top Hinge Cover C. 5/16" Hex-Head Hinge Screws D. Shim (on some models) B. Bottom Hinge C. Hinge Cover Screw B. Top Hinge Bottom Hinges 1 A B C A. Top Hinges A B C D Door Removal & Replacement A. WARNING Electrical Shock Hazard Disconnect power before removing doors. Hinge Screws Wiring Plug 2 A Drawer Front Removal A. 3/32" Set Screw A A. 3/32" Set Screw Drawer Front Replacement A A. Loosen 4 Door Bracket Screws 7
Use & Care Guide
Page 8
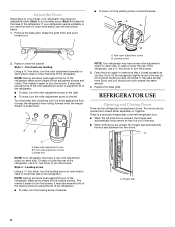
...leveling screw clockwise. Open the door again to keep the refrigerator from rolling forward when the freezer drawer is opened and closed , the hinged seal automatically forms a seal between the two doors. Rear roller adjustment screw B. Style 2 - Leveling screw Using a ¹⁄... If your refrigerator may have a rear roller adjustment screw on each side. Rear roller adjustment screw B. The doors can be opened , the hinged seal automatically folds inward so that side of the refrigerator. A C A. Brake foot NOTE: Your refrigerator may have four adjustable rollers (Style...
...leveling screw clockwise. Open the door again to keep the refrigerator from rolling forward when the freezer drawer is opened and closed , the hinged seal automatically forms a seal between the two doors. Rear roller adjustment screw B. Style 2 - Leveling screw Using a ¹⁄... If your refrigerator may have a rear roller adjustment screw on each side. Rear roller adjustment screw B. The doors can be opened , the hinged seal automatically folds inward so that side of the refrigerator. A C A. Brake foot NOTE: Your refrigerator may have four adjustable rollers (Style...
Use & Care Guide
Page 9
...is warm and more than recommended setting will cool. ■ Press either the refrigerator or freezer (-) touch pad to turn on the door hinge seal. The FREEZER control adjusts the freezer compartment temperature. NOTE: Except when first turning on , the temperature display shows the set point ...to the normal freezer set the freezer to the lowest temperature setting. The refrigerator uses more . If you notice moisture on the door hinge seal. The temperature displays will be lit when humidity control is ON. ■ Press Humidity Control to save energy when the environment ...
...is warm and more than recommended setting will cool. ■ Press either the refrigerator or freezer (-) touch pad to turn on the door hinge seal. The FREEZER control adjusts the freezer compartment temperature. NOTE: Except when first turning on , the temperature display shows the set point ...to the normal freezer set the freezer to the lowest temperature setting. The refrigerator uses more . If you notice moisture on the door hinge seal. The temperature displays will be lit when humidity control is ON. ■ Press Humidity Control to save energy when the environment ...


