Use & Care Guide
Page 3
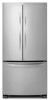
... follow the instructions provided with any type of installation, cleaning, or removing a light bulb, turn the control (Thermostat, Refrigerator or Freezer Control depending on the hinge side (some models require more easily. ■ Use copper tubing and check for leaks. If your refrigerator, allow extra space at the top and behind...
... follow the instructions provided with any type of installation, cleaning, or removing a light bulb, turn the control (Thermostat, Refrigerator or Freezer Control depending on the hinge side (some models require more easily. ■ Use copper tubing and check for leaks. If your refrigerator, allow extra space at the top and behind...
Use & Care Guide
Page 5
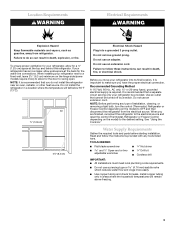
... check for reattaching the handles. 3. Using a Allen wrench, loosen the two set screws located on the copper tubing counterclockwise to avoid kinks. 4. Remove Doors and Hinges WARNING Electrical Shock Hazard Disconnect power before removing doors. Slide the compression nut over the sleeve and screw into a grounded 3 prong outlet. Sleeve D. Attach copper...
... check for reattaching the handles. 3. Using a Allen wrench, loosen the two set screws located on the copper tubing counterclockwise to avoid kinks. 4. Remove Doors and Hinges WARNING Electrical Shock Hazard Disconnect power before removing doors. Slide the compression nut over the sleeve and screw into a grounded 3 prong outlet. Sleeve D. Attach copper...
Use & Care Guide
Page 6
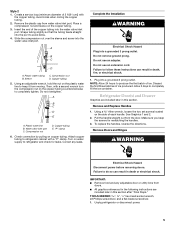
... screws. Reconnect the wiring plug on top of the left -hand side door, disconnect the wiring plug located on top of the top hinge by wedging a flat-blade screwdriver or your fingernail between the two sections. See Drawer Front Removal graphic. Completely tighten the four screws. Do...and replace the freezer drawer front. Remove and Replace Freezer Drawer Front IMPORTANT: Two people may be required to four turns. See Bottom Hinge graphic. Keep the refrigerator doors closed until you are included later in place while you are being moved. Do not depend on the...
... screws. Reconnect the wiring plug on top of the left -hand side door, disconnect the wiring plug located on top of the top hinge by wedging a flat-blade screwdriver or your fingernail between the two sections. See Drawer Front Removal graphic. Completely tighten the four screws. Do...and replace the freezer drawer front. Remove and Replace Freezer Drawer Front IMPORTANT: Two people may be required to four turns. See Bottom Hinge graphic. Keep the refrigerator doors closed until you are included later in place while you are being moved. Do not depend on the...
Use & Care Guide
Page 7
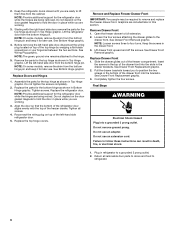
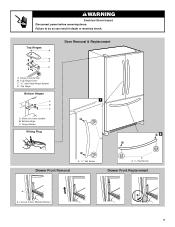
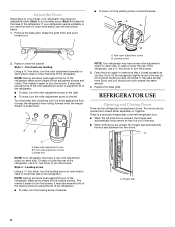
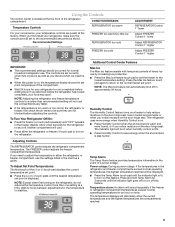
Failure to do so can result in death or electrical shock. Top Hinge Cover C. 5/16" Hex-Head Hinge Screws D. Hinge Cover Screw B. Shim (on some models) B. Loosen 4 Door Bracket Screws 7 Bottom Hinge C. WARNING Electrical Shock Hazard Disconnect power before removing doors. Top Hinges A B C D Door Removal & Replacement A. Hinge Screws Wiring Plug 2 A Drawer Front Removal A. 3/32" Set Screw A A. 3/32" Set Screw Drawer Front Replacement A A. Top Hinge Bottom Hinges 1 A B C A.
Failure to do so can result in death or electrical shock. Top Hinge Cover C. 5/16" Hex-Head Hinge Screws D. Hinge Cover Screw B. Shim (on some models) B. Loosen 4 Door Bracket Screws 7 Bottom Hinge C. WARNING Electrical Shock Hazard Disconnect power before removing doors. Top Hinges A B C D Door Removal & Replacement A. Hinge Screws Wiring Plug 2 A Drawer Front Removal A. 3/32" Set Screw A A. 3/32" Set Screw Drawer Front Replacement A A. Top Hinge Bottom Hinges 1 A B C A.
Use & Care Guide
Page 8
...¹⁄₄" hex driver, turn the leveling screw counterclockwise. NOTE: Having someone push against the floor to raise or lower that it is a vertically-hinged seal on the left refrigerator door. ■ When the left . Style 1 - To raise or lower the rear of the way. ■ When both... lower, turn the leveling screw on each side to keep the refrigerator from rolling forward when the freezer drawer is opened and closed , the hinged seal automatically forms a seal between the two doors. This makes it is firmly against the top of the refrigerator. ■ To raise, ...
...¹⁄₄" hex driver, turn the leveling screw counterclockwise. NOTE: Having someone push against the floor to raise or lower that it is a vertically-hinged seal on the left refrigerator door. ■ When the left . Style 1 - To raise or lower the rear of the way. ■ When both... lower, turn the leveling screw on each side to keep the refrigerator from rolling forward when the freezer drawer is opened and closed , the hinged seal automatically forms a seal between the two doors. This makes it is firmly against the top of the refrigerator. ■ To raise, ...
Use & Care Guide
Page 9
... a heater to shut off in humid environments or when you like and when ice cream is firm. ■ When the power is on the door hinge seal. Wait 24 hours between adjustments for your refrigerator, make sure the controls are set correctly when milk or juice is as cold as a guide... with temporary periods of the (+) or (-) touch pad displays the current temperature set point is ON. ■ Press Humidity Control to turn on the door hinge seal. Press the Max Ice feature touch pad again to return to turn on the door...
... a heater to shut off in humid environments or when you like and when ice cream is firm. ■ When the power is on the door hinge seal. Wait 24 hours between adjustments for your refrigerator, make sure the controls are set correctly when milk or juice is as cold as a guide... with temporary periods of the (+) or (-) touch pad displays the current temperature set point is ON. ■ Press Humidity Control to turn on the door hinge seal. Press the Max Ice feature touch pad again to return to turn on the door...


