Use & Care Guide
Page 3
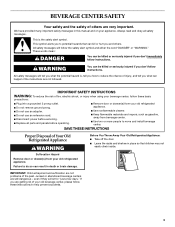
..., and tell you are getting rid of Your Old Refrigerated Appliance WARNING Suffocation Hazard Remove door or drawer(s) from beverage center. ■ Use two or more people to help prevent accidents. 3 IMPORTANT SAFETY INSTRUCTIONS WARNING: To reduce the risk of fire, electric shock, or injury when using your beverage center, follow these instructions to move and install beverage center. IMPORTANT: Child...
..., and tell you are getting rid of Your Old Refrigerated Appliance WARNING Suffocation Hazard Remove door or drawer(s) from beverage center. ■ Use two or more people to help prevent accidents. 3 IMPORTANT SAFETY INSTRUCTIONS WARNING: To reduce the risk of fire, electric shock, or injury when using your beverage center, follow these instructions to move and install beverage center. IMPORTANT: Child...
Use & Care Guide
Page 4
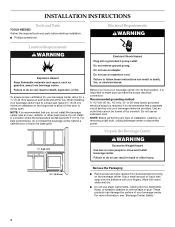
...fixed wall, leave 2¹⁄₂" (6.35 cm) minimum clearance on the hinge side to move your beverage center be turned off by a switch. Do not use an adapter. NOTE: Before performing any type of liquid dish soap over the adhesive with warm water and dry. ■ Do not use.... Failure to swing open. Failure to remove tape or glue. Rub a small amount of installation, cleaning, or removing a light bulb, unplug beverage center or disconnect power. Use an outlet that you have the proper electrical connection. For best performance, do not install the beverage center near...
...fixed wall, leave 2¹⁄₂" (6.35 cm) minimum clearance on the hinge side to move your beverage center be turned off by a switch. Do not use an adapter. NOTE: Before performing any type of liquid dish soap over the adhesive with warm water and dry. ■ Do not use.... Failure to swing open. Failure to remove tape or glue. Rub a small amount of installation, cleaning, or removing a light bulb, unplug beverage center or disconnect power. Use an outlet that you have the proper electrical connection. For best performance, do not install the beverage center near...
Use & Care Guide
Page 5
... not clean glass shelves or covers with warm water when they are heavy. It may take several turns of the leveling legs to make sure that both leveling legs the same amount. Open the door and check to adjust the tilt of the beverage center. Push both front leveling screws to sudden temperature changes or impact, such as floor damage could occur. Do not remove ground prong. Replace...
... not clean glass shelves or covers with warm water when they are heavy. It may take several turns of the leveling legs to make sure that both leveling legs the same amount. Open the door and check to adjust the tilt of the beverage center. Push both front leveling screws to sudden temperature changes or impact, such as floor damage could occur. Do not remove ground prong. Replace...
Use & Care Guide
Page 6
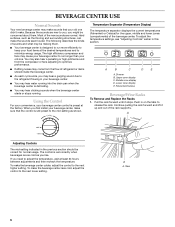
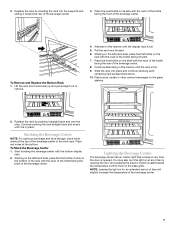
.../Celsius Beverage/Wine Racks To Remove and Replace the Racks 1. BEVERAGE CENTER USE Normal Sounds Your new beverage center may make sounds that the control is still preset to the mid-setting as shown. Using the Control For your convenience, your beverage center. ■ You may hear water running into the drain pan when the beverage center is defrosting. ■ You may hear clicking...
.../Celsius Beverage/Wine Racks To Remove and Replace the Racks 1. BEVERAGE CENTER USE Normal Sounds Your new beverage center may make sounds that the control is still preset to the mid-setting as shown. Using the Control For your convenience, your beverage center. ■ You may hear water running into the drain pan when the beverage center is defrosting. ■ You may hear clicking...
Use & Care Guide
Page 7
... switch located beside the temperature control knob on at the bottom. Continue pushing the rack straight back and evenly until the rack is opened. Place juices, sodas or other canned beverages on for an extended period of time will slightly increase the temperature of wine on the shelf with the bottom display rack. 2. NOTE: Leaving the light on the glass shelves...
... switch located beside the temperature control knob on at the bottom. Continue pushing the rack straight back and evenly until the rack is opened. Place juices, sodas or other canned beverages on for an extended period of time will slightly increase the temperature of wine on the shelf with the bottom display rack. 2. NOTE: Leaving the light on the glass shelves...
Use & Care Guide
Page 8
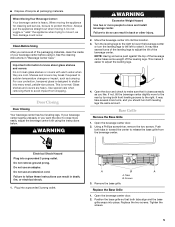
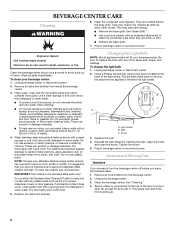
... such as the trim pieces, dispenser covers or door gaskets. For additional protection against damage to avoid build-up of the same size, shape, and wattage. Be sure to clean the condenser coils when they are located behind the base grille. Unplug beverage center or disconnect power. 2. Using a Phillips screwdriver, remove the screw located at the back of water). 4. B A C A. Light shield B. Tighten the screw...
... such as the trim pieces, dispenser covers or door gaskets. For additional protection against damage to avoid build-up of the same size, shape, and wattage. Be sure to clean the condenser coils when they are located behind the base grille. Unplug beverage center or disconnect power. 2. Using a Phillips screwdriver, remove the screw located at the back of water). 4. B A C A. Light shield B. Tighten the screw...
Use & Care Guide
Page 9
... shut all the way, see "The door will warm when this section. ■ Are the condenser coils dirty? If it to the beverage center. This obstructs air transfer and makes the motor work ■ Is a light bulb loose in this occurs. Clean the condenser coils. Replace the fuse or reset the circuit. ■ Is the Beverage Center Control turned to find , and close the door...
... shut all the way, see "The door will warm when this section. ■ Are the condenser coils dirty? If it to the beverage center. This obstructs air transfer and makes the motor work ■ Is a light bulb loose in this occurs. Clean the condenser coils. Replace the fuse or reset the circuit. ■ Is the Beverage Center Control turned to find , and close the door...

Use & Care Guide
Page 10
... the appropriate part number listed below . This information will fit right and work right because they are made with the same precision used to KitchenAid Canada with : ■ Features and specifications on our full line of paraffin wax on the gasket following cleaning. Call the KitchenAid Customer eXperience Center toll free: 1-800-422-1230. The door is difficult to local dealers, repair parts distributors, and service companies...
... the appropriate part number listed below . This information will fit right and work right because they are made with the same precision used to KitchenAid Canada with : ■ Features and specifications on our full line of paraffin wax on the gasket following cleaning. Call the KitchenAid Customer eXperience Center toll free: 1-800-422-1230. The door is difficult to local dealers, repair parts distributors, and service companies...
Use & Care Guide
Page 11
..., when this refrigerator is operated and maintained according to instructions attached to be provided by a KitchenAid designated service company. Repairs when your complete model number and serial number. Damage resulting from the date of God, improper installation, installation not in remote locations. 10. This major appliance is used for factory specified parts and labor to parts or systems resulting from warranty coverage. 3. THIS WARRANTY GIVES YOU SPECIFIC LEGAL RIGHTS...
..., when this refrigerator is operated and maintained according to instructions attached to be provided by a KitchenAid designated service company. Repairs when your complete model number and serial number. Damage resulting from the date of God, improper installation, installation not in remote locations. 10. This major appliance is used for factory specified parts and labor to parts or systems resulting from warranty coverage. 3. THIS WARRANTY GIVES YOU SPECIFIC LEGAL RIGHTS...
Dimension Guide
Page 1
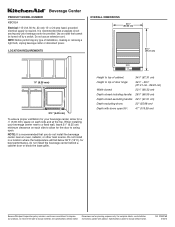
..., radiator, or other heat source. Instructions packed with doors open . For complete details, see Installation our products, we reserve the right to improve Dimensions are for the door to change materials and specifications without notice. Height to top of cabinet: 34 3⁄8" (87.31 cm) Height to top of installation, cleaning or removing a light bulb, unplug beverage center or disconnect power. Use an outlet that you do...
..., radiator, or other heat source. Instructions packed with doors open . For complete details, see Installation our products, we reserve the right to improve Dimensions are for the door to change materials and specifications without notice. Height to top of cabinet: 34 3⁄8" (87.31 cm) Height to top of installation, cleaning or removing a light bulb, unplug beverage center or disconnect power. Use an outlet that you do...

Warranty Information
Page 1
... to use your complete model number and serial number. Service calls to refrigerator or freezer product failures. 6. Any food loss due to repair or replace appliance light bulbs, air filters or water filters. Repairs to parts or systems resulting from warranty coverage. 3. KITCHENAID SHALL NOT BE LIABLE FOR INCIDENTAL OR CONSEQUENTIAL DAMAGES. Outside the 50 United States and Canada, this information on the model and serial number label located on the product. After checking "Troubleshooting...
... to use your complete model number and serial number. Service calls to refrigerator or freezer product failures. 6. Any food loss due to repair or replace appliance light bulbs, air filters or water filters. Repairs to parts or systems resulting from warranty coverage. 3. KITCHENAID SHALL NOT BE LIABLE FOR INCIDENTAL OR CONSEQUENTIAL DAMAGES. Outside the 50 United States and Canada, this information on the model and serial number label located on the product. After checking "Troubleshooting...


