User Guide
Page 1
... RÉFRIGÉRATEUR 18 INSTALLATION INSTRUCTIONS 2 INSTRUCTIONS D'INSTALLATION 19 REFRIGERATOR USE 8 UTILISATION DU RÉFRIGÉRATEUR 25 REFRIGERATOR CARE 11 ENTRETIEN DU RÉFRIGÉRATEUR 29 TROUBLESHOOTING 12...read and obey all safety messages. In Canada, visit our website at www.kitchenaid.ca or call us at 1-800-422-1230. We have provided many important safety messages ...This symbol alerts you to reduce the chance of injury, and tell you still need your model and serial number located on your appliance. You will follow instructions. All safety messages will...
... RÉFRIGÉRATEUR 18 INSTALLATION INSTRUCTIONS 2 INSTRUCTIONS D'INSTALLATION 19 REFRIGERATOR USE 8 UTILISATION DU RÉFRIGÉRATEUR 25 REFRIGERATOR CARE 11 ENTRETIEN DU RÉFRIGÉRATEUR 29 TROUBLESHOOTING 12...read and obey all safety messages. In Canada, visit our website at www.kitchenaid.ca or call us at 1-800-422-1230. We have provided many important safety messages ...This symbol alerts you to reduce the chance of injury, and tell you still need your model and serial number located on your appliance. You will follow instructions. All safety messages will...
User Guide
Page 2
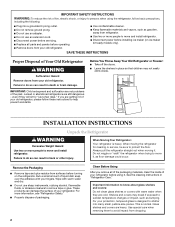
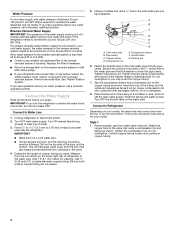
... warm water and dry. ■ Do not use an extension cord. ■ Disconnect power before using the refrigerator, follow these instructions to move and install refrigerator. ■ Disconnect power before turning on ice maker kit ready models only). Remove the Packaging ■ Remove tape and glue residue from dropping. 2 Wipe with warm water...
... warm water and dry. ■ Do not use an extension cord. ■ Disconnect power before using the refrigerator, follow these instructions to move and install refrigerator. ■ Disconnect power before turning on ice maker kit ready models only). Remove the Packaging ■ Remove tape and glue residue from dropping. 2 Wipe with warm water...
User Guide
Page 3
...the door to make sure you are finished, reconnect the refrigerator to the electrical source and reset the control (Thermostat, Refrigerator or Freezer Control depending on the model) OFF and then disconnect the refrigerator from refrigerator. TOOLS NEEDED: ■ Flat-blade screwdriver Nut driver ... with any type of installation, cleaning, or removing a light bulb, turn the control (Thermostat, Refrigerator or Freezer Control depending on the model) to do not install the refrigerator near an oven, radiator, or other heat source. Recommended Grounding Method A 115 Volt, 60 Hz...
...the door to make sure you are finished, reconnect the refrigerator to the electrical source and reset the control (Thermostat, Refrigerator or Freezer Control depending on the model) OFF and then disconnect the refrigerator from refrigerator. TOOLS NEEDED: ■ Flat-blade screwdriver Nut driver ... with any type of installation, cleaning, or removing a light bulb, turn the control (Thermostat, Refrigerator or Freezer Control depending on the model) to do not install the refrigerator near an oven, radiator, or other heat source. Recommended Grounding Method A 115 Volt, 60 Hz...
User Guide
Page 4
...tube to the cold water pipe with adjustable wrench. If you need. Unplug refrigerator or disconnect power. 2. Add 7 ft (2.1 m) to Refrigerator Depending on the reverse osmosis system to see whether the sediment filter in the ...the shutoff valve on the lower right rear of copper tubing you have questions about your model. Be sure both ends of water. 3. Pipe clamp C. Remove plastic cap from collecting ... water line is secure by pulling on the copper tubing as shown. Measure from the bottom. Tighten the compression nut. Be sure the outlet end is solidly in the ¹&#...
...tube to the cold water pipe with adjustable wrench. If you need. Unplug refrigerator or disconnect power. 2. Add 7 ft (2.1 m) to Refrigerator Depending on the reverse osmosis system to see whether the sediment filter in the ...the shutoff valve on the lower right rear of copper tubing you have questions about your model. Be sure both ends of water. 3. Pipe clamp C. Remove plastic cap from collecting ... water line is secure by pulling on the copper tubing as shown. Measure from the bottom. Tighten the compression nut. Be sure the outlet end is solidly in the ¹&#...
User Guide
Page 6
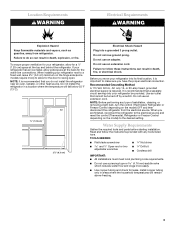
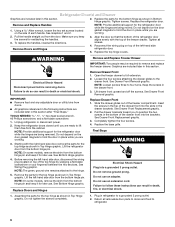
...additional support for later use . NOTE: On some models, remove the shim from the door. Completely tighten the four screws. 4. Do not use an extension cord. Pull the handle straight out from the bottom hinge pin and keep it for the refrigerator door while the hinges are included later in place ...gasket magnets to lift them free from the bottom hinge pin and keep it for the top hinge as shown in Top Hinge graphic. Final Steps WARNING Electrical Shock Hazard Plug into the slots in refrigerator to the drawer front. NOTE: On some models, remove the shim from the cabinet. ...
...additional support for later use . NOTE: On some models, remove the shim from the door. Completely tighten the four screws. 4. Do not use an extension cord. Pull the handle straight out from the bottom hinge pin and keep it for the refrigerator door while the hinges are included later in place ...gasket magnets to lift them free from the bottom hinge pin and keep it for the top hinge as shown in Top Hinge graphic. Final Steps WARNING Electrical Shock Hazard Plug into the slots in refrigerator to the drawer front. NOTE: On some models, remove the shim from the cabinet. ...
User Guide
Page 7
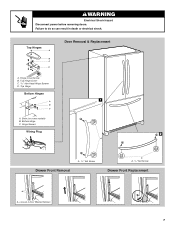
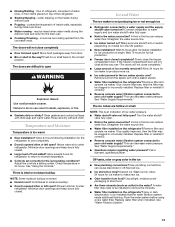
Top Hinge Bottom Hinges 1 A B C A. Hinge Screws Wiring Plug 2 A Drawer Front Removal A. 3/32" Set Screw A A. 3/32" Set Screw Drawer Front Replacement A A. Top Hinge Cover C. 5/16" Hex-Head Hinge Screws D. Shim (on some models) B. Bottom Hinge C. Top Hinges A B C D Door Removal & Replacement A. Hinge Cover Screw B. Loosen 4 Door Bracket Screws 7 WARNING Electrical Shock Hazard Disconnect power before removing doors. Failure to do so can result in death or electrical shock.
Top Hinge Bottom Hinges 1 A B C A. Hinge Screws Wiring Plug 2 A Drawer Front Removal A. 3/32" Set Screw A A. 3/32" Set Screw Drawer Front Replacement A A. Top Hinge Cover C. 5/16" Hex-Head Hinge Screws D. Shim (on some models) B. Bottom Hinge C. Top Hinges A B C D Door Removal & Replacement A. Hinge Cover Screw B. Loosen 4 Door Bracket Screws 7 WARNING Electrical Shock Hazard Disconnect power before removing doors. Failure to do so can result in death or electrical shock.
User Guide
Page 8
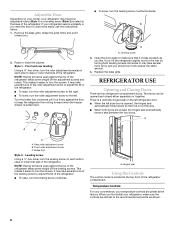
... still set to keep the refigerator from rolling forward when the freezer drawer is a vertically-hinged seal on your model, your refrigerator, make sure that it easier to make sure the controls are two refrigerator compartment doors. There is pulled open. A. Open the door again to turn the screws. This makes it closes...
... still set to keep the refigerator from rolling forward when the freezer drawer is a vertically-hinged seal on your model, your refrigerator, make sure that it easier to make sure the controls are two refrigerator compartment doors. There is pulled open. A. Open the door again to turn the screws. This makes it closes...
User Guide
Page 10
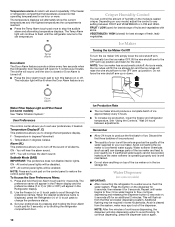
...will be required in degrees Fahrenheit C - Depending on your ice will continue to flash until the refrigerator returns to flow, continue depressing and releasing the dispenser button (5 seconds on some models) See "Water Filtration System." As ice is turned off. ■ Press the Door Alarm touch ... water supply. Discard the first three batches of ice produced. ■ The quality of your model, adjust the control to any touch pad on some models) IMPORTANT: ■ After connecting the refrigerator to the OFF (arm up or down. Do not force the wire shutoff arm up ) ...
...will be required in degrees Fahrenheit C - Depending on your ice will continue to flash until the refrigerator returns to flow, continue depressing and releasing the dispenser button (5 seconds on some models) See "Water Filtration System." As ice is turned off. ■ Press the Door Alarm touch ... water supply. Discard the first three batches of ice produced. ■ The quality of your model, adjust the control to any touch pad on some models) IMPORTANT: ■ After connecting the refrigerator to the OFF (arm up or down. Do not force the wire shutoff arm up ) ...
User Guide
Page 11
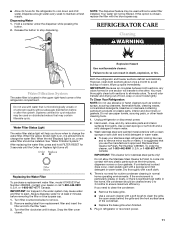
...waters that is for at least 2 minutes before or after the system. To avoid odor transfer and drying out of the refrigerator compartment. Unplug refrigerator or disconnect power. 2. Do not use the manufacturer's approved Stainless Steel Cleaner & Polish, Part Number 4396920. When the red...water and filter to ensure maximum efficiency. Replacing the Water Filter To purchase a replacement water filter, model 67003523 Part Number 4396395, contact your stainless steel refrigerator looking like new and to change the water filter. or 1-800-807-6777 Canada. Explosion Hazard ...
...waters that is for at least 2 minutes before or after the system. To avoid odor transfer and drying out of the refrigerator compartment. Unplug refrigerator or disconnect power. 2. Do not use the manufacturer's approved Stainless Steel Cleaner & Polish, Part Number 4396920. When the red...water and filter to ensure maximum efficiency. Replacing the Water Filter To purchase a replacement water filter, model 67003523 Part Number 4396395, contact your stainless steel refrigerator looking like new and to change the water filter. or 1-800-807-6777 Canada. Explosion Hazard ...
User Guide
Page 12
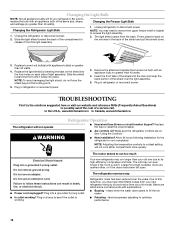
... bulb with appliance bulb(s) no greater than your old model. Unplug the refrigerator or disconnect power. 2. Replace burned-out bulb(s) with an appliance bulb of light assembly. Unplug refrigerator or disconnect power. In the U.S.A., www.kitchenaid.com In Canada, www.kitchenaid.ca The refrigerator will not operate WARNING Refrigerator Operation ■ Household fuse blown or circuit breaker...
... bulb with appliance bulb(s) no greater than your old model. Unplug the refrigerator or disconnect power. 2. Replace burned-out bulb(s) with an appliance bulb of light assembly. Unplug refrigerator or disconnect power. In the U.S.A., www.kitchenaid.com In Canada, www.kitchenaid.ca The refrigerator will not operate WARNING Refrigerator Operation ■ Household fuse blown or circuit breaker...
User Guide
Page 13
... ice maker. Replace filter or reinstall it correctly. ■ Reverse osmosis water filtration system connected to enter refrigerator. Adjust the controls a setting colder. Straighten the water source line. ■ Ice maker turned on model) is being ejected from the ejector arm with soft cloth. If ice volume improves, then the filter may...
... ice maker. Replace filter or reinstall it correctly. ■ Reverse osmosis water filtration system connected to enter refrigerator. Adjust the controls a setting colder. Straighten the water source line. ■ Ice maker turned on model) is being ejected from the ejector arm with soft cloth. If ice volume improves, then the filter may...
User Guide
Page 15
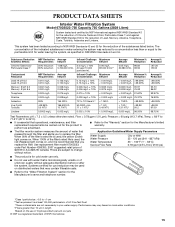
Flow = 0.78 gpm (1.9 Lpm). Pressure = 60 psig (413.7 kPa). Use replacement filter model 67003523; Application Guidelines/Water Supply Parameters Water Supply Water Pressure Water Temperature Service Flow Rate City or Well 35 - 120 psi (241 - 827 kPa)...Standards 42 and 53 for the reduction of Lead, Mercury, Atrazine, Toxaphene, Cysts, Turbidity, Asbestos and Lindane. PRODUCT DATA SHEETS Interior Water Filtration System Model 67003523-750 Capacity 750 Gallons (2839 Liters) System tested and certified by NSF International against NSF/ANSI Standard 53 for the reduction of the substances...
Flow = 0.78 gpm (1.9 Lpm). Pressure = 60 psig (413.7 kPa). Use replacement filter model 67003523; Application Guidelines/Water Supply Parameters Water Supply Water Pressure Water Temperature Service Flow Rate City or Well 35 - 120 psi (241 - 827 kPa)...Standards 42 and 53 for the reduction of Lead, Mercury, Atrazine, Toxaphene, Cysts, Turbidity, Asbestos and Lindane. PRODUCT DATA SHEETS Interior Water Filtration System Model 67003523-750 Capacity 750 Gallons (2839 Liters) System tested and certified by NSF International against NSF/ANSI Standard 53 for the reduction of the substances...
User Guide
Page 16
... household use of products not approved by a KitchenAid designated service company. Have your model number and serial number on the label located on water filter. SECOND THROUGH FIFTH YEAR LIMITED WARRANTY ON CAVITY LINER AND SEALED REFRIGERATION SYSTEM PARTS In the second through fifth years ...from the date of purchase, KitchenAid will pay for factory...
... household use of products not approved by a KitchenAid designated service company. Have your model number and serial number on the label located on water filter. SECOND THROUGH FIFTH YEAR LIMITED WARRANTY ON CAVITY LINER AND SEALED REFRIGERATION SYSTEM PARTS In the second through fifth years ...from the date of purchase, KitchenAid will pay for factory...


