User Guide
Page 2
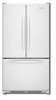
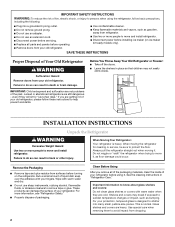
... alcohol, flammable fluids, or abrasive cleaners to move and install refrigerator. ■ Disconnect power before installing ice maker (on the refrigerator. Remove the Packaging ■ Remove tape and glue residue from refrigerator. ■ Use two or more people to move and install refrigerator. Wipe with your refrigerator. Shelves and covers may not easily climb inside of the...
... alcohol, flammable fluids, or abrasive cleaners to move and install refrigerator. ■ Disconnect power before installing ice maker (on the refrigerator. Remove the Packaging ■ Remove tape and glue residue from refrigerator. ■ Use two or more people to move and install refrigerator. Wipe with your refrigerator. Shelves and covers may not easily climb inside of the...
User Guide
Page 3
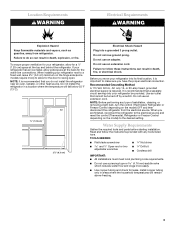
... Plug into its final location, it is recommended that cannot be provided. Install copper tubing only in death, explosion, or fire. When installing your refrigerator next to a fixed wall, leave 2¹⁄₂" (6.3 cm) minimum on the model) to make sure you do so can result in ... Hazard Keep flammable materials and vapors, such as gasoline, away from the electrical source. Do not install the refrigerator in death, fire, or electrical shock. When you move your refrigerator has an ice maker, allow for a ¹⁄₂" (1.25 cm) space at the back for the door to do...
... Plug into its final location, it is recommended that cannot be provided. Install copper tubing only in death, explosion, or fire. When installing your refrigerator next to a fixed wall, leave 2¹⁄₂" (6.3 cm) minimum on the model) to make sure you do so can result in ... Hazard Keep flammable materials and vapors, such as gasoline, away from the electrical source. Do not install the refrigerator in death, fire, or electrical shock. When you move your refrigerator has an ice maker, allow for a ¹⁄₂" (1.25 cm) space at the back for the door to do...
User Guide
Page 4
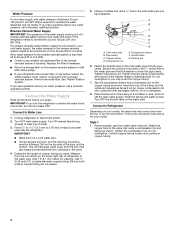
Remove the water filter. IMPORTANT: If you begin. Add 7 ft (2.1 m) to Water Line 1. Compression sleeve F. Slip the compression sleeve and compression nut on the reverse osmosis system to refill after heavy usage. ■ If your ... on copper tubing. 4 Connect to 414 kPa). Remove plastic cap from the bottom. Do not overtighten. Turn OFF main water supply. Be sure both ends of the refrigerator needs to operate the water dispenser and ice maker. Be sure the outlet end is solidly in the ¹⁄₄" drilled hole in the reverse...
Remove the water filter. IMPORTANT: If you begin. Add 7 ft (2.1 m) to Water Line 1. Compression sleeve F. Slip the compression sleeve and compression nut on the reverse osmosis system to refill after heavy usage. ■ If your ... on copper tubing. 4 Connect to 414 kPa). Remove plastic cap from the bottom. Do not overtighten. Turn OFF main water supply. Be sure both ends of the refrigerator needs to operate the water dispenser and ice maker. Be sure the outlet end is solidly in the ¹⁄₄" drilled hole in the reverse...
User Guide
Page 10
...wire shutoff arm to the OFF (arm up or down. Temperature in the Refrigerator display. 2. See "Using the Controls." Water softener chemicals (such as the quality of the ice maker or in the ice storage bin. If a softened water supply cannot be disabled. Temperature alarm: ... feature sounds a chime every few seconds when the refrigerator door has been left open ) for 3 seconds, or by shutting the refrigerator compartment door. 10 Ice Production Rate ■ The ice maker should produce a complete batch of the ice maker and lead to avoid flooding. The indicator light will...
...wire shutoff arm to the OFF (arm up or down. Temperature in the Refrigerator display. 2. See "Using the Controls." Water softener chemicals (such as the quality of the ice maker or in the ice storage bin. If a softened water supply cannot be disabled. Temperature alarm: ... feature sounds a chime every few seconds when the refrigerator door has been left open ) for 3 seconds, or by shutting the refrigerator compartment door. 10 Ice Production Rate ■ The ice maker should produce a complete batch of the ice maker and lead to avoid flooding. The indicator light will...
User Guide
Page 12
... when the water valve opens to optimize performance 12 fans/compressor adjusting to fill the ice maker ■ Pulsating - Plug in refrigerator or reconnect power. Plug in refrigerator or reconnect power. 3. In the U.S.A., www.kitchenaid.com In Canada, www.kitchenaid.ca The refrigerator will not cool either compartment more quickly. Replace the fuse or reset the circuit...
... when the water valve opens to optimize performance 12 fans/compressor adjusting to fill the ice maker ■ Pulsating - Plug in refrigerator or reconnect power. Plug in refrigerator or reconnect power. 3. In the U.S.A., www.kitchenaid.com In Canada, www.kitchenaid.ca The refrigerator will not cool either compartment more quickly. Replace the fuse or reset the circuit...
User Guide
Page 13
... 24 hours following installation for refrigerator to return to open ? Ice and Water The ice maker is too warm ■ New installation? Wait 24 hours after ice maker installation for ice maker to a water supply and the supply shutoff valve turned on the refrigerator? Allow 24 hours for ice production to enter refrigerator. A kink in the ice maker ejector arm? Straighten the water...
... 24 hours following installation for refrigerator to return to open ? Ice and Water The ice maker is too warm ■ New installation? Wait 24 hours after ice maker installation for ice maker to a water supply and the supply shutoff valve turned on the refrigerator? Allow 24 hours for ice production to enter refrigerator. A kink in the ice maker ejector arm? Straighten the water...


