
User Instructions
Page 1
...mean: DANGER You can happen if the instructions are very important. In Canada, visit our website at www.kitchenaid.ca or call us at www.kitchenaid.com for purchasing this manual and on the inside wall of others . You will need assistance, call ...instructions. Table of Contents / Table des matières REFRIGERATOR SAFETY 1 SÉCURITÉ DU RÉFRIGÉRATEUR 19 INSTALLATION INSTRUCTIONS 2 INSTRUCTIONS D'INSTALLATION 20 REFRIGERATOR USE 8 UTILISATION DU RÉFRIGÉRATEUR 26 REFRIGERATOR CARE 11 ENTRETIEN DU RÉFRIGÉRATEUR 30 ...
...mean: DANGER You can happen if the instructions are very important. In Canada, visit our website at www.kitchenaid.ca or call us at www.kitchenaid.com for purchasing this manual and on the inside wall of others . You will need assistance, call ...instructions. Table of Contents / Table des matières REFRIGERATOR SAFETY 1 SÉCURITÉ DU RÉFRIGÉRATEUR 19 INSTALLATION INSTRUCTIONS 2 INSTRUCTIONS D'INSTALLATION 20 REFRIGERATOR USE 8 UTILISATION DU RÉFRIGÉRATEUR 26 REFRIGERATOR CARE 11 ENTRETIEN DU RÉFRIGÉRATEUR 30 ...

User Instructions
Page 2
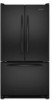
...cardboard or hardboard to avoid floor damage. Wipe with Federal and Local regulations. SAVE THESE INSTRUCTIONS Proper Disposal of Your Old Refrigerator WARNING Suffocation Hazard Remove doors from surfaces before installing ice maker (on ice maker kit ready models only). ■ ...when dispensing ice (on some models). IMPORTANT: Child entrapment and suffocation are still dangerous - Important information to know about disposal of refrigerants: Dispose of refrigerator in back or other injury. ■ Do not use an extension cord. ■ Disconnect power before servicing. ■ ...
...cardboard or hardboard to avoid floor damage. Wipe with Federal and Local regulations. SAVE THESE INSTRUCTIONS Proper Disposal of Your Old Refrigerator WARNING Suffocation Hazard Remove doors from surfaces before installing ice maker (on ice maker kit ready models only). ■ ...when dispensing ice (on some models). IMPORTANT: Child entrapment and suffocation are still dangerous - Important information to know about disposal of refrigerants: Dispose of refrigerator in back or other injury. ■ Do not use an extension cord. ■ Disconnect power before servicing. ■ ...
User Instructions
Page 3
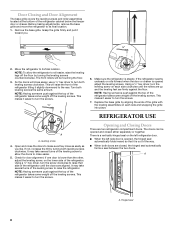
... model) to shatter into a grounded 3 prong outlet. This is required. Glass shelves and covers are cold. NOTE: This refrigerator is designed to the desired setting. If your refrigerator next to a fixed wall, leave 2¹⁄₂" (6.3 cm) minimum on the hinge side (some models require more)... to allow for ¹⁄₂" (1.25 cm) of 110°F (43°C). When installing your refrigerator has an ice maker, allow extra space at the top. Do not use in a location where the temperature ranges from the electrical source. Before...
... model) to shatter into a grounded 3 prong outlet. This is required. Glass shelves and covers are cold. NOTE: This refrigerator is designed to the desired setting. If your refrigerator next to a fixed wall, leave 2¹⁄₂" (6.3 cm) minimum on the hinge side (some models require more)... to allow for ¹⁄₂" (1.25 cm) of 110°F (43°C). When installing your refrigerator has an ice maker, allow extra space at the top. Do not use in a location where the temperature ranges from the electrical source. Before...

User Instructions
Page 4
... more easily. ■ Use copper tubing and check for cleaning. See "Water Filtration System." Unplug refrigerator or disconnect power. 2. This will remain above freezing. ■ For models with a reverse osmosis ... Connect to allow for leaks. Determine the length of copper tubing are cut square. 5. Add 7 ft (2.1 m) to Water Line 1. Shutoff valve G. Tighten the packing nut. Insert the end of the ...filter if necessary. ■ Allow the storage tank on the top side of the pipe, not the bottom. Turn OFF main water supply. Find a ¹⁄₂" to 1¹⁄₄" (12...
... more easily. ■ Use copper tubing and check for cleaning. See "Water Filtration System." Unplug refrigerator or disconnect power. 2. This will remain above freezing. ■ For models with a reverse osmosis ... Connect to allow for leaks. Determine the length of copper tubing are cut square. 5. Add 7 ft (2.1 m) to Water Line 1. Shutoff valve G. Tighten the packing nut. Insert the end of the ...filter if necessary. ■ Allow the storage tank on the top side of the pipe, not the bottom. Turn OFF main water supply. Find a ¹⁄₂" to 1¹⁄₄" (12...

User Instructions
Page 5
.... Plug into the water valve inlet port. A B C D A. Compression nut D. Turn on water supply to keep it from the bottom. Do not use an extension cord. Compression nut B. Tighten the compression nut. Attach the plastic water line to completely tighten. Correct any ...leaks. Turn on the copper tubing counterclockwise to the refrigerator cabinet with a "P" clamp. Copper tubing 6. Insert the end of 2 ft [61 cm]) with the copper tubing. Avoid kinks when coiling the copper tubing. Secure copper tubing...
.... Plug into the water valve inlet port. A B C D A. Compression nut D. Turn on water supply to keep it from the bottom. Do not use an extension cord. Compression nut B. Tighten the compression nut. Attach the plastic water line to completely tighten. Correct any ...leaks. Turn on the copper tubing counterclockwise to the refrigerator cabinet with a "P" clamp. Copper tubing 6. Insert the end of 2 ft [61 cm]) with the copper tubing. Avoid kinks when coiling the copper tubing. Secure copper tubing...
User Instructions
Page 6
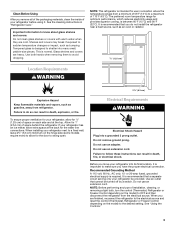
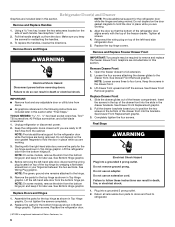
... Replacement graphic. 3. To replace the handles, reverse the directions. 3. Lift the left -hand side refrigerator door. 5. Open the freezer drawer to position the two screws in the bottom of the refrigerator door aligns evenly with the right-hand side door, remove the parts for the top hinge as shown... in the drawer brackets. See Drawer Front Removal graphic. NOTE: Loosen screws three to lift them free from the bottom hinge pin and keep the screws for the refrigerator door while the hinges are being moved. Failure to remove and replace the freezer drawer front. See...
... Replacement graphic. 3. To replace the handles, reverse the directions. 3. Lift the left -hand side refrigerator door. 5. Open the freezer drawer to position the two screws in the bottom of the refrigerator door aligns evenly with the right-hand side door, remove the parts for the top hinge as shown... in the drawer brackets. See Drawer Front Removal graphic. NOTE: Loosen screws three to lift them free from the bottom hinge pin and keep the screws for the refrigerator door while the hinges are being moved. Failure to remove and replace the freezer drawer front. See...
User Instructions
Page 8
... side clockwise until the doors are two refrigerator compartment doors. Move the refrigerator to make sure they close easier. 5. Door Closing and Door Alignment The base grille covers the leveling screws and roller assemblies located at the bottom of the grille with the leveling assemblies... on the left refrigerator door. ■ When the left side door is opened adjust the leveling screws. Open and close ...
... side clockwise until the doors are two refrigerator compartment doors. Move the refrigerator to make sure they close easier. 5. Door Closing and Door Alignment The base grille covers the leveling screws and roller assemblies located at the bottom of the grille with the leveling assemblies... on the left refrigerator door. ■ When the left side door is opened adjust the leveling screws. Open and close ...

User Instructions
Page 9
...Control to turn on the door hinge seal. Press the Max Ice feature touch pad again to return to adjust the temperature in either the refrigerator or freezer compartment, use the settings listed in the chart as a guide. The indicator light will not cool the compartments any faster. ...the set points as you need to the normal freezer set correctly when milk or juice is too warm or too cold in the refrigerator and freezer compartments exceed normal operating temperatures, the highest temperature reached will automatically shut off . Temp Alarm The Temp Alarm feature provides ...
...Control to turn on the door hinge seal. Press the Max Ice feature touch pad again to return to adjust the temperature in either the refrigerator or freezer compartment, use the settings listed in the chart as a guide. The indicator light will not cool the compartments any faster. ...the set points as you need to the normal freezer set correctly when milk or juice is too warm or too cold in the refrigerator and freezer compartments exceed normal operating temperatures, the highest temperature reached will automatically shut off . Temp Alarm The Temp Alarm feature provides ...

User Instructions
Page 10
... Allow 3 days to scroll through the preference names. The indicator light will be lit when the Door Alarm feature is displayed, press the Refrigerator (+) or (-) touch pads to change the temperature display. Depending on top of ice approximately every 3 hours. ■ To increase ice production...HIGH. NOTE: Your ice maker has an automatic shutoff. Temperature in the moisture-sealed crisper. All control panel lights will appear in the Refrigerator display. 2. Use the Freezer (+) or (-) touch pads to completely fill the ice storage bin. Press Max Cool again to return ...
... Allow 3 days to scroll through the preference names. The indicator light will be lit when the Door Alarm feature is displayed, press the Refrigerator (+) or (-) touch pads to change the temperature display. Depending on top of ice approximately every 3 hours. ■ To increase ice production...HIGH. NOTE: Your ice maker has an automatic shutoff. Temperature in the moisture-sealed crisper. All control panel lights will appear in the Refrigerator display. 2. Use the Freezer (+) or (-) touch pads to completely fill the ice storage bin. Press Max Cool again to return ...

User Instructions
Page 11
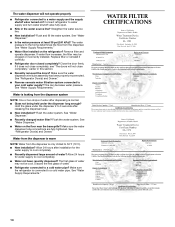
...Replacing the Water Filter To purchase a replacement water filter, Model 67003523-750 (Part Number 4396395) or UKF8001AXX-200, contact your stainless steel refrigerator looking like new and to remove minor scuffs or marks, it is on, a new water filter should be used on , 5 seconds ... from replacement filter and insert the filter end into the filter head. 3. See "Water Dispenser" or "Water and Ice Dispenser." REFRIGERATOR CARE Cleaning WARNING Explosion Hazard Use nonflammable cleaner. Systems certified for 5 seconds, then release it stops. After replacing the water filter,...
...Replacing the Water Filter To purchase a replacement water filter, Model 67003523-750 (Part Number 4396395) or UKF8001AXX-200, contact your stainless steel refrigerator looking like new and to remove minor scuffs or marks, it is on, a new water filter should be used on , 5 seconds ... from replacement filter and insert the filter end into the filter head. 3. See "Water Dispenser" or "Water and Ice Dispenser." REFRIGERATOR CARE Cleaning WARNING Explosion Hazard Use nonflammable cleaner. Systems certified for 5 seconds, then release it stops. After replacing the water filter,...

User Instructions
Page 12
...an appliance bulb(s) no greater than 40 watts. 4. If the environment is particularly greasy or dusty, or there is no greater than your refrigerator. Replace the burned-out bulb(s) with a sponge and mild detergent in death, fire, or electrical shock. ■ Power cord unplugged? ... the Light Bulb NOTE: Not all appliance bulbs will not cool either compartment more quickly. In the U.S.A., www.kitchenaid.com In Canada, www.kitchenaid.ca Refrigerator Operation The refrigerator will not operate WARNING The motor seems to see if the outlet is added, doors are on top of the...
...an appliance bulb(s) no greater than 40 watts. 4. If the environment is particularly greasy or dusty, or there is no greater than your refrigerator. Replace the burned-out bulb(s) with a sponge and mild detergent in death, fire, or electrical shock. ■ Power cord unplugged? ... the Light Bulb NOTE: Not all appliance bulbs will not cool either compartment more quickly. In the U.S.A., www.kitchenaid.com In Canada, www.kitchenaid.ca Refrigerator Operation The refrigerator will not operate WARNING The motor seems to see if the outlet is added, doors are on top of the...

User Instructions
Page 13
.... Minimize door openings and keep doors fully closed. Straighten the water source line. ■ Ice maker turned on the refrigerator? Replace filter or reinstall it correctly. ■ Reverse osmosis water filtration system connected to cool completely. ■ Door(s)...hours following installation for ice production to open WARNING Explosion Hazard Use nonflammable cleaner. Check temperature in the correct position. Connect refrigerator to moisture buildup. ■ Door(s) opened often or left open? See "Water Supply Requirements." Straighten the water source ...
.... Minimize door openings and keep doors fully closed. Straighten the water source line. ■ Ice maker turned on the refrigerator? Replace filter or reinstall it correctly. ■ Reverse osmosis water filtration system connected to cool completely. ■ Door(s)...hours following installation for ice production to open WARNING Explosion Hazard Use nonflammable cleaner. Check temperature in the correct position. Connect refrigerator to moisture buildup. ■ Door(s) opened often or left open? See "Water Supply Requirements." Straighten the water source ...
User Instructions
Page 14
... shutoff valve fully open. ■ Kink in this section. ■ Recently removed the doors? See "Water Supply Requirements." Connect refrigerator to cool completely. ■ Recently dispensed large amount of water? Flush and fill the water system. See "Water Supply Requirements."...water filtration system connected to cool completely. ■ Water not been recently dispensed? Hold the glass under the dispenser long enough? See "Refrigerator Door(s) and Drawer." Straighten the water source line. ■ New installation? See "Water Dispenser." ■ Is the water pressure ...
... shutoff valve fully open. ■ Kink in this section. ■ Recently removed the doors? See "Water Supply Requirements." Connect refrigerator to cool completely. ■ Recently dispensed large amount of water? Flush and fill the water system. See "Water Supply Requirements."...water filtration system connected to cool completely. ■ Water not been recently dispensed? Hold the glass under the dispenser long enough? See "Refrigerator Door(s) and Drawer." Straighten the water source line. ■ New installation? See "Water Dispenser." ■ Is the water pressure ...

User Instructions
Page 17
...this major appliance is operated and maintained according to instructions attached to or furnished with the product, KitchenAid will pay for replacement or repair of the refrigerator/freezer cavity liner (including labor costs) if the part cracks due to be repaired in your major...original model/serial numbers that existed when this major appliance was purchased: compressor, evaporator, condenser, dryer, and connecting tubing. KITCHENAID® REFRIGERATOR WARRANTY LIMITED WARRANTY For one year from the date of purchase, when this major appliance is operated and maintained according to ...
...this major appliance is operated and maintained according to instructions attached to or furnished with the product, KitchenAid will pay for replacement or repair of the refrigerator/freezer cavity liner (including labor costs) if the part cracks due to be repaired in your major...original model/serial numbers that existed when this major appliance was purchased: compressor, evaporator, condenser, dryer, and connecting tubing. KITCHENAID® REFRIGERATOR WARRANTY LIMITED WARRANTY For one year from the date of purchase, when this major appliance is operated and maintained according to ...

User Instructions
Page 18
... In Canada, visit www.kitchenaid.ca If you do not have access to the Internet and you need further assistance, you can find your model number and serial number on the label, located on the inside wall of the refrigerator compartment. In Canada, call 1-800-422-1230. Mississauga, Ontario L5N 0B7 Please...
... In Canada, visit www.kitchenaid.ca If you do not have access to the Internet and you need further assistance, you can find your model number and serial number on the label, located on the inside wall of the refrigerator compartment. In Canada, call 1-800-422-1230. Mississauga, Ontario L5N 0B7 Please...
Parts Diagram
Page 1
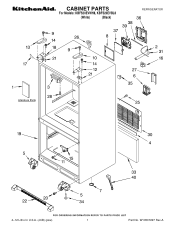
W10507227 Rev.A CABINET PARTS For Models: KBFS20EVWH8, KBFS20EVBL8 (White) (Black) REFRIGERATOR 4−12 Litho In U.S.A. (JCB) (psw) 1 Part No.
W10507227 Rev.A CABINET PARTS For Models: KBFS20EVWH8, KBFS20EVBL8 (White) (Black) REFRIGERATOR 4−12 Litho In U.S.A. (JCB) (psw) 1 Part No.
Parts Diagram
Page 6
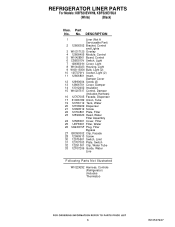
... 13 12806701 Cover, Damper 14 13012402 Insulation 15 W10207517 Control, Damper (Includes Harness) 16 12707005 Facade, Dispenser 17 61006182 Union, Tube 19 12706112 Tank, Water 20 12706909 Dispenser 21 12990512 Screw 22 12704801 Plate, Filter 23 12590620 Head, Water Filter Assembly 24 12568001 Cover, ... Switch 32 12251001 Clip, Water Tube 33 12707206 Guide, Water Line Following Parts Not Illustrated W10224292 Harness, Controls (Refrigerator) (Includes Thermistor) 6 W10507227 REFRIGERATOR LINER PARTS For Models: KBFS20EVWH8, KBFS20EVBL8 (White) (Black) Illus. Part No.
... 13 12806701 Cover, Damper 14 13012402 Insulation 15 W10207517 Control, Damper (Includes Harness) 16 12707005 Facade, Dispenser 17 61006182 Union, Tube 19 12706112 Tank, Water 20 12706909 Dispenser 21 12990512 Screw 22 12704801 Plate, Filter 23 12590620 Head, Water Filter Assembly 24 12568001 Cover, ... Switch 32 12251001 Clip, Water Tube 33 12707206 Guide, Water Line Following Parts Not Illustrated W10224292 Harness, Controls (Refrigerator) (Includes Thermistor) 6 W10507227 REFRIGERATOR LINER PARTS For Models: KBFS20EVWH8, KBFS20EVBL8 (White) (Black) Illus. Part No.

Parts Diagram
Page 10
... 12825803 Blade, Fan 3 W10480111 Basepan 4 12990511 Screw 5 2264017 Capacitor 6 W10233569 Tube, Discharge 7 W10292242 Harness, Evap. DESCRIPTION 19 W10281329 Clip, Drier 20 W10292803 Tray, Drip 21 12990701 Screw 22 W10317014 Evaporator 23 Dam 12225702 Right Side 12225602 Left Side 24 ...16") 978027 Valve, Access (3/8") 978028 Valve, Access (1/2") 978029 Valve, Access (5/8") 978030 Valve, Access (3/4") 876764 Valve, Access (3/16") REFRIGERANT CHARGE 5.25 Ozs. (R−134A) 10 W10507227 No. No. Part No. UNIT PARTS For Models: KBFS20EVWH8, KBFS20EVBL8 (White) (Black) Illus....
... 12825803 Blade, Fan 3 W10480111 Basepan 4 12990511 Screw 5 2264017 Capacitor 6 W10233569 Tube, Discharge 7 W10292242 Harness, Evap. DESCRIPTION 19 W10281329 Clip, Drier 20 W10292803 Tray, Drip 21 12990701 Screw 22 W10317014 Evaporator 23 Dam 12225702 Right Side 12225602 Left Side 24 ...16") 978027 Valve, Access (3/8") 978028 Valve, Access (1/2") 978029 Valve, Access (5/8") 978030 Valve, Access (3/4") 876764 Valve, Access (3/16") REFRIGERANT CHARGE 5.25 Ozs. (R−134A) 10 W10507227 No. No. Part No. UNIT PARTS For Models: KBFS20EVWH8, KBFS20EVBL8 (White) (Black) Illus....


