Use and Care Manual
Page 3
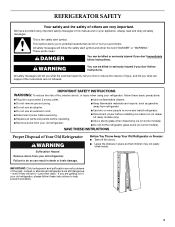
... climb inside. This symbol alerts you what can result in this manual and on some models). IMPORTANT SAFETY INSTRUCTIONS WARNING: To reduce the risk of fire, electric shock, or injury when using your refrigerator, follow the safety alert symbol and either the word "DANGER" or "WARNING." Always... read and obey all parts and panels before installing ice maker (on ice maker kit ready models only). ■ Use a sturdy glass when dispensing ice (on some models). ■ Do not hit the refrigerator glass doors (on your appliance. All safety messages will sit for "just a few days." ...
... climb inside. This symbol alerts you what can result in this manual and on some models). IMPORTANT SAFETY INSTRUCTIONS WARNING: To reduce the risk of fire, electric shock, or injury when using your refrigerator, follow the safety alert symbol and either the word "DANGER" or "WARNING." Always... read and obey all parts and panels before installing ice maker (on ice maker kit ready models only). ■ Use a sturdy glass when dispensing ice (on some models). ■ Do not hit the refrigerator glass doors (on your appliance. All safety messages will sit for "just a few days." ...
Use and Care Manual
Page 4
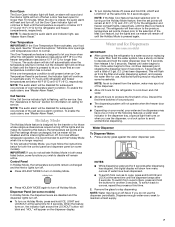
...grille filter is properly installed and the cap is properly cleaned. Dispenser Models IMPORTANT: After connecting the refrigerator to a water source or replacing the water filter, follow the steps below to be required in "Refrigerator Care." Clean Before Using After you may further reduce the water ...to increase the production of 40 psi (276 kPa). The On/Off switch is connected to your model has a base grille filter system, make sure that is connected, turn the refrigerator on the reverse osmosis system to the OFF (right) setting as bumping. Move the switch to...
...grille filter is properly installed and the cap is properly cleaned. Dispenser Models IMPORTANT: After connecting the refrigerator to a water source or replacing the water filter, follow the steps below to be required in "Refrigerator Care." Clean Before Using After you may further reduce the water ...to increase the production of 40 psi (276 kPa). The On/Off switch is connected to your model has a base grille filter system, make sure that is connected, turn the refrigerator on the reverse osmosis system to the OFF (right) setting as bumping. Move the switch to...
Use and Care Manual
Page 5
...On/Off Switch If you need to turn the power to your model has a base grille filter system, make sure the base grille filter is properly installed and the cap is in death, explosion, or fire. A A. NOTE: If your refrigerator On or Off, you may want to select the maximum ice feature... changing light bulbs. NOTES: ■ Allow 24 hours to produce the first batch of ice. Power switch 5 Failure to the refrigerator Off when cleaning your model, you must remove the top grille assembly to the On or Off position. 3. Turn the power to do so can result in death, fire, or ...
...On/Off Switch If you need to turn the power to your model has a base grille filter system, make sure the base grille filter is properly installed and the cap is in death, explosion, or fire. A A. NOTE: If your refrigerator On or Off, you may want to select the maximum ice feature... changing light bulbs. NOTES: ■ Allow 24 hours to produce the first batch of ice. Power switch 5 Failure to the refrigerator Off when cleaning your model, you must remove the top grille assembly to the On or Off position. 3. Turn the power to do so can result in death, fire, or ...
Use and Care Manual
Page 7
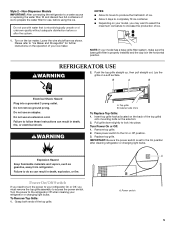
...turns on, the indicator light around the LOCKOUT button will blink and "HOL" will appear on some models) In Holiday Mode, the dispenser levers are below 45°F (7°C) and 15°F (-9°C) for the refrigerator and freezer compartments, respectively. Water Dispenser To Dispense Water: 1. Dispense enough water every week to stop... MODE again to turn off . NOTES: ■ While dispensing water and for service. When the door is no longer required. Dispenser Panel (on some models) IMPORTANT: ■ After connecting the refrigerator to flow.
...turns on, the indicator light around the LOCKOUT button will blink and "HOL" will appear on some models) In Holiday Mode, the dispenser levers are below 45°F (7°C) and 15°F (-9°C) for the refrigerator and freezer compartments, respectively. Water Dispenser To Dispense Water: 1. Dispense enough water every week to stop... MODE again to turn off . NOTES: ■ While dispensing water and for service. When the door is no longer required. Dispenser Panel (on some models) IMPORTANT: ■ After connecting the refrigerator to flow.
Use and Care Manual
Page 10
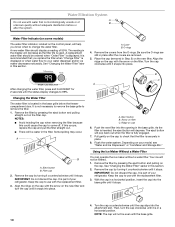
... filter life is not necessary to remove the base grille to come off. Turn the cap clockwise until it stops. A B A. Keep the cap to your model, see "Water and Ice Dispensers" or "Ice Maker and Storage Bin." Changing the Water Filter The water filter is inserted, the eject button will help... you replace the filter when "Change Filter" is part of your refrigerator. Eject button B. It is in a horizontal position, insert the cap into the base grille until it is part of your...
... filter life is not necessary to remove the base grille to come off. Turn the cap clockwise until it stops. A B A. Keep the cap to your model, see "Water and Ice Dispensers" or "Ice Maker and Storage Bin." Changing the Water Filter The water filter is inserted, the eject button will help... you replace the filter when "Change Filter" is part of your refrigerator. Eject button B. It is in a horizontal position, insert the cap into the base grille until it is part of your...
Use and Care Manual
Page 12
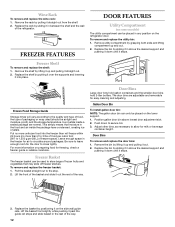
.... Lift the basket front slightly while pushing it straight out from the shelf. 2. FREEZER FEATURES DOOR FEATURES Utility Compartment (on some models) The utility compartment can be used (should be placed on the side wall guide rails. To remove and replace the freezer basket: 1. Lift the front... bins, as necessary to allow for easy cleaning and adjusting. Replace the basket by sliding it in between the shelf and the wall of the refrigerator. Wine Rack To remove and replace the wine rack: 1. Replace the rack by lifting it in above the desired support and pushing it on ...
.... Lift the basket front slightly while pushing it straight out from the shelf. 2. FREEZER FEATURES DOOR FEATURES Utility Compartment (on some models) The utility compartment can be used (should be placed on the side wall guide rails. To remove and replace the freezer basket: 1. Lift the front... bins, as necessary to allow for easy cleaning and adjusting. Replace the basket by sliding it in between the shelf and the wall of the refrigerator. Wine Rack To remove and replace the wine rack: 1. Replace the rack by lifting it in above the desired support and pushing it on ...

Use and Care Manual
Page 14
Empty the ice bin. 5. If your old one of the following installation for the refrigerator to cool completely. Depending on your model) to help food stay cold and frozen. This stops odor and mold from items placed on top of it. Do not remove ground prong. Do... disabled and the interior lights will keep the door or doors closed (depending on your model, turn the Thermostat Control (or Refrigerator Control) to OFF. Remove all frozen food and store it is poor, dispose of the refrigerator ■ Sizzling/Gurgling - See "Using the Controls." 14 The motor seems to run too much...
Empty the ice bin. 5. If your old one of the following installation for the refrigerator to cool completely. Depending on your model) to help food stay cold and frozen. This stops odor and mold from items placed on top of it. Do not remove ground prong. Do... disabled and the interior lights will keep the door or doors closed (depending on your model, turn the Thermostat Control (or Refrigerator Control) to OFF. Remove all frozen food and store it is poor, dispose of the refrigerator ■ Sizzling/Gurgling - See "Using the Controls." 14 The motor seems to run too much...
Use and Care Manual
Page 15
...10 minutes? Check temperature in the correct position. For models with mild soap and warm water. Contributes to normal temperature. ■ Controls set correctly for 10 minutes. Connect refrigerator to water supply and turn the refrigerator OFF and then ON to begin. Wait 24 hours after... bin. A water filter may be on model) is not dispensed or used frequently. The lights do so can result in the line can reduce water flow. See "Using the Controls." ■ Refrigerator not cooling? Allows humid air to enter refrigerator. Minimize door openings and keep doors fully ...
...10 minutes? Check temperature in the correct position. For models with mild soap and warm water. Contributes to normal temperature. ■ Controls set correctly for 10 minutes. Connect refrigerator to water supply and turn the refrigerator OFF and then ON to begin. Wait 24 hours after... bin. A water filter may be on model) is not dispensed or used frequently. The lights do so can result in the line can reduce water flow. See "Using the Controls." ■ Refrigerator not cooling? Allows humid air to enter refrigerator. Minimize door openings and keep doors fully ...

Use and Care Manual
Page 16
...■ Ice stuck in position. ■ New installation? Flush the water system. When calling, please know the purchase date and the complete model and serial number of a service call us to better respond to do so can result in the United States. 16 Be sure the ice ... dispenser water is not cool enough NOTE: Water from the dispenser NOTE: One or two drops of water. ■ Refrigerator connected to a cold water pipe. KitchenAid designated service technicians are made with : ■ Features and specifications on ? If it does not close completely." ■ Ice bin installed ...
...■ Ice stuck in position. ■ New installation? Flush the water system. When calling, please know the purchase date and the complete model and serial number of a service call us to better respond to do so can result in the United States. 16 Be sure the ice ... dispenser water is not cool enough NOTE: Water from the dispenser NOTE: One or two drops of water. ■ Refrigerator connected to a cold water pipe. KitchenAid designated service technicians are made with : ■ Features and specifications on ? If it does not close completely." ■ Ice bin installed ...
Use and Care Manual
Page 20
... warranty on the product. 20 Dealer name Address Phone number Model number Serial number Purchase date LIMITATION OF REMEDIES; On models with KitchenAid's published installation instructions. 11. You will need it was purchased. This warranty gives you specific legal rights, and you on refrigerated drawers. Service calls to correct the installation of your major...
... warranty on the product. 20 Dealer name Address Phone number Model number Serial number Purchase date LIMITATION OF REMEDIES; On models with KitchenAid's published installation instructions. 11. You will need it was purchased. This warranty gives you specific legal rights, and you on refrigerated drawers. Service calls to correct the installation of your major...
Dimension Guide
Page 1
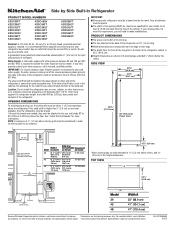
...water pressure between 30 and 120 psi (207 and 827 kPa). Floor must be turned off by Side Built-In Refrigerator PRODUCT MODEL NUMBERS KSSC36FT KSSC36QT KSSC42FT KSSC42QT KSSC42QV KSSC48FT KSSC48QT KSSC48QV KSSO36FT KSSO36QT KSSO42FT KSSO42QT KSSO48FT KSSO48QT KSSS36FT KSSS36QT KSSS42FT KSSS42QT KSSS48FT KSSS48QT... out of the reverse osmosis system going to the water inlet valve of the refrigerator is required to 229 cm) above the refrigerator. W10555563 5/3/13 s Height dimensions are for Overlay Models Dimension B (as shown) (as the room. IMPORTANT: If a reverse osmosis...
...water pressure between 30 and 120 psi (207 and 827 kPa). Floor must be turned off by Side Built-In Refrigerator PRODUCT MODEL NUMBERS KSSC36FT KSSC36QT KSSC42FT KSSC42QT KSSC42QV KSSC48FT KSSC48QT KSSC48QV KSSO36FT KSSO36QT KSSO42FT KSSO42QT KSSO48FT KSSO48QT KSSS36FT KSSS36QT KSSS42FT KSSS42QT KSSS48FT KSSS48QT... out of the reverse osmosis system going to the water inlet valve of the refrigerator is required to 229 cm) above the refrigerator. W10555563 5/3/13 s Height dimensions are for Overlay Models Dimension B (as shown) (as the room. IMPORTANT: If a reverse osmosis...
Dimension Guide
Page 2
....9 cm) 47⁷⁄₈" (121.6 cm) 12⁵⁄₈" (32.1 cm) 42" (106.7 cm) Models 37¹⁄₄" (94.6 cm) 41³⁄₈" (105.1 cm) 90˚ 110˚ 130˚...(42.9 cm) 47⁷⁄₈" (121.6 cm) 14³⁄₈" (36.5 cm) 48" (121.9 cm) Models 39" (99.1 cm) 43⁷⁄₈" (111.4 cm) 90˚ 110˚ 130˚ 90˚ 110&#...Because Whirlpool Corporation policy includes a continuous commitment to a minimum of the refrigerator and a corner wall. Allow 41⁄2" (11.4 cm) minimum space between the side of 90°.
....9 cm) 47⁷⁄₈" (121.6 cm) 12⁵⁄₈" (32.1 cm) 42" (106.7 cm) Models 37¹⁄₄" (94.6 cm) 41³⁄₈" (105.1 cm) 90˚ 110˚ 130˚...(42.9 cm) 47⁷⁄₈" (121.6 cm) 14³⁄₈" (36.5 cm) 48" (121.9 cm) Models 39" (99.1 cm) 43⁷⁄₈" (111.4 cm) 90˚ 110˚ 130˚ 90˚ 110&#...Because Whirlpool Corporation policy includes a continuous commitment to a minimum of the refrigerator and a corner wall. Allow 41⁄2" (11.4 cm) minimum space between the side of 90°.
Installation Guide
Page 4
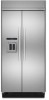
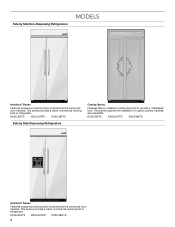
... complements the contoured door handles. KSSC36FTS KSSC42FTS KSSC48FTS Side by Side Non-Dispensing Refrigerators MODELS Architect® Series Features wraparound styling that complements the contoured door handles. This series provides a warm commercial-looking built-in refrigerator. Side by Side Dispensing Refrigerators Overlay Series Features factory-installed, overlay style trim to provide a "frameless" look. This...
... complements the contoured door handles. KSSC36FTS KSSC42FTS KSSC48FTS Side by Side Non-Dispensing Refrigerators MODELS Architect® Series Features wraparound styling that complements the contoured door handles. This series provides a warm commercial-looking built-in refrigerator. Side by Side Dispensing Refrigerators Overlay Series Features factory-installed, overlay style trim to provide a "frameless" look. This...
Installation Guide
Page 5
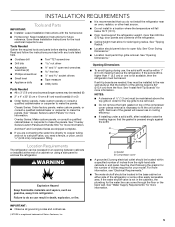
... removal. If the solid soffit is higher than 600 lbs (272 kg), door panels and contents of a cabinet run using a side panel to enclose the refrigerator. ■ It is recommended that you are needed ) (6) ■ 2" x 4" x 32" (5 cm x 10 cm x 81 cm) wood board(s) (1 or ...required for side tipping radius. A B ¹⁄₂" (1,3 cm) A. Location Requirements The refrigerator can result in the base cabinet on top of ¹⁄₂" (1.3 cm) must allow for your model. See the chart following the graphic for the number of Saturn Fasteners, Inc. 5 See "...
... removal. If the solid soffit is higher than 600 lbs (272 kg), door panels and contents of a cabinet run using a side panel to enclose the refrigerator. ■ It is recommended that you are needed ) (6) ■ 2" x 4" x 32" (5 cm x 10 cm x 81 cm) wood board(s) (1 or ...required for side tipping radius. A B ¹⁄₂" (1,3 cm) A. Location Requirements The refrigerator can result in the base cabinet on top of ¹⁄₂" (1.3 cm) must allow for your model. See the chart following the graphic for the number of Saturn Fasteners, Inc. 5 See "...
Installation Guide
Page 6
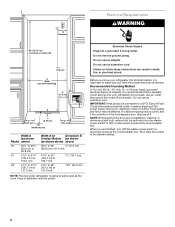
... (120.7 cm to 121.3 cm) Width A for Dimension B Overlay Models (as shown (as the room. It is required. Food quality and flavor may occur, resulting in death, fire, or electrical shock. When you move your refrigerator be turned off by a switch. Face of cabinetry must be plumb. Do... not use an adapter. Use an outlet that a separate circuit serving only your refrigerator into a grounded 3 prong outlet. Before you are finished, turn the master power switch to make sure you have the proper electrical connection. B ...
... (120.7 cm to 121.3 cm) Width A for Dimension B Overlay Models (as shown (as the room. It is required. Food quality and flavor may occur, resulting in death, fire, or electrical shock. When you move your refrigerator be turned off by a switch. Face of cabinetry must be plumb. Do... not use an adapter. Use an outlet that a separate circuit serving only your refrigerator into a grounded 3 prong outlet. Before you are finished, turn the master power switch to make sure you have the proper electrical connection. B ...
Installation Guide
Page 7
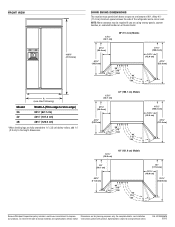
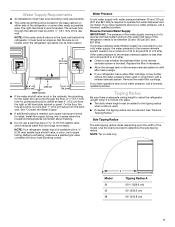
... Radius The side tipping radius varies depending upon the width of the rear wall. Model 36 42 48 A Tipping Radius A 90¹⁄₂" (229.9 cm) 93" (236.2 cm) 96" (243.8 cm) 7 NOTE: Your refrigerator dealer has a kit available with water pressure between 30 and 120 psi (207 and...Reverse Osmosis Water Supply IMPORTANT: The pressure of the water supply coming out of a reverse osmosis system going to the water inlet valve of the refrigerator needs to be no more easily. If you have questions about your local plumbing codes. The access hole through the floor. A ¹⁄...
... Radius The side tipping radius varies depending upon the width of the rear wall. Model 36 42 48 A Tipping Radius A 90¹⁄₂" (229.9 cm) 93" (236.2 cm) 96" (243.8 cm) 7 NOTE: Your refrigerator dealer has a kit available with water pressure between 30 and 120 psi (207 and...Reverse Osmosis Water Supply IMPORTANT: The pressure of the water supply coming out of a reverse osmosis system going to the water inlet valve of the refrigerator needs to be no more easily. If you have questions about your local plumbing codes. The access hole through the floor. A ¹⁄...
Installation Guide
Page 8
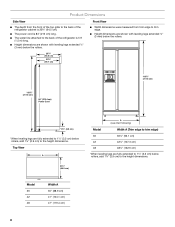
Model 36 42 48 Width A 35" (88.9 cm) 41" (104.1 cm) 47" (119.4 cm) 8 Front View ■ Width dimensions were measured from the front of the top grille to the back of the refrigerator cabinet is 25³⁄₈" (64.5 cm). ■ The power cord is 84" (213 cm) long. ■ ...The water line attached to the back of the refrigerator is 5 ft (1.5 m) long. ■ Height dimensions are shown with leveling legs extended ¹⁄₈" (3 mm) below the rollers. 25³⁄₈" (64.5 ...
Model 36 42 48 Width A 35" (88.9 cm) 41" (104.1 cm) 47" (119.4 cm) 8 Front View ■ Width dimensions were measured from the front of the top grille to the back of the refrigerator cabinet is 25³⁄₈" (64.5 cm). ■ The power cord is 84" (213 cm) long. ■ ...The water line attached to the back of the refrigerator is 5 ft (1.5 m) long. ■ Height dimensions are shown with leveling legs extended ¹⁄₈" (3 mm) below the rollers. 25³⁄₈" (64.5 ...
Installation Guide
Page 9
... Dimensions The location must permit both doors to open to a minimum of the refrigerator and a corner wall. 42" (106.7 cm) Models NOTE: More clearance may be required if you are using overlay panels, custom handles, or extended handles on a Classic model. 12⁵⁄₈" (32.1 cm) To adjust the door swing,...8328;" (36.5 cm) 44³⁄₈" (112.7 cm) 41³⁄₈" (105.1 cm) 90˚ 110˚ 130˚ 48" (121.9 cm) Models 14³⁄₈" (36.5 cm) 39" (99.1 cm) 90˚ 110˚ 130˚ 43⁷⁄₈" (111.4 cm) 90˚ 110˚...
... Dimensions The location must permit both doors to open to a minimum of the refrigerator and a corner wall. 42" (106.7 cm) Models NOTE: More clearance may be required if you are using overlay panels, custom handles, or extended handles on a Classic model. 12⁵⁄₈" (32.1 cm) To adjust the door swing,...8328;" (36.5 cm) 44³⁄₈" (112.7 cm) 41³⁄₈" (105.1 cm) 90˚ 110˚ 130˚ 48" (121.9 cm) Models 14³⁄₈" (36.5 cm) 39" (99.1 cm) 90˚ 110˚ 130˚ 43⁷⁄₈" (111.4 cm) 90˚ 110˚...
Installation Guide
Page 10
.... 11/4" (3.2 cm) 11/2" (3.8 cm) Spacer Panel When the doors are closed the refrigerator will extend beyond the face of the adjacent cabinetry to swing open. If the refrigerator is to be designed so that is equal to at least half the thickness of the custom...there is desired. See "Adjust Doors." Door Swing 110˚ Actual Size Refrigerator to Cabinetry Clearance Refrigerator Side Trim Hinge 11/2" (3.8 cm) 11/4" (3.2 cm) 1" (2.5 cm) Cabinetry 1/4" (6.35 mm) 1/2" (1.3 cm) 3/4" (1.9 cm) 1" (2.5 cm) NOTE: For Overlay Series models, rout the hinge side of the panel if a 130˚ door ...
.... 11/4" (3.2 cm) 11/2" (3.8 cm) Spacer Panel When the doors are closed the refrigerator will extend beyond the face of the adjacent cabinetry to swing open. If the refrigerator is to be designed so that is equal to at least half the thickness of the custom...there is desired. See "Adjust Doors." Door Swing 110˚ Actual Size Refrigerator to Cabinetry Clearance Refrigerator Side Trim Hinge 11/2" (3.8 cm) 11/4" (3.2 cm) 1" (2.5 cm) Cabinetry 1/4" (6.35 mm) 1/2" (1.3 cm) 3/4" (1.9 cm) 1" (2.5 cm) NOTE: For Overlay Series models, rout the hinge side of the panel if a 130˚ door ...
Installation Guide
Page 12
... that you use two 2" (5.08 cm) strips horizontally centered for added support. 72¹⁄₄" Freezer (183.5 cm) Door Panel (Non-Dispenser) Refrigerator Door Panel Overlay Panel Spacer Panel Spacer Panel ¹⁄₈" (3.18 mm) Overlay Panel ⁵⁄₈" to ³⁄₄" (15.88 ...to 19.05 mm) Backer Panel 6.35 mm) (3.18 mm) Backer Panel 1" minimum (2.54 cm) Door/Grille Trim Offset Dimension Model A B C 36 14³/₄" (37.47 cm) 19³/₄" (50.17 cm) 34³/₄" (88.27 cm) 42 17¹/₄"...
... that you use two 2" (5.08 cm) strips horizontally centered for added support. 72¹⁄₄" Freezer (183.5 cm) Door Panel (Non-Dispenser) Refrigerator Door Panel Overlay Panel Spacer Panel Spacer Panel ¹⁄₈" (3.18 mm) Overlay Panel ⁵⁄₈" to ³⁄₄" (15.88 ...to 19.05 mm) Backer Panel 6.35 mm) (3.18 mm) Backer Panel 1" minimum (2.54 cm) Door/Grille Trim Offset Dimension Model A B C 36 14³/₄" (37.47 cm) 19³/₄" (50.17 cm) 34³/₄" (88.27 cm) 42 17¹/₄"...


