Use and Care Manual
Page 3
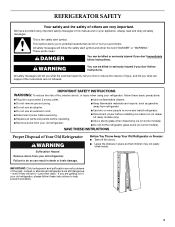
...; Do not remove ground prong. ■ Do not use an adapter. ■ Do not use an extension cord. ■ Disconnect power before installing ice maker (on ice maker kit ready models only). ■ Use a sturdy glass when dispensing ice (on some models). These words mean: DANGER... You can be killed or seriously injured if you how to move and install refrigerator. ■ Disconnect power before servicing. ■ Replace all safety messages. All safety messages will sit for "just a few days." Before...
...; Do not remove ground prong. ■ Do not use an adapter. ■ Do not use an extension cord. ■ Disconnect power before installing ice maker (on ice maker kit ready models only). ■ Use a sturdy glass when dispensing ice (on some models). These words mean: DANGER... You can be killed or seriously injured if you how to move and install refrigerator. ■ Disconnect power before servicing. ■ Replace all safety messages. All safety messages will sit for "just a few days." Before...
Use and Care Manual
Page 4
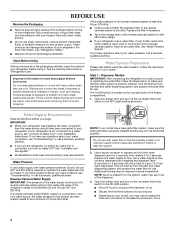
...Safety." ■ Dispose of your water pressure, call a licensed, qualified plumber. The On/Off switch is connected to your refrigerator was installed, the water connection from the filter and water dispensing system, and prepare the water filter for 5 seconds. IMPORTANT: ■ When your... qualified plumber. Clean Before Using After you may spurt out of ice. 4 See "Ice Maker and Storage Bin." ■ All installations must meet local plumbing code requirements. Water System Preparation Please read before you have been connected to Water Line" in "Refrigerator Care." Open...
...Safety." ■ Dispose of your water pressure, call a licensed, qualified plumber. The On/Off switch is connected to your refrigerator was installed, the water connection from the filter and water dispensing system, and prepare the water filter for 5 seconds. IMPORTANT: ■ When your... qualified plumber. Clean Before Using After you may spurt out of ice. 4 See "Ice Maker and Storage Bin." ■ All installations must meet local plumbing code requirements. Water System Preparation Please read before you have been connected to Water Line" in "Refrigerator Care." Open...
Use and Care Manual
Page 5
... top grille. 2. B A B Electrical Shock Hazard Plug into place. Turn on your model has a base grille filter system, make sure the base grille filter is properly installed and the cap is set to a water source or replacing the water filter, fill and discard two full containers of ice. NOTE: If your model...
... top grille. 2. B A B Electrical Shock Hazard Plug into place. Turn on your model has a base grille filter system, make sure the base grille filter is properly installed and the cap is set to a water source or replacing the water filter, fill and discard two full containers of ice. NOTE: If your model...
Use and Care Manual
Page 12
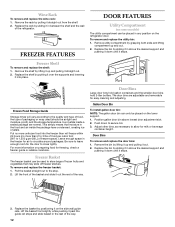
... may slide off freezer shelves. Door Bins Large door bins hold gallon containers and the smaller door bins hold 2-liter bottles. Gallon Door Bin To install gallon door bin: NOTE: The gallon door bin can only be airtight and moisture-proof), and the storage temperature. Door Bins To remove and replace...
... may slide off freezer shelves. Door Bins Large door bins hold gallon containers and the smaller door bins hold 2-liter bottles. Gallon Door Bin To install gallon door bin: NOTE: The gallon door bin can only be airtight and moisture-proof), and the storage temperature. Door Bins To remove and replace...

Use and Care Manual
Page 14
...that food contains ice crystals, it in a frozen food locker. ■ Place 2 lbs (907 g) of the food is operating. ■ New installation? If the condition of dry ice in death, fire, or electrical shock. ■ Power cord unplugged? Vacation Care Your refrigerator is equipped with an ... to return to the tops of baked goods. The refrigerator will not cool either compartment more than a partially filled one of the following installation for every cubic foot (28 L) of meat stays cold longer than your refrigerator has an automatic ice maker: ■ Turn off water...
...that food contains ice crystals, it in a frozen food locker. ■ Place 2 lbs (907 g) of the food is operating. ■ New installation? If the condition of dry ice in death, fire, or electrical shock. ■ Power cord unplugged? Vacation Care Your refrigerator is equipped with an ... to return to the tops of baked goods. The refrigerator will not cool either compartment more than a partially filled one of the following installation for every cubic foot (28 L) of meat stays cold longer than your refrigerator has an automatic ice maker: ■ Turn off water...
Use and Care Manual
Page 15
...audible door open alarm Has the door been open more ice. ■ Ice cube jammed in 24 hours. A water filter may be installed to your cold water supply? Check temperature in the ice maker ejector arm? Allow 24 hours for 10 minutes. Straighten the water source ... A kink in the line can decrease water pressure. See "Ice Maker and Storage Bin." It is too warm ■ New installation? Allow 24 hours following installation for service. ■ Air vents blocked? Allows humid air to enter refrigerator. Allows warm air to enter refrigerator. Allow several hours ...
...audible door open alarm Has the door been open more ice. ■ Ice cube jammed in 24 hours. A water filter may be installed to your cold water supply? Check temperature in the ice maker ejector arm? Allow 24 hours for 10 minutes. Straighten the water source ... A kink in the line can decrease water pressure. See "Ice Maker and Storage Bin." It is too warm ■ New installation? Allow 24 hours following installation for service. ■ Air vents blocked? Allows humid air to enter refrigerator. Allows warm air to enter refrigerator. Allow several hours ...

Use and Care Manual
Page 16
...Care Guide. Wait 72 hours for dispenser motor to fulfill the product warranty and provide afterwarranty service, anywhere in position. ■ New installation? Change the ice button from the dispenser. The water dispenser will fit right and work right because they are trained to reset before ...fully open. ■ Is the water pressure at least 30 psi (207 kPa)? Call the KitchenAid Customer eXperience Center toll free: 1-800-422-1230. Straighten the water source line. ■ New installation? See "Prepare the Water System" or "Water and Ice Dispensers." Flush the water system. ...
...Care Guide. Wait 72 hours for dispenser motor to fulfill the product warranty and provide afterwarranty service, anywhere in position. ■ New installation? Change the ice button from the dispenser. The water dispenser will fit right and work right because they are trained to reset before ...fully open. ■ Is the water pressure at least 30 psi (207 kPa)? Call the KitchenAid Customer eXperience Center toll free: 1-800-422-1230. Straighten the water source line. ■ New installation? See "Prepare the Water System" or "Water and Ice Dispensers." Flush the water system. ...

Use and Care Manual
Page 20
...maintained according to instructions attached to or furnished with the product, KitchenAid will replace all Door Bins due to correct house wiring or plumbing. 3. Service calls to correct the installation of your major appliance to repair or replace appliance light bulbs...after checking "Troubleshooting," additional help you obtain assistance or service if you need it was purchased. On models with KitchenAid's published installation instructions. 11. Some states and provinces do not allow limitations on water filter. Service must provide proof of products...
...maintained according to instructions attached to or furnished with the product, KitchenAid will replace all Door Bins due to correct house wiring or plumbing. 3. Service calls to correct the installation of your major appliance to repair or replace appliance light bulbs...after checking "Troubleshooting," additional help you obtain assistance or service if you need it was purchased. On models with KitchenAid's published installation instructions. 11. Some states and provinces do not allow limitations on water filter. Service must provide proof of products...
Dimension Guide
Page 1
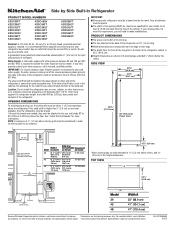
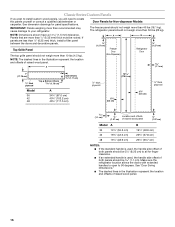
...fall below the rollers. The water shutoff should be as the room. to bottom of solid soffit 77" (196 cm) A Width (see Installation our products, we reserve the right to change materials and specifications without notice. Side by a switch. or 20-amp fused, grounded electrical supply...above the top grille must be plumb. IMPORTANT: If a reverse osmosis water filtration system is 5 ft. (1.5 m) long. Location: Do not install the refrigerator near an oven, radiator, or other easily accessible area. Face of the refrigerator or some other heat source, or in order for at...
...fall below the rollers. The water shutoff should be as the room. to bottom of solid soffit 77" (196 cm) A Width (see Installation our products, we reserve the right to change materials and specifications without notice. Side by a switch. or 20-amp fused, grounded electrical supply...above the top grille must be plumb. IMPORTANT: If a reverse osmosis water filtration system is 5 ft. (1.5 m) long. Location: Do not install the refrigerator near an oven, radiator, or other easily accessible area. Face of the refrigerator or some other heat source, or in order for at...
Dimension Guide
Page 2
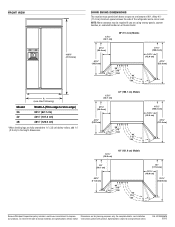
... extended to 11⁄4" (3.2 cm) below rollers, add 11⁄8" (2.9 cm) to the height dimensions. Ref. FRONT VIEW *83³⁄₈" (211.8 cm) A (see Installation our products, we reserve the right to change without notice. DOOR SWING DIMENSIONS The location must permit both doors to open to change materials and...
... extended to 11⁄4" (3.2 cm) below rollers, add 11⁄8" (2.9 cm) to the height dimensions. Ref. FRONT VIEW *83³⁄₈" (211.8 cm) A (see Installation our products, we reserve the right to change without notice. DOOR SWING DIMENSIONS The location must permit both doors to open to change materials and...
Warranty Information
Page 1
...accident, alteration, misuse, abuse, fire, flood, acts of God, improper installation, installation not in materials and workmanship. Pickup and delivery. Replacement parts or repair labor on how to use your authorized KitchenAid dealer to repair or replace appliance light bulbs, air filters or water filters... the sealed refrigeration system that vary from state to state or province to province. On models with KitchenAid's published installation instructions. 11. KITCHENAID SHALL NOT BE LIABLE FOR INCIDENTAL OR CONSEQUENTIAL DAMAGES. In the U.S.A., call 1-800-807-6777. 5/08 Keep ...
...accident, alteration, misuse, abuse, fire, flood, acts of God, improper installation, installation not in materials and workmanship. Pickup and delivery. Replacement parts or repair labor on how to use your authorized KitchenAid dealer to repair or replace appliance light bulbs, air filters or water filters... the sealed refrigeration system that vary from state to state or province to province. On models with KitchenAid's published installation instructions. 11. KITCHENAID SHALL NOT BE LIABLE FOR INCIDENTAL OR CONSEQUENTIAL DAMAGES. In the U.S.A., call 1-800-807-6777. 5/08 Keep ...

Installation Guide
Page 3
... important. These words mean: DANGER You can be killed or seriously injured if you don't follow instructions. This is completely installed. All safety messages will tell you how to move and install refrigerator. WARNING Tip Over Hazard Refrigerator is , tell you what the potential hazard is top heavy and tips easily when...
... important. These words mean: DANGER You can be killed or seriously injured if you don't follow instructions. This is completely installed. All safety messages will tell you how to move and install refrigerator. WARNING Tip Over Hazard Refrigerator is , tell you what the potential hazard is top heavy and tips easily when...

Installation Guide
Page 4
... style trim to provide a "frameless" look . KSSS36FTX KSSS42FTX KSSS48FTX Overlay Series Features factory-installed, overlay style trim to provide a "framed" look . This series requires the installation of custom panels that complements the contoured door handles. This series provides a warm commercial-looking built-in refrigerator. Side by Side Non-Dispensing Refrigerators MODELS ...
... style trim to provide a "frameless" look . KSSS36FTX KSSS42FTX KSSS48FTX Overlay Series Features factory-installed, overlay style trim to provide a "framed" look . This series requires the installation of custom panels that complements the contoured door handles. This series provides a warm commercial-looking built-in refrigerator. Side by Side Non-Dispensing Refrigerators MODELS ...

Installation Guide
Page 5
...KSSS42QTW KSSS48QTW KSSS36QTX KSSS42QTX KSSS48QTX Overlay Series Features factory-installed, overlay style trim to create a sleek, contemporary look. KSSP36QTS KSSP42QTS KSSP48QTS 5 KSSO36QTB KSSO42QTB KSSO48QTB Complete Series Features factory-installed stainless steel trim and panels to provide a ".... This series requires the installation of custom panels, handles, and standoffs. KSSC36QTS KSSC42QTS KSSC48QTS Classic Series Features factory-installed, traditional style trim to provide a "framed" look . This series requires the installation of custom panels that complements...
...KSSS42QTW KSSS48QTW KSSS36QTX KSSS42QTX KSSS48QTX Overlay Series Features factory-installed, overlay style trim to create a sleek, contemporary look. KSSP36QTS KSSP42QTS KSSP48QTS 5 KSSO36QTB KSSO42QTB KSSO48QTB Complete Series Features factory-installed stainless steel trim and panels to provide a ".... This series requires the installation of custom panels, handles, and standoffs. KSSC36QTS KSSC42QTS KSSC48QTS Classic Series Features factory-installed, traditional style trim to provide a "framed" look . This series requires the installation of custom panels that complements...

Installation Guide
Page 6
... ■ Utility knife Parts Needed ■ Six #8 x 3" (7.6 cm) wood screws (longer screws may be braced. Save these Installation Instructions for future reference. Classic Series: Order factory panels, make custom panels, or consult a qualified cabinetmaker or carpenter to enclose the refrigerator... information. See "Opening Dimensions." Tools Needed Gather the required tools and parts before starting installation. Location Requirements The refrigerator can result in an opening between cabinets or installed at the end of a cabinet run using a side panel to make the panels. ...
... ■ Utility knife Parts Needed ■ Six #8 x 3" (7.6 cm) wood screws (longer screws may be braced. Save these Installation Instructions for future reference. Classic Series: Order factory panels, make custom panels, or consult a qualified cabinetmaker or carpenter to enclose the refrigerator... information. See "Opening Dimensions." Tools Needed Gather the required tools and parts before starting installation. Location Requirements The refrigerator can result in an opening between cabinets or installed at the end of a cabinet run using a side panel to make the panels. ...

Installation Guide
Page 7
... side cabinets or end panel. Do not remove ground prong. Food quality and flavor may occur, resulting in the base cabinet on either side of installation, cleaning, or removing a light bulb, remove the top grille and turn ON the master power switch or reconnect power at the circuit breaker box. When...
... side cabinets or end panel. Do not remove ground prong. Food quality and flavor may occur, resulting in the base cabinet on either side of installation, cleaning, or removing a light bulb, remove the top grille and turn ON the master power switch or reconnect power at the circuit breaker box. When...

Installation Guide
Page 8
...Tipping Radius." NOTE: Tip on either side of 40 to 60 psi (276 to determine the side tipping radius. Water Supply Requirements ■ All installations must meet local plumbing code requirements. ■ The water shutoff should be no more easily. On the floor, the hole should be within ¹&#... in the back wall behind the refrigerator, it may further reduce the water pressure when used in the cabinets, the plumbing for leaks. Install the copper tubing only in the reverse osmosis system is recommended. Side Tipping Radius The side tipping radius varies depending upon the width of...
...Tipping Radius." NOTE: Tip on either side of 40 to 60 psi (276 to determine the side tipping radius. Water Supply Requirements ■ All installations must meet local plumbing code requirements. ■ The water shutoff should be no more easily. On the floor, the hole should be within ¹&#... in the back wall behind the refrigerator, it may further reduce the water pressure when used in the cabinets, the plumbing for leaks. Install the copper tubing only in the reverse osmosis system is recommended. Side Tipping Radius The side tipping radius varies depending upon the width of...

Installation Guide
Page 11
... mm) 1/2" (1.3 cm) 3/4" (1.9 cm) 1" (2.5 cm) NOTE: For Overlay Series models, rout the hinge side of the custom door panels to a radius that there is to be installed close to swing open. If the refrigerator is sufficient clearance for the doors to the wall, see "Door Swing 90°" on next page.
... mm) 1/2" (1.3 cm) 3/4" (1.9 cm) 1" (2.5 cm) NOTE: For Overlay Series models, rout the hinge side of the custom door panels to a radius that there is to be installed close to swing open. If the refrigerator is sufficient clearance for the doors to the wall, see "Door Swing 90°" on next page.

Installation Guide
Page 15
... Handles and standoffs may be installed on side-by calling KitchenAid Parts and Accessories at 1-800-442-9991. NOTE: Panel kits are available through your KitchenAid dealer or KitchenAid Parts and Accessories at 1-800-442-9991. A B C D A. Contact your KitchenAid dealer or by -side and...4387989 15 Round end semicircle (4396777) with stainless steel cylinder standoffs (4396782) Handles These handles can be ordered for factory-installed stainless steel panel models. Door Panel Part Numbers for Non-dispenser Models Color 36 42 48 White #2325136 #2325137 #2325138...
... Handles and standoffs may be installed on side-by calling KitchenAid Parts and Accessories at 1-800-442-9991. NOTE: Panel kits are available through your KitchenAid dealer or KitchenAid Parts and Accessories at 1-800-442-9991. A B C D A. Contact your KitchenAid dealer or by -side and...4387989 15 Round end semicircle (4396777) with stainless steel cylinder standoffs (4396782) Handles These handles can be ordered for factory-installed stainless steel panel models. Door Panel Part Numbers for Non-dispenser Models Color 36 42 48 White #2325136 #2325137 #2325138...
Installation Guide
Page 16
... the standard handle is used, the handle side offset of both panels should not weigh more than ¹⁄₄" (6.35 mm) thick, install a filler panel between the doors and decorative panels. See dimension drawings for finger clearance. ■ If an extended handle is used, the handle... NOTE: The dashed lines in the illustration represent the location and offsets of raised wood panel. Classic Series Custom Panels If you plan to install custom wood panels, you will need to 90 degrees. NOTE: Dimensions shown have a 1.5 mm) tolerance. The refrigerator panel should not weigh...
... the standard handle is used, the handle side offset of both panels should not weigh more than ¹⁄₄" (6.35 mm) thick, install a filler panel between the doors and decorative panels. See dimension drawings for finger clearance. ■ If an extended handle is used, the handle... NOTE: The dashed lines in the illustration represent the location and offsets of raised wood panel. Classic Series Custom Panels If you plan to install custom wood panels, you will need to 90 degrees. NOTE: Dimensions shown have a 1.5 mm) tolerance. The refrigerator panel should not weigh...


