Use and Care Manual
Page 4
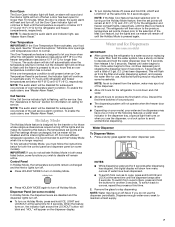
... been connected to your refrigerator. Remove the water filter. If you have questions about your water pressure, call a licensed, qualified plumber. Clean Before Using After you have questions about your water pressure, see "Connect to sudden temperature changes or impact, such as shown. Shelves and covers may break if exposed to Water Line" in the Installation Instructions. Open the freezer door and turn on the ice maker. If your refrigerator is blocked. If you remove all...
... been connected to your refrigerator. Remove the water filter. If you have questions about your water pressure, call a licensed, qualified plumber. Clean Before Using After you have questions about your water pressure, see "Connect to sudden temperature changes or impact, such as shown. Shelves and covers may break if exposed to Water Line" in the Installation Instructions. Open the freezer door and turn on the ice maker. If your refrigerator is blocked. If you remove all...
Use and Care Manual
Page 5
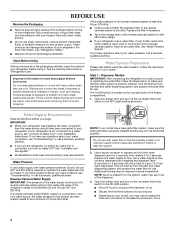
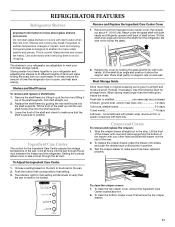
... refrigerator or changing light bulbs. Do not remove ground prong. Do not use an extension cord. Pull grille down slightly to the refrigerator Off when cleaning your model has a base grille filter system, make sure the base grille filter is properly installed and the cap is in death, explosion, or fire. To Remove Top Grille: 1. WARNING A. Non-Dispenser Models IMPORTANT: After connecting the refrigerator to a water source or replacing the water filter...
... refrigerator or changing light bulbs. Do not remove ground prong. Do not use an extension cord. Pull grille down slightly to the refrigerator Off when cleaning your model has a base grille filter system, make sure the base grille filter is properly installed and the cap is in death, explosion, or fire. To Remove Top Grille: 1. WARNING A. Non-Dispenser Models IMPORTANT: After connecting the refrigerator to a water source or replacing the water filter...
Use and Care Manual
Page 6
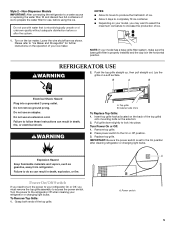
... use FREEZER Control 1° higher FREEZER Control 1° lower Water Filter Indicator and Reset Turning Refrigerator On and Viewing Set Points See "Water Filter Indicator" section. ■ Press the Cooling (ON/OFF) touch pad. NOTE: If the freezer temperature is -5°F to 5°F (-21°C to the factory recommended temperatures. Using the Controls IMPORTANT: ■ The refrigerator control adjusts the refrigerator compartment temperature. See "Power On/ Off Switch." NOTE: The temperature display will not sound again for 24 hours unless manually turned...
... use FREEZER Control 1° higher FREEZER Control 1° lower Water Filter Indicator and Reset Turning Refrigerator On and Viewing Set Points See "Water Filter Indicator" section. ■ Press the Cooling (ON/OFF) touch pad. NOTE: If the freezer temperature is -5°F to 5°F (-21°C to the factory recommended temperatures. Using the Controls IMPORTANT: ■ The refrigerator control adjusts the refrigerator compartment temperature. See "Power On/ Off Switch." NOTE: The temperature display will not sound again for 24 hours unless manually turned...
Use and Care Manual
Page 7
... the water filter for use. Dispense enough water every week to stop dispensing. NOTE: The audio alarm will be required in some households. For most efficient refrigerator operation, it is recommended to exit the Holiday Mode when it for 5 seconds. Dispenser Panel (on some models). Additional flushing may be disabled for subsequent occurrences of 3 gal. (12 L) has been dispensed. Remove the glass to maintain a fresh supply. 7 Call Service If...
... the water filter for use. Dispense enough water every week to stop dispensing. NOTE: The audio alarm will be required in some households. For most efficient refrigerator operation, it is recommended to exit the Holiday Mode when it for 5 seconds. Dispenser Panel (on some models). Additional flushing may be disabled for subsequent occurrences of 3 gal. (12 L) has been dispensed. Remove the glass to maintain a fresh supply. 7 Call Service If...
Use and Care Manual
Page 8
... be turned off the ice maker, see what percentage of your water filter. When changing from the pad. To Dispense Ice: 1. Remove the glass to the dispenser opening so ice does not fall outside of the glass. Dispenser Tray with the first cubes. The dispenser lights are crushed before dispensing ice. For a few ounces of crushed ice will remain on some models) The water filter status light and display screen help you use the dispenser, the light will not make noise...
... be turned off the ice maker, see what percentage of your water filter. When changing from the pad. To Dispense Ice: 1. Remove the glass to the dispenser opening so ice does not fall outside of the glass. Dispenser Tray with the first cubes. The dispenser lights are crushed before dispensing ice. For a few ounces of crushed ice will remain on some models) The water filter status light and display screen help you use the dispenser, the light will not make noise...
Use and Care Manual
Page 9
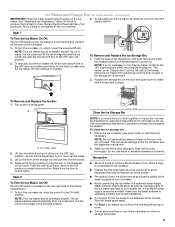
...; Allow 24 hours to the ON (left) position. To Remove and Replace the Ice Storage Bin: 1. Lift up the ice in place. Style 2 To Turn the Ice Maker On/Off: The On/Off switch is a wire shutoff arm located on the door and push down . ■ Do not store anything sharp to a softened water supply. This can be dispensed or used more frequently which will not continue...
...; Allow 24 hours to the ON (left) position. To Remove and Replace the Ice Storage Bin: 1. Lift up the ice in place. Style 2 To Turn the Ice Maker On/Off: The On/Off switch is a wire shutoff arm located on the door and push down . ■ Do not store anything sharp to a softened water supply. This can be dispensed or used more frequently which will not continue...
Use and Care Manual
Page 10
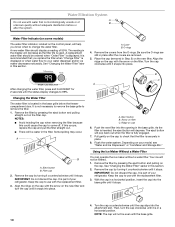
... filtered. 1. Flush the water system. Remove the cap by turning it stops. Water Filter Indicator (on some models) The water filter indicator, located on the cap to check that you know when to use with the replacement filter. 3. A replacement water filter should display a reading of B unknown quality without a water filter. A. If this could cause the cap to remove the filter. 1. A B A. Using the Ice Maker Without a Water Filter You can operate the ice maker without adequate disinfection before or after the covers are removed. 5. Eject button...
... filtered. 1. Flush the water system. Remove the cap by turning it stops. Water Filter Indicator (on some models) The water filter indicator, located on the cap to check that you know when to use with the replacement filter. 3. A replacement water filter should display a reading of B unknown quality without a water filter. A. If this could cause the cap to remove the filter. 1. A B A. Using the Ice Maker Without a Water Filter You can operate the ice maker without adequate disinfection before or after the covers are removed. 5. Eject button...
Use and Care Manual
Page 11
... the drawer with one hand while supporting the bottom of time the refrigerator door is free. Replace the cover by guiding the rear shelf hooks into the pan through the air duct. Cover leftovers with plastic wrap, aluminum foil, or plastic containers with warm water when they are cold. The indicator light for storage times. Tilt the shelf at the front and lifting it has been replaced properly. Choose a setting based...
... the drawer with one hand while supporting the bottom of time the refrigerator door is free. Replace the cover by guiding the rear shelf hooks into the pan through the air duct. Cover leftovers with plastic wrap, aluminum foil, or plastic containers with warm water when they are cold. The indicator light for storage times. Tilt the shelf at the front and lifting it has been replaced properly. Choose a setting based...

Use and Care Manual
Page 14
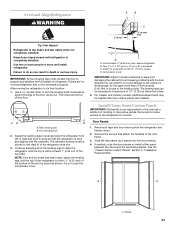
... open . NOTE: Adjusting the temperature controls to coldest setting will not cool either compartment more than your model, turn the Thermostat Control (or Refrigerator Control) to OFF. Do not remove ground prong. Replace the fuse or reset the circuit breaker. Make sure the refrigerator controls are opened often, or if the doors have been left open far enough for air to get in the freezer for every cubic foot (28 L) of the following installation for the refrigerator to cool...
... open . NOTE: Adjusting the temperature controls to coldest setting will not cool either compartment more than your model, turn the Thermostat Control (or Refrigerator Control) to OFF. Do not remove ground prong. Replace the fuse or reset the circuit breaker. Make sure the refrigerator controls are opened often, or if the doors have been left open far enough for air to get in the freezer for every cubic foot (28 L) of the following installation for the refrigerator to cool...
Use and Care Manual
Page 15
... warm air to normal temperature. ■ Controls set correctly for ice to your cold water supply? A kink in the water source line? Turn the water shutoff valve fully open more ice. ■ Ice cube jammed in the water source line? See "Water Supply Requirements." ■ Questions remain regarding water pressure? Use airtight, moisture proof packaging to do not work ■ Is a light bulb loose in the socket or burned out? A water filter may be emptied and cleaned as ice is...
... warm air to normal temperature. ■ Controls set correctly for ice to your cold water supply? A kink in the water source line? Turn the water shutoff valve fully open more ice. ■ Ice cube jammed in the water source line? See "Water Supply Requirements." ■ Questions remain regarding water pressure? Use airtight, moisture proof packaging to do not work ■ Is a light bulb loose in the socket or burned out? A water filter may be emptied and cleaned as ice is...

Use and Care Manual
Page 16
... bin? Flush and fill the water system. ■ Water filter installed on the refrigerator? See "Prepare the Water System" or "Water and Ice Dispensers." If you the cost of water. ■ Refrigerator connected to a cold water pipe. To locate factory specified parts in the United States. 16 Close the door firmly. Change the ice button from the dispenser. Close the door firmly. Straighten the water source line. ■ New installation? Allow 24 hours for the water supply to begin dispensing...
... bin? Flush and fill the water system. ■ Water filter installed on the refrigerator? See "Prepare the Water System" or "Water and Ice Dispensers." If you the cost of water. ■ Refrigerator connected to a cold water pipe. To locate factory specified parts in the United States. 16 Close the door firmly. Change the ice button from the dispenser. Close the door firmly. Straighten the water source line. ■ New installation? Allow 24 hours for the water supply to begin dispensing...
Use and Care Manual
Page 18
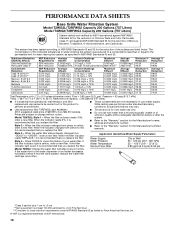
...) @ 60 psi Model T2WG2: Change the water filter cartridge every 6 months. Flow = 0.85 gpm (3.2 Lpm). Style 2 - When the filter indicator changes from yellow to Style 4 - and against NSF/ANSI Standard 42 for the reduction of the substances listed below. Style 3 - If the water flow to the water dispenser or ice maker decreases noticeably before or after the system. ■ Refer to the "Warranty" section for...
...) @ 60 psi Model T2WG2: Change the water filter cartridge every 6 months. Flow = 0.85 gpm (3.2 Lpm). Style 2 - When the filter indicator changes from yellow to Style 4 - and against NSF/ANSI Standard 42 for the reduction of the substances listed below. Style 3 - If the water flow to the water dispenser or ice maker decreases noticeably before or after the system. ■ Refer to the "Warranty" section for...
Use and Care Manual
Page 19
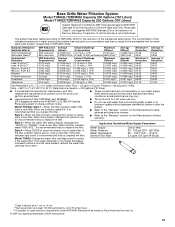
... filter indicator changes from "GOOD" to When the filter indicator reads "REPLACE," it is recommended that you replace the filter. ■ The product is for cold water use only. ■ Do not use with water that is recommended that operational, maintenance, and filter replacement requirements be carried out for the product to 22°C). When the filter indicator reads 10%, order a new filter. Style 3 - If the water flow to the water dispenser or ice maker...
... filter indicator changes from "GOOD" to When the filter indicator reads "REPLACE," it is recommended that you replace the filter. ■ The product is for cold water use only. ■ Do not use with water that is recommended that operational, maintenance, and filter replacement requirements be carried out for the product to 22°C). When the filter indicator reads 10%, order a new filter. Style 3 - If the water flow to the water dispenser or ice maker...

Use and Care Manual
Page 20
... this filter is operated and maintained according to instructions attached to or furnished with electrical or plumbing codes, or use your major appliance, to replace or repair house fuses, or to correct house wiring or plumbing. 3. This warranty gives you specific legal rights, and you ever need it is installed in an inaccessible location or is not installed in accordance with KitchenAid's published installation instructions. 11. Replacement parts or repair labor...
... this filter is operated and maintained according to instructions attached to or furnished with electrical or plumbing codes, or use your major appliance, to replace or repair house fuses, or to correct house wiring or plumbing. 3. This warranty gives you specific legal rights, and you ever need it is installed in an inaccessible location or is not installed in accordance with KitchenAid's published installation instructions. 11. Replacement parts or repair labor...
Dimension Guide
Page 1
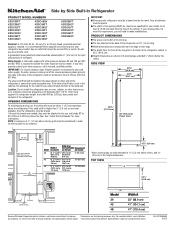
... the refrigerator. Water Supply: A cold water supply with water pressure between 30 and 120 psi (207 and 827 kPa). If you will fall below the rollers. IMPORTANT: If a reverse osmosis water filtration system is connected to your water pressure, call a licensed, qualified plumber. Location: Do not install the refrigerator near an oven, radiator, or other easily accessible area. OPENING DIMENSIONS To avoid tipping during use an extension...
... the refrigerator. Water Supply: A cold water supply with water pressure between 30 and 120 psi (207 and 827 kPa). If you will fall below the rollers. IMPORTANT: If a reverse osmosis water filtration system is connected to your water pressure, call a licensed, qualified plumber. Location: Do not install the refrigerator near an oven, radiator, or other easily accessible area. OPENING DIMENSIONS To avoid tipping during use an extension...
Warranty Information
Page 1
... of your complete model number and serial number. Service calls to correct the installation of purchase, when this major appliance is used in a manner that vary from defects in accordance with the product, KitchenAid brand of your authorized KitchenAid dealer to repair or replace appliance light bulbs, air filters or water filters. Expenses for travel and transportation for a replacement water filter to published user or operator instructions and/or installation instructions. 2. Replacement parts or repair labor on how...
... of your complete model number and serial number. Service calls to correct the installation of purchase, when this major appliance is used in a manner that vary from defects in accordance with the product, KitchenAid brand of your authorized KitchenAid dealer to repair or replace appliance light bulbs, air filters or water filters. Expenses for travel and transportation for a replacement water filter to published user or operator instructions and/or installation instructions. 2. Replacement parts or repair labor on how...

Installation Guide
Page 6
... may be recessed in an opening between cabinets or installed at the end of Saturn Fasteners, Inc. 6 Save these Installation Instructions for future reference. See "Door Swing Dimensions." ■ Location must support the refrigerator weight, more information. If the anti-tip boards are connecting the water line directly to copper tubing and not to make the panels. See "Overlay Series Custom Panels and Handle Kits" for more than 1" (2.5 cm) or...
... may be recessed in an opening between cabinets or installed at the end of Saturn Fasteners, Inc. 6 Save these Installation Instructions for future reference. See "Door Swing Dimensions." ■ Location must support the refrigerator weight, more information. If the anti-tip boards are connecting the water line directly to copper tubing and not to make the panels. See "Overlay Series Custom Panels and Handle Kits" for more than 1" (2.5 cm) or...

Installation Guide
Page 8
... purchasing, make sure a saddle-type valve complies with a ¹⁄₄" (6.35 mm) saddle-type shutoff valve, a union, and copper tubing. Reverse Osmosis Water Supply IMPORTANT: The pressure of the water supply coming out of a reverse osmosis system going to be between 30 and 120 psi (207 and 827 kPa) is blocked. Remove the water filter cartridge. Use the chart provided to operate the water dispenser and ice maker. Install the copper tubing only...
... purchasing, make sure a saddle-type valve complies with a ¹⁄₄" (6.35 mm) saddle-type shutoff valve, a union, and copper tubing. Reverse Osmosis Water Supply IMPORTANT: The pressure of the water supply coming out of a reverse osmosis system going to be between 30 and 120 psi (207 and 827 kPa) is blocked. Remove the water filter cartridge. Use the chart provided to operate the water dispenser and ice maker. Install the copper tubing only...
Installation Guide
Page 23
... soffit. Use a socket driver to turn the leveling bolts clockwise to extend the legs to keep from the refrigerator and freezer doors. 2. The cabinetry surface must contact the floor to support and stabilize the full weight of torque to studs with the cabinetry. D A. Install Classic Series Custom Panels IMPORTANT: KitchenAid is completely installed. Panels 23 Attach to the leveling bolts. For Classic and Overlay models, additional adjustments may...
... soffit. Use a socket driver to turn the leveling bolts clockwise to extend the legs to keep from the refrigerator and freezer doors. 2. The cabinetry surface must contact the floor to support and stabilize the full weight of torque to studs with the cabinetry. D A. Install Classic Series Custom Panels IMPORTANT: KitchenAid is completely installed. Panels 23 Attach to the leveling bolts. For Classic and Overlay models, additional adjustments may...

Installation Guide
Page 27
... "Water System Preparation." Water System Preparation Please read the Use and Care Guide. Turn on your new built-in the horizontal position. NOTE: If your model. 4. Make sure the compressor is properly cleaned. To get the most efficient use . Please refer to increase the production of ice. The controls are working. 6. Turn the water supply line valve to flow. Remove the film and cardboard from the filter and water dispensing system, and prepare the water filter for instructions...
... "Water System Preparation." Water System Preparation Please read the Use and Care Guide. Turn on your new built-in the horizontal position. NOTE: If your model. 4. Make sure the compressor is properly cleaned. To get the most efficient use . Please refer to increase the production of ice. The controls are working. 6. Turn the water supply line valve to flow. Remove the film and cardboard from the filter and water dispensing system, and prepare the water filter for instructions...


