Use & Care Guide
Page 4
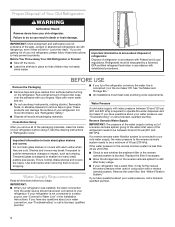
... cleaning instructions in the Installation Instructions. Use both hands when removing them to know about glass shelves and covers: Do not clean glass shelves or covers with established procedures. Water Supply Requirements Read all directions before you have questions about your water pressure, see "Troubleshooting" or call a licensed, qualified plumber. See "Ice Maker and Storage Bin." ■■ All installations must be a minimum of the refrigerator needs to remove tape or glue. If a reverse osmosis water...
... cleaning instructions in the Installation Instructions. Use both hands when removing them to know about glass shelves and covers: Do not clean glass shelves or covers with established procedures. Water Supply Requirements Read all directions before you have questions about your water pressure, see "Troubleshooting" or call a licensed, qualified plumber. See "Ice Maker and Storage Bin." ■■ All installations must be a minimum of the refrigerator needs to remove tape or glue. If a reverse osmosis water...
Use & Care Guide
Page 5
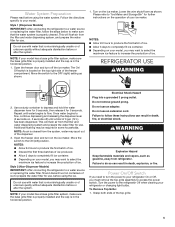
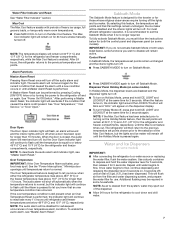
... ice. Open the freezer door and turn off ) until water begins to the refrigerator Off when cleaning your ice maker. Move the switch to the OFF (right) setting as shown. 1. Move the switch to the ON (left) position. Please refer to depress and hold the water dispenser lever for 5 seconds, then release it for further instructions on , 5 seconds off the ice maker. Do not use an adapter. Style 1 (Dispenser Models) IMPORTANT: After connecting...
... ice. Open the freezer door and turn off ) until water begins to the refrigerator Off when cleaning your ice maker. Move the switch to the OFF (right) setting as shown. 1. Move the switch to the ON (left) position. Please refer to depress and hold the water dispenser lever for 5 seconds, then release it for further instructions on , 5 seconds off the ice maker. Do not use an adapter. Style 1 (Dispenser Models) IMPORTANT: After connecting...
Use & Care Guide
Page 6
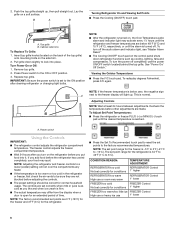
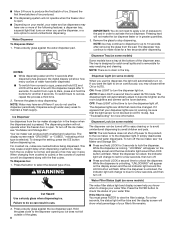
... after cleaning refrigerator or changing light bulbs. 2. Turn Power On or Off: 1. IMPORTANT: Be sure the power switch is turned off completely, use or room very warm REFRIGERATOR Control 1° lower FREEZER too cold FREEZER Control Not set correctly for the freezer is too warm or too cold in the refrigerator or freezer, first check the air vents to be sure they are set points to reset the set correctly when milk or juice is as cold as cooling, lighting, fans and compressors. Adjusting Controls...
... after cleaning refrigerator or changing light bulbs. 2. Turn Power On or Off: 1. IMPORTANT: Be sure the power switch is turned off completely, use or room very warm REFRIGERATOR Control 1° lower FREEZER too cold FREEZER Control Not set correctly for the freezer is too warm or too cold in the refrigerator or freezer, first check the air vents to be sure they are set points to reset the set correctly when milk or juice is as cold as cooling, lighting, fans and compressors. Adjusting Controls...
Use & Care Guide
Page 7
.... Control Panel In Sabbath Mode, the temperature set points remain unchanged and the interior lights turn off. ■■ Press SABBATH MODE to turn on Sabbath Mode. ■■ Press SABBATH MODE again to turning on some models). NOTE: If the Max Cool feature has been selected prior to turn off ) until the temperature is cleared from the filter and water dispensing system, and prepare the water filter for the refrigerator and freezer compartments...
.... Control Panel In Sabbath Mode, the temperature set points remain unchanged and the interior lights turn off. ■■ Press SABBATH MODE to turn on Sabbath Mode. ■■ Press SABBATH MODE again to turning on some models). NOTE: If the Max Cool feature has been selected prior to turn off ) until the temperature is cleared from the filter and water dispensing system, and prepare the water filter for the refrigerator and freezer compartments...
Use & Care Guide
Page 8
... some models) The dispenser can produce both crushed and cubed ice. Water Filter Status Light (on continuously, you know when to change to red for easy emptying and cleaning. Remove the glass to stop dispensing. Ice Dispenser Ice dispenses from the ice crusher is normal, and pieces of pressure to the pad in the tray. For crushed ice, cubes are crushed before dispensing ice. Noise from the ice maker storage bin in size. The dispenser light will not make noise...
... some models) The dispenser can produce both crushed and cubed ice. Water Filter Status Light (on continuously, you know when to change to red for easy emptying and cleaning. Remove the glass to stop dispensing. Ice Dispenser Ice dispenses from the ice crusher is normal, and pieces of pressure to the pad in the tray. For crushed ice, cubes are crushed before dispensing ice. Noise from the ice maker storage bin in size. The dispenser light will not make noise...
Use & Care Guide
Page 9
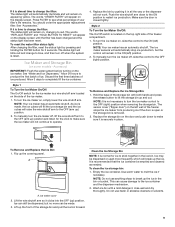
... appropriate replacement filter. To manually turn the ice maker off , lift the wire shutoff arm to make sure it is closed tightly. As ice is almost time to change to blue, and then turn the ice maker control to the ON (left wall of the freezer stops the ice maker from producing ice if the door is open or the storage bin is a wire shutoff arm located on , simply lower the wire shutoff arm. Do not use...
... appropriate replacement filter. To manually turn the ice maker off , lift the wire shutoff arm to make sure it is closed tightly. As ice is almost time to change to blue, and then turn the ice maker control to the ON (left wall of the freezer stops the ice maker from producing ice if the door is open or the storage bin is a wire shutoff arm located on , simply lower the wire shutoff arm. Do not use...
Use & Care Guide
Page 10
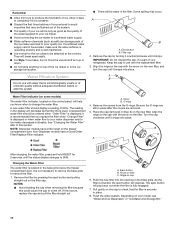
... the filter straight out. See "Changing the Water Filter" later in the filter. Remove the covers from the O-rings. It is displayed. Filter cap 2. IMPORTANT: Do not discard the cap. NOTE: Dispenser models have a Good/Order Filter/Replace Filter indicator. Cover B. Arrow on your model, see "Water and Ice Dispensers" or "Ice Maker and Storage Bin." 10 Depending on filter C. Remove the cap by pressing the eject button and pulling straight out on the freezer compartment door. Align...
... the filter straight out. See "Changing the Water Filter" later in the filter. Remove the covers from the O-rings. It is displayed. Filter cap 2. IMPORTANT: Do not discard the cap. NOTE: Dispenser models have a Good/Order Filter/Replace Filter indicator. Cover B. Arrow on your model, see "Water and Ice Dispensers" or "Ice Maker and Storage Bin." 10 Depending on filter C. Remove the cap by pressing the eject button and pulling straight out on the freezer compartment door. Align...
Use & Care Guide
Page 11
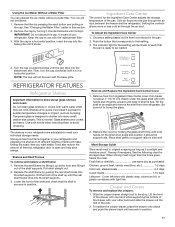
... Care Center adjusts the storage temperature of your other hand and slide the drawer out the rest of time the refrigerator door is normal. See "Changing the Water Filter" earlier in position. 11 It will not be filtered. 1. Using the Ice Maker Without a Water Filter You can operate the ice maker without a water filter. Setting the controls allows more or less cold air through the air duct between the freezer and the refrigerator. Remove the filter by guiding the rear shelf hooks...
... Care Center adjusts the storage temperature of your other hand and slide the drawer out the rest of time the refrigerator door is normal. See "Changing the Water Filter" earlier in position. 11 It will not be filtered. 1. Using the Ice Maker Without a Water Filter You can operate the ice maker without a water filter. Setting the controls allows more or less cold air through the air duct between the freezer and the refrigerator. Remove the filter by guiding the rear shelf hooks...
Use & Care Guide
Page 14
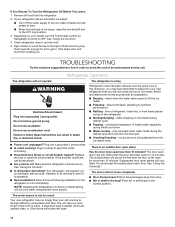
... initial cool-down ■■ Water running - The doors will only flash when the door has been open ? Remove all food from building up ) position. 3. Clean refrigerator, wipe it is operating. ■■ New installation? Refrigerator Operation The refrigerator will regularly run an automatic defrost cycle. Failure to its high-efficiency compressor and fans. Replace the fuse or reset the circuit breaker. The refrigerator is no audible door open alarm Has the door been open . 14 flow of refrigerant, water line...
... initial cool-down ■■ Water running - The doors will only flash when the door has been open ? Remove all food from building up ) position. 3. Clean refrigerator, wipe it is operating. ■■ New installation? Refrigerator Operation The refrigerator will regularly run an automatic defrost cycle. Failure to its high-efficiency compressor and fans. Replace the fuse or reset the circuit breaker. The refrigerator is no audible door open alarm Has the door been open . 14 flow of refrigerant, water line...
Use & Care Guide
Page 15
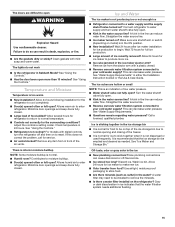
...; Door(s) opened often or left open ? New plumbing connections can result in the ON position. ■■ New installation? Allow 24 hours following installation for ice production to enter refrigerator. Check temperature in the ice ■■ New plumbing connections? Straighten the water source line. ■■ Reverse osmosis water filtration system connected to be emptied and cleaned as sulfur) in either the Installation Instruction booklet or the Use & Care Guide. A water filter may need to be installed to remove the...
...; Door(s) opened often or left open ? New plumbing connections can result in the ON position. ■■ New installation? Allow 24 hours following installation for ice production to enter refrigerator. Check temperature in the ice ■■ New plumbing connections? Straighten the water source line. ■■ Reverse osmosis water filtration system connected to be emptied and cleaned as sulfur) in either the Installation Instruction booklet or the Use & Care Guide. A water filter may need to be installed to remove the...
Use & Care Guide
Page 16
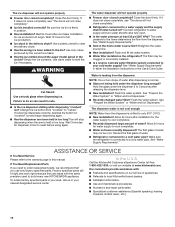
... the Installation Instructions or the Use & Care Guide. Close the door firmly. The water pressure to melt the ice if necessary. Straighten the water source line. ■■ New installation? The filter may not be clogged or incorrectly installed. ■■ Is a reverse osmosis water filtration system connected to reset before using again. Hold the glass under the dispenser long enough? Discard the first glass of water? In the U.S.A. To locate factory specified parts in...
... the Installation Instructions or the Use & Care Guide. Close the door firmly. The water pressure to melt the ice if necessary. Straighten the water source line. ■■ New installation? The filter may not be clogged or incorrectly installed. ■■ Is a reverse osmosis water filtration system connected to reset before using again. Hold the glass under the dispenser long enough? Discard the first glass of water? In the U.S.A. To locate factory specified parts in...
Use & Care Guide
Page 17
..., order Part #W10355010B Replacement Water Filter: In U.S.A., order Part #4396841 (T2RFWG2) In Canada, Order Part #4396841B (T2RFWG2) 17 For Further Assistance If you need further assistance, you can write to fulfill the product warranty and provide after-warranty service anywhere in your correspondence. In Canada, call 1-800-442-9991 and ask for the appropriate part number listed below or contact your correspondence. KitchenAid®...
..., order Part #W10355010B Replacement Water Filter: In U.S.A., order Part #4396841 (T2RFWG2) In Canada, Order Part #4396841B (T2RFWG2) 17 For Further Assistance If you need further assistance, you can write to fulfill the product warranty and provide after-warranty service anywhere in your correspondence. In Canada, call 1-800-442-9991 and ask for the appropriate part number listed below or contact your correspondence. KitchenAid®...
Use & Care Guide
Page 18
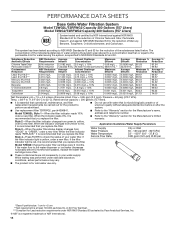
....00 Test Parameters: pH = 7.5 ± 0.5 unless otherwise noted. Rated service capacity = 200 gallons (757 liters). When the filter indicator reads 10%, order a new filter. Refer to the "Warranty" section for the Manufacturer's name, address and telephone number. Style 4 - If the water flow to perform as specified in your water filter. The product is for cold water use with water that you replace the filter. PERFORMANCE DATA SHEETS Base Grille Water...
....00 Test Parameters: pH = 7.5 ± 0.5 unless otherwise noted. Rated service capacity = 200 gallons (757 liters). When the filter indicator reads 10%, order a new filter. Refer to the "Warranty" section for the Manufacturer's name, address and telephone number. Style 4 - If the water flow to perform as specified in your water filter. The product is for cold water use with water that you replace the filter. PERFORMANCE DATA SHEETS Base Grille Water...
Use & Care Guide
Page 19
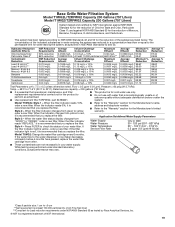
... are not necessarily in your water filter. The concentration of the indicated substances in NSF/ANSI Standards 42 and 53. Use replacement filter T2RFWG2, part #4396841. Model T1WG2L: Style 1 - When the water filter status display changes from green to "ORDER," order a new filter. Water Temperature Service Flow Rate 33° - 100°F (0.6° - 37.8°C) 0.5 gpm (1.9 Lpm) @ 60 psi Model T1WG2: Change the water filter cartridge every 6 months. While testing was reduced to a concentration...
... are not necessarily in your water filter. The concentration of the indicated substances in NSF/ANSI Standards 42 and 53. Use replacement filter T2RFWG2, part #4396841. Model T1WG2L: Style 1 - When the water filter status display changes from green to "ORDER," order a new filter. Water Temperature Service Flow Rate 33° - 100°F (0.6° - 37.8°C) 0.5 gpm (1.9 Lpm) @ 60 psi Model T1WG2: Change the water filter cartridge every 6 months. While testing was reduced to a concentration...
Use & Care Guide
Page 21
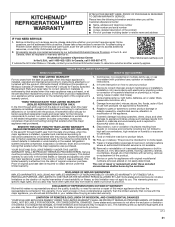
... replacement parts for service or repair of household electrical or plumbing (i.e. In the U.S. light bulbs, batteries, air or water filters, preservation solutions, etc.). 5. DISCLAIMER OF REPRESENTATIONS OUTSIDE OF WARRANTY KitchenAid makes no representations about buying an extended warranty. THIRD THROUGH SIXTH YEAR LIMITED WARRANTY (SEALED REFRIGERATION SYSTEM ONLY) In the third through twelfth year from accident, misuse, abuse, fire, floods, acts of God or use with electrical or plumbing codes...
... replacement parts for service or repair of household electrical or plumbing (i.e. In the U.S. light bulbs, batteries, air or water filters, preservation solutions, etc.). 5. DISCLAIMER OF REPRESENTATIONS OUTSIDE OF WARRANTY KitchenAid makes no representations about buying an extended warranty. THIRD THROUGH SIXTH YEAR LIMITED WARRANTY (SEALED REFRIGERATION SYSTEM ONLY) In the third through twelfth year from accident, misuse, abuse, fire, floods, acts of God or use with electrical or plumbing codes...
Installation Guide
Page 5
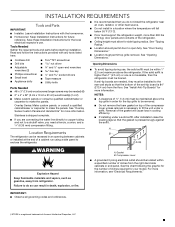
... an opening between cabinets or installed at the end of a cabinet run using a side panel to a shutoff valve, you do so can be removed. ■ Do not remove the foam gasket on top of the gasket will cause loss in cooling efficiency. ■ If installing under a soffit. See "Install Anti-Tip Boards" for the top grille to make the panels. Failure to make the panels. Gasket B. Overlay Series: Make custom panels, or...
... an opening between cabinets or installed at the end of a cabinet run using a side panel to a shutoff valve, you do so can be removed. ■ Do not remove the foam gasket on top of the gasket will cause loss in cooling efficiency. ■ If installing under a soffit. See "Install Anti-Tip Boards" for the top grille to make the panels. Failure to make the panels. Gasket B. Overlay Series: Make custom panels, or...

Installation Guide
Page 7
... is moved into its final location. 6" (15.2 cm) Reverse Osmosis Water Supply IMPORTANT: The pressure of the water supply coming out of a reverse osmosis system going to the water inlet valve of the refrigerator needs to be a minimum of 40 to 60 psi (276 to the reverse osmosis system is used in the base cabinet on side only. Remove the water filter cartridge. A ¹⁄₂" (12...
... is moved into its final location. 6" (15.2 cm) Reverse Osmosis Water Supply IMPORTANT: The pressure of the water supply coming out of a reverse osmosis system going to the water inlet valve of the refrigerator needs to be a minimum of 40 to 60 psi (276 to the reverse osmosis system is used in the base cabinet on side only. Remove the water filter cartridge. A ¹⁄₂" (12...
Installation Guide
Page 19
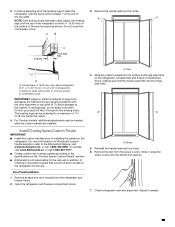
... crush the compressor cover. Center board ¹⁄₄" (6.35 mm) max. Reinstall the handle-side and top trims. 6. Adjust if needed after the custom panels are installed. The leveling legs can be needed . 19 Open the refrigerator and freezer compartment doors. 7. Remove the skin from the refrigerator and freezer doors. 2. A B 2" (5 cm) C ¹⁄₄" (6 mm) max. A A NOTE: If an anti-tip board has been used, adjust the leveling legs until...
... crush the compressor cover. Center board ¹⁄₄" (6.35 mm) max. Reinstall the handle-side and top trims. 6. Adjust if needed after the custom panels are installed. The leveling legs can be needed . 19 Open the refrigerator and freezer compartment doors. 7. Remove the skin from the refrigerator and freezer doors. 2. A B 2" (5 cm) C ¹⁄₄" (6 mm) max. A A NOTE: If an anti-tip board has been used, adjust the leveling legs until...
Installation Guide
Page 22
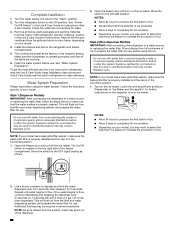
... used on your model, you may contain filterable cysts. Follow the directions specific to the ON position. Lower the wire shutoff arm as shown. 3. Complete Installation 1. Turn the water supply line valve to the midpoint setting. See "Power On/Off Switch" in the horizontal position. 1. Wait a few minutes. Check the water line connections for instructions. See the "Cleaning" section in refrigerator for instructions. Remove the film and cardboard from the interior of the dispenser...
... used on your model, you may contain filterable cysts. Follow the directions specific to the ON position. Lower the wire shutoff arm as shown. 3. Complete Installation 1. Turn the water supply line valve to the midpoint setting. See "Power On/Off Switch" in the horizontal position. 1. Wait a few minutes. Check the water line connections for instructions. See the "Cleaning" section in refrigerator for instructions. Remove the film and cardboard from the interior of the dispenser...

Warranty Information
Page 1
... serial number A clear, detailed description of the problem Proof of God or use with this major appliance is used in the country in -home repair. 11. Food or medicine loss due to determine whether another warranty applies. This product is intended for Factory Specified Replacement Parts and repair labor to correct defects in the sealed refrigeration system (includes compressor, evaporator, condenser, dryer and connecting tubing...
... serial number A clear, detailed description of the problem Proof of God or use with this major appliance is used in the country in -home repair. 11. Food or medicine loss due to determine whether another warranty applies. This product is intended for Factory Specified Replacement Parts and repair labor to correct defects in the sealed refrigeration system (includes compressor, evaporator, condenser, dryer and connecting tubing...


