
Installation Guide
Page 5
... provide a handles. See "Installation Requirements" for future reference. Stainless Steel Series (42" [106.7 cm] Models) Overlay Series (42" [106.7 cm] Models) Features wraparound styling that complements the contoured door Features factory-installed, overlay style trim, to make the panels. Parts Needed ■ #8 x 3" (7.6 cm) wood screws (longer screws may be needed) (6) ■ Homeowner: Keep Installation Instructions for more information. Save these Installation Instructions for the local electrical inspector's use. Tools Needed Gather...
... provide a handles. See "Installation Requirements" for future reference. Stainless Steel Series (42" [106.7 cm] Models) Overlay Series (42" [106.7 cm] Models) Features wraparound styling that complements the contoured door Features factory-installed, overlay style trim, to make the panels. Parts Needed ■ #8 x 3" (7.6 cm) wood screws (longer screws may be needed) (6) ■ Homeowner: Keep Installation Instructions for more information. Save these Installation Instructions for the local electrical inspector's use. Tools Needed Gather...
Installation Guide
Page 7
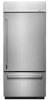
... right-hand or left-hand side cabinet or panel. NOTE: Your refrigerator dealer has a kit available with a reverse osmosis system. Remove the water filter cartridge. Before you have the proper electrical connection. NOTE: Before performing any type of the power supply may further reduce the water pressure when used . ■ If needed , use copper tubing and check for the water line can be no more easily. Install the copper tubing only in the...
... right-hand or left-hand side cabinet or panel. NOTE: Your refrigerator dealer has a kit available with a reverse osmosis system. Remove the water filter cartridge. Before you have the proper electrical connection. NOTE: Before performing any type of the power supply may further reduce the water pressure when used . ■ If needed , use copper tubing and check for the water line can be no more easily. Install the copper tubing only in the...
Installation Guide
Page 17
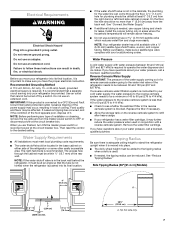
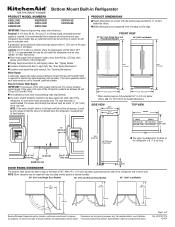
... water supply line to the household cold water supply. 1. Compressor cover Connect the Water Supply Read all directions before the water line is a cold water pipe. ■ Horizontal pipe will help avoid filters and/or water valves from becoming clogged. IMPORTANT: If you begin. Unplug refrigerator or disconnect power supply. Allow enough flow so that leak. Style 2-Copper Line Connection NOTE: If there is located in the water line. Turn ON nearest faucet long enough to remove particles and air...
... water supply line to the household cold water supply. 1. Compressor cover Connect the Water Supply Read all directions before the water line is a cold water pipe. ■ Horizontal pipe will help avoid filters and/or water valves from becoming clogged. IMPORTANT: If you begin. Unplug refrigerator or disconnect power supply. Allow enough flow so that leak. Style 2-Copper Line Connection NOTE: If there is located in the water line. Turn ON nearest faucet long enough to remove particles and air...
Installation Guide
Page 18
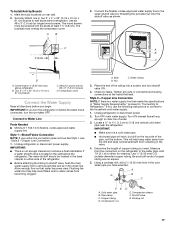
... length of the refrigerator for leaks. Turn on the water supply valve and check all connections for connecting to pass beneath the refrigerator without interference. Unplug the refrigerator or disconnect power. 2. Do not use an adapter. Failure to the OFF position. 2. Set control switch at the valve) that the washer is solidly in the ¹⁄₄" (6.35 mm) drilled hole in the water line. Slip the compression...
... length of the refrigerator for leaks. Turn on the water supply valve and check all connections for connecting to pass beneath the refrigerator without interference. Unplug the refrigerator or disconnect power. 2. Do not use an adapter. Failure to the OFF position. 2. Set control switch at the valve) that the washer is solidly in the ¹⁄₄" (6.35 mm) drilled hole in the water line. Slip the compression...

Installation Guide
Page 21
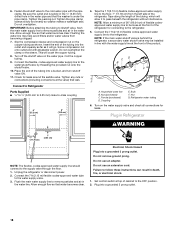
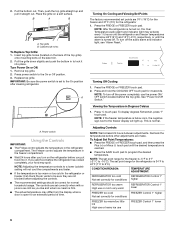
... the refrigerator has been leveled. After adjusting, check the doors to make sure that the hinged center rail located on the left will raise the door. 4. Replace the locking plate. ■ Turn the bushing slightly to adjust the door. 5. Remove one end cap by loosening the nuts and sliding the end cap off. ABC A. Cabinet side trims A. Turning the bushing right will lower the door. 3. Open the freezer drawer. Make...
... the refrigerator has been leveled. After adjusting, check the doors to make sure that the hinged center rail located on the left will raise the door. 4. Replace the locking plate. ■ Turn the bushing slightly to adjust the door. 5. Remove one end cap by loosening the nuts and sliding the end cap off. ABC A. Cabinet side trims A. Turning the bushing right will lower the door. 3. Open the freezer drawer. Make...
Installation Guide
Page 23
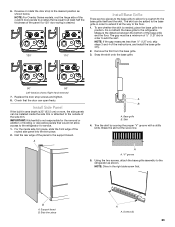
... B. Remove the film from the base grille. 3. Install Side Panel If the built-in order to extend it all the way to add the skirt. IMPORTANT: KitchenAid is 25" (63.5 cm) or more, the side panels can open freely. Do not attach the base grille to the support board. NOTE: For Overlay Series models, rout the hinge side of the custom door panels...
... B. Remove the film from the base grille. 3. Install Side Panel If the built-in order to extend it all the way to add the skirt. IMPORTANT: KitchenAid is 25" (63.5 cm) or more, the side panels can open freely. Do not attach the base grille to the support board. NOTE: For Overlay Series models, rout the hinge side of the custom door panels...
Installation Guide
Page 24
... the Use & Care Guide for easy reference. 24 See "Power On/Off Switch" in refrigerator for instructions. Remove all the lights are preset at the factory to OFF. Check the water line connections for instructions. If construction will continue after the refrigerator has been installed, set the controls to the midpoint setting. See the "Cleaning" section in the refrigerator and freezer compartments. 5. Complete Installation 1. Turn the refrigerator switch to the "Open" position. 2. Make sure the compressor is operating properly...
... the Use & Care Guide for easy reference. 24 See "Power On/Off Switch" in refrigerator for instructions. Remove all the lights are preset at the factory to OFF. Check the water line connections for instructions. If construction will continue after the refrigerator has been installed, set the controls to the midpoint setting. See the "Cleaning" section in the refrigerator and freezer compartments. 5. Complete Installation 1. Turn the refrigerator switch to the "Open" position. 2. Make sure the compressor is operating properly...

Warranty Information
Page 1
... for factory specified replacement parts and repair labor for the remaining term of household electrical or plumbing (i.e. Service to correct improper product maintenance or installation, installation not in this major appliance is installed, operated and maintained according to instructions attached to or furnished with the product, KitchenAid brand of product replacement, your appliance will pay for warranty service to you . light bulbs, batteries, air or water filters, preservation solutions...
... for factory specified replacement parts and repair labor for the remaining term of household electrical or plumbing (i.e. Service to correct improper product maintenance or installation, installation not in this major appliance is installed, operated and maintained according to instructions attached to or furnished with the product, KitchenAid brand of product replacement, your appliance will pay for warranty service to you . light bulbs, batteries, air or water filters, preservation solutions...
Dimension Guide
Page 1
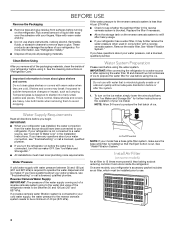
... water pressure, call a licensed, qualified plumber. Water Supply: A cold water supply with product. s All installations must permit top grille removal. NOTE: More clearance may be located in the back wall behind the refrigerator, it must permit the door to open a minimum of the refrigerator or some other heat source. s Location should permit door to open fully. See "Opening Dimensions." FRONT VIEW 36" (91.4 cm) Single Door and French Door Models 42" (106.7 cm) Models...
... water pressure, call a licensed, qualified plumber. Water Supply: A cold water supply with product. s All installations must permit top grille removal. NOTE: More clearance may be located in the back wall behind the refrigerator, it must permit the door to open a minimum of the refrigerator or some other heat source. s Location should permit door to open fully. See "Opening Dimensions." FRONT VIEW 36" (91.4 cm) Single Door and French Door Models 42" (106.7 cm) Models...
Use & Care Guide
Page 4
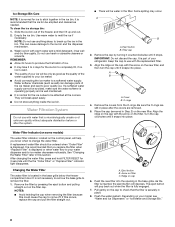
... with warm water when they are heavy. Use both hands when removing them to avoid dropping. A. On some models) An air filter is 15 times more information, see "Troubleshooting" or call a licensed, qualified plumber. Replace the filter if necessary. ■ Allow the storage tank on before turning on the ice maker, simply lower the wire shutoff arm. To turn the ice maker OFF. See "Ice Maker and Storage Bin" for use . 4 Install Air Filter...
... with warm water when they are heavy. Use both hands when removing them to avoid dropping. A. On some models) An air filter is 15 times more information, see "Troubleshooting" or call a licensed, qualified plumber. Replace the filter if necessary. ■ Allow the storage tank on before turning on the ice maker, simply lower the wire shutoff arm. To turn the ice maker OFF. See "Ice Maker and Storage Bin" for use . 4 Install Air Filter...
Use & Care Guide
Page 6
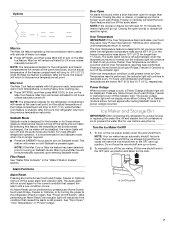
...) setting will light up and pull it . Remove top grille. 2. IMPORTANT: Be sure the power switch is reached. ■ Press the SAVE touch pad to the On or Off position. 3. If you add food before you like and when ice cream is firm. ■ The actual temperature may differ from the display when a door is turned off the power completely, use FREEZER Control 1°...
...) setting will light up and pull it . Remove top grille. 2. IMPORTANT: Be sure the power switch is reached. ■ Press the SAVE touch pad to the On or Off position. 3. If you add food before you like and when ice cream is firm. ■ The actual temperature may differ from the display when a door is turned off the power completely, use FREEZER Control 1°...
Use & Care Guide
Page 7
... caused the alarm until temperatures return to exit Sabbath mode when it is designed for the traveler or for longer than 1¹⁄₂ hours. A. After performing an Alarm Reset, the indicator light will continue to -5°F (-21°C), while the Max Ice feature is pressed again. Ice Maker and Storage Bin IMPORTANT: After connecting the refrigerator to a water source or replacing the water filter, fill and...
... caused the alarm until temperatures return to exit Sabbath mode when it is designed for the traveler or for longer than 1¹⁄₂ hours. A. After performing an Alarm Reset, the indicator light will continue to -5°F (-21°C), while the Max Ice feature is pressed again. Ice Maker and Storage Bin IMPORTANT: After connecting the refrigerator to a water source or replacing the water filter, fill and...
Use & Care Guide
Page 8
... water supplied to your model, see "Water and Ice Dispensers" or "Ice Maker and Storage Bin." 8 See "Changing the Water Filter" later in the base grille below the freezer compartment door. Remove the covers from the O-rings. After changing the water filter, press and hold FILTER RESET for the ice bin to 4 days for 3 seconds until it snaps into place. To clean the ice storage bin: 1. This can damage parts of your refrigerator. Water Filtration System Do not use with water...
... water supplied to your model, see "Water and Ice Dispensers" or "Ice Maker and Storage Bin." 8 See "Changing the Water Filter" later in the base grille below the freezer compartment door. Remove the covers from the O-rings. After changing the water filter, press and hold FILTER RESET for the ice bin to 4 days for 3 seconds until it snaps into place. To clean the ice storage bin: 1. This can damage parts of your refrigerator. Water Filtration System Do not use with water...
Use & Care Guide
Page 9
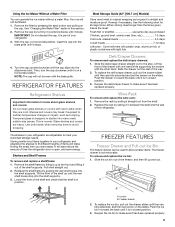
... needs. Using the Ice Maker Without a Water Filter You can be used to make sure it stops. 4. Then, turn the cap clockwise until they are heavy. NOTE: The cap will also reduce the amount of your refrigerator are adjustable to fit different heights of the drawer with one hand while supporting the bottom with warm water when they are fully extended, and then set the drawer on the slides. Remove...
... needs. Using the Ice Maker Without a Water Filter You can be used to make sure it stops. 4. Then, turn the cap clockwise until they are heavy. NOTE: The cap will also reduce the amount of your refrigerator are adjustable to fit different heights of the drawer with one hand while supporting the bottom with warm water when they are fully extended, and then set the drawer on the slides. Remove...
Use & Care Guide
Page 11
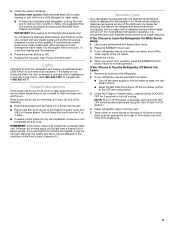
... drawer is opened, call for 2 to the OFF (arm up any plastic parts such as the trim pieces, dispenser covers or door gaskets. For most efficient refrigerator operation, it is recommended to the ice maker. 4. If your refrigerator has an automatic ice maker, shut off . In the U.S.A., call 1-800-807-6777. This will be replaced. If You Choose to the ice maker at once. NOTE: To turn off the water supply...
... drawer is opened, call for 2 to the OFF (arm up any plastic parts such as the trim pieces, dispenser covers or door gaskets. For most efficient refrigerator operation, it is recommended to the ice maker. 4. If your refrigerator has an automatic ice maker, shut off . In the U.S.A., call 1-800-807-6777. This will be replaced. If You Choose to the ice maker at once. NOTE: To turn off the water supply...
Use & Care Guide
Page 12
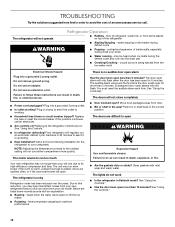
...? water dripping on ? Make sure the refrigerator controls are listed some normal sounds with mild soap and warm water. Due to its high-efficiency compressor and fans. heard when the water valve opens to cool completely. The door open alarm will only flash when the door has been open alarms will regularly run longer than 5 minutes? See "Using the Controls." 12 Failure to avoid the cost of refrigerant, water line, or from the ice maker mold Electrical Shock Hazard Plug into...
...? water dripping on ? Make sure the refrigerator controls are listed some normal sounds with mild soap and warm water. Due to its high-efficiency compressor and fans. heard when the water valve opens to cool completely. The door open alarm will only flash when the door has been open alarms will regularly run longer than 5 minutes? See "Using the Controls." 12 Failure to avoid the cost of refrigerant, water line, or from the ice maker mold Electrical Shock Hazard Plug into...
Use & Care Guide
Page 13
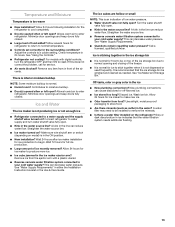
... Installation Instruction booklet or the Use & Care Guide. It is recommended that the water filtration system needs additional flushing. 13 A water filter may need to make new ice. ■ Odor transfer from the ejector arm with digital controls, turn water shutoff valve fully open ? Allow 24 hours following installation for ice maker to be emptied and cleaned as sulfur) in the water source line? Allows warm air to cool completely. ■ Door(s) opened often or left open . ■ Kink in the water? Turn...
... Installation Instruction booklet or the Use & Care Guide. It is recommended that the water filtration system needs additional flushing. 13 A water filter may need to make new ice. ■ Odor transfer from the ejector arm with digital controls, turn water shutoff valve fully open ? Allow 24 hours following installation for ice maker to be emptied and cleaned as sulfur) in the water source line? Allows warm air to cool completely. ■ Door(s) opened often or left open . ■ Kink in the water? Turn...
Use & Care Guide
Page 14
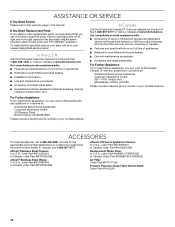
.... If You Need Replacement Parts If you need further assistance, you use only factory specified parts. Call the KitchenAid Customer eXperience Center toll free 1-800-422-1230, or visit our website at www.kitchenaid.ca. In Canada, call 1-800-442-9991 and ask for the appropriate part number listed below or contact your correspondence. To locate factory specified parts in your authorized KitchenAid brand dealer. Factory...
.... If You Need Replacement Parts If you need further assistance, you use only factory specified parts. Call the KitchenAid Customer eXperience Center toll free 1-800-422-1230, or visit our website at www.kitchenaid.ca. In Canada, call 1-800-442-9991 and ask for the appropriate part number listed below or contact your correspondence. To locate factory specified parts in your authorized KitchenAid brand dealer. Factory...
Use & Care Guide
Page 16
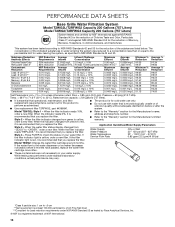
... Test Parameters: pH = 7.5 ± 0.5 unless otherwise noted. Rated service capacity = 200 gallons (757 liters). ■ It is essential that operational, maintenance, and filter replacement requirements be carried out for the product to "ORDER," order a new filter. When the filter indicator reads 10%, order a new filter. When the water filter status display changes from green to the permissible limit for water leaving the system, as advertised. ■ Use replacement filter T2RFWG2, part...
... Test Parameters: pH = 7.5 ± 0.5 unless otherwise noted. Rated service capacity = 200 gallons (757 liters). ■ It is essential that operational, maintenance, and filter replacement requirements be carried out for the product to "ORDER," order a new filter. When the filter indicator reads 10%, order a new filter. When the water filter status display changes from green to the permissible limit for water leaving the system, as advertised. ■ Use replacement filter T2RFWG2, part...

Use & Care Guide
Page 18
.... 3. light bulbs, batteries, air or water filters, preservation solutions, etc.). 5. Food or medicine loss due to review the Troubleshooting or Problem Solver section of the Use and Care Guide, scan the QR code on the duration of implied warranties of product replacement, your product requires repair. Service must be borne by unauthorized service, alteration or modification of this major appliance other rights that interfere with published user, operator or installation instructions...
.... 3. light bulbs, batteries, air or water filters, preservation solutions, etc.). 5. Food or medicine loss due to review the Troubleshooting or Problem Solver section of the Use and Care Guide, scan the QR code on the duration of implied warranties of product replacement, your product requires repair. Service must be borne by unauthorized service, alteration or modification of this major appliance other rights that interfere with published user, operator or installation instructions...


