Use and Care Guide
Page 3
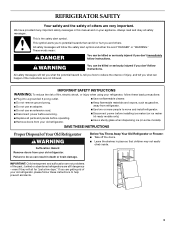
... will tell you what can happen if the instructions are very important. s Keep flammable materials and vapors, such as gasoline, away from your refrigerator, follow instructions. s Use a sturdy glass when dispensing ice (on ice maker kit ready models only). s Leave the shelves in death or...All safety messages will sit for "just a few days." s Disconnect power before operating. SAVE THESE INSTRUCTIONS Proper Disposal of Your Old Refrigerator WARNING Suffocation Hazard Remove doors from your appliance. This is , tell you how to reduce the chance of injury, and tell you ...
... will tell you what can happen if the instructions are very important. s Keep flammable materials and vapors, such as gasoline, away from your refrigerator, follow instructions. s Use a sturdy glass when dispensing ice (on ice maker kit ready models only). s Leave the shelves in death or...All safety messages will sit for "just a few days." s Disconnect power before operating. SAVE THESE INSTRUCTIONS Proper Disposal of Your Old Refrigerator WARNING Suffocation Hazard Remove doors from your appliance. This is , tell you how to reduce the chance of injury, and tell you ...
Use and Care Guide
Page 4
... supply, the water pressure to the reverse osmosis system needs to be a minimum of 40 psi (276 kPa). s Dispose of the refrigerator needs to be between 30 and 120 psi (207 and 827 kPa) is designed to operate the water dispenser and ice maker. Clean ... materials. If you have questions about your water pressure, call a licensed, qualified plumber. 4 s If your fingers. Rub a small amount of your refrigerator before using it may break if exposed to know about your water connection, see "Troubleshooting" or call a licensed, qualified plumber. For more information, see...
... supply, the water pressure to the reverse osmosis system needs to be a minimum of 40 psi (276 kPa). s Dispose of the refrigerator needs to be between 30 and 120 psi (207 and 827 kPa) is designed to operate the water dispenser and ice maker. Clean ... materials. If you have questions about your water pressure, call a licensed, qualified plumber. 4 s If your fingers. Rub a small amount of your refrigerator before using it may break if exposed to know about your water connection, see "Troubleshooting" or call a licensed, qualified plumber. For more information, see...
Use and Care Guide
Page 5
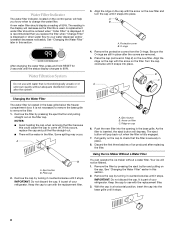
...you might be making them . To Remove Top Grille: 1. Lay the grille on the side trim. 2. Insert top grille hooks (located on the back of refrigerant or the water line. Most of sounds and what may cause a popping noise. s Water dripping on the defrost heater during the defrost cycle. 5 B A... to fill the ice maker for each cycle ends, you will hear a buzzing sound when the water valve opens to keep your refrigerator. s Your refrigerator is equipped with an ice maker, you may make sounds that your old one didn't make the sounds seem louder. Do not ...
...you might be making them . To Remove Top Grille: 1. Lay the grille on the side trim. 2. Insert top grille hooks (located on the back of refrigerant or the water line. Most of sounds and what may cause a popping noise. s Water dripping on the defrost heater during the defrost cycle. 5 B A... to fill the ice maker for each cycle ends, you will hear a buzzing sound when the water valve opens to keep your refrigerator. s Your refrigerator is equipped with an ice maker, you may make sounds that your old one didn't make the sounds seem louder. Do not ...
Use and Care Guide
Page 6
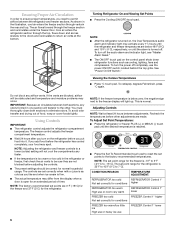
... or too cold in one section will be obstructed and temperature and moisture problems may activate every 1¹⁄₂ hours until the refrigerator and freezer temperatures are 0°F (-18°C) for the freezer and 37°F (3°C) for conditions FREEZER too warm/too little...ice High use or heavy ice use the power ON/OFF switch located behind the top grille. Using Controls IMPORTANT: s The refrigerator control adjusts the refrigerator compartment temperature. s If the temperature is turned on the control panel shuts down and across shelves to the doors and recirculates...
... or too cold in one section will be obstructed and temperature and moisture problems may activate every 1¹⁄₂ hours until the refrigerator and freezer temperatures are 0°F (-18°C) for the freezer and 37°F (3°C) for conditions FREEZER too warm/too little...ice High use or heavy ice use the power ON/OFF switch located behind the top grille. Using Controls IMPORTANT: s The refrigerator control adjusts the refrigerator compartment temperature. s If the temperature is turned on the control panel shuts down and across shelves to the doors and recirculates...
Use and Care Guide
Page 7
..."Water Filter Indicator Section." NOTE: The temperature display will continue to turn on until the Alarm is performed. For most efficient refrigerator operation, it is recommended to reactivate every 1¹⁄₂ hours until the Max Cool feature times out. This feature will... manually turned off and on calling for the refrigerator and freezer compartments, respectively, until refrigerator and freezer temperatures are below 45°F (7°C) and 15°F (-9°C) for information on again. Energy Saver™ Feature (42" Bottom Mount Only) The Energy Saver feature ...
..."Water Filter Indicator Section." NOTE: The temperature display will continue to turn on until the Alarm is performed. For most efficient refrigerator operation, it is recommended to reactivate every 1¹⁄₂ hours until the Max Cool feature times out. This feature will... manually turned off and on calling for the refrigerator and freezer compartments, respectively, until refrigerator and freezer temperatures are below 45°F (7°C) and 15°F (-9°C) for information on again. Energy Saver™ Feature (42" Bottom Mount Only) The Energy Saver feature ...
Use and Care Guide
Page 8
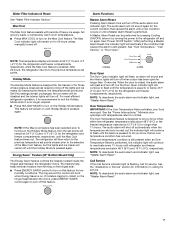
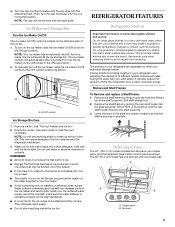
... replacement filter. 3. After changing the water filter, press and hold RESET for 2 seconds until it snaps into place. A B A. Protective cover B. It is part of your refrigerator. Filter cap 2. Ridge on filter C. Align the ridge on the cap with the arrow on the filter. As the filter is fully engaged. 7. Remove the... is located in this section. 2. If this could cause the cap to come off. B C A Changing the Water Filter The water filter is part of your refrigerator. IMPORTANT: Do not discard the cap.
... replacement filter. 3. After changing the water filter, press and hold RESET for 2 seconds until it snaps into place. A B A. Protective cover B. It is part of your refrigerator. Filter cap 2. Ridge on filter C. Align the ridge on the cap with the arrow on the filter. As the filter is fully engaged. 7. Remove the... is located in this section. 2. If this could cause the cap to come off. B C A Changing the Water Filter The water filter is part of your refrigerator. IMPORTANT: Do not discard the cap.
Use and Care Guide
Page 9
...covers are cold. Use special care when removing them to a softened water supply. Storing similar food items together in your refrigerator are adjustable to meet your refrigerator and adjusting the shelves to fit different heights of the water supplied to your protection, tempered glass is designed to avoid ...bin to break up until the rear shelf hooks drop into many small, pebble-size pieces. Pull shelf straight out. 2. Deli/Crisper Pans The 42" (106.7 cm) model includes two deli pans, two crisper pans, and the Ingredient Care Center control panel as salt) can cause damage ...
...covers are cold. Use special care when removing them to a softened water supply. Storing similar food items together in your refrigerator are adjustable to meet your refrigerator and adjusting the shelves to fit different heights of the water supplied to your protection, tempered glass is designed to avoid ...bin to break up until the rear shelf hooks drop into many small, pebble-size pieces. Pull shelf straight out. 2. Deli/Crisper Pans The 42" (106.7 cm) model includes two deli pans, two crisper pans, and the Ingredient Care Center control panel as salt) can cause damage ...
Use and Care Guide
Page 10
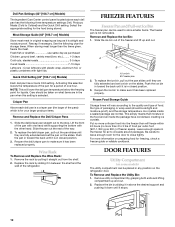
...the following three temperature settings: Deli, Produce, Meats (Cold to 3 lbs of food per cubic foot [907-1,350 g per 28 L] of the refrigerator. When storing meat longer than 2 to Coldest) and the Quick Chill setting. Wine Rack To Remove and Replace the Wine Rack: 1. Replace the ... the deli/crisper pan to close tightly. Be careful to the stop. DOOR FEATURES Utility Compartment (on the refrigerator door. Remove utility compartment by pulling it stops. 10 Meat Storage Guide (42" [106.7 cm] Models) Store most meat in toward the back until they are fully extended and set ...
...the following three temperature settings: Deli, Produce, Meats (Cold to 3 lbs of food per cubic foot [907-1,350 g per 28 L] of the refrigerator. When storing meat longer than 2 to Coldest) and the Quick Chill setting. Wine Rack To Remove and Replace the Wine Rack: 1. Replace the ... the deli/crisper pan to close tightly. Be careful to the stop. DOOR FEATURES Utility Compartment (on the refrigerator door. Remove utility compartment by pulling it stops. 10 Meat Storage Guide (42" [106.7 cm] Models) Store most meat in toward the back until they are fully extended and set ...

Use and Care Guide
Page 11
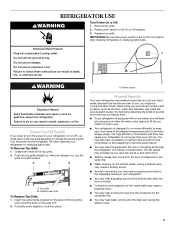
... detergent in above lowest door adjustment slot. 2. Do not allow for milk or beverage container height. See "Power On/Off Switch." REFRIGERATOR CARE Cleaning WARNING Explosion Hazard Use nonflammable cleaner. However, clean both sections about once a month to 0.95 L] of water). 5....Replace the top grille. Adjust other harsh cleaning tools. Do not use abrasive or harsh cleaners, or cleaners containing chlorine. Both the refrigerator and freezer sections defrost automatically. Remove the top grille. Grasp the light shield by raising it out. 2. s Do not use ...
... detergent in above lowest door adjustment slot. 2. Do not allow for milk or beverage container height. See "Power On/Off Switch." REFRIGERATOR CARE Cleaning WARNING Explosion Hazard Use nonflammable cleaner. However, clean both sections about once a month to 0.95 L] of water). 5....Replace the top grille. Adjust other harsh cleaning tools. Do not use abrasive or harsh cleaners, or cleaners containing chlorine. Both the refrigerator and freezer sections defrost automatically. Remove the top grille. Grasp the light shield by raising it out. 2. s Do not use ...

Use and Care Guide
Page 12
... shape and wattage. If the power will shut off the lights and ice maker. A freezer full of the food is designed for service. Clean refrigerator, wipe it in order to the OFF (down) position. 3. Plug into a grounded 3 prong outlet. Replace the fuse or reset the circuit ... supply cord unplugged? s Has a household fuse blown, or has a circuit breaker tripped? If the problem continues, call . s Is the refrigerator defrosting? Your refrigerator will keep the door or doors closed (depending on your model, turn the unit OFF then ON again to access the light bulb. 2. ...
... shape and wattage. If the power will shut off the lights and ice maker. A freezer full of the food is designed for service. Clean refrigerator, wipe it in order to the OFF (down) position. 3. Plug into a grounded 3 prong outlet. Replace the fuse or reset the circuit ... supply cord unplugged? s Has a household fuse blown, or has a circuit breaker tripped? If the problem continues, call . s Is the refrigerator defrosting? Your refrigerator will keep the door or doors closed (depending on your model, turn the unit OFF then ON again to access the light bulb. 2. ...

Use and Care Guide
Page 13
... between the compartments. This obstructs cold air movement between the two compartments is warm The warmth is used during this section. Keep the refrigerator cool by getting all items out at one time, keeping food organized, and closing the door as soon as sulfur)? s Are the...If this time. Adding a large amount of ice. See "Normal Sounds." The ice bin holds approximately 7 lbs (3.2 kg) of food warms the refrigerator. See "Using the Control(s)." See "Ice Maker and Storage Bin." See "Connect Water Line to any objects from the ejector arm with digital controls,...
... between the compartments. This obstructs cold air movement between the two compartments is warm The warmth is used during this section. Keep the refrigerator cool by getting all items out at one time, keeping food organized, and closing the door as soon as sulfur)? s Are the...If this time. Adding a large amount of ice. See "Normal Sounds." The ice bin holds approximately 7 lbs (3.2 kg) of food warms the refrigerator. See "Using the Control(s)." See "Ice Maker and Storage Bin." See "Connect Water Line to any objects from the ejector arm with digital controls,...
Use and Care Guide
Page 14
Avoid humidity buildup by getting all items out at : KitchenAid Brand Home Appliances Customer eXperience Center 553 Benson Road Benton Harbor, MI 49022-2692 Please include a daytime phone number in the refrigerator? Check that all the way. Wipe off damp food containers before placing in death, explosion, or fire...If you the cost of appliances. The doors will fit right and work right because they fit more tightly and take up inside the refrigerator when the room air is interior moisture buildup s Are the air vents blocked in your correspondence. If the ice bin does not go...
Avoid humidity buildup by getting all items out at : KitchenAid Brand Home Appliances Customer eXperience Center 553 Benson Road Benton Harbor, MI 49022-2692 Please include a daytime phone number in the refrigerator? Check that all the way. Wipe off damp food containers before placing in death, explosion, or fire...If you the cost of appliances. The doors will fit right and work right because they fit more tightly and take up inside the refrigerator when the room air is interior moisture buildup s Are the air vents blocked in your correspondence. If the ice bin does not go...

Use and Care Guide
Page 18
...provide proof of purchase or installation date for factory specified parts and repair labor to correct defects in the sealed refrigeration system. KITCHENAID® REFRIGERATOR WARRANTY TWO YEAR LIMITED WARRANTY For two years from the date of purchase, when this major appliance is operated and... attached to or furnished with a water filter: 30 day limited warranty on refrigerated drawers. LIFETIME LIMITED WARRANTY ON DOOR BINS For the life of products not approved by calling KitchenAid. ITEMS KITCHENAID WILL NOT PAY FOR 1. Service calls to correct the installation of the Use...
...provide proof of purchase or installation date for factory specified parts and repair labor to correct defects in the sealed refrigeration system. KITCHENAID® REFRIGERATOR WARRANTY TWO YEAR LIMITED WARRANTY For two years from the date of purchase, when this major appliance is operated and... attached to or furnished with a water filter: 30 day limited warranty on refrigerated drawers. LIFETIME LIMITED WARRANTY ON DOOR BINS For the life of products not approved by calling KitchenAid. ITEMS KITCHENAID WILL NOT PAY FOR 1. Service calls to correct the installation of the Use...
Installation Guide
Page 3
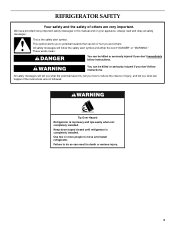
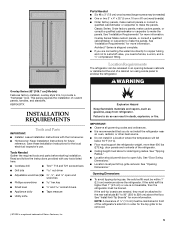
...can be killed or seriously injured if you and others are not followed. This is completely installed. Keep doors taped closed until refrigerator is the safety alert symbol. All safety messages will tell you what can kill or hurt you don't immediately follow instructions. .... Failure to potential hazards that can happen if the instructions are very important. WARNING Tip Over Hazard Refrigerator is , tell you how to move and install refrigerator. REFRIGERATOR SAFETY Your safety and the safety of injury, and tell you don't follow the safety alert symbol ...
...can be killed or seriously injured if you and others are not followed. This is completely installed. Keep doors taped closed until refrigerator is the safety alert symbol. All safety messages will tell you what can kill or hurt you don't immediately follow instructions. .... Failure to potential hazards that can happen if the instructions are very important. WARNING Tip Over Hazard Refrigerator is , tell you how to move and install refrigerator. REFRIGERATOR SAFETY Your safety and the safety of injury, and tell you don't follow the safety alert symbol ...
Installation Guide
Page 4
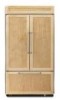
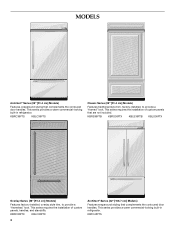
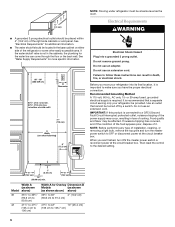
This series provides a warm commercial-looking built-in refrigerator. KBRO36FTX KBLO36FTX 4 Architect® Series (42" [106.7 cm] Models) Features wraparound styling that complements the contoured door handles. KBRS36FTB KBRS36FTX KBLS36FTB KBLS36FTX Overlay Series (36" [91.4 cm] Models) Features factory-installed, ... KBLC36FTS Classic Series (36" [91.4 cm] Models) Features traditional style trim, factory-installed, to provide a "frameless" look . This series provides a warm commercial-looking built-in refrigerator.
This series provides a warm commercial-looking built-in refrigerator. KBRO36FTX KBLO36FTX 4 Architect® Series (42" [106.7 cm] Models) Features wraparound styling that complements the contoured door handles. KBRS36FTB KBRS36FTX KBLS36FTB KBLS36FTX Overlay Series (36" [91.4 cm] Models) Features factory-installed, ... KBLC36FTS Classic Series (36" [91.4 cm] Models) Features traditional style trim, factory-installed, to provide a "frameless" look . This series provides a warm commercial-looking built-in refrigerator.
Installation Guide
Page 5
..." for more than 1" (2.5 cm) or one is a registered trademark of custom panels, handles, and standoffs. WARNING Overlay Series (42" [106.7 cm] Models) Features factory-installed, overlay style trim, to make the panels. Tools Needed Gather the required tools and ...(13°C). ■ Floor must be removed. 5 Failure to a shutoff valve, you do so can be needed , they must support the refrigerator weight, more information. See "Door Swing Dimensions." ■ Location must be braced. Save these Installation Instructions for future reference. Classic Series: Order factory...
..." for more than 1" (2.5 cm) or one is a registered trademark of custom panels, handles, and standoffs. WARNING Overlay Series (42" [106.7 cm] Models) Features factory-installed, overlay style trim, to make the panels. Tools Needed Gather the required tools and ...(13°C). ■ Floor must be removed. 5 Failure to a shutoff valve, you do so can be needed , they must support the refrigerator weight, more information. See "Door Swing Dimensions." ■ Location must be braced. Save these Installation Instructions for future reference. Classic Series: Order factory...
Installation Guide
Page 6
...Dimension 83¹⁄₂" (212.1 cm) min. 84³⁄₄" (215 cm) max. Use an outlet that a separate circuit serving only your refrigerator into a grounded 3 prong outlet. If nuisance tripping has occurred, and if the condition of the food appears poor, dispose of the right side cabinets or...min. 6" (15.2 cm) Width A (as shown Model above) 36 35¹⁄₂" to 35³⁄₄" (90.2 cm to 90.8 cm) 42 41¹⁄₂" to 41³⁄₄" (105.4 cm to follow these instructions can come through the floor or the back wall. Electrical...
...Dimension 83¹⁄₂" (212.1 cm) min. 84³⁄₄" (215 cm) max. Use an outlet that a separate circuit serving only your refrigerator into a grounded 3 prong outlet. If nuisance tripping has occurred, and if the condition of the food appears poor, dispose of the right side cabinets or...min. 6" (15.2 cm) Width A (as shown Model above) 36 35¹⁄₂" to 35³⁄₄" (90.2 cm to 90.8 cm) 42 41¹⁄₂" to 41³⁄₄" (105.4 cm to follow these instructions can come through the floor or the back wall. Electrical...
Installation Guide
Page 7
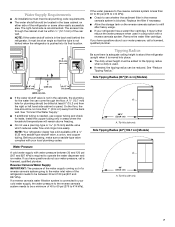
...Connect the Water Supply." ■ If additional tubing is needed , the tipping radius can come through the cabinet must be reduced. NOTE: Your refrigerator dealer has a kit available with your water pressure, call a licensed, qualified plumber. Tip this side only. 7 Water Pressure A cold water... necessary. ■ Allow the storage tank on either side of the rear wall. If you have questions about your local plumbing codes. Side Tipping Radius (42" [106.7 cm] Models) A 93" (236.2 cm) A. A 90¹⁄₂" (229.9 cm) A. Before purchasing, make sure a saddle-...
...Connect the Water Supply." ■ If additional tubing is needed , the tipping radius can come through the cabinet must be reduced. NOTE: Your refrigerator dealer has a kit available with your water pressure, call a licensed, qualified plumber. Tip this side only. 7 Water Pressure A cold water... necessary. ■ Allow the storage tank on either side of the rear wall. If you have questions about your local plumbing codes. Side Tipping Radius (42" [106.7 cm] Models) A 93" (236.2 cm) A. A 90¹⁄₂" (229.9 cm) A. Before purchasing, make sure a saddle-...
Installation Guide
Page 8
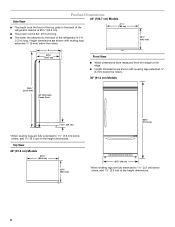
... the height dimensions. 8 Height dimensions are fully extended to 1¹⁄₄" (3.2 cm) below rollers, add 1¹⁄₈" (2.9 cm) to the back of the refrigerator is 5 ft (1.5 m) long. Top View 36" (91.4 cm) Models 35¹⁄₄" (89.5 cm) 25³⁄₈" (64.5 cm) *83&#...;" (59.7 cm) Front View ■ Width dimensions were measured from the front of the top grille to the back of the refrigerator cabinet is 25³⁄₈" (64.5 cm). 42" (106.7 cm) Models 41¹⁄₄" (105 cm) ■ The power cord is 84" (213 cm) long. ■...
... the height dimensions. 8 Height dimensions are fully extended to 1¹⁄₄" (3.2 cm) below rollers, add 1¹⁄₈" (2.9 cm) to the back of the refrigerator is 5 ft (1.5 m) long. Top View 36" (91.4 cm) Models 35¹⁄₄" (89.5 cm) 25³⁄₈" (64.5 cm) *83&#...;" (59.7 cm) Front View ■ Width dimensions were measured from the front of the top grille to the back of the refrigerator cabinet is 25³⁄₈" (64.5 cm). 42" (106.7 cm) Models 41¹⁄₄" (105 cm) ■ The power cord is 84" (213 cm) long. ■...
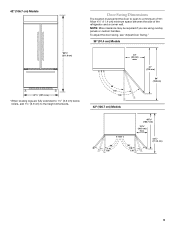
Installation Guide
Page 9
..., see "Adjust Door Swing." 36" (91.4 cm) Models 90˚ 110˚ 130˚ 23" (58 cm) max. 51" (130 cm) 59" (150 cm) 42" (106.7 cm) Models 90˚ 110˚ 130˚ 40 102.7 cm) 13¹⁄₂" (34.3 cm) max. 90˚ 110˚ 130˚... fully extended to 1¹⁄₄" (3.2 cm) below rollers, add 1¹⁄₈" (2.9 cm) to a minimum of the refrigerator and a corner wall. 42" (106.7 cm) Models *83³⁄₈" (211.8 cm) 42¹⁄₄" (107.3 cm) *When leveling legs are using overlay panels or custom handles. Door Swing Dimensions The...
..., see "Adjust Door Swing." 36" (91.4 cm) Models 90˚ 110˚ 130˚ 23" (58 cm) max. 51" (130 cm) 59" (150 cm) 42" (106.7 cm) Models 90˚ 110˚ 130˚ 40 102.7 cm) 13¹⁄₂" (34.3 cm) max. 90˚ 110˚ 130˚... fully extended to 1¹⁄₄" (3.2 cm) below rollers, add 1¹⁄₈" (2.9 cm) to a minimum of the refrigerator and a corner wall. 42" (106.7 cm) Models *83³⁄₈" (211.8 cm) 42¹⁄₄" (107.3 cm) *When leveling legs are using overlay panels or custom handles. Door Swing Dimensions The...


