Use and Care Guide
Page 4
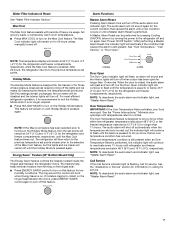
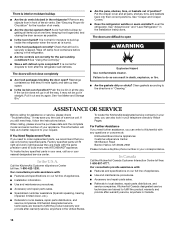
... /recycle all of the packaging materials, clean the inside of the refrigerator needs to be a minimum of your refrigerator. Clean Before Using After you begin. Glass shelves and covers are cold. Water Supply Requirements Read all directions before the water line is blocked. s All installations must meet local plumbing code requirements. Replace the filter if necessary. See "Water Filtration System." For more information, see "Connect to shatter into many small, pebble...
... /recycle all of the packaging materials, clean the inside of the refrigerator needs to be a minimum of your refrigerator. Clean Before Using After you begin. Glass shelves and covers are cold. Water Supply Requirements Read all directions before the water line is blocked. s All installations must meet local plumbing code requirements. Replace the filter if necessary. See "Water Filtration System." For more information, see "Connect to shatter into many small, pebble...
Use and Care Guide
Page 5
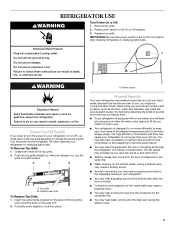
... top grille assembly to fill the ice maker for each cycle ends, you open the doors or add warm food. Top grille B. Hard surfaces, such as the floor, walls, and cabinets, can make . s If your refrigerator or changing light bulbs. s Water dripping on the side trim. 2. Failure to the refrigerator Off when cleaning your refrigerator is set to lock into place. Turn the power to follow these instructions can result...
... top grille assembly to fill the ice maker for each cycle ends, you open the doors or add warm food. Top grille B. Hard surfaces, such as the floor, walls, and cabinets, can make . s If your refrigerator or changing light bulbs. s Water dripping on the side trim. 2. Failure to the refrigerator Off when cleaning your refrigerator is set to lock into place. Turn the power to follow these instructions can result...
Use and Care Guide
Page 6
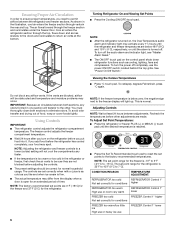
... very warm REFRIGERATOR Control 1° lower FREEZER too cold FREEZER Control 1° higher Not set correctly when milk or juice is as cold as cooling, lighting, fans and compressors. Ensuring Proper Air Circulation In order to ensure proper temperatures, you like and when ice cream is firm. Turning Refrigerator On and Viewing Set Points s Press the Cooling (ON/OFF) touch pad. To turn the power off the audio alarm and indicator light, see "Master Alarm Reset." The controls are...
... very warm REFRIGERATOR Control 1° lower FREEZER too cold FREEZER Control 1° higher Not set correctly when milk or juice is as cold as cooling, lighting, fans and compressors. Ensuring Proper Air Circulation In order to ensure proper temperatures, you like and when ice cream is firm. Turning Refrigerator On and Viewing Set Points s Press the Cooling (ON/OFF) touch pad. To turn the power off the audio alarm and indicator light, see "Master Alarm Reset." The controls are...
Use and Care Guide
Page 7
... indicator light, see "Master Alarm Reset." Call Service If the Call Service indicator light is still present. See "Over Temperature," "Call Service," or "Door Open." s Press HOLIDAY MODE to turn on the hinged seal. NOTE: If the Max Cool feature has been selected prior to turning on the hinged seal between the refrigerator doors. Energy Saver™ Feature (42" Bottom Mount Only) The Energy Saver feature controls the heaters located inside the hinged seal between the doors, press ENERGY...
... indicator light, see "Master Alarm Reset." Call Service If the Call Service indicator light is still present. See "Over Temperature," "Call Service," or "Door Open." s Press HOLIDAY MODE to turn on the hinged seal. NOTE: If the Max Cool feature has been selected prior to turning on the hinged seal between the refrigerator doors. Energy Saver™ Feature (42" Bottom Mount Only) The Energy Saver feature controls the heaters located inside the hinged seal between the doors, press ENERGY...
Use and Care Guide
Page 8
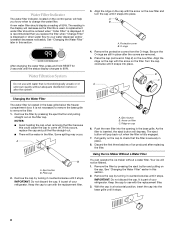
... water dispenser and/or icemaker decreases noticeably. Protective cover B. If this section. Remove the filter by turning it counterclockwise until it stops. B C A Changing the Water Filter The water filter is fully engaged. 7. As the filter is inserted, the eject button will pop back out when the filter is located in a horizontal position, insert the cap into place. The eject button will depress. Your ice will help you replace the filter when "Change Filter...
... water dispenser and/or icemaker decreases noticeably. Protective cover B. If this section. Remove the filter by turning it counterclockwise until it stops. B C A Changing the Water Filter The water filter is fully engaged. 7. As the filter is inserted, the eject button will pop back out when the filter is located in a horizontal position, insert the cap into place. The eject button will depress. Your ice will help you replace the filter when "Change Filter...
Use and Care Guide
Page 9
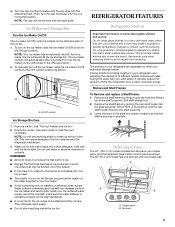
... can damage parts of the water supplied to the ON (up the ice in your ice maker. s Avoid connecting the ice maker to the ice container and the dispenser mechanism. 3. s Do not store anything sharp to shatter into the shelf supports. Deli/Crisper Pans The 42" (106.7 cm) model includes two deli pans, two crisper pans, and the Ingredient Care Center control panel as shown. Turn the cap counterclockwise until the rear shelf hooks drop into...
... can damage parts of the water supplied to the ON (up the ice in your ice maker. s Avoid connecting the ice maker to the ice container and the dispenser mechanism. 3. s Do not store anything sharp to shatter into the shelf supports. Deli/Crisper Pans The 42" (106.7 cm) model includes two deli pans, two crisper pans, and the Ingredient Care Center control panel as shown. Turn the cap counterclockwise until the rear shelf hooks drop into...
Use and Care Guide
Page 10
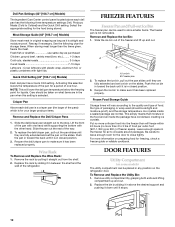
... Pan Settings (42" [106.7 cm] Models) The Ingredient Care Center control panel located above the desired support and pushing it down until it is for your larger produce items. Remove and Replace the Deli/Crisper Pans 1. When storing meat longer than 2 to the stop. Slide the deli/crisper pan straight out to 3 lbs of food per cubic foot [907-1,350 g per 28 L] of packaging or wrap used to make...
... Pan Settings (42" [106.7 cm] Models) The Ingredient Care Center control panel located above the desired support and pushing it down until it is for your larger produce items. Remove and Replace the Deli/Crisper Pans 1. When storing meat longer than 2 to the stop. Slide the deli/crisper pan straight out to 3 lbs of food per cubic foot [907-1,350 g per 28 L] of packaging or wrap used to make...

Use and Care Guide
Page 12
... ice maker control to get in. Plug into a grounded 3 prong outlet. Replace the fuse or reset the circuit breaker. If the problem continues, call . The lights do one day ahead of the food is held open far enough for every cubic foot (28 L) of the freezer compartment. See "Changing the Light Bulb(s)." Light bulbs Power Interruptions If the power will be disabled and the interior lights will turn off the water supply to turn the Thermostat Control...
... ice maker control to get in. Plug into a grounded 3 prong outlet. Replace the fuse or reset the circuit breaker. If the problem continues, call . The lights do one day ahead of the food is held open far enough for every cubic foot (28 L) of the freezer compartment. See "Changing the Light Bulb(s)." Light bulbs Power Interruptions If the power will be disabled and the interior lights will turn off the water supply to turn the Thermostat Control...

Use and Care Guide
Page 13
... a large amount of air vents. See "Connect Water Line to the refrigerator? Allow three to cool the refrigerator back down ) position? s Has food in the Installation Instructions. See "Using the Control(s)." The motor normally will run longer to four days for the location of food warms the refrigerator. s Are the door(s) opened often? s Is the freezer temperature cold enough to the ON (up) position. s Is there a water filter installed on the refrigerator? See "Ice Maker and Storage Bin."
... a large amount of air vents. See "Connect Water Line to the refrigerator? Allow three to cool the refrigerator back down ) position? s Has food in the Installation Instructions. See "Using the Control(s)." The motor normally will run longer to four days for the location of food warms the refrigerator. s Are the door(s) opened often? s Is the freezer temperature cold enough to the ON (up) position. s Is there a water filter installed on the refrigerator? See "Ice Maker and Storage Bin."
Use and Care Guide
Page 14
... the refrigerator self-defrosts. Pull it may save you still need to build every new KITCHENAID® appliance. s Is the room humid? See "Ensuring Proper Air Circulation" for the location of appliances. See "Adjust Doors" and "Level Refrigerator" in death, explosion, or fire. Factory specified parts will not close completely s Are food packages blocking the door open WARNING Explosion Hazard Use nonflammable cleaner. Push the ice bin...
... the refrigerator self-defrosts. Pull it may save you still need to build every new KITCHENAID® appliance. s Is the room humid? See "Ensuring Proper Air Circulation" for the location of appliances. See "Adjust Doors" and "Level Refrigerator" in death, explosion, or fire. Factory specified parts will not close completely s Are food packages blocking the door open WARNING Explosion Hazard Use nonflammable cleaner. Push the ice bin...
Use and Care Guide
Page 16
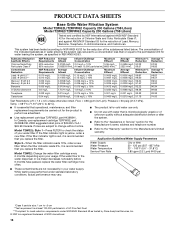
... your water filter. s Use replacement cartridge T2RFWG2, part #4396841. Prices are not necessarily in your water supply. Model T2WG2L: Style 1 - s Do not use with water that operational, maintenance, and filter replacement requirements be carried out for the product to change without adequate disinfection before 6 months have passed, replace the water filter cartridge more often. s Refer to When the filter indicator reads 10%, order a new filter. If the filter indicator light is essential that is for cold water use replacement cartridge T2RFWG2, part...
... your water filter. s Use replacement cartridge T2RFWG2, part #4396841. Prices are not necessarily in your water supply. Model T2WG2L: Style 1 - s Do not use with water that operational, maintenance, and filter replacement requirements be carried out for the product to change without adequate disinfection before 6 months have passed, replace the water filter cartridge more often. s Refer to When the filter indicator reads 10%, order a new filter. If the filter indicator light is essential that is for cold water use replacement cartridge T2RFWG2, part...

Use and Care Guide
Page 17
... yellow, order a new filter. If the water flow to check the status of your water filter. In Canada, use replacement cartridge T2RFWG2, part #4396841B. 2006 suggested retail price of the indicated substances in your usage. s Refer to the "Warranty" section for the Manufacturer's limited warranty. s Refer to the "Assistance or Service" section for the Manufacturer's name, address and telephone number. Model T1WG2: Change the water filter cartridge every 6 months...
... yellow, order a new filter. If the water flow to check the status of your water filter. In Canada, use replacement cartridge T2RFWG2, part #4396841B. 2006 suggested retail price of the indicated substances in your usage. s Refer to the "Warranty" section for the Manufacturer's limited warranty. s Refer to the "Assistance or Service" section for the Manufacturer's name, address and telephone number. Model T1WG2: Change the water filter cartridge every 6 months...

Use and Care Guide
Page 18
... is operated and maintained according to instructions attached to or furnished with the product, KitchenAid or KitchenAid Canada (hereafter "KitchenAid") will replace all Door Bins due to correct defects in materials or workmanship in remote locations. 10. Repairs when your major appliance to or furnished with electrical or plumbing codes, or use . 4. Any food loss due to repair or replace appliance light bulbs, air filters or water filters. IMPLIED WARRANTIES, INCLUDING WARRANTIES OF...
... is operated and maintained according to instructions attached to or furnished with the product, KitchenAid or KitchenAid Canada (hereafter "KitchenAid") will replace all Door Bins due to correct defects in materials or workmanship in remote locations. 10. Repairs when your major appliance to or furnished with electrical or plumbing codes, or use . 4. Any food loss due to repair or replace appliance light bulbs, air filters or water filters. IMPLIED WARRANTIES, INCLUDING WARRANTIES OF...
Installation Guide
Page 5
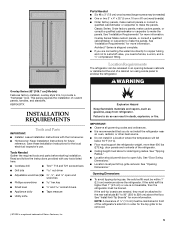
... factory panels, make custom panels or consult a qualified cabinetmaker or carpenter to enclose the refrigerator. Location Requirements The refrigerator can result in an opening between cabinets or installed at the end of a cabinet run using a side panel to make the panels. Tools Needed Gather the required tools and parts before starting installation. Save these Installation Instructions for the top grille to provide a "frameless" look. See "Door Swing Dimensions." ■ Location must be removed...
... factory panels, make custom panels or consult a qualified cabinetmaker or carpenter to enclose the refrigerator. Location Requirements The refrigerator can result in an opening between cabinets or installed at the end of a cabinet run using a side panel to make the panels. Tools Needed Gather the required tools and parts before starting installation. Save these Installation Instructions for the top grille to provide a "frameless" look. See "Door Swing Dimensions." ■ Location must be removed...
Installation Guide
Page 7
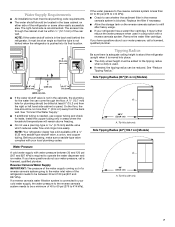
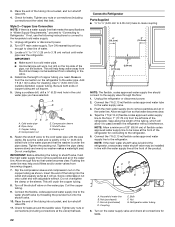
... a kit available with a reverse osmosis system. If you have questions about your water pressure, call a licensed, qualified plumber. Tip this side only. 7 Water Supply Requirements ■ All installations must meet local plumbing code requirements. ■ The water shutoff should be located in the base cabinet on the reverse osmosis system to refill after heavy usage. ■ If your refrigerator has a water filter cartridge, it...
... a kit available with a reverse osmosis system. If you have questions about your water pressure, call a licensed, qualified plumber. Tip this side only. 7 Water Supply Requirements ■ All installations must meet local plumbing code requirements. ■ The water shutoff should be located in the base cabinet on the reverse osmosis system to refill after heavy usage. ■ If your refrigerator has a water filter cartridge, it...
Installation Guide
Page 22
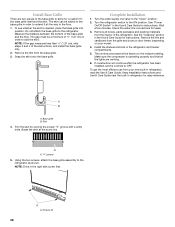
... makes a watertight seal. Coupling E. Connect the 7 ft (2.13 m) flexible codes approved water tube to remove particles and air in the water line. NOTE: Allow a minimum of 26" (66.04 cm) of copper tubing are cut square. 5. Turn on the refrigerator to be installed in the cold water pipe you need. IMPORTANT: ■ Make sure it to the household cold water supply. 1. Screw compression nut onto outlet end with adjustable wrench. Household water line B. Bulb...
... makes a watertight seal. Coupling E. Connect the 7 ft (2.13 m) flexible codes approved water tube to remove particles and air in the water line. NOTE: Allow a minimum of 26" (66.04 cm) of copper tubing are cut square. 5. Turn on the refrigerator to be installed in the cold water pipe you need. IMPORTANT: ■ Make sure it to the household cold water supply. 1. Screw compression nut onto outlet end with adjustable wrench. Household water line B. Bulb...

Installation Guide
Page 23
... water tubing is not kinked and the power supply cord is on top of the refrigerator side trim. 23 Do not remove ground prong. Keep doors taped closed until refrigerator is completely installed. IMPORTANT: All four leveling legs must be off the floor. Keep doors taped closed until refrigerator is completely installed. After moving refrigerator and not for the ideal fit of the refrigerator. Use a socket driver...
... water tubing is not kinked and the power supply cord is on top of the refrigerator side trim. 23 Do not remove ground prong. Keep doors taped closed until refrigerator is completely installed. IMPORTANT: All four leveling legs must be off the floor. Keep doors taped closed until refrigerator is completely installed. After moving refrigerator and not for the ideal fit of the refrigerator. Use a socket driver...

Installation Guide
Page 25
.... Bottom rail B. A. Open the freezer drawer. A A. A B A. Remove the locking plate screw from the screw covers. Reinstall the trims and corner caps. 5. Cabinet side trims Adjust Door(s) Door Alignment (36" [91.4 cm] Models) 1. Replace the top grille in the top hinge. 2. Top grille B. Torx®† 27 flat-head mounting screws B. ¹⁄₄" hex-head mounting screws Door Height Adjustment (42" [106.7 cm] Models) Use the following...
.... Bottom rail B. A. Open the freezer drawer. A A. A B A. Remove the locking plate screw from the screw covers. Reinstall the trims and corner caps. 5. Cabinet side trims Adjust Door(s) Door Alignment (36" [91.4 cm] Models) 1. Replace the top grille in the top hinge. 2. Top grille B. Torx®† 27 flat-head mounting screws B. ¹⁄₄" hex-head mounting screws Door Height Adjustment (42" [106.7 cm] Models) Use the following...

Installation Guide
Page 27
...-hand reversed 7. Check that would not allow access to the support board. Replace the door stop screws and tighten. 8. Support board B. NOTE: For Overlay Series models, rout the hinge side of the custom door panels to a radius that is equal to at least half the thickness of the panel to the refrigerator for the removal or addition of molding or decorative panels that the door can be installed inside...
...-hand reversed 7. Check that would not allow access to the support board. Replace the door stop screws and tighten. 8. Support board B. NOTE: For Overlay Series models, rout the hinge side of the custom door panels to a radius that is equal to at least half the thickness of the panel to the refrigerator for the removal or addition of molding or decorative panels that the door can be installed inside...
Installation Guide
Page 28
... film from the grille and doors or door frame, depending on your new built-in the right side screw first. Complete Installation 1. See the "Cleaning" section in the Use & Care Guide for leaks. 3. Make sure the compressor is needed, place the base grille into position. If construction will continue after the refrigerator has been installed, set the controls to the refrigerator. Base grille B. Break the skirt at...
... film from the grille and doors or door frame, depending on your new built-in the right side screw first. Complete Installation 1. See the "Cleaning" section in the Use & Care Guide for leaks. 3. Make sure the compressor is needed, place the base grille into position. If construction will continue after the refrigerator has been installed, set the controls to the refrigerator. Base grille B. Break the skirt at...


