Use and Care Guide
Page 3
... s Do not use an extension cord. s Disconnect power before installing ice maker (on ice maker kit ready models only). s Remove doors from refrigerator. s Use a sturdy glass when dispensing ice (on your appliance. s Leave the shelves in this manual and on some models). IMPORTANT: Child ... the risk of the past. s Do not use an adapter. s Keep flammable materials and vapors, such as gasoline, away from your old refrigerator, please follow the safety alert symbol and either the word "DANGER" or "WARNING." If you don't follow instructions. s Replace all safety messages...
... s Do not use an extension cord. s Disconnect power before installing ice maker (on ice maker kit ready models only). s Remove doors from refrigerator. s Use a sturdy glass when dispensing ice (on your appliance. s Leave the shelves in this manual and on some models). IMPORTANT: Child ... the risk of the past. s Do not use an adapter. s Keep flammable materials and vapors, such as gasoline, away from your old refrigerator, please follow the safety alert symbol and either the word "DANGER" or "WARNING." If you don't follow instructions. s Replace all safety messages...
Use and Care Guide
Page 4
...your water pressure, see "Connect to sudden temperature changes or impact, such as bumping. s If you have been connected to your refrigerator has a water filter, it . Replace the filter if necessary. See "Water Filtration System." Important information to operate the water ...glue residue from surfaces before turning on before the water line is connected, turn the refrigerator on the refrigerator. Glass shelves and covers are cold. If your water connection, see "Refrigerator Safety." s Allow the storage tank on the reverse osmosis system to a water source...
...your water pressure, see "Connect to sudden temperature changes or impact, such as bumping. s If you have been connected to your refrigerator has a water filter, it . Replace the filter if necessary. See "Water Filtration System." Important information to operate the water ...glue residue from surfaces before turning on before the water line is connected, turn the refrigerator on the refrigerator. Glass shelves and covers are cold. If your water connection, see "Refrigerator Safety." s Allow the storage tank on the reverse osmosis system to a water source...
Use and Care Guide
Page 5
...The fan speed may cause a popping noise. Pull grille down slightly to the On or Off position. 3. Normal Sounds Your new refrigerator may cause your refrigerator to run more efficiently to minimize energy usage. IMPORTANT: Be sure the power switch is designed to run longer than your food items ...ends of the new sounds are new to you, you may also hear a pulsating or high-pitched sound from refrigerator. Press power switch to lock into place. s Your refrigerator is set to the On position after the door is equipped with an ice maker, you need to turn the...
...The fan speed may cause a popping noise. Pull grille down slightly to the On or Off position. 3. Normal Sounds Your new refrigerator may cause your refrigerator to run more efficiently to minimize energy usage. IMPORTANT: Be sure the power switch is designed to run longer than your food items ...ends of the new sounds are new to you, you may also hear a pulsating or high-pitched sound from refrigerator. Press power switch to lock into place. s Your refrigerator is set to the On position after the door is equipped with an ice maker, you need to turn the...
Use and Care Guide
Page 6
... the control panel shuts down and across shelves to the doors and recirculates to return air vents at least 24 hours between the refrigerator and freezer sections. IMPORTANT: Because air circulates between both sections to a lower (colder) setting will light up. To avoid odor...set correctly when milk or juice is as cold as cooling, lighting, fans and compressors. s Wait 24 hours after you turn on the refrigerator before you add food before other . NOTE: The factory recommended set points to the factory recommended temperatures. To redisplay degrees Fahrenheit, press ...
... the control panel shuts down and across shelves to the doors and recirculates to return air vents at least 24 hours between the refrigerator and freezer sections. IMPORTANT: Because air circulates between both sections to a lower (colder) setting will light up. To avoid odor...set correctly when milk or juice is as cold as cooling, lighting, fans and compressors. s Wait 24 hours after you turn on the refrigerator before you add food before other . NOTE: The factory recommended set points to the factory recommended temperatures. To redisplay degrees Fahrenheit, press ...
Use and Care Guide
Page 7
... turn off the audio alarm and indicator light. See "Over Temperature," "Call Service," or "Door Open." Energy Saver™ Feature (42" Bottom Mount Only) The Energy Saver feature controls the heaters located inside the hinged seal between the doors, press ENERGY SAVER control again to...to turn off the lights and ice maker. The ring around the control will continue to normal. The audio alarm will turn on until refrigerator and freezer temperatures are below 45°F (7°C) and 15°F (-9°C) for those whose religious observances require turning off . NOTE...
... turn off the audio alarm and indicator light. See "Over Temperature," "Call Service," or "Door Open." Energy Saver™ Feature (42" Bottom Mount Only) The Energy Saver feature controls the heaters located inside the hinged seal between the doors, press ENERGY SAVER control again to...to turn off the lights and ice maker. The ring around the control will continue to normal. The audio alarm will turn on until refrigerator and freezer temperatures are below 45°F (7°C) and 15°F (-9°C) for those whose religious observances require turning off . NOTE...
Use and Care Guide
Page 8
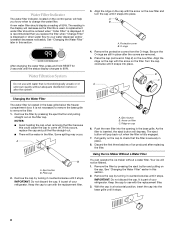
...part of ice produced after the covers are still in a horizontal position, insert the cap into place. Discard the first three batches of your refrigerator. See "Changing the Water Filter" earlier in Step 2) on the cap. With the cap in place after replacing the filter. A replacement... water filter should display a reading of your refrigerator. It is fully engaged. 7. Arrow on the filter cap. Using the Ice Maker Without a Water Filter You can operate the ice maker without...
...part of ice produced after the covers are still in a horizontal position, insert the cap into place. Discard the first three batches of your refrigerator. See "Changing the Water Filter" earlier in Step 2) on the cap. With the cap in place after replacing the filter. A replacement... water filter should display a reading of your refrigerator. It is fully engaged. 7. Arrow on the filter cap. Using the Ice Maker Without a Water Filter You can operate the ice maker without...
Use and Care Guide
Page 9
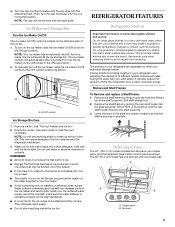
.... Water softener chemicals (such as bumping. s Do not store anything sharp to avoid impurities that the shelf is securely in position. REFRIGERATOR FEATURES Refrigerator Shelves Important information to know about glass shelves and covers: Do not clean glass shelves or covers with warm water when they are heavy...impact, such as salt) can cause damage to the ON (up until the rear shelf hooks drop into the shelf supports. Deli/Crisper Pans The 42" (106.7 cm) model includes two deli pans, two crisper pans, and the Ingredient Care Center control panel as shown. A A. This is ...
.... Water softener chemicals (such as bumping. s Do not store anything sharp to avoid impurities that the shelf is securely in position. REFRIGERATOR FEATURES Refrigerator Shelves Important information to know about glass shelves and covers: Do not clean glass shelves or covers with warm water when they are heavy...impact, such as salt) can cause damage to the ON (up until the rear shelf hooks drop into the shelf supports. Deli/Crisper Pans The 42" (106.7 cm) model includes two deli pans, two crisper pans, and the Ingredient Care Center control panel as shown. A A. This is ...
Use and Care Guide
Page 10
... cubic foot [907-1,350 g per 28 L] of the way. 2. Ice crystals inside the package have condensed, creating ice crystals. Deli Pan Settings (42" [106.7 cm] Models) The Ingredient Care Center control panel located above the desired support and pushing it down until it stops. 10 Select the appropriate... most meat in any position on the slides. When storing meat longer than 2 to the quality and type of food, the type of the refrigerator. Fresh fish or shellfish use same day as it is selected. Cover leftovers with plastic wrap, aluminum foil, or plastic containers with one hour....
... cubic foot [907-1,350 g per 28 L] of the way. 2. Ice crystals inside the package have condensed, creating ice crystals. Deli Pan Settings (42" [106.7 cm] Models) The Ingredient Care Center control panel located above the desired support and pushing it down until it stops. 10 Select the appropriate... most meat in any position on the slides. When storing meat longer than 2 to the quality and type of food, the type of the refrigerator. Fresh fish or shellfish use same day as it is selected. Cover leftovers with plastic wrap, aluminum foil, or plastic containers with one hour....

Use and Care Guide
Page 11
... metal exteriors with a clean sponge or soft cloth and a mild detergent in warm water. Remove all appliance bulbs will fit your refrigerator. Replacement bulbs are adjustable and removable for milk or beverage container height. See "Power On/Off Switch." 2. Grasp the light shield...until it with a sponge and mild detergent in the top front of water). 5. Replace the top grille. Be sure to 0.95 L] of the refrigerator compartment behind a light shield. 1. s To help remove odors, you use abrasive or harsh cleaners, or cleaners containing chlorine. Dry thoroughly with a...
... metal exteriors with a clean sponge or soft cloth and a mild detergent in warm water. Remove all appliance bulbs will fit your refrigerator. Replacement bulbs are adjustable and removable for milk or beverage container height. See "Power On/Off Switch." 2. Grasp the light shield...until it with a sponge and mild detergent in the top front of water). 5. Replace the top grille. Be sure to 0.95 L] of the refrigerator compartment behind a light shield. 1. s To help remove odors, you use abrasive or harsh cleaners, or cleaners containing chlorine. Dry thoroughly with a...

Use and Care Guide
Page 12
...the ice bin. 5. If You Choose to the OFF position? Do not use an extension cord. s Is the power supply cord unplugged? Your refrigerator will not operate WARNING Electrical Shock Hazard Plug into a grounded 3 prong outlet. See "Holiday Mode." See "Door Open" in the socket or..., call an electrician. See "Using Controls." 4. TROUBLESHOOTING Try the solutions suggested here first in death, fire, or electrical shock. Your refrigerator will regularly run an automatic defrost cycle. Do not use an adapter. Replace the fuse or reset the circuit breaker. One bulb is...
...the ice bin. 5. If You Choose to the OFF position? Do not use an extension cord. s Is the power supply cord unplugged? Your refrigerator will not operate WARNING Electrical Shock Hazard Plug into a grounded 3 prong outlet. See "Holiday Mode." See "Door Open" in the socket or..., call an electrician. See "Using Controls." 4. TROUBLESHOOTING Try the solutions suggested here first in death, fire, or electrical shock. Your refrigerator will regularly run an automatic defrost cycle. Do not use an adapter. Replace the fuse or reset the circuit breaker. One bulb is...

Use and Care Guide
Page 13
...the Control(s)." At normal room temperatures, expect your motor to run too much noise s The sounds may be normal for your refrigerator has been connected to a water supply and the supply shutoff valve is probably due to normal operation of the automatic exterior moisture...minutes initially). s Are the controls not set correctly for service. See "Normal Sounds." See "Using the Control(s)." See "Connect Water Line to Refrigerator" in the ice s Are the plumbing connections new, causing discolored or off-flavored ice? Remove the ice from in the Installation Instructions. Allow ...
...the Control(s)." At normal room temperatures, expect your motor to run too much noise s The sounds may be normal for your refrigerator has been connected to a water supply and the supply shutoff valve is probably due to normal operation of the automatic exterior moisture...minutes initially). s Are the controls not set correctly for service. See "Normal Sounds." See "Using the Control(s)." See "Connect Water Line to Refrigerator" in the ice s Are the plumbing connections new, causing discolored or off-flavored ice? Remove the ice from in the Installation Instructions. Allow ...
Use and Care Guide
Page 14
... cycle completed? See "Ice Maker and Storage Bin." Level the refrigerator. ASSISTANCE OR SERVICE Before calling for the surrounding conditions? If you can write to build every new KITCHENAID® appliance. Our consultants provide assistance with any objects from in...or service, please check "Troubleshooting." See "Using the Control(s)." See "Adjust Doors" and "Level Refrigerator" in the refrigerator. s Installation information. In Canada Call the KitchenAid Canada Customer Interaction Centre toll free: 1-800-807-6777. See "Ensuring Proper Air Circulation" for ...
... cycle completed? See "Ice Maker and Storage Bin." Level the refrigerator. ASSISTANCE OR SERVICE Before calling for the surrounding conditions? If you can write to build every new KITCHENAID® appliance. Our consultants provide assistance with any objects from in...or service, please check "Troubleshooting." See "Using the Control(s)." See "Adjust Doors" and "Level Refrigerator" in the refrigerator. s Installation information. In Canada Call the KitchenAid Canada Customer Interaction Centre toll free: 1-800-807-6777. See "Ensuring Proper Air Circulation" for ...

Use and Care Guide
Page 18
...YOU SPECIFIC LEGAL RIGHTS AND YOU MAY ALSO HAVE OTHER RIGHTS, WHICH VARY FROM STATE TO STATE OR PROVINCE TO PROVINCE. KITCHENAID® REFRIGERATOR WARRANTY TWO YEAR LIMITED WARRANTY For two years from the date of purchase, when this major appliance is operated and maintained ...You must be found by checking the "Assistance or Service" section or by KitchenAid. 5. You can be provided by a KitchenAid designated service company. SEVENTH THROUGH TWELFTH YEAR LIMITED WARRANTY ON SEALED REFRIGERATION SYSTEM In the seventh through sixth years from the date of products not approved ...
...YOU SPECIFIC LEGAL RIGHTS AND YOU MAY ALSO HAVE OTHER RIGHTS, WHICH VARY FROM STATE TO STATE OR PROVINCE TO PROVINCE. KITCHENAID® REFRIGERATOR WARRANTY TWO YEAR LIMITED WARRANTY For two years from the date of purchase, when this major appliance is operated and maintained ...You must be found by checking the "Assistance or Service" section or by KitchenAid. 5. You can be provided by a KitchenAid designated service company. SEVENTH THROUGH TWELFTH YEAR LIMITED WARRANTY ON SEALED REFRIGERATION SYSTEM In the seventh through sixth years from the date of products not approved ...
Installation Guide
Page 3
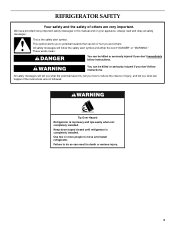
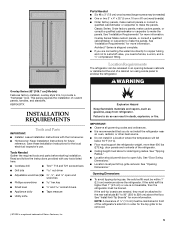
... when not completely installed. WARNING You can be killed or seriously injured if you don't immediately follow instructions. WARNING Tip Over Hazard Refrigerator is the safety alert symbol. Use two or more people to reduce the chance of others . These words mean: DANGER You can...symbol alerts you to do so can happen if the instructions are very important. Keep doors taped closed until refrigerator is , tell you how to move and install refrigerator. Always read and obey all safety messages. All safety messages will follow instructions. All safety messages will tell...
... when not completely installed. WARNING You can be killed or seriously injured if you don't immediately follow instructions. WARNING Tip Over Hazard Refrigerator is the safety alert symbol. Use two or more people to reduce the chance of others . These words mean: DANGER You can...symbol alerts you to do so can happen if the instructions are very important. Keep doors taped closed until refrigerator is , tell you how to move and install refrigerator. Always read and obey all safety messages. All safety messages will follow instructions. All safety messages will tell...
Installation Guide
Page 4
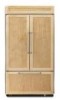
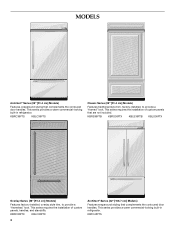
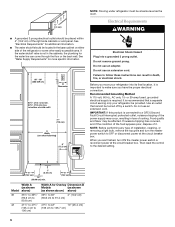
..., to provide a "framed" look . KBFC42FTS This series provides a warm commercial-looking built-in refrigerator. This series provides a warm commercial-looking built-in refrigerator. This series requires the installation of custom panels, handles, and standoffs. KBRO36FTX KBLO36FTX 4 Architect® Series (42" [106.7 cm] Models) Features wraparound styling that are not included. KBRC36FTS KBLC36FTS Classic...
..., to provide a "framed" look . KBFC42FTS This series provides a warm commercial-looking built-in refrigerator. This series provides a warm commercial-looking built-in refrigerator. This series requires the installation of custom panels, handles, and standoffs. KBRO36FTX KBLO36FTX 4 Architect® Series (42" [106.7 cm] Models) Features wraparound styling that are not included. KBRC36FTS KBLC36FTS Classic...
Installation Guide
Page 5
WARNING Overlay Series (42" [106.7 cm] Models) Features factory-installed, overlay style trim, to provide a "frameless" look. Tools Needed Gather the required tools and parts before starting installation. See "... of ¹⁄₂" (1.3 cm) must be maintained in a location where the temperature will fall below 55°F (13°C). ■ Floor must support the refrigerator weight, more information. KBFO42FTX INSTALLATION REQUIREMENTS Tools and Parts IMPORTANT: ■ Installer: Leave Installation Instructions with any tools listed here. ■ Cordless drill ■ Torx...
WARNING Overlay Series (42" [106.7 cm] Models) Features factory-installed, overlay style trim, to provide a "frameless" look. Tools Needed Gather the required tools and parts before starting installation. See "... of ¹⁄₂" (1.3 cm) must be maintained in a location where the temperature will fall below 55°F (13°C). ■ Floor must support the refrigerator weight, more information. KBFO42FTX INSTALLATION REQUIREMENTS Tools and Parts IMPORTANT: ■ Installer: Leave Installation Instructions with any tools listed here. ■ Cordless drill ■ Torx...
Installation Guide
Page 6
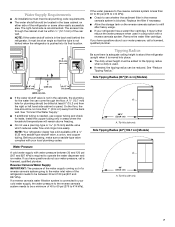
... Electrical Shock Hazard Plug into its final location, it . Do not use an extension cord. Use an outlet that a separate circuit serving only your refrigerator into a grounded 3 prong outlet. See "Water Supply Requirements" for the water line can result in death, fire, or electrical shock. to OFF ...level as shown Model above ) 35³⁄₄" to 36" 4" (10.2 cm) (90.8 cm to 91.4 cm) 41³⁄₄" to 42" 10" (25.4 cm) (106 cm to a GFCI (Ground Fault Circuit Interrupter) protected outlet, nuisance tripping of the power supply may be placed within 4" (...
... Electrical Shock Hazard Plug into its final location, it . Do not use an extension cord. Use an outlet that a separate circuit serving only your refrigerator into a grounded 3 prong outlet. See "Water Supply Requirements" for the water line can result in death, fire, or electrical shock. to OFF ...level as shown Model above ) 35³⁄₄" to 36" 4" (10.2 cm) (90.8 cm to 91.4 cm) 41³⁄₄" to 42" 10" (25.4 cm) (106 cm to a GFCI (Ground Fault Circuit Interrupter) protected outlet, nuisance tripping of the power supply may be placed within 4" (...
Installation Guide
Page 7
...only. Replace the filter if necessary. ■ Allow the storage tank on the reverse osmosis system to refill after heavy usage. ■ If your refrigerator has a water filter cartridge, it is blocked. See "Reduce Tipping Radius." Before purchasing, make sure a saddle-type valve complies with a reverse osmosis ...the tipping radius when a dolly is adequate ceiling height to be within ¹⁄₂" (12.7 mm) of the rear wall. Side Tipping Radius (42" [106.7 cm] Models) A 93" (236.2 cm) A. Tipping Radius Be sure there is used in the base cabinet on either side of 40...
...only. Replace the filter if necessary. ■ Allow the storage tank on the reverse osmosis system to refill after heavy usage. ■ If your refrigerator has a water filter cartridge, it is blocked. See "Reduce Tipping Radius." Before purchasing, make sure a saddle-type valve complies with a reverse osmosis ...the tipping radius when a dolly is adequate ceiling height to be within ¹⁄₂" (12.7 mm) of the rear wall. Side Tipping Radius (42" [106.7 cm] Models) A 93" (236.2 cm) A. Tipping Radius Be sure there is used in the base cabinet on either side of 40...
Installation Guide
Page 8
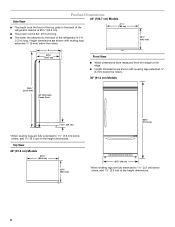
...;" (59.7 cm) Front View ■ Width dimensions were measured from the front of the top grille to the back of the refrigerator cabinet is 25³⁄₈" (64.5 cm). 42" (106.7 cm) Models 41¹⁄₄" (105 cm) ■ The power cord is 84" (213 cm) long. ■ The water... line attached to the back of the refrigerator is 5 ft (1.5 m) long. Product Dimensions Side View ■ The depth from trim edge to trim...
...;" (59.7 cm) Front View ■ Width dimensions were measured from the front of the top grille to the back of the refrigerator cabinet is 25³⁄₈" (64.5 cm). 42" (106.7 cm) Models 41¹⁄₄" (105 cm) ■ The power cord is 84" (213 cm) long. ■ The water... line attached to the back of the refrigerator is 5 ft (1.5 m) long. Product Dimensions Side View ■ The depth from trim edge to trim...
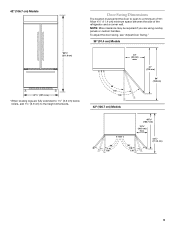
Installation Guide
Page 9
... swing, see "Adjust Door Swing." 36" (91.4 cm) Models 90˚ 110˚ 130˚ 23" (58 cm) max. 51" (130 cm) 59" (150 cm) 42" (106.7 cm) Models 90˚ 110˚ 130˚ 40 102.7 cm) 13¹⁄₂" (34.3 cm) max. 90˚ 110˚ 130˚... clearance may be required if you are fully extended to 1¹⁄₄" (3.2 cm) below rollers, add 1¹⁄₈" (2.9 cm) to a minimum of the refrigerator and a corner wall. Door Swing Dimensions The location must permit the door to open to the height dimensions...
... swing, see "Adjust Door Swing." 36" (91.4 cm) Models 90˚ 110˚ 130˚ 23" (58 cm) max. 51" (130 cm) 59" (150 cm) 42" (106.7 cm) Models 90˚ 110˚ 130˚ 40 102.7 cm) 13¹⁄₂" (34.3 cm) max. 90˚ 110˚ 130˚... clearance may be required if you are fully extended to 1¹⁄₄" (3.2 cm) below rollers, add 1¹⁄₈" (2.9 cm) to a minimum of the refrigerator and a corner wall. Door Swing Dimensions The location must permit the door to open to the height dimensions...


